MEXICAN BOLILLOS

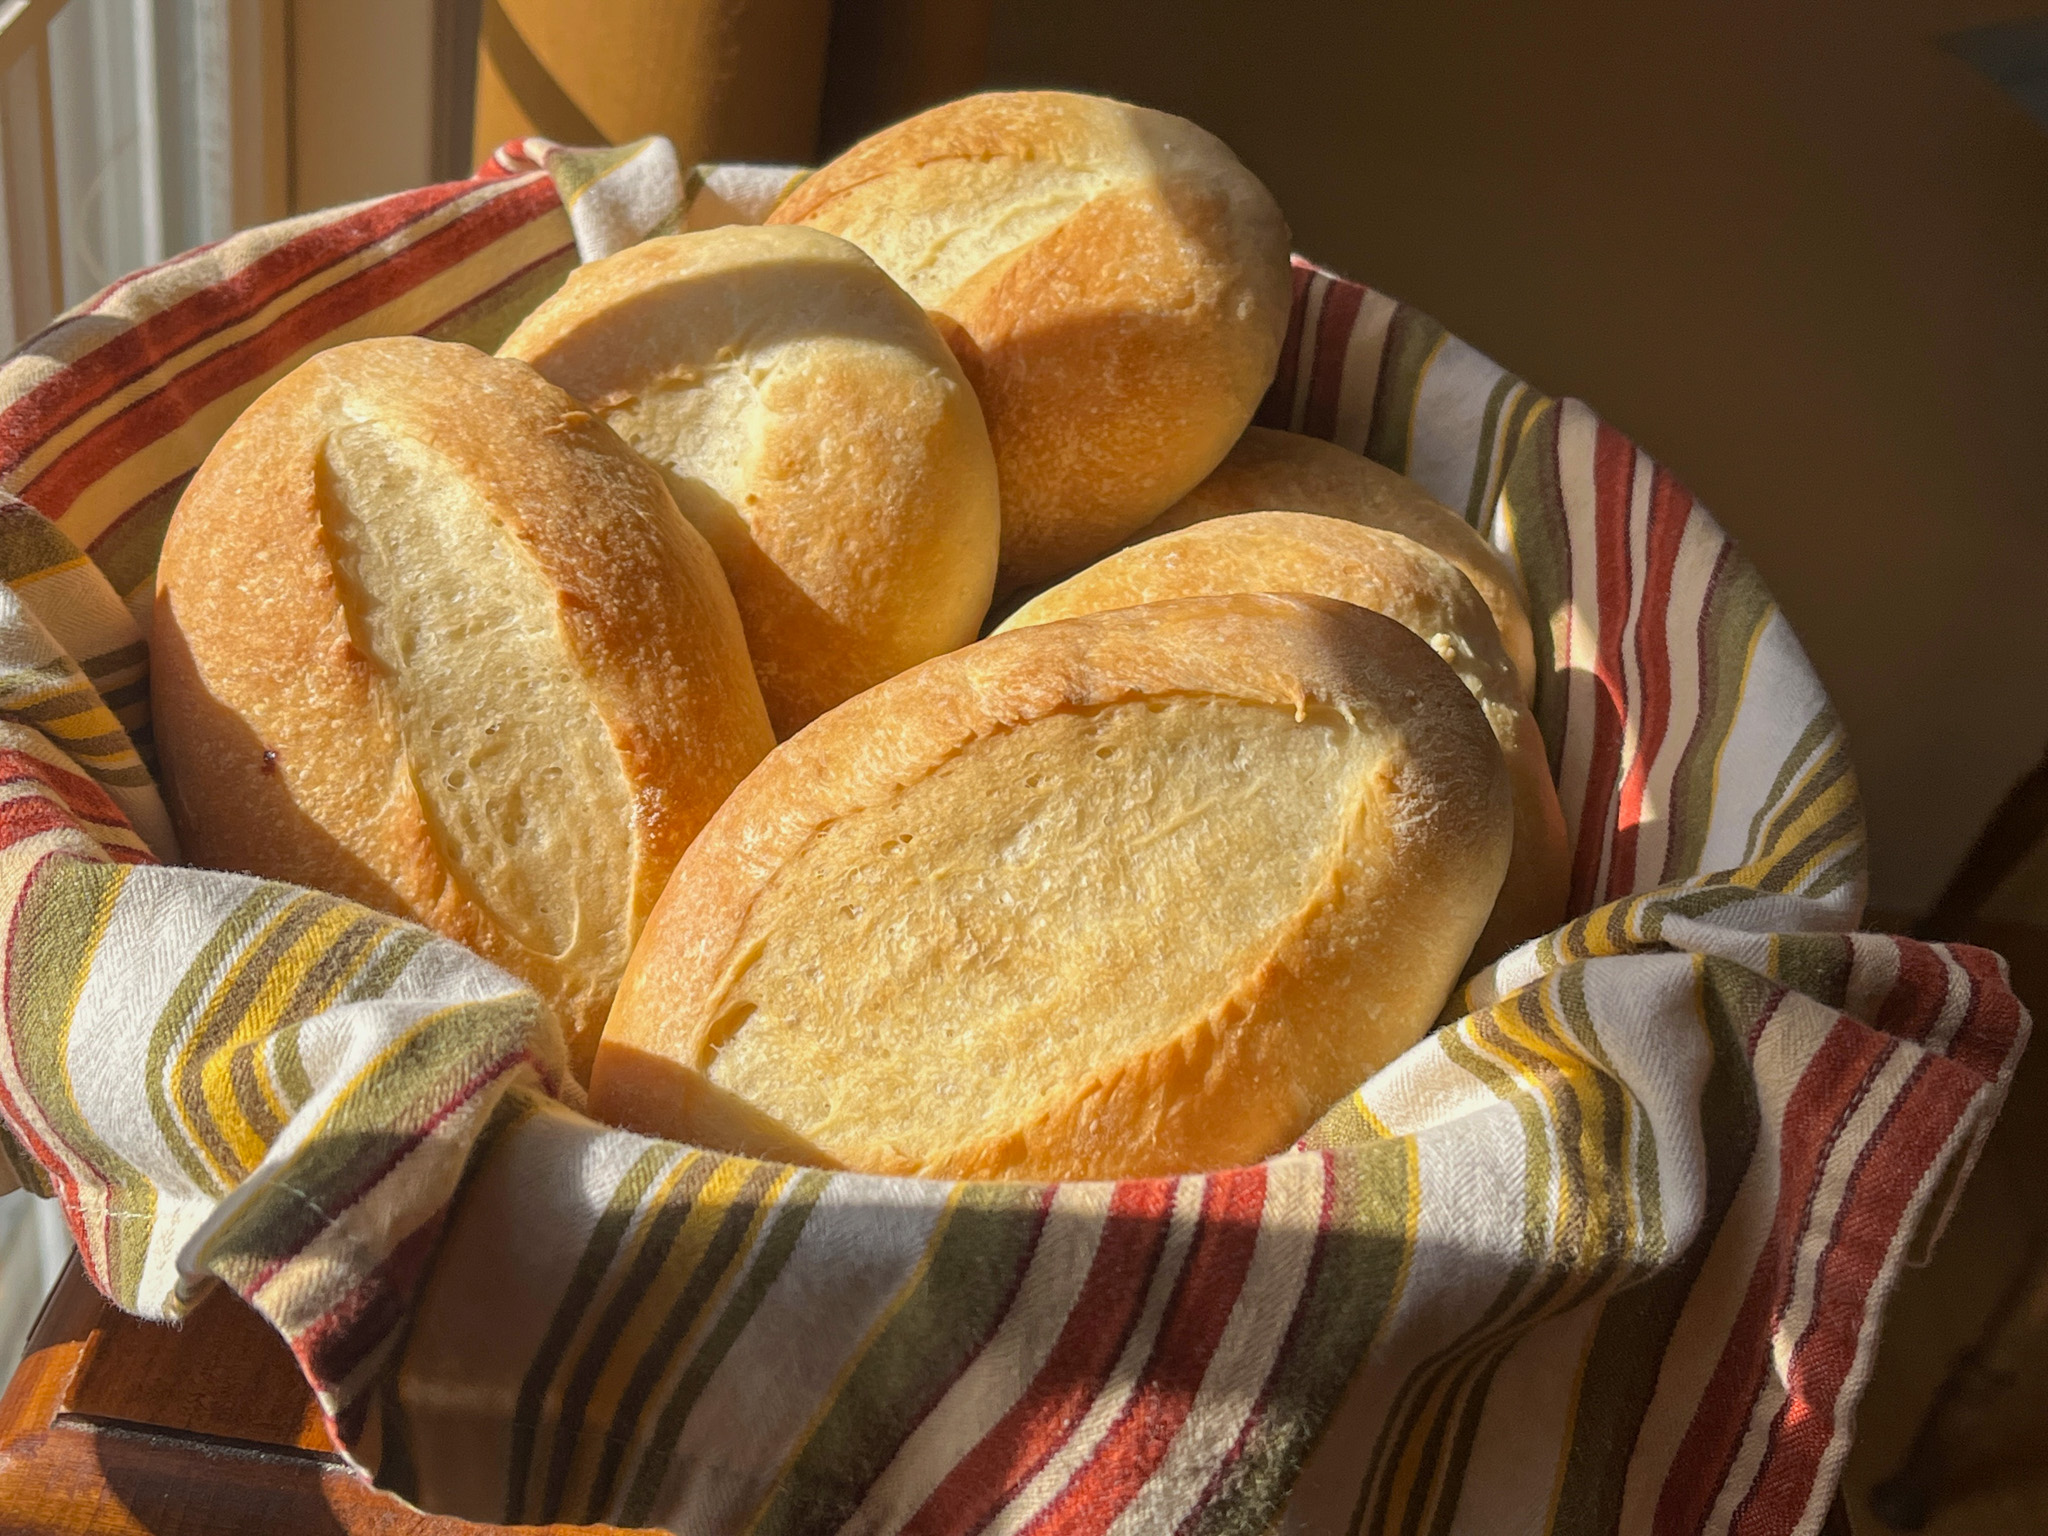
Super excited to share these! Hubby loves them and always gets a bag at the grocery store, so I was tempted to bake them from scratch. My first attempt got over-baked and the crust was not as soft as the commercially available, but my second batch was pretty close to perfect, even if I say so myself… This is a very easy bread, made with instant yeast. From start to finish, about 3 hours.

MEXICAN BOLILLOS
(adapted from this post)

1 ½ cups warm water, plus more for steam baking
2 ¼ teaspoons active dry yeast (1 package)
1 tablespoon granulated sugar
500g all-purpose flour (about 4 cups)
2 teaspoons salt
2 tablespoons avocado oil (or another neutral oil)
vegetable oil spray (I used olive oil)

Prepare the yeast. Mix the water and sugar with the instant yeast. Let it stand for 5 minutes until it gets foamy. Prepare the dough. In the bowl of a stand mixer whisk together the all-purpose flour and salt.

Attach the dough hook to the mixer. Drizzle the oil over the yeast-water mixture, whisk a bit and with the machine running in low-speed, add the whole mixture to the bowl. Knead on the same low-speed for 7 minutes.  The dough will be slightly sticky. If it seems too sticky, knead in 1 tablespoon of additional flour at a time until smooth and elastic. If it’s too dry, add a little water and keep kneading for another minute.

Place the dough in a slightly oiled bowl and cover with plastic wrap. Proof at room temperature for about 90 minutes, when it should double in size. Line a large baking sheet with parchment paper. Divide the dough in 6 equal pieces (I used a scale, they were about 148 g each), shape each as a little oblong bread, trying to mimic the shape of the bolillo as you form it.

Spray the surface lightly with olive oil. Cover with plastic loosely and let it rise for 45 minutes at room temperature. Meanwhile, heat the oven to 420F and 15 minutes before you bake the rolls, place a 9 x 13 pan in the bottom rack and add 10 cups of hot water inside. That will generate steam for the baking.

Slit the dough in the center, spray the rolls with a little water and bake for about 30 minutes. If they are darkening too much, reduce the temperature to 400F and cover the surface with foil. Bread is baked if internal temperature reaches 205F.

Let them cool for at least 20 minutes before serving.

ENJOY!

to print the recipe, click here

Comments: Such a fun little bread to make! Just make sure to not bake them too long, because the crust will get very dark and hard if you do. It is still great but not like the original. Here you see my first bake maybe you can tell the crust got a little too baked, but the crumb was still very nice, just a bit harder than the second batch.

I urge you to make these, they go well with so many fillings, and even just a smear of olive oil and balsamic if you like to keep it simple. I know I will keep making batches to have some in the freezer at all times, just like I do regularly with sourdough. It is just a different style of bread.

ONE YEAR AGO: Brazilian Style Banana Cake

TWO YEARS AGO: Tiger Shrimp in Chili Sauce

THREE YEARS AGO: Tangzhong Hamburger Buns

FOUR YEARS AGO: Potato Soup with Spicy Shrimp

FIVE YEARS AGO: Rose-Harissa Chicken Thighs

SIX YEARS AGO: Caramel-Chocolate Tartlets

SEVEN YEARS AGO: Chicken Korma-ish

EIGHT YEARS AGO: Sunday Gravy with Braciola

NINE YEARS AGO: In My Kitchen, February 2015

TEN YEARS AGO: Avocado and Orange Salad with Charred Jalapeno Dressing

ELEVEN YEARS AGO: Green Olive, Walnuts and Pomegranate Salad

TWELVE YEARS AGO: Romanian Flatbreads

THIRTEEN YEARS AGO: Ziti with Artichokes and Meyer Lemon Sauce

FOURTEEN YEARS AGO: Blasted Broccoli, Stove-top version

PEPPERMINT DUST MACARONS

Embracing winter, one macaron at a time…


PEPPERMINT DUST MACARONS
(from The Bewitching Kitchen)

For the shells:
200g Icing/powdered sugar (1 ⅔ cups)
115 g Almond Meal (1 + scant ¼ cup)
115 g egg whites at room temperature (approx. 4 eggs)
1/8 tsp of cream of tartar (optional)
100 g granulated sugar (½ cup)
1/8 tsp vanilla extract
light blue food gel (I used Colour Mill Baby Blue)

Line 3 heavy baking sheets with parchment/baking paper or Silpat mats. Layer the powdered/icing sugar and ground almonds/almond meal in a food processor. Pulse until the mixture looks like fine meal, about 12 pulses. Pass through a sieve and transfer to a small bowl or to a sheet of parchment/baking paper. Set aside.

Place the egg whites and cream of tartar in the bowl of a stand mixer fitted with the whisk attachment. Make sure that the bowl and the whisk are impeccably clean. Starting on medium speed, whip the whites with the cream of tartar until they look like light foam. The whites should not appear liquid. The foam will be light and should not have any structure.

Slowly rain in the granulated sugar in five additions, trying to aim the stream between the whisk and the side of the bowl. Turn the speed up to high. Continue to whip the meringue until it is soft and shiny. It should look like marshmallow creme (marshmallow fluff). Add the vanilla and food gel color. Whip the egg whites until the mixture begins to dull and the lines of the whisk are visible on the surface of the meringue. Check the peak. It should be firm. Transfer the whites to a medium bowl.

Fold in the ground almond/almond meal mixture in two increments. Paint the mixture halfway up the side of the bowl, using the flat side of a spatula. Scrape the mixture down to the center of the bowl. Repeat two or three times, then check to see if the mixture slides slowly down the side of the bowl. Add drops of gel color and mix them briefly with a toothpick. Put the mixture in a piping bag fitted with your choice of piping tip (round, ¼ or ½ inch in diameter or 6 – 12 mm). If you don’t have a macaron mat, draw circles on baking/parchment paper about 2inches/5cm in diameter & turn the paper over before placing on the baking sheets. Pipe shells, I like to count numbers in my head and use the same count for each shell so they end up similar in size.

Slam each sheet hard four to six times on the counter/worktop. Let the unbaked macarons dry until they look dull but not overly dry. Drying time depends on humidity. In a dry climate, the macarons can dry in 15 to 20 minutes; in a humid climate, it can take 35 to 40 minutes.

While the macarons are drying, heat the oven to 300 F (150 C/130C Fan oven/Gas Mark 2). Bake one sheet at a time on the middle rack. Check in 11 minutes. If the tops slide or move (independently of the ‘feet’ when you gently twist the top), then bake for 2 to 3 more minutes. Check one or two. If they move when gently touched, put them back in the oven for 1 to 2 more minutes until they don’t move when touched. Let the macaroons cool for 10 minutes before removing from the pan. The macarons should release without sticking.

Assemble the macarons: find two macarons similar in size and add a good amount of filling to the bottom of one of them. Place the other on top and squeeze gently to take the filling all the way to the edge. Store in the fridge for 24 hours for perfect texture.

For the filling:

PEPPERMINT BUTTERCREAM
1 + 1/3 cups powdered sugar
4 tbsp unsalted butter softened
1/2 tsp vanilla extract
a couple tablespoons peppermint dust (I got mine on Marshall’s, similar to this)
1/2 -1 tbsp milk to adjust consistency, if needed

Whisk butter, powdered sugar and vanilla extract until light and fluffy. Mix gently the peppermint dust, adjust consistency with milk, if needed. Transfer to a piping bag fitted with a round tip. Match similar sized macaron shells with each other, fill and sandwich the cookies. Decorate the top with Royal icing in the shape of a snowflake and sanding sugar, if so desired, or leave them plain. Keep in the fridge for 24 hours for perfect texture.

ENJOY!

to print the recipe click here

Comments: After the incredibly amazing macaron masterpiece I shared with you, maybe this post should be named “Down to Earth Macarons”…. I am still in complete awe of Veronika’s talent. But moving on to my little babies: normally I would add peppermint extract or peppermint oil to the buttercream, but this time I omitted and just incorporated some of the peppermint dust. I find that it is very easy to add too much of the extract, and get into “Toothpaste Territory”. I liked the more subtle flavor of the pulverized candy. As to the decoration, piping consistency Royal icing and sanding sugar did the job.

From what I learned browsing around, peppermint “dust” is sold in many versions, some quite fine, some pretty coarse. I don’ think it makes much of a difference in taste, so use what you are able to find, and if all else fails, you can always crush some candy yourself and incorporate it in your buttercream. It is a flavor that helps fight the cold outside. Macarons, a little hot chocolate, and a fireplace going! 

ONE YEAR AGO: Valentine’s Sourdough, Three Ways

TWO YEARS AGO: Embossed Chocolate-Cherry Sourdough Loaf

THREE YEARS AGO: Springerle Painting 101

FOUR YEARS AGO: Mincemeat Pies, when the third time is a charm

FIVE YEARS AGO: Shibari Bread]

SIX YEARS AGO: Incredibly Simple Times Four – January 2018 

SEVEN YEARS AGO: Two Salads and a Blog Award!

EIGHT YEARS AGO: When Three is Better than Two

NINE YEARS AGO: Somebody Stop Me!

TEN YEARS AGO: Zucchini Pasta with Cilantro-Cashew Pesto

ELEVEN YEARS AGO: Bran Muffins, Take Two

TWELVE YEARS AGO: Brown Butter Chocolate Chip Cookies

THIRTEEN YEARS AGO: Mogo Mojo

FOURTEEN YEARS AGO: Slow-Roasted Chicken Thighs: an Ice-Breaker

VERONIKA GOWAN, THE MACARON QUEEN!

I am absolutely excited to invite you to visit my cookie blog, aka For the Love of Cookies, as I have a very special guest blogger featured today. I have admired Veronika’s work for such a long time, she takes the concept of decorated macarons to the highest possible level. They are pure art. And she is not just about what they look like. Her fillings are very carefully crafted to be the perfect match for each design. She is a source of inspiration like no other! It is a huge honor to have her contribute to my cookie blog sharing how she designed and brought to life a box full of chocolates, all in macaron format. Please stop by to see it, clicking here. Below I share some of her creations. And to follow her, visit Instagram with a click here.

FOOD PROCESSOR FLATBREAD WITH SESAME SEEDS


One of my default recipes that I go back to every time is the old Fine Cooking food processor’s pizza dough (click here for post from 2009!). It always works, it is fast, convenient, and I have it memorized, so whenever I want pizza, I mix the dough early in the morning, stick it in the fridge and come back hours later. I might change slightly the composition of flour, adding spelt or whole wheat if I feel like it but the basic procedure is the one from the blog. It got me thinking that the same approach could work for a slightly more complex type of dough, one that includes yogurt, but does not quite go into the direction of the Indian naan. I am super happy with the outcome, and urge you to give it a try…

FOOD PROCESSOR FLATBREAD WITH SESAME SEEDS
(from The Bewitching Kitchen)

250 grams (about 2 cups) bread flour
1½ teaspoons instant yeast
1/2 teaspoon salt
¾ cup plain, full-fat yogurt
2 teaspoons agave nectar
1/4 cup of water (you might not need the whole amount)
olive oil, za’atar, Herbes de Provence, sesame seeds (to taste)

Mix the yogurt with the agave nectar and reserver.

In a food processor, combine the flour, yeast and salt, then process until combined, 2 to 3 pulses. Add the mixture of yogurt with honey, process, and with the machine running, drizzle the water. Stop when the contents in the bowl start for form a cohesive dough. Process for about 60 seconds, adjust with more flour or water if needed. Ideally the dough should be slightly sticky.

Remove the dough from the processor, form as a smooth ball, and leave it to proof at room temperature for 90 minutes.

Heat the oven to 450F and place a baking stone on a rack to heat. Divide the dough in two equal portions, then stretch them into oval shape on a piece of parchment paper. Brush with some olive oil, sprinkle your spice mixture of choice, then sesame seeds. Transfer the flatbread into the oven, still on the parchment paper, and bake until puffed and golden, about 15 minutes.

Remove to a cooling rack, and enjoy once it cools down a bit.

ENJOY!

to print the recipe, click here

Comments: I made a small batch, with only 250g flour, because I was testing the food processor method, but it ended up really perfect for the two of us. Even four people could be happy with the two flatbreads, although in that case I guarantee you won’t have leftovers. I liked the za’atar version the most, hubby preferred the one with Herbes de Provence. Your kitchen, your choice!

ONE YEAR AGO:Almond-Raspberry Sandwich Cookies

TWO YEARS AGO: Cole-Slaw with Almond Dressing

THREE YEARS AGO: Busy Bee Sugar Cookies

FOUR YEARS AGO: Mincemeat Pies, when the third time is a charm

FIVE YEARS AGO: Shibari Bread]

SIX YEARS AGO: Incredibly Simple Times Four – January 2018 

SEVEN YEARS AGO: Two Salads and a Blog Award!

EIGHT YEARS AGO: When Three is Better than Two

NINE YEARS AGO: Somebody Stop Me!

TEN YEARS AGO: Zucchini Pasta with Cilantro-Cashew Pesto

ELEVEN YEARS AGO: Bran Muffins, Take Two

TWELVE YEARS AGO: Brown Butter Chocolate Chip Cookies

THIRTEEN YEARS AGO: Mogo Mojo

FOURTEEN YEARS AGO: Slow-Roasted Chicken Thighs: an Ice-Breaker

IT IS NOT THE RECIPE

No recipe today, quite the opposite. My passion for baking has made me join many groups on Facebook related to cookie decorating, macarons, patisserie in general. One of the most common requests in those groups is “I want to start baking macarons… please give me a foolproof recipe”… or… I want to make decorated sugar cookies, but I want a cookie recipe that won’t spread, and the BEST Royal icing that will be easy to work with. Similar requests for bread baking, or pie crust, or laminated dough… Basically they believe that “the best recipe” is the answer to all issues. Guess what? It is not. Just to give one basic example, you can make macarons using three very different methods for the meringue (French, Swiss, Italian), and they will ALL work, if you add to it the one key ingredient no one lists in any recipe: PRACTICE. 

About a year ago, I fell for something I saw advertised. A cookie recipe that was so good that you could only get it by paying for it through the author’s etsy shop. I was so intrigued, that I confess I did pay. I paid almost $20 to get ONE recipe for cookie dough, which is probably the price I pay for most cookbooks I own. It turns out that magical recipe was almost exactly the one I’ve been using for a long time, with minor differences. It taught me a big lesson. It is NOT the recipe. It is your experience, the “feel” you develop for something once you do it over and over and over. 

Royal icing is tricky. Consistencies need to absolutely perfect depending on what you want to do with it. I’ve been decorating cookies on a regular basis for at least 3 years and I can tell you that every single recipe out there will work once you get used to it, once you PRACTICE. No recipe will replace practice. Some recipes tend to attract a lot of attention, because all of a sudden a group of seasoned bakers start praising it and then those who are just beginning their baking journey will try it. If that fails, they assume THEY are the failure. Trust me, most recipes can work if you allow yourself to get acquainted with the different steps, and commit to practicing it. Yes, I do sound like a broken record today… 


Do I have recipes I consider excellent and tend to go back to all the time? Yes. My Grown-up Spicy Chocolate Cookie dough is one. My default French macaron recipe is another. But even those, it took me MANY attempts at making and optimizing it, until I felt comfortable with them. I now add different flavorings to the chocolate dough, omit the chipotle, take it into different directions with orange or cardamon, but the overall procedure is the same and I am confident about tweaking it because I have made it more than 100 times. If my dough behaves different one day, I can tell, and I can do the adjustments because I got the “feel” for it. No recipe gave it to me, it was just practice. Over, and over.


Sugar cookies are another example. Some recipes omit baking powder and add cornstarch. I am quite fond of that basic approach. After trying many different versions, for my particular goals, a little bit of baking powder is a good thing, but not as much as most recipes call for. Yes, baking powder makes the cookies rise UP, which is not a bad thing. But it also gives them a rounded edge I don’t care for if I am decorating with Royal icing. I rather have a more flat surface all the way to the edge. Omitting baking powder completely is perfect in that sense, but the texture of the cookie suffers. So I use 1/4 tsp of baking powder for a nice compromise (a favorite recipe of mine is this one, but I vary the flavors all the time). It works for me, but it took me months of tweaking, observing the results and testing again. And again. Another whole universe is stamped cookies in which keeping the design is a must . Different molds behave better with some recipes than others. No single recipe will be a winner. But once you commit to finding what works for you, it will all fall in place.


Bottomline is, every time someone begs for the perfect recipe and expects success, I tend to roll my eyes to the ceiling a bit. You want the perfect recipe? Be ready to work for it. You have to make it happen in your kitchen, with your oven, your ingredients and for your personal taste. No one, absolutely no one can do it for you. Baking is one of the most rewarding activities, if you enjoy the path. Including the failures, the mistakes, the less than stellar results. Don’t expect the perfect recipe to be handed to you, instead make it materialize. Work with it, and above all, make your path fun! 

ONE YEAR AGO: Pfeffernusse

TWO YEARS AGO: Clay Pot Pork and Tomatillo Braise

THREE YEARS AGO: Vegan Chocolate-Dipped Cinnamon Cookies

FOUR YEARS AGO: Lemony Barley with Shrimp and Spinach

FIVE YEARS AGO:Black Rice with Roasted Cauliflower

SIX YEARS AGO:
La Couronne Bordelaise

SEVEN YEARS AGO: A Special Birthday Dinner

EIGHT YEARS AGO: Duck Confit for a Special Occasion

NINE YEARS AGO: Tuscan Grilled Chicken and Sausage Skewers

TEN YEARS AGO: Celebrate Wednesday with Pork Tenderloin & Apples

ELEVEN YEARS AGO: Salmon Wellington

TWELVE YEARS AGO: The Green Chip Alternative

THIRTEEN YEARS AGO: Weekend Pita Project

FOURTEEN YEARS AGO: Let it snow, let it snow, eggs in snow