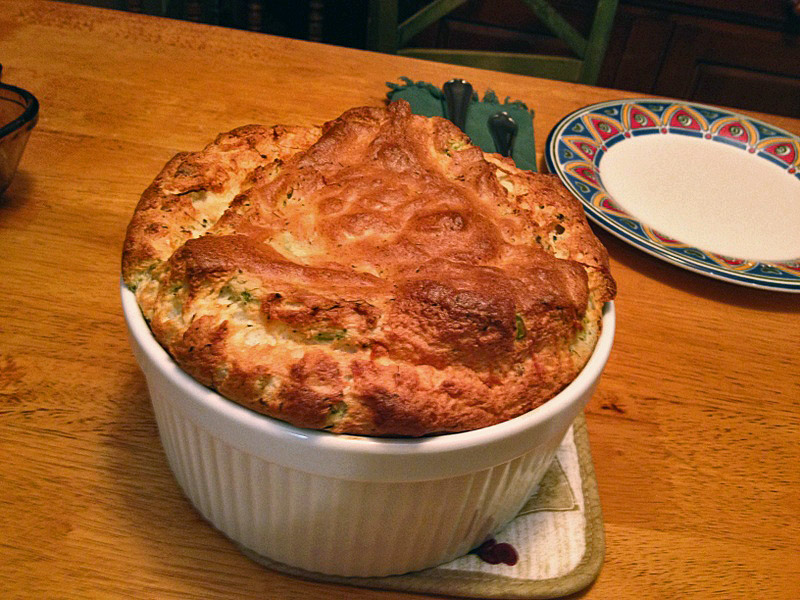
BROCCOLI-WALNUT SOUFFLE FROM A SPECIAL COOKBOOK

served1Last month I got a wonderful gift from Fer, my virtual friend who hosts the blog “Chucrute com Salsicha“.   She sent me a cookbook:  The Vegetarian Epicure Book Two, written by Anna Thomas.  Anna’s family was originally from Poland, but she was born in Germany, and moved to the US as a young child. While in college at film school in UCLA, she wrote a masterpiece of a cookbook, The Vegetarian Epicure, at a time when avoiding meat was not very common.  I enjoyed my gift so much that I could not resist getting her most recent book, Love Soup. It will have a special spot in our home, as the first cookbook I bought this year. By exercising considerable restraint, I lasted through the first week of February. I certainly make  my readers proud!  ;-)Fer’s thoughtful gift arrived at our doorstep on a Thursday.  Forty eight hours later, we enjoyed this very delicious souffle.

BROCCOLI-WALNUT SOUFFLE
(reprinted with permission from Anna Thomas)
Original recipe in  The Vegetarian Epicure Book 2, published by Alfred Knopf, New York, 1988

4 Tbs butter
4 Tbs flour
1 + 1/2 cup hot milk
5 egg yolks
1 + 1/2 cups chopped cooked broccoli
1/2 cup finely chopped walnuts (I lightly toasted them first)
2 Tbs minced onions
2 Tbs grated Parmigiano cheese
1/2 tsp salt, ground black pepper to taste
7 egg whites
pinch of cream of tartar

Butter a 2-quart souffle dish and tie a buttered “collar” made of parchment paper if you want (I omitted this step).

Melt the butter in a saucepan and stir in the flour. Cook the roux over medium heat for a minute or two, stirring constantly. Then add the hot milk and stir with a whisk as the sauce thickens.

When the sauce is smooth, remove it from the heat and whisk in the egg yolks, one by one. Then add the cooked broccoli, the walnuts, the onions, and the cheese. Stir well and season with salt and pepper.

In another bowl, add a pinch of cream of tartar to the egg whites and beat them with a clean whisk or beater until they are stiff enough to form peaks.  Stir about 1 cup of the beaten egg whites into the warm sauce. Now add the remaining egg whites and gently fold them in, making sure not to lose the air incorporated into it.

Pile the souffle into the prepared dish, place it in the middle of a 375 F oven, and bake it for 40 to 45 minutes.

Serve immediately. Remember, a souffle waits for no one…  😉

ENJOY!

to print the recipe, click here
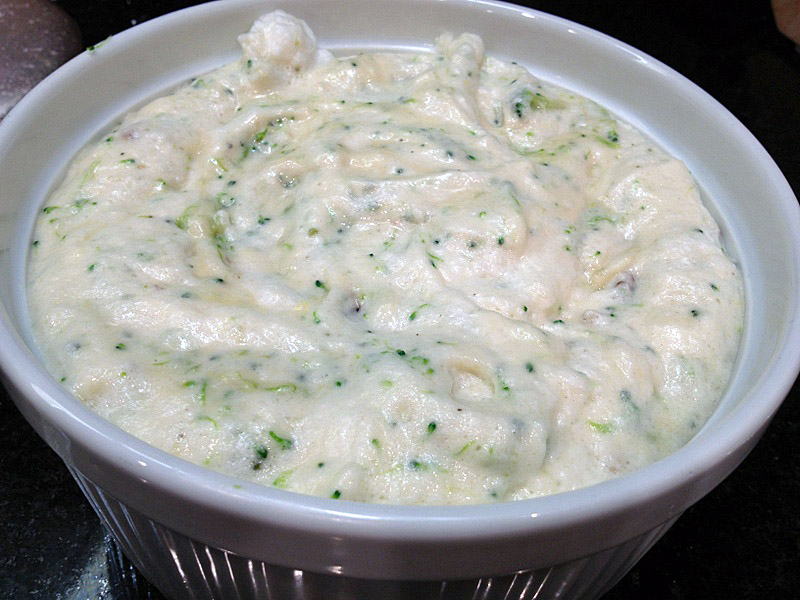
before

Comments: We always alternate cooking days. One day I’m in charge, the other day it’s Phil.  That Saturday, mid-afternoon, Phil looks at me and asks “Am I cooking tonight?”  Before I could answer, he remembered that no, it would be me.  He quickly changed the question to “What are we having tonight?”  I tried to be as nonchalant as possible, “We are having a souffle“.    Oh, the big smile that I love so much!  But, how could a souffle not bring a smile?  It makes any meal special…

This version is heartier than your regular cheese souffle, with the broccoli and the nuts.  It is satisfying, creamy, and delicious to the last bite!  It won’t rise as lightly as a cheese-only, as the eggs need  to carry heavier stuff with them. But, what it might lack in airy nature, it compensates with flavor.   I think it is wonderful as a full meal, served with a salad and a piece of bread.  But, if you absolutely must have some  meat with it,  a simple roast chicken will do.  French home-cooking at its best!

Double thank you is in order:  Fer, thanks for sending me this book, and Anna, thank you for your kind emails, and giving me permission to publish your recipe in my blog!  Your Love Soup is such a great book, I already have 5 or 6 recipes fighting to be prepared first… 😉

ONE YEAR AGO: Voila’ les baguettes!

TWO YEARS AGO: Cornmeal English Muffins

THREE YEARS AGO: Butterflied Cornish hens with apricot-pistachio dressing

2012 FITNESS REPORT: P90X2

Disclaimer:  This is a post exclusively about exercise.
Back to food next week… 😉

As I mentioned before, I’ve been keeping exercise records since January 1998. Each month for the past 15 years I strive to exercise more than 50% of the days.  The only way I can keep my exercise routine going is by adding variety to it. P90X was perfect in that sense, so when I heard that Tony Horton was launching the P90X2 (December 2011), I had to try it. Similarly to my experience with the original system, it took me longer than 90 days to wrap it up, but I did it. I wrote a very detailed article about the original program, and hoped to do the same for the X2. However, I found a wonderful review online that saved me all the work. If you are interested, click here. I will instead simply summarize the differences between the two programs.

P90X22
A common question:
is P90X2 harder than P90X?   Yes. I would not start with the X2, as right from the get-go it involves exercises that are close to the top level of difficulty in the original program.  One example: Yoga-X ends the standing series with a sequence of Warrior III, Half-Moon, and Twisted Half-Moon. You will be standing on one leg for almost 3 minutes, balancing, twisting, breathing hard, wishing Tony Horton had never been born.  😉   Fast forward to P90X2, and you will see the Warrior III and the Half-Moon poses showing up not only in the yoga routine, but in the middle of strength-training and aerobic exercises as well.  While in Warrior III or Half-Moon you will be doing bicep curls, triceps kick-backs, abdominal crunches (yes, abdominal crunches while in standing splits), and other weight-bearing moves.  The bottom line is, in P90X2, you will see a lot more combined exercises that target many muscle groups simultaneously. They require balance, flexibility, and core strength all at the same time.

plyocide
Another aspect of P90X2 is a mixture of aerobics and strength training in the same routine.  It was a bit shocking to realize that doing 52 minutes of aerobics (original Plyometrics-90X)  is not as hard as 40 minutes of a mixture of  aerobics with strength-training (the Plyocide-90X2 routine).  Somehow the body struggles harder when demanded to constantly change gears. But, as Tony would put it: “it’s good for you”   😉

yogaX2
Surprisingly,  two routines of the new system are actually easier.  First, yoga. I was afraid of what 90X2 yoga would be like, but  it is shorter (you are done in 1 hour instead of 90 minutes), and the exercises are at the same overall level of difficulty of the original series.  Second, the abdominal workout from the original  series. Ab-RipperX is actually harder  (and I think more efficient) than the Ab-RipperX2.  In fact, I don’t even bother with it anymore, the original version is my default routine.

motivation
Some exercises of X2 are so incredibly hard that I was forced to adapt them to my level.  I simply will not do a pull-up and then curl my body up into a ball going over the bar.  One should keep in mind that Tony targets a broad audience including extremely fit men, who want to bulk up. They need to be challenged to their limits.  I also won’t attempt to do the push-ups balancing my body in four medicine balls as the top photo shows.  Tony Horton himself described that exercise as “doing push ups during an earthquake“.  Sounds like a ton of fun, but I rather not risk breaking my nose… 😉  When exercises like this come, he always demonstrates variations that do the job on a more
“humane” level.  And that’s the road I humbly follow.

progress

Having “graduated” from both programs,  I went on with a mix-and-match of the two, picking the routines the way I feel like and working out according to how sore I am. But, after moving to Kansas our life got so frantic that I had to find quicker workouts for some weekdays. I looked for alternatives lasting at most 30 minutes, but still challenging.  That’s how I got to Jillian Michaels’  6-Week/6-Pack,  Ripped in 30, and a few others of her many DVDs.   I will be reviewing her exercise program in the future.  It won’t be pretty, though. Expect some harsh words. I will say one thing upfront: unless you are very careful, you will get injured.  And I speak from experience (sigh). Stay tuned!

never say never

We never know what lays ahead in our path. I can only hope I will be healthy enough to follow the footsteps of this impressive woman! 

ONE YEAR AGO: Caramelized Bananas

TWO YEARS AGO: Roasted Lemon Vinaigrette

THREE YEARS AGO: Whole-Wheat Bread

A FEW BLOGGING ISSUES

A little bit of a tangent, this won’t be about food…   I am writing this post mainly to have something I can link to when needed.

My personal policy on exchanging links:  I don’t do it.  The blogs on my blogroll are sites I found  (or in some cases was invited to visit through a nice email) and love to read.  I also do not accept offers for guest posts, sorry!

I don’t accept products to review.  I will evaluate products (and also cookbook and exercise videos ;-)), but on my own.  If I recommend something, you can be 100% sure it’s because I love it.

Finally, I appreciate getting blog awards, but I don’t forward them.  This is a delicate subject, I admit. But I rather celebrate the blogs I love by cooking from them.  If you follow my blog, you may have noticed I do that regularly.

Having said so many “I don’t“, let me finish on a positive note:  I wish you all  a Happy Valentine’s Day!  Enjoy it to the fullest, following the example of very wise creatures, who definitely know how to live in the moment...    😉

doggies

ALMOND BUTTER CHOCOLATE CHIP COOKIES

I am not very fond of peanut butter.  Its sticky, gooey nature manages to turn me off. I like to cook savory dishes with it, but I shy away from desserts that call for it as an ingredient.  Until now, I had placed almond butter in the same category. But, truth be told, I never bothered to try it.   Then,  I read Lynda’s post about Almond Butter Chocolate Chip Cookies.  A quote about this nut spread made me re-evaluate my position. Here’s what she had to say about it:

It’s not as pronounced in flavor as peanut butter which can overwhelm a cookie. Almond butter is mellower with notes of deeply roasted nuts, adding a subtle, golden background to the dough.

It was worth a try…   😉

closeup

ALMOND BUTTER CHOCOLATE CHIP COOKIES
(from Taste Food)

makes 36 cookies

1 + 3/4 cups all-purpose flour
1 teaspoon baking soda
1 teaspoon sea salt
1 cup unsalted butter, softened
1 cup brown sugar
1/2 cup granulated sugar
1 large egg
1 teaspoon vanilla extract
3/4 cup unsalted creamy almond butter (not raw)
1 cup dark chocolate chips or chunks

Whisk the flour, baking soda and salt in a bowl; set aside. Cream the butter and both sugars in the bowl of an electric mixer for a couple of minutes or until light and fluffy. Add the egg and vanilla. Mix well. Mix in the almond butter until smooth. Add the flour and mix to combine, then stir in the chocolate. Refrigerate the batter for at least one hour, or up to 24 hours.
Heat oven to 350 F. Drop rounded tablespoons of dough on baking sheets lined with parchment. Bake until light golden, about 14 minutes.

Optional: Sprinkle a few flakes of sea salt on the cookies before baking.

ENJOY!

to print the recipe, click here

composite2
Comments:  I am so glad I did not allow prejudice to prevent me from trying this recipe!  Lynda was absolutely right, the almond butter gives these cookies a very unique flavor.  You won’t quite know what it is, they just taste rich and intense.  I omitted the sprinkle of salt on top.  However, I think the flavor of the salt added to the dough  was assertive enough for us.   Now, for the best part…  I fell in love with almond butter!   It is creamier, has a much more pleasant texture and mouth feel. All of a sudden, a new favorite concoction in my life: Toasted Ezekiel Sprouted Grain bread + Almond butter +  Banana Slices.  It has it all, the crunch of the bread, the sweetness of the fruit, and the rich almond butter to tie them together…

cooling

Lynda, once again your blog pointed me in a tasty direction!  Thank you!

ONE YEAR AGO: Dan Dan Noodles

TWO YEARS AGO: Sophie Grigson’s Parmesan Cake

THREE YEARS AGO: Antibiotics and Food

SESAME AND FLAXSEED SOURDOUGH

This  loaf of bread was made on a whim on a busy weekend mainly devoted to the lab. Tired of refreshing my starter and putting it back in the fridge, I decided that – no matter what – we would be having home-made bread on Super Bowl Sunday.  I had to cheat, though. The dough got spiked with some commercial yeast to speed up fermentation. Let’s hope the Wild Yeast Gods will have mercy on me…  😉
boule1

SESAME AND FLAXSEED SOURDOUGH
(inspired by Hamelman’s Bread)

Starter mix:
2.4 oz bread flour
3 oz water at room temperature
1 Tablespoon mature sourdough culture

Soaker:
1.5 oz flax seeds (about 1/4 cup)
1/2 cup water at room temperature

final dough:
12 oz bread flour
1.6 oz rye flour
2 oz sesame seeds, toasted
5.7 oz water
10 g salt
all the soaker
4.8 oz starter mix (you will have a small amount left)
1/2 teaspoon active dry yeast

Prepare the levain build 12-18 hours before making the final dough. Mix all ingredients and leave in a covered container at room temperature.  At the same time, make the soaker placing the flax seeds with water in a small bowl.  The seeds will expand quite a bit, so use a bowl that will allow that to happen without overflowing.

Next morning, make the final dough by mixing all the ingredients together in the bowl of a KitchenAid type mixer.  Mix on lowest speed for a couple of minutes.  Check the hydration level, adjust if necessary.  Increase speed to medium-low (level 3 of a KitchenAid), and mix for 3 to 4 minutes.

Let the dough ferment in a lightly oiled bowl for 2 and half hours, folding the dough twice at 50 minutes interval. After 2.5 hours, shape the dough as a ball and place in a suitable container for the final proofing.   My bread was ready to bake in 2 hours and 45 minutes.

Bake in a 450 F oven for 45 minutes. If baking covered to generate steam, remove the cover after 30 minutes.  Cool completely before slicing.

ENJOY!

to print the recipe, click here

composite

Whenever I bake a loaf of bread, I go into full scrutiny mode. I stare at the crust,  inspect the edge of the slashing,  and look for small blisters on the surface.  Then, after patiently waiting for the bread to cool,  I cut a slice and start the convoluted process of analyzing the crumb.  Phil knows better and allows me this important “bread-introspection” time before reaching to grab a piece. But, once he senses the green light, it never fails:  “This is good bread”.  Really, this bread is awesome!”   It gives me a thrill… I know he means it, and it puts all my bread scrutiny into perspective.   For instance, I had to stop beating myself up because the holes in the crumb did not organize into the pyramidal shape I love so much.  Oh, well… This is good bread.

IMG_1434
The flax seeds are visible, of course, but the sesame more or less disappears in the crumb. However, the flavor is there beyond any shadow of a doubt, and complements very well the small amount of rye and the hint of sourness.  Everyone watching the Super Bowl loved this loaf, some even preferred to turn the back to the TV and concentrate on it.  😉

Buck2

I am submitting this post to Susan’s Yeastspotting….

ONE YEAR AGO: Green Beans with Miso and Almonds

TWO YEARS AGO: Saturday Morning Scones

THREE YEARS AGO: White Bread