MACARONS: MUCH BETTER WITH A FRIEND!

Making macarons has been on my list of culinary projects for a very long time! They are quite intimidating, because small details in the preparation can ruin them. Even experienced bakers often share stories involving feet-less macarons  (can you imagine the horror?), cracked macarons, and many other types of monstrosities. Even though I did not list cooking projects for 2014, I was set on not letting another year pass by without attempting them.  Then, the perfect opportunity shaped up: our friend Cindy came up for a visit with her husband, and we decided to tackle this challenge together.  We had so much fun, I highly recommend that you consider inviting a friend over and doing the same. I’d been collecting recipes, tips, advice, and after consulting with my expert patissier friend Gary, we focused our efforts in two sites: Gwen’s Kitchen Creations and Joanne’s Eats Well With Others. They both definitely know their ways around the tricky Parisian macarons.
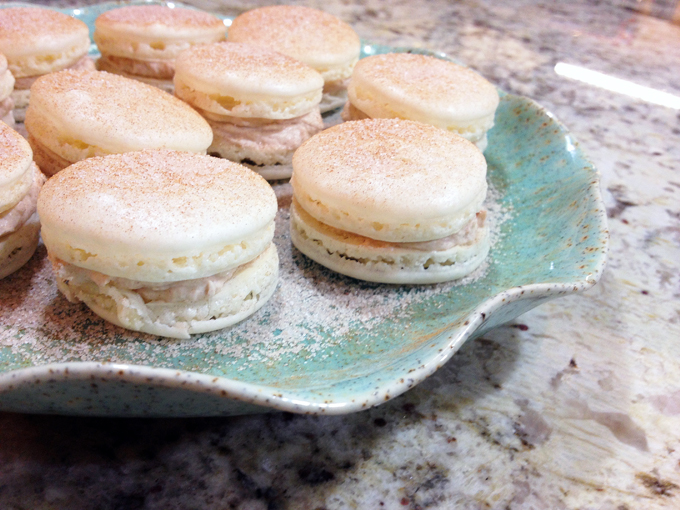
FrenchMacarons

SNICKERDOODLE MACARONS
(adapted from Gwen & Joanne)

for the shells:
3 large egg whites, (95-100g), aged overnight
1/4 tsp cream of tartar
1/4 cup sugar (50g)
pinch of salt
2 cups powdered sugar (200g)
1 cup almond flour  (120g)
.
for the filling:

(makes a lot, you can reduce the amount, if you prefer)
1 cup unsalted butter, room temperature
4 cups confectioner’s sugar
¼ cup heavy cream
2 tsp vanilla extract
salt, to taste
1 tbsp cinnamon, plus more for dusting

 .
 Sift the salt, powdered sugar, and almond flour into a large container. Discard any clumps in the sieve. Using a whisk attachment, beat egg whites with cream of tartar until foamy. Add sugar in 3 batches. Continue beating until stiff peaks form. Add gel food coloring, if desired, whisk again.
.
Add 1/3 of the almond mixture into the egg whites. Fold until incorporated – about 15-20 turns. Then add another 1/3. Fold again. Repeat one last time. It will take about 65 folds for the right consistency.
.
Draw circles with a pencil on a sheet of parchment paper, then place the sheet with the drawing side down on a baking sheet, so that you can see the lines through. Pipe small circles using a pastry bag, making sure your hand is vertical, at 90 degrees over the center of the circle.
.
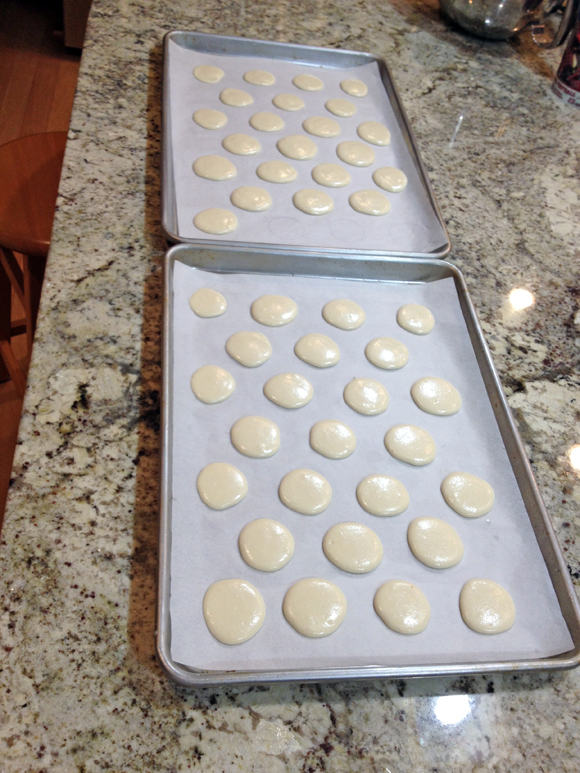
Let rest until a skin forms. It should no longer be sticky. 30-60 minutes.
.
Bake at 275F for 17 minutes. Let the shells cool completely before attempting to peel them off.

Make the filling: in the bowl of a stand mixer fitted with the paddle attachment, combine the butter and powdered sugar, mixing on medium-high speed until light and fluffy. Add in the cream and vanilla and beat on medium-high for 3 minutes. Mix in the cinnamon until completely combined, as well as salt to taste.

Pipe the buttercream onto the flat side of half of the macarons and then top them with a second, similarly sized macaron. Refrigerate in an airtight container overnight. Dust with cinnamon before serving.

ENJOY!

to print the recipe, click here
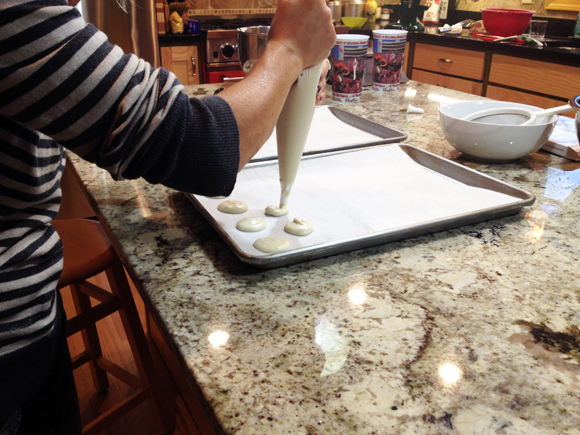
piping

Comments: Very few culinary projects will confuse you as much as macarons. If you read cookbooks or advice online, you will find conflicting info almost for every step. Do not over-beat the egg whites… It’s impossible to over-beat the egg whites, beat a couple of minutes longer after you think they are done… don’t over-dry the shells…. it’s impossible to over-dry the shells….  sift the flour at room temperature…. roast the flour to dry it completely…  don’t even think of making macarons with regular meringue…  Mind blowing, my friends, mind-blowing.  At some point you will have to settle on a recipe for your first time, take a deep breath, and see how it goes. I think for a first time we did pretty good, actually.  Aren’t they cute?

closeup
From what I gathered around the many sources, it is VERY important to age the egg whites, so make sure to do that. Crack the eggs the day before, separating the whites and let them sit over the countertop overnight.

Since this was such an involved process, I’d like to share a few photos of our adventure…

Sifting… it was by far the most painful and boring step of the whole recipe. We took turns, but sifting the almond flour took a loooong time. Cindy did a much better job than me, she is patient and thorough. Moi? Not so much… (sigh)
sifting

We made a nice template for the shells, using the top of shot glasses….
template

Egg whites were beaten until shiny, smooth-looking peaks formed…
eggwghites

Here are the results of our labor of love, shells piped and drying….
drying

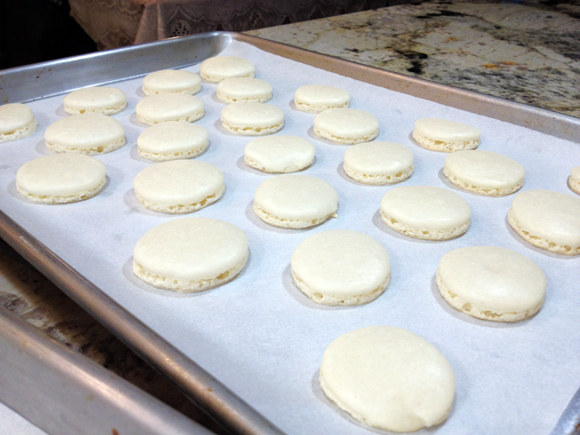
Here are our baby-shells after baking, most with nice little feet…..
baked

All in all, we had a great time, and learned a lot that day… We assembled the best looking ones, and some of the ugly ducklings were consumed right away by our partners in the name of aesthetics.
ready

The advice to wait to savor them next day is also spot-on: there is a definite improvement in texture, so these are perfect to make in advance and show-off your baking abilities at a get together.

Next time I will try Dorie Greenspan’s recipe, that uses an Italian-type meringue, in which the sugar-egg white mixture is stabilized by heat. I thought it was too involved for our first time, but from what I’ve been reading, it might be a better approach.

Cindy, thanks for joining me in this challenge,
I definitely could not have done it without you!

ONE YEAR AGO: Our Mexican Holiday Dinner 

TWO YEARS AGO: The Ultimate Cranberry Sauce

THREE YEARS AGO: Edamame Dip

FOUR YEARS AGO: Gougeres

FIVE YEARS AGO: Beef Wellington on a Special Night
STAR-SHAPED CHOCOLATE BRIOCHE BREAD

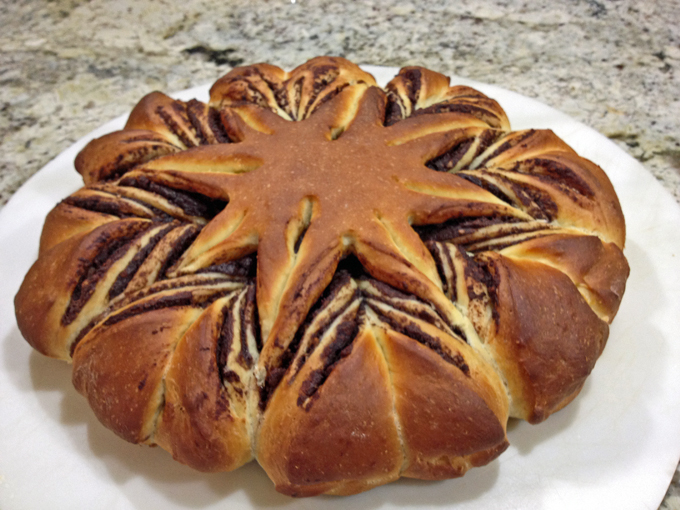
Every once in a while I fall in love with a recipe, and cannot wait to make it. Last week I logged into Facebook, and by pure chance there on the top of the Artisan Bread Bakers page I saw a gorgeous bread, worthy of the cover of a Breads Illustrated Swimsuit Issue – if there was such a thing. Except that, contrary to what seems to be the case for many supermodels, no Photoshop tweaking was involved. The bread was naturally stunning. I wasn’t sure I would be able to make it, as it involved a shaping technique I had never seen before. But, it all worked well. It’s bread after all, not cake.  😉

Star-Shaped Brioche1

STAR-SHAPED CHOCOLATE BRIOCHE BREAD
(from  Lindarose at Instructables)

for the dough:
500g all-purpose flour
2 eggs
60g sugar
180ml room temperature milk (3/4 cup)
80g room temperature butter
7g active dry yeast
8g salt
peel from one orange

for the chocolate cream:
35g cocoa powder
75g sugar
250g ricotta ( about 1 cup)
30g hazelnuts

Put the flour in the mixer and add the yeast, milk, sugar and eggs. Start mixing on low, as the ingredients start to incorporate, add the butter in small pieces, the salt, and the orange peel.  Keep mixing until very smooth (about 5 minutes on a Kitchen Aid type mixer). Remove the dough to a lightly floured surface and finish kneading it by hand, to make sure all butter is uniformly distributed. The dough should be slightly tacky, resist the urge to add more flour. Form a ball, and let it rise in a bowl in a warm spot until double in size, about 2 hours, depending on the temperature of your kitchen.

While you wait for your dough to rise, prepare the chocolate cream.

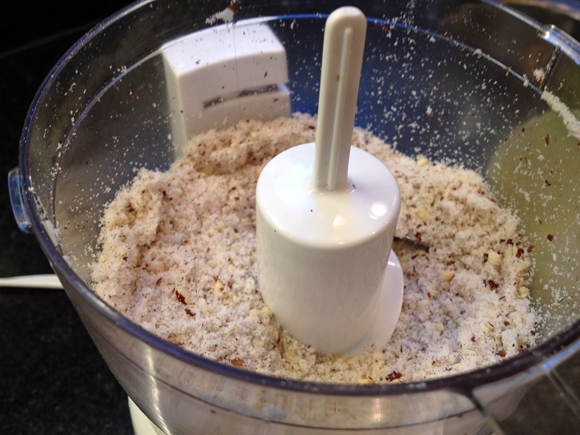
In a food processor, mix the sugar and hazelnuts together until you obtain a powder. It’s ok if there are still some big pieces in it. Transfer to a bowl, and sift the cocoa powder on top of it.   Add the ricotta and mix everything together with a hand mixer until your mixture becomes a cream.

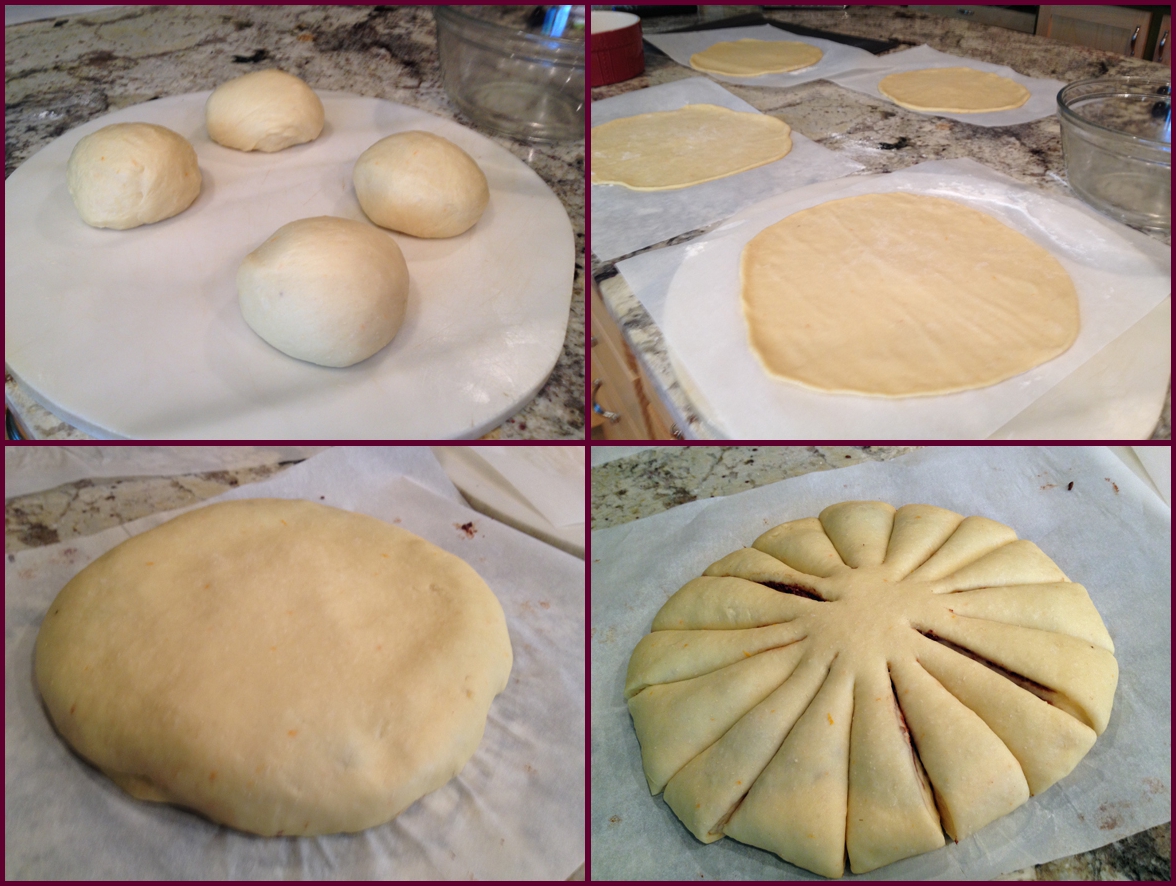
Once your dough has risen, divide it in 4 equal pieces and make 4 separate balls. Make a disc with each of the 4 balls using a rolling-pin. The most important thing is that the discs are all the same size.

Place the first disc on a piece of parchment paper and spread some chocolate cream on it, making sure to leave about half an inch of free border all around. Lay the second disc on the first one and press the border with your fingers to join them together. Now spread some other chocolate cream on the second disc (always leaving a free border), add the third disc and close it with your fingers. Do the same on the third disc and close it with the last disc, but don’t spread the chocolate on it this time. The 4th disc is the top of the bread.

Using a knife, divide the dough in 4 with 4 cuts. It’s  crucial for the shaping that you don’t cut the center of the disc (see pictures). Now make other 4 cuts between the others, for a total of 8, always leaving the center free. Finally, make 8 cuts between the ones you already made, just like the others. You will have a total of 16 sections now.

Consider 2 sections that are next to each other: lift one with one hand and the other with the other hand and twist each of them towards the outside. This means that the piece you are holding with your right hand will be twisted to the right and the one you are holding with your left hand will be twisted to the left. Do this for all the sections. Your bread will look like a snowflake. Put it in the baking sheet with the help of the parchment paper (don’t remove it) and let it rest and rise for another hour. As the bread rises, turn your oven to 350 F.

Bake at 350°F (180°C) for 25 to 30 minutes. Let it cool on a rack.

ENJOY!

to print the recipe, click here

balls-checker

I woke up very early on Labor Day to bake this bread. Long before sunrise. Mixed the dough and went for a run with Phil, while the streets were still completely dark. Come to think of it, “with Phil” is not a correct statement. Let’s say we start together and within five minutes I am begging for mercy,  slow down my pace and see him move farther and farther ahead.  The sun started to rise midway through our run, in such a magical experience, the subtle change in light, slow and beautiful. By far my favorite kind of run. A day that started so perfectly had  to be a good baking day. And indeed it was.

hazelnutpowder

This dough is wonderful to work with.  As you can see in the instructions, the most important thing to keep in mind is dividing the dough in equal parts – use a scale, don’t just eye-ball it.  Once the dough is divided, it rolls out very nicely, use just a little bit of flour on top of the parchment paper so that you can release it easily. I rolled all four balls of dough, but if you prefer, roll one at a time, spread the chocolate cream, move to the next one. Before you cover the bread with the last disk of dough, wash your hands of any chocolate to keep the surface of the bread clean.

shaped

Slicing the dough in 16 sections and twisting the sections for the final shaping is not as hard as it may seem.  I have a lot of trouble with spacing things regularly, and was a bit nervous handling the knife, but even if my cutting was not perfectly uniform,  the bread turned out ok.  Maybe not worthy of the cover of Breads Illustrated, but not bad for a first time.

This star-shaped bread reminded me of the classic Chocolate Babka, which I’ve never made, but saw Peter Reinhart demonstrate in a lecture in Dallas many years ago. In fact, my friend Marilyn said this bread looked like “Babka’s wealthy cousin”.  I suppose that defines it quite well.

The filling can be anything you like. Some bakers from the Facebook group used pesto and cheese, others used cinnamon cream, or a mixture of different nuts with chocolate. Pretty much anything goes with the exact same dough and shaping.  Be creative and impress your friends and family, it is a show-stopper of a bread.

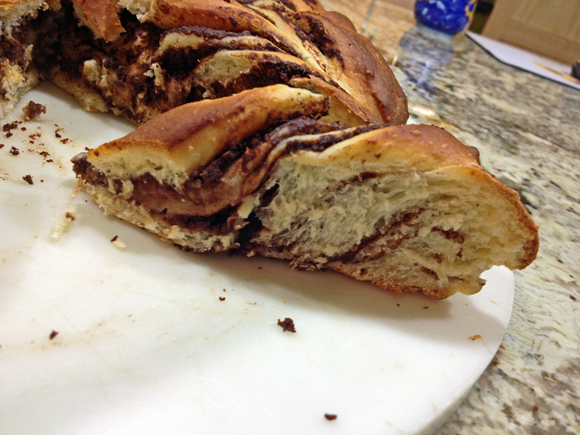
Sliced

I am submitting this post to Susan’s Yeastspotting event…

ONE YEAR AGO: Blueberry-Banana Bread 

TWO YEARS AGO: Into the Light Again

THREE YEARS AGO: Five Grain Sourdough Bread

FOUR YEARS AGO: The Nano-Kitchen

FIVE YEARS AGO: Kaiser Rolls

SOUR CHERRY SORBET: A LABOR OF LOVE

HAPPY BIRTHDAY TO MY MOM!

Far away in Brazil, today she celebrates her 91st Birthday!
We are not there for the occasion, but I share a photo taken one year ago.

 PSMomSee you in November…. countdown started!

 On my last In My Kitchen post, I mentioned we got to pick sour cherries from a friend’s tree. It was a first time for me, and I admit that it surprised me how much work was involved. Of course, picking the fruit requires that you climb up a ladder carrying a basket, and spend quite some time in a daze-inducing repetitive activity. Nothing wrong with that, except that all that Zen might make one less careful. It is tempting to stretch the body just a little more to reach that great looking cherry winking at you, maybe a tad too far.  Thankfully, it all had a happy ending, no falls, no broken bones. We went home with a load of fruit ready for the next step: sorting.  The basic goal is to get rid of the cherries that have worms inside. That information was not conveyed to me BEFORE we picked the fruit. I wasn’t thrilled, and made sure my beloved husband got the message loud and clear during our drive home. The thought that I had my hands on stuff potentially hiding slimy creatures was unbearable. Unfortunately, it was too late, I had already been exposed to danger. So how do you sort the cherries? You dump them all in a container with water. The ones that float very likely have worms. The ones that sink to the bottom better be worm-free because next comes pitting. Finding a worm together with the pit would be extremely no bueno. No bueno as the end of me.

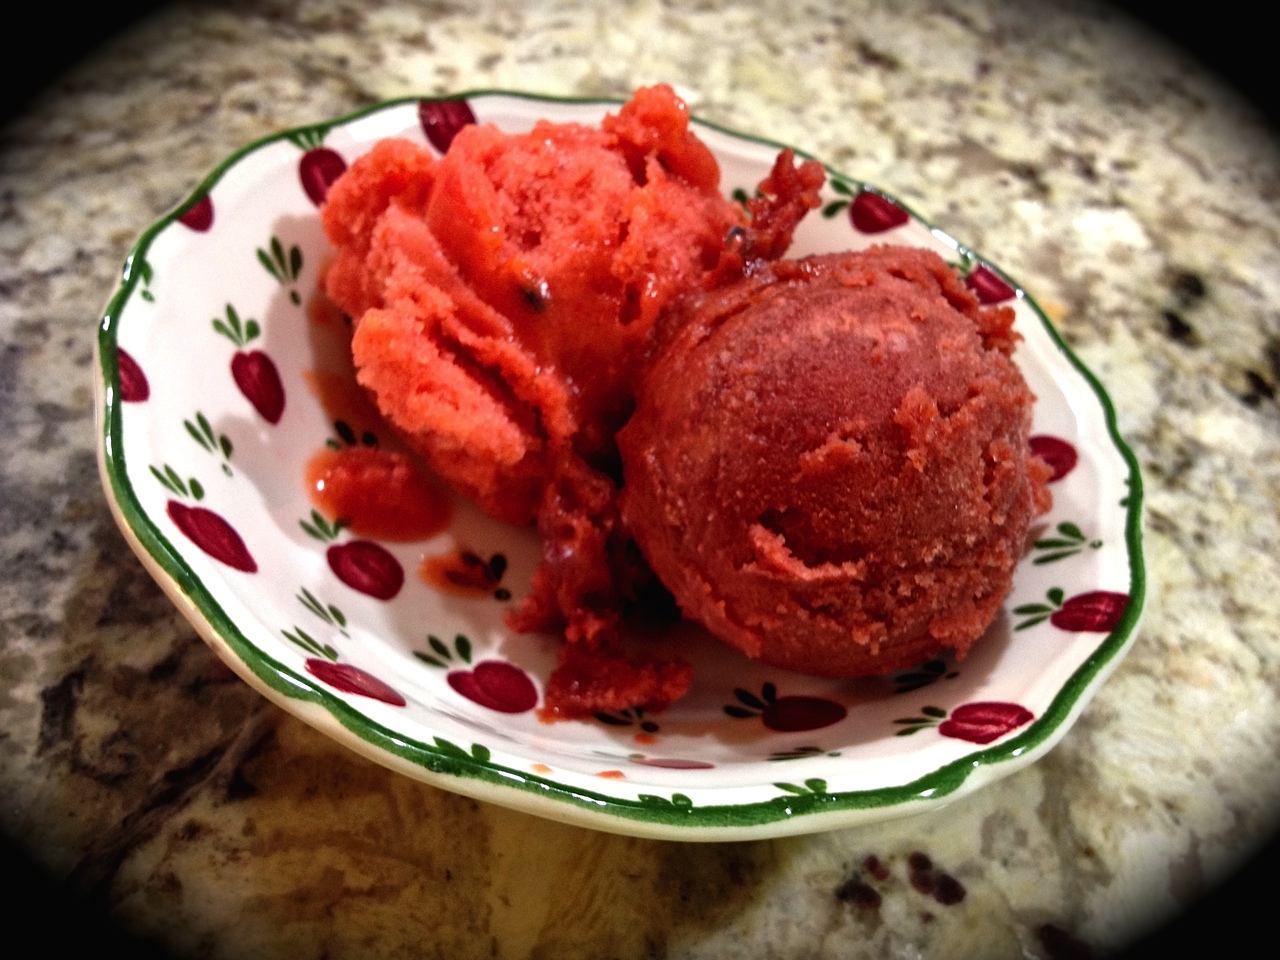
IMG_4994(on the left, Apricot-Passion Fruit Sorbet; on the right, Sour Cherry)

SOUR CHERRY SORBET
(from the Bewitching Kitchen)

4 cups worm-free, pitted sour cherries
1 ripe banana
1 Tablespoon lemon juice
3/4  cup sugar (you can add more)
1 cup water
2 Tablespoons vodka

Add the cherries, and the banana to the bowl of a food processor.  Process until smooth, cleaning the sides of the bowl a couple of times. Add the lemon juice, the sugar, and the water, and process everything together until fully smooth. Taste and adjust the sugar level, adding more if you like.  Add the vodka, give it a final mix.

Keep the base in the fridge overnight or for at least 4 hours to cool completely.

Place the mixture in your ice cream maker and churn it according to the instructions of the manufacturer.

Scoop into a freezer-safe container.

ENJOY!

to print the recipe, click here


PittingAdventure

Comments:  All credit for the sorbets featured in the blog in the past couple of years should go to Phil, even if he fooled me into handling worm-containing fruit. He comes up with all sorts of flavors, each and every one of his concoctions turns out great!  The only fruit he cooks down before churning is apricot, all others go in fresh.  He always includes a ripe banana, and in his latest versions a tablespoon or so of some type of alcohol, usually vodka or rum. They give the sorbet a creamier  consistency when frozen, and you will not taste any alcohol.

Once more I should add that we like our sorbets with very little sugar, you might find that our versions are too tart for your taste. Adjust accordingly, tasting the base before you churn it.

stored
As  you can see, it often takes me a little time to go from making a recipe to blogging about it, but better late than never, I wanted to get this post out before summer is over.  Summer and over is never a good combination. Oh, the pain, the incredible cruelty of what lays ahead for me…  Autumn first, then misery.

ONE YEAR AGO: In My Kitchen – September 2013

TWO YEARS AGO: Raspberry Sorbet at Summer’s End

THREE YEARS AGO: When three is better than two 

FOUR YEARS AGO: Grating Tomatoes (and loving it!)

FIVE YEARS AGO: A Peachy Salad for a Sunny Day

LEMON PISTACHIO LOAF

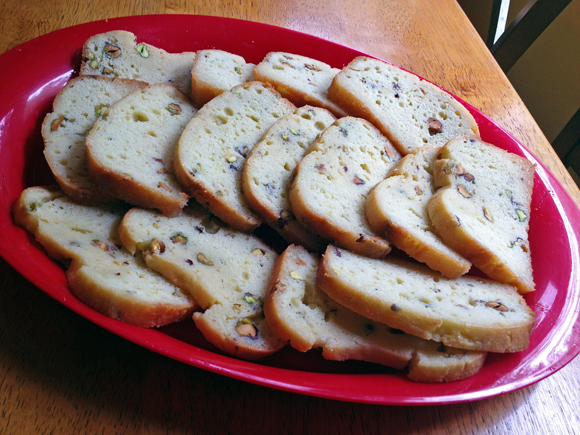
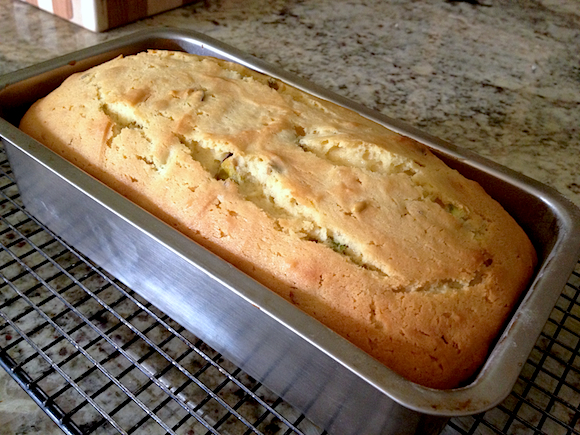
Where is that “PLEASE MAKE ME” folder when I need it so badly?  This recipe from  Homesick Texan is fabulous. Lisa calls it Lemon Bread, I took some liberties with her recipe and decided to change it to loaf. To me, bread immediately brings the thought of yeast, and a drier crumb.  This is very moist and tender.  I also used pistachios instead of pecans, because one of our graduate students is nuts about pistachios (sorry, lousy pun). We like to keep our students happy, because happy students do great experiments. Or so we hope… 😉

LemonPistachioLoaf1

(made on May 18th – blogged on August 17th)

LEMON PISTACHIO LOAF
(slightly adapted from Homesick Texan)

for the loaf:
1/2 cup buttermilk
1/4 teaspoon baking soda
1/2 cup (1 stick) unsalted butter, room temperature
1 cup granulated sugar
2 large eggs, room temperature
1 + 1/2 cups all-purpose flour
1 tablespoon finely grated lemon zest
1/2 cup pistachios, chopped coarsely

for the glaze:
6 tablespoons fresh squeezed lemon juice
3/4 cups granulated sugar

Heat the oven to 350°F and grease and flour a 9×5 bread pan, lining the bottom of the pan with parchment paper.

Stir together the buttermilk and the baking soda and set it aside. Cream together the butter and sugar. Beat together the eggs and slowly add to the creamed butter. Stir in the buttermilk and then slowly add the flour. Mix until a smooth batter is formed. Stir in the lemon zest and the pistachios.

Pour in the batter and bake until a toothpick inserted in the center of the loaf comes out clean, about 55 minutes. Cool the loaf in the pan on a rack for 30 minutes.

As the bread is cooling, mix together the lemon juice and sugar for the glaze. To apply the glaze, tear out a sheet of foil large enough to contain the loaf when wrapped. Remove the loaf from the pan by running a knife along the edges and gently tapping it out onto the sheet of foil.

Spread the glaze evenly over the top of the loaf and on the sides. The glaze will be runny, just make sure to contain it all when you wrap the bread with the foil.

Place in the refrigerator for at least 12 hours. Serve cold.

ENJOY!

to print the recipe, click here

 LemonLoafEdited

I am sure Lisa’s original version is amazing too, but when I saw the bright yellow-green color of the cut pistachios in the loaf, and how well their taste combined with the acidity of the lemon flavor, I was glad I used them.  Of course, for weeks I’d seen packages of shelled pistachios at the grocery store, but they disappeared the moment I wanted to make this recipe.  I had to buy whole pistachios and shell them, one by one.  A labor of love, but worth it.

This would be perfect for brunch, to take to a potluck, or to brighten up the morning of your co-workers.

ONE YEAR AGO: Roast Beef French Dip Sandwich with Green Pea Pesto

TWO YEARS AGO: Asparagus Pesto

THREE YEARS AGO: Chocolate and Chestnut Terrine

FOUR YEARS AGO: Under the spell of lemongrass

FIVE YEARS AGO: Greens + Grapefruit + Shrimp = Great Salad!


BEWITCHING KITCHEN TURNS TWO!

Two years of blogging!  Forgive the cliche’, but it does seem like yesterday.  😉  I’m a few days late for my own party, mainly because the move home wasn’t trouble free.  Our internet and cable services needed some tweaking, and then a tree fell on our bedroom roof during a hail storm!  We certainly can’t complain for lack of excitement!

And what’s more exciting  than Sally baking a layered cake?  My adrenaline level went sky-high, but, in the name of my blog anniversary,  I grabbed my wooden spoons and marched with cautious optimism to the Kitchen Aid.   Things quickly went downhill, but I managed to make the cake!

TUXEDO CAKE
(from The Pastry Queen, by Rebecca Rather)

For the cake batter:
4 cups granulated sugar
1 cup unsweetened cocoa powder
4 cups all-purpose flour
1 tablespoon baking soda
½ teaspoon salt
1 cup buttermilk
1 tablespoon vanilla extract
1 cup (2 sticks) unsalted butter
1 cup canola or vegetable oil
2 cups water
4 large eggs

For the whipped cream filling and frosting:
4 cups chilled whipping (heavy) cream
1¼ cups confectioner’s (powdered) sugar

For the chocolate glaze:
4 ounces bittersweet chocolate, chopped into small pieces
½ cup whipping (heavy) cream
¼ cup Lyle’s Golden Syrup
2 teaspoons vanilla extract

Preheat oven to 350o degrees F. Prepare three 9-inch cake pans: lightly grease the pans with butter, line with parchment paper and then lightly grease the top of the parchment paper and dust with flour.
In a large mixing bowl combine sugar, cocoa, flour, baking soda, and salt; whisk together to mix. Set aside.
In a medium saucepan combine butter, oil, and water. Heat over low heat until the butter is melted, stirring often. Pour the butter mixture into the sugar mixture. Using a Kitchen Aid type mixer on low speed, stir or whisk until combined and smooth. Scrape down the sides and bottom of the bowl with a rubber spatula so the mixture blends evenly.  Add the eggs, one a time, mixing thoroughly after each addition.  Finally, add the buttermilk and the vanilla extract, stirring well until smooth.

Pour the batter into the prepared pans. Bake 35 to 40 minutes or until a  toothpick inserted in the center comes out clean. Remove from oven and place pans on a rack to cool for 10 to 15 minutes then remove cake from the pans and place the cake on the wire cooling rack to finish cooling. Cool completely before frosting.

For the frosting:
In a large mixing bowl, using an electric mixer, beat the whipping cream until soft mounds form; gradually add the powdered sugar, continue beating until thick and stiff.
Place one cake layer on a cake plate. Using an  offset spatula thickly spread some of the whipped cream over the top. Top with the remaining cake layers, coating the top of each with the whipped cream, and then covering the sides of the cake. Spread the cream as smooth as possible over the top and sides. Refrigerate the cake at least one hour to stabilize the whipped cream before glazing.

Chocolate Glaze:
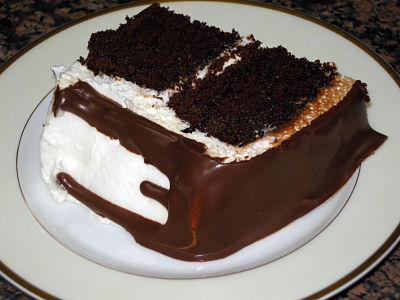
Place the chopped chocolate in a medium bowl. Set aside. In a small heavy saucepan over medium low heat, heat the cream until it is hot and just beginning to steam. Remove from heat and pour over the chocolate, stirring until the chocolate is completely melted. Add Lyle’s Golden Syrup and vanilla, stirring until completely mixed. Pour the chocolate mixture into a measuring cup with a pouring spout and let the glaze cool for 10 minutes, no longer than that. Slowly pour the glaze over the cake. Cover the top of the cake entirely, letting some of the glaze drizzle down the sides, and allowing some of the whipped cream show through the drizzles around the side of the cake. Refrigerate the cake until the glaze is set and the whipped cream frosting is firm, at least one hour.

ENJOY!

to print the recipe, click here

Comments:  When I baked my first layer cake last year I had problems with small differences in the diameter of my 9-inch pans. Now that I am one year smarter,  I took one of my pans to the store and bought siblings pans of the exact same size.  After a deep breath I opened the book and got started preparing the pans and the batter.

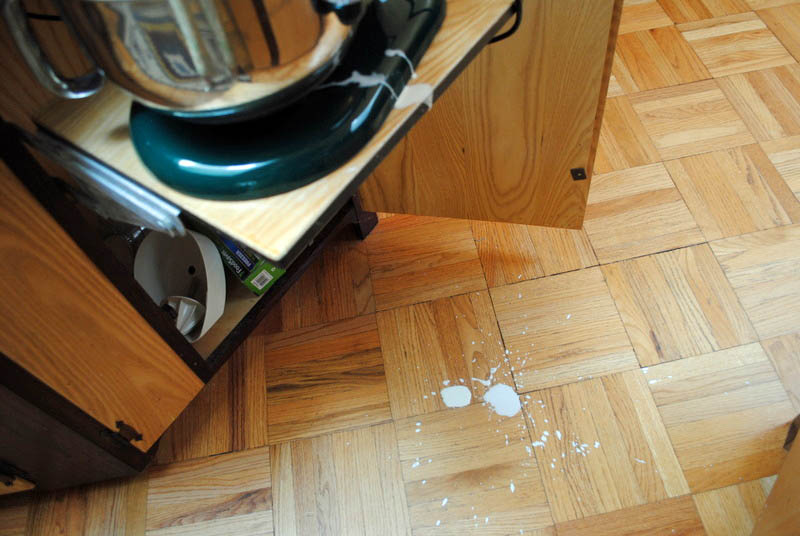
Keep in mind that this is enough batter for three layers of cake. In other words, it’s A LOT of batter. The Kitchen Aid was almost full, and pretty heavy.  I poured some batter in the first pan, the second pan, the third pan. I was filling each one a little more when the bowl slipped from my hands into the center of one of the half-full pans!  Chocolate batter splashed everywhere, onto everything in its path, including my laptop’s charger (that had no business being on the countertop, what was I thinking?), the bag of flour, the carton of eggs…  the list goes on.     I confess to some pretty crass language that would extremely disappoint my mother.

The pans went in the oven, I cleaned up the kitchen chaos, and while washing my feet and flip-flops I told myself that only a good night’s sleep would purge my cake demons and prepare me for phase 2: the FROSTING.

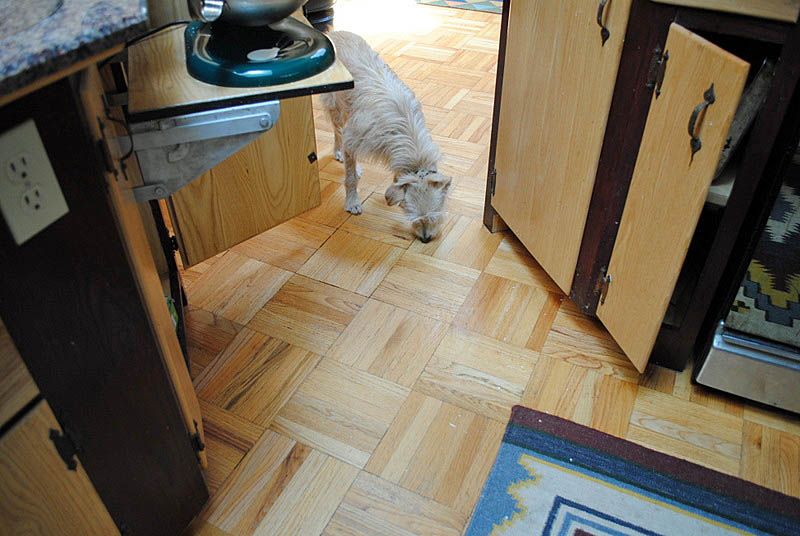
What can possibly go wrong with whipped cream?  In theory, not much, especially because I make it so often. But, because this was intended to frost a cake, I immediately spilled the whipping cream as I poured it in the bowl, making a big mess.  My quick cleaning was apparently not thorough enough, requiring the additional help that you see here, from our puppy Oscar.  Our other dog Chief,  who’s been with us for 12 years, disappears from the kitchen whenever I bake, so Oscar went at it alone.

Apart from those “issues,”  the frosting and the icing went smoothly.  I decided to reduce the cake to two layers because it’s already so caloric. Three layers is just too much for us, in my humble opinion.  However, it tasted incredibly good: rich, chocolatey and succulent, so if you have a special occasion to celebrate, make this baby and get ready for the compliments…    😉

Now let’s have some fun on this anniversary celebration:
help me pick a cake for next year!  Just leave your suggestion in a comment (even if it involves that dreadful “cream sugar with butter step”) and I’ll conduct a random drawing to select my cake challenge for the the blog anniversary in June 2012.    You can include a link to a recipe, or just the name of the cake.

Thank you for hanging out with me for these two years of culinary adventures!

Add to FacebookAdd to DiggAdd to Del.icio.usAdd to StumbleuponAdd to RedditAdd to BlinklistAdd to TwitterAdd to TechnoratiAdd to Yahoo BuzzAdd to Newsvine