
Making macarons has been on my list of culinary projects for a very long time! They are quite intimidating, because small details in the preparation can ruin them. Even experienced bakers often share stories involving feet-less macarons (can you imagine the horror?), cracked macarons, and many other types of monstrosities. Even though I did not list cooking projects for 2014, I was set on not letting another year pass by without attempting them. Then, the perfect opportunity shaped up: our friend Cindy came up for a visit with her husband, and we decided to tackle this challenge together. We had so much fun, I highly recommend that you consider inviting a friend over and doing the same. I’d been collecting recipes, tips, advice, and after consulting with my expert patissier friend Gary, we focused our efforts in two sites: Gwen’s Kitchen Creations and Joanne’s Eats Well With Others. They both definitely know their ways around the tricky Parisian macarons.
SNICKERDOODLE MACARONS
(adapted from Gwen & Joanne)
3 large egg whites, (95-100g), aged overnight
.
for the filling:
(makes a lot, you can reduce the amount, if you prefer)
1 cup unsalted butter, room temperature
4 cups confectioner’s sugar
¼ cup heavy cream
2 tsp vanilla extract
salt, to taste
1 tbsp cinnamon, plus more for dusting
.
.
.
.
Make the filling: in the bowl of a stand mixer fitted with the paddle attachment, combine the butter and powdered sugar, mixing on medium-high speed until light and fluffy. Add in the cream and vanilla and beat on medium-high for 3 minutes. Mix in the cinnamon until completely combined, as well as salt to taste.
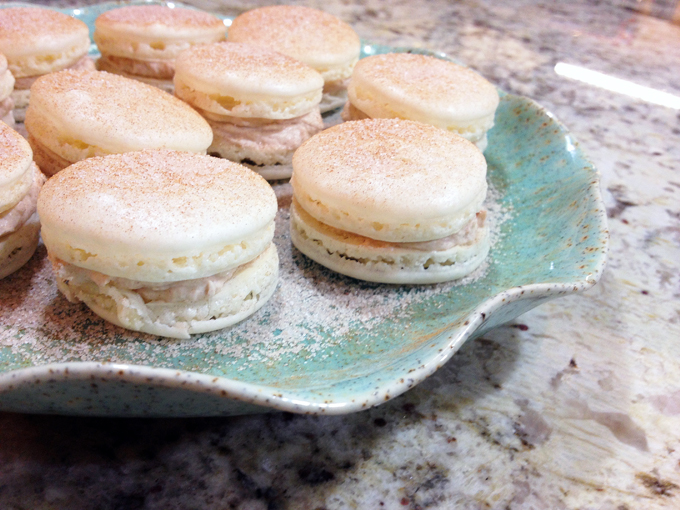
Pipe the buttercream onto the flat side of half of the macarons and then top them with a second, similarly sized macaron. Refrigerate in an airtight container overnight. Dust with cinnamon before serving.
ENJOY!
to print the recipe, click here
Comments: Very few culinary projects will confuse you as much as macarons. If you read cookbooks or advice online, you will find conflicting info almost for every step. Do not over-beat the egg whites… It’s impossible to over-beat the egg whites, beat a couple of minutes longer after you think they are done… don’t over-dry the shells…. it’s impossible to over-dry the shells…. sift the flour at room temperature…. roast the flour to dry it completely… don’t even think of making macarons with regular meringue… Mind blowing, my friends, mind-blowing. At some point you will have to settle on a recipe for your first time, take a deep breath, and see how it goes. I think for a first time we did pretty good, actually. Aren’t they cute?

From what I gathered around the many sources, it is VERY important to age the egg whites, so make sure to do that. Crack the eggs the day before, separating the whites and let them sit over the countertop overnight.
Since this was such an involved process, I’d like to share a few photos of our adventure…
Sifting… it was by far the most painful and boring step of the whole recipe. We took turns, but sifting the almond flour took a loooong time. Cindy did a much better job than me, she is patient and thorough. Moi? Not so much… (sigh)

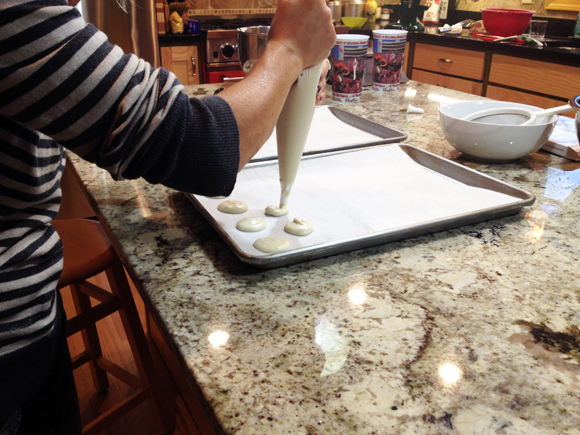
We made a nice template for the shells, using the top of shot glasses….

Egg whites were beaten until shiny, smooth-looking peaks formed…

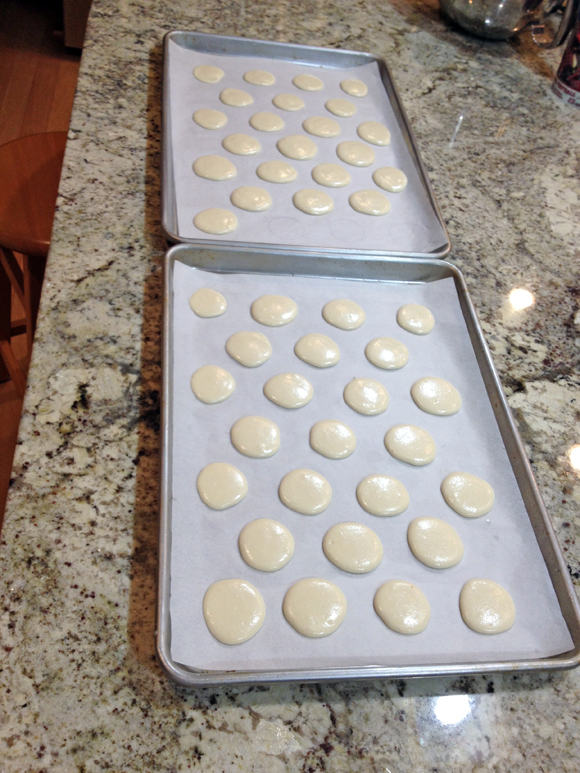
Here are the results of our labor of love, shells piped and drying….
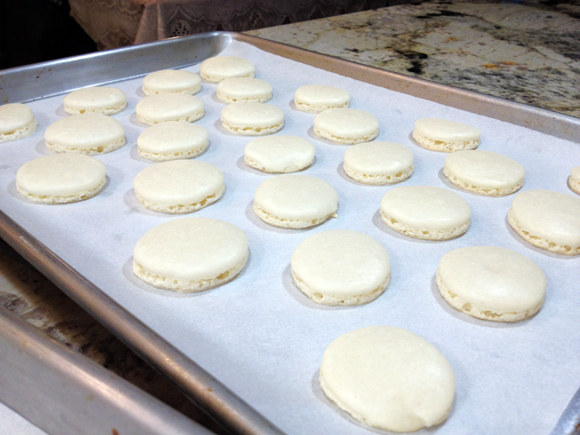
Here are our baby-shells after baking, most with nice little feet…..
All in all, we had a great time, and learned a lot that day… We assembled the best looking ones, and some of the ugly ducklings were consumed right away by our partners in the name of aesthetics.

The advice to wait to savor them next day is also spot-on: there is a definite improvement in texture, so these are perfect to make in advance and show-off your baking abilities at a get together.
Next time I will try Dorie Greenspan’s recipe, that uses an Italian-type meringue, in which the sugar-egg white mixture is stabilized by heat. I thought it was too involved for our first time, but from what I’ve been reading, it might be a better approach.
Cindy, thanks for joining me in this challenge,
I definitely could not have done it without you!
ONE YEAR AGO: Our Mexican Holiday Dinner
TWO YEARS AGO: The Ultimate Cranberry Sauce
THREE YEARS AGO: Edamame Dip
FOUR YEARS AGO: Gougeres
FIVE YEARS AGO: Beef Wellington on a Special Night
