SECRET RECIPE CLUB: MINI-CHOCOLATE CHEESECAKE BITES

August is already knocking at the door, this year is flying by.  But before a new month starts, there’s always the excitement of the last Monday of the month, with Reveal Day of The Secret Recipe Club. For those who are new to this concept, bloggers are paired in secret, have a few weeks to stalk their assigned site, and everyone in the club blogs about their recipe on the exact same day and time. Nothing cooler than that, you must admit…  This month I was paired with Colie’s Kitchen.  Nicole, who hosts the site, is a full-time college student, with a full-time life of organized chaos.”  Ha!  I can totally relate…  She is married and a “bonus mom”, what a great expression, much better than step mom,  I guess I can relate to that too.  I had quite a few options selected as possibilities for my assignment, like her Lasagna Rolls, her Parmesan Meatloaf Muffins (great idea!),  her Oh My God Macaroon Pie, and her Cauliflower Cheddar Fritters.  But, as is often the case with The Secret Recipe, I took the sweet path, and ended up with these super cute single bite (ok, a couple of bites) desserts…

MiniCheesecakeBits


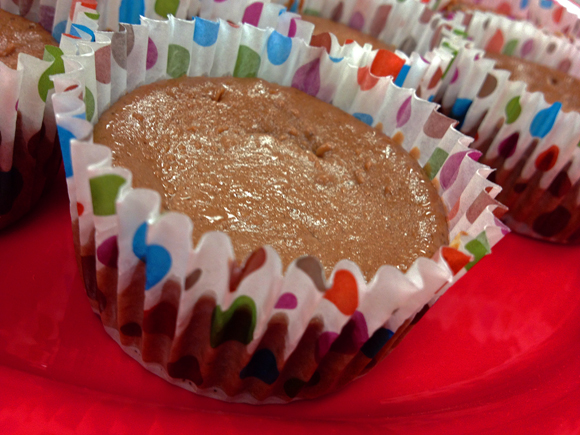
MINI CHOCOLATE CHEESECAKE BITES
(from Colie’s Kitchen)

3 Packages of Neufchatel, softened
1 + 1/4 cups sugar
1 (8 ounce) container of dairy sour cream
2 teaspoons vanilla extract
1/2 cup cocoa powder
2 Tablespoons all-purpose flour
3 eggs
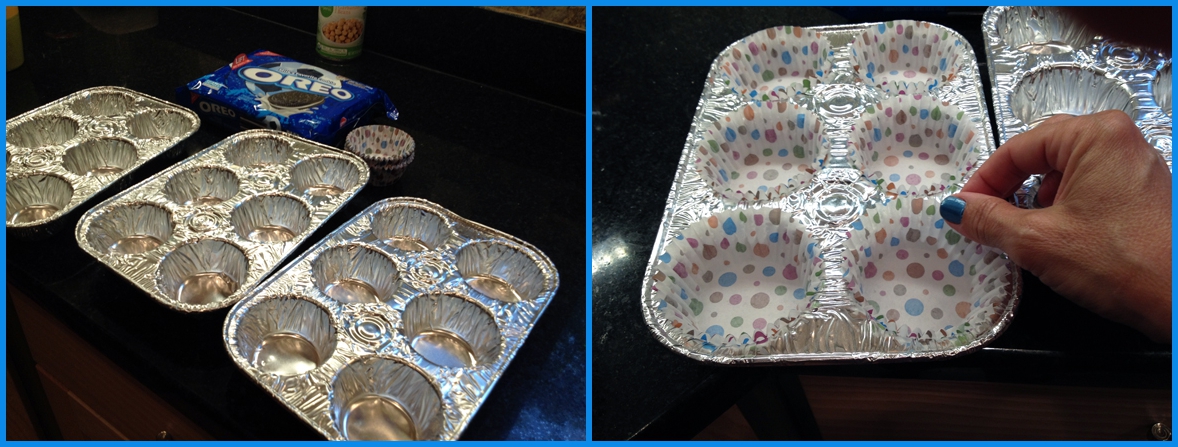
28 Oreo cookies halves, removing the cream center
28 cupcake tins/liners

Heat oven to 300 degrees F.

Beat cream cheese and sugar until blended. Add sour cream and vanilla and beat until fully mixed.

Beat in cocoa and flour. Add eggs, one at a time, beating just until well blended.

Remove Oreo filling with a butter knife and add one half of a Oreo to each cupcake tin. Fill each tin with one large spoon full of cheesecake filling until you have filled all 28 then go back and top off each tin with any extra filling.

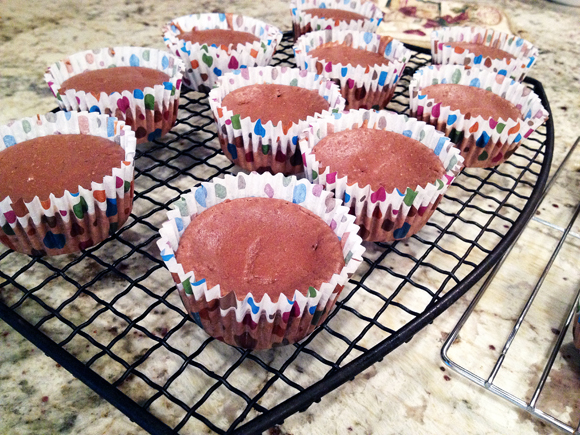
Bake for 20-25 minutes. Remove from oven and cool on a rack.

Refrigerate 4 to 6 hours. Store covered in refrigerator or in the freezer.

 ENJOY!

to print the recipe, click here

composite1

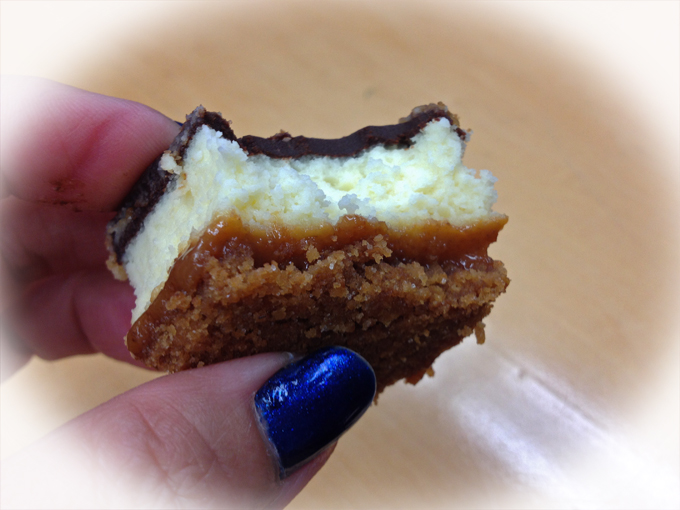
Comments:  I cannot tell you how much fun I had making this recipe! The toughest part was discarding the filling of the Oreo cookies. Part of me wanted to throw caution to the wind and behave like my former self of decades ago: shamelessly open the Oreos, scrape them clean, and try to sneak the cookie halves to the trash can without my Mom realizing. That never had a happy ending.  At most, I could get by with a couple of cookies, then pay a price for my behavior. Waste not. Ever. Do you know how many kids in the world went to bed hungry last night?  Apparently, I did not. (sigh)

The idea of using Oreos as a base for these cheesecake bites is a strike of genius!  Perfect size for cupcake liners. Because the recipe made so many and I only have one muffin baking pan, I got the disposable aluminum pans at the grocery store, and was quite pleased by how well they worked.  No difference in quality of baking, although in the name of full disclosure, I confess that I dropped one of the disposable pans while taking them out of the oven.  Huge big mess, coupled with language even more colorful than the cupcake liners. I am glad there are no hidden cameras in our home…

rack

If you follow my blog, you know that I never add the caloric content of any of my recipes for the simple reason that I don’t pay attention to it. But, since Nicole provided that info, I will share it with you: one of these babies has only 134 calories, which, as far as dessert is concerned, sounds pretty moderate to me.  Keep in mind this interesting linear fit, though. It can be cruel to your waistline.

cheesecake


Nicole, thanks for such a cute recipe that was very appreciated by our colleagues at the department…  I hope you had as much fun as I did with my assignment this month.

As usual, if any of my readers would like to see all assignments for my group, click on the blue amphibian at the end of this post, and enjoy the ride through the blogosphere…

ONE YEAR AGO: Whole-Wheat Spaghetti with Grated Tomato Sauce

TWO YEARS AGO: A Taste of Yellow to Honor Barbara

THREE YEARS AGO: Gratin of Beefsteak Tomatoes

FOUR YEARS AGO: Tour de France Final Stage: PARIS

FIVE YEARS AGO: Snickerdoodles with a Twist

WHITE CHOCOLATE MACADAMIA NUT COOKIES

I think I should add a new category to my recipes: PLEASE MAKE ME! This one would go right in, without a shadow of a doubt.  Of course, if you are part of the team that hates white chocolate and rather goes for statements like “it’s not real chocolate“, and “any chocolate connoisseur should walk away from such abnormality“… then, maybe these cookies are not for you.  I am not 100% sure, though.  Something about the marriage between white chocolate and macadamia nuts might shake the convictions of even the most stubborn anti-white chocolate being. Please make these. As Mel described them in her post: these are absolute perfection.

CookiesServed


WHITE CHOCOLATE MACADAMIA NUT COOKIES

(from Mel’s Kitchen)

1 cup (2 sticks) butter, softened
3/4 cup granulated sugar
1 cup packed light brown sugar
2 teaspoons vanilla extract
2 large eggs
3 cups all-purpose flour
3/4 teaspoon salt
1 teaspoon baking soda
12 ounces white chocolate chips
1 cup macadamia nuts, coarsely chopped

Heat the oven to 350 degrees F.

In a large bowl, beat together the butter, granulated sugar and brown sugar in the bowl of a stand mixer until the mixture is well-combined.

Add the vanilla and eggs and beat until the mixture is creamy and light in color, 2-3 minutes.

Stir in the flour, salt and soda and mix until just combined; a few streaks of flour remaining are not a problem.

Add the white chocolate chips and macadamia nuts and mix until combined and no streaks of flour remain.

Roll tablespoon (or slightly larger) size balls of dough and place on silpat or parchment lined baking sheets, 1 to 2 inches apart.

Bake for 9-11 minutes.

ENJOY!

to print the recipe, click here

composite

Growing up, I did not like nuts.  In those days, back in Brazil, they were awfully expensive, something reserved for special occasions, which in our family meant…. December, with Christmas and New Year’s Eve on the horizon.  My Dad would buy walnuts and pecans, still in their shells, and every evening after dinner, would sit at the sofa, patiently cracking them, one at a time. He loved to show off and crack them karate style, much to my Mom’s despair, as pieces of shell would fly everywhere, and sometimes his hand would be hurt in the process.  He never admitted to being hurt, instead acted as if he felt no pain whatsoever. If a nut resisted his blows, he would walk to the door that separated the living room from my bedroom, wedge the nut between the frame and the door, and crack it by attempting to shut the door close. Mom would not approve of that either, as it makes a royal mess on the floor.  As you can see, anything but a real nut cracker was part of the game. Not that we did not have one, I vividly remember a beautiful silver gadget sitting over the table, neglected to a minor decorative role.  Go figure.  Dad probably thought that nut crackers were for sissies. After all that hard work, he would dig chunky pieces of walnuts from the shell, and offer me. Silly child that I was, I promptly twisted my nose.

But now that I am older and wiser, I find myself in love with every single type of nut, oddly enough maybe the Brazil nut is the one I like the least. But macadamia, pistachios, walnuts, almonds, pecans, hazelnuts… love them all!  Roasted, salted, raw, in sweets, in sauces, in pestos… Dad would be proud.

Cookies

Make these cookies sooner rather than later…

 ONE YEAR AGO: Cilantro-Jalapeno “Hummus”

TWO YEARS AGO: A Moving Odyssey (has it been two years already?)

THREE YEARS AGO:
  Hoegaarden Beer Bread

FOUR YEARS AGO:
 Ancho-Chile Marinade: Pleased to Meat you!
FIVE YEARS AGO: Shrimp Moqueca

FRENCH LEMON YOGURT CAKE WITH POPPYSEEDS

It’s a little hard to believe that it took me 5 years to finally blog on this cake, a classic that I’ve made quite a few times in the past decade to take to graduate students in our lab. The funny thing is that I thought it was already in the blog, so whenever I made it, I never bothered taking a picture. Last month, searching through my index to retrieve the recipe, I was shocked to realize the harsh reality: it was nowhere to be found.   Better late than never, this is the cake-challenged dream.  One bowl, one whisk, absolutely nothing can go wrong. Except of course, if you tip the bowl…

IMG_4759

FRENCH-STYLE YOGURT LEMON CAKE
(from Alpineberry)

for the cake:
3/4 cup plain yogurt
1 cup granulated sugar
1 tbsp finely grated lemon zest
3 large eggs
1 + 1/2 cups all-purpose flour
2 tsp baking powder
1 tbsp poppy seeds
1/3 cup canola oil

for the glaze:
1/4 cup freshly squeezed lemon juice
1/3 cup powdered sugar

Heat the oven to 350F. Butter a 9-inch round cake pan. Line with a parchment circle and butter the paper.

In a large bowl, mix the yogurt, sugar, and lemon zest with a whisk. spoon. Add the eggs and mix well.  Add the flour, baking powder, and poppy seeds. Mix until flour is just incorporated.

Add the oil and mix well. The batter will look curdled at first but it will come together. Pour the batter into your prepared pan.

Bake at 350F for 30-35 minutes, until your cake tester is clean and the cake springs back when lightly touched.

Allow cake to cool in pan on a rack for about 15 minutes. Remove cake from the pan and set on a rack to cool completely.

Combine the lemon juice and powdered sugar and spoon it gently over the cake. The glaze will be thin and will soak in like a syrup.

ENJOY!

to print the recipe, click here

Such a perfect little dessert or morning treat with a cup of cappuccino.  Not too sweet, not too rich, poppy seeds are of course optional, but they add a very unique flavor, and look pretty cute in their random distribution through the cake.  If you have kids, it will be hard to find a recipe more appropriate for their first lesson in baking. By starting them early enough on this path, they won’t turn into cake-o-phobes like certain food bloggers you may know 😉


sliced

Disclaimer: No bowls were tipped during the making of this cake.
Isn’t that something?


ONE YEAR AGO: In My Kitchen – July 2013

TWO YEARS AGO: Jacques Torres Chocolate Chip Cookies

THREE YEARS AGO: Ina Garten’s Banana Bran Muffins

FOUR YEARS AGO: Beer Bread with Roasted Barley

FIVE YEARS AGO: Tomato Confit with Arugula and Zucchini

THE BEWITCHING KITCHEN TURNS FIVE!

IT’S GIVEAWAY TIME!
UPDATE: time’s up, comments shutdown for this post

It’s been five years and 688 posts. I enjoyed blogging from the beginning, and then it got better as the years passed. Now I’m more relaxed about it, I suppose. Looking back,  I went through a few phases that are maybe not obvious to you. For instance, in the second year I became slightly obsessed with getting special serving dishes, plates and small bowls “for the blog.”   I also flirted with the idea of a fancy camera and photography classes, until I realized that’s not what my blog should be about. I assembled all the extra stuff, donated it, and felt great.  Our life has little to do with perfectly set tables and carefully placed food props.  “…not that there’s anything wrong with that!”   😉

The Bewitching Kitchen revolves around our desire to eat well while working jobs that demand our full attention, even beyond the daily 9-to-5.  So, most stuff I post reflects the need for simple dishes that are reasonably quick to prepare, but flavorful and fun to eat.  I have neither goals nor expectations for the blog, except to keep it going as long as I enjoy it.  If this site can motivate busy people to cook, eat well, and  – I bet you knew this was coming – exercise often, so much the better!

Five years went by so quickly.  This blogging milestone demanded that I face my own cooking demons. I baked a cake!  What’s even more amazing  is that it involved creaming TWO types of sugar with butter.  Can you imagine that? It will take me a while to recover …

Apple Spice Cake1

APPLE SPICE BUNDT CAKE WITH RUM GLAZE
(slightly modified from Alton Brown, Best Thing I Ever Made)

for the cake:
12 ounces unsalted butter, at room temperature, plus extra for the pan
15 1/2 ounces all-purpose flour, plus extra for the pan
1 teaspoon baking soda
1/2 teaspoon salt
2 teaspoons ground grains of paradise
1 teaspoon ground nutmeg
1/2 teaspoon ground ginger
1/4 teaspoon ground allspice
1/4 teaspoon ground cardamom
1/8 teaspoon ground star anise
8 ounces granulated sugar
7 ounces light brown sugar
3 large eggs, at room temperature
1 teaspoon vanilla extract
2 Granny Smith apples, about 8 ounces each, 1/4-inch dice
3 ounces walnuts, chopped
1 1/2 ounces crystallized ginger, finely chopped

 for the glaze:
6 ounces powdered sugar
4 teaspoons dark rum
Turbinado sugar, for sprinkling

Heat the oven to 325 degrees F. Lightly butter a Bundt pan and dust with flour, tapping out the excess.

Whisk the flour, baking soda, salt and spices together in a large bowl.

Combine the butter, granulated sugar and brown sugar in the bowl of a stand mixer and, using the paddle attachment, beat on medium until the mixture is pale and fluffy, about 3 minutes.

Whisk together the eggs and vanilla and slowly add, with the mixer on low-speed, to the butter and sugar. Add the flour one-third at a time and beat on low just until combined after each addition. Stir in the apples, pecans and ginger.

Transfer the batter to the prepared bundt pan; the batter is thick and will almost fill the pan. Bake for 75 minutes, rotating the pan after 30 minutes. The cake is done when it pulls away from the sides of the pan, springs back when pressed and the internal temperature reaches 205 degrees F.

Cool the cake in the pan on a rack for 30 minutes. Invert and remove the cake from the pan. Cool completely on the rack before glazing.

Combine the powdered sugar, rum and 1 tablespoon water in a small mixing bowl and whisk until smooth. Pour the glaze onto the bundt cake and sprinkle with turbinado sugar. Let the glaze set for at least 30 minutes before serving.

ENJOY!

to print the recipe, click here


composite


Comments: This cake was part of the show “Best Thing I Ever Made” on FoodTV Network a few years ago. Ever since I watched that episode and listened to Alton Brown describe his rationale behind the recipe, I wanted to make it. First, I love a cake that goes in the direction of speculoos with all those delicious spices. And this cake had two things that appealed even more to me: the inclusion of grains of paradise, and the omission of cinnamon.  Grains of paradise (shown on the top left of the composite photo) have a very unique flavor, so I was quite intrigued by their use in this cake. And cinnamon is so common when apple cakes are concerned, that NOT having it immediately called my attention.  In fact, Alton made a specific point of not adding cinnamon to the batter, to avoid taking his masterpiece in the direction of apple pie.  Brilliant move!

The whole thing works beautifully together, just as he promised:  chunks of apple permeate the cake, a tender crunch of walnuts (he used pecans, by the way), and the assertive crunch of crystallized ginger.  The delicate shell of the icing with rum (barely noticeable) is perked up by the sprinkle of turbinado sugar, not to be omitted…   For my taste, this cake is close to perfection.  I did not have that many issues to bake it, which is a bit unusual. Ok, later I had to wash some dried up cake batter from my right eyebrow, but that’s nothing compared to what cake baking has done to me in the past. Still, below you see a photo of the state of our kitchen midway through this labor of love.  Trust me, I never make this mess, only when I’m working on a cake. It is absolutely pathetic.  Please notice the place I chose for resting the bowl with all the flour.  Why would I pick the most unstable place ever? Let’s not waste time trying to understand it. It is cake. And it is me. Capisci?

kitchen,jpg

And now…  GIVEAWAY TIME!   I am so thrilled to celebrate my 5th year in the blogosphere that I am offering two gifts. First, a wooden board beautifully crafted by Michael (link to his site), who has been featured on IMK in the recent past.  He was actually quite busy with some trips but managed to make time in his schedule to have this board ready for my giveaway. Thank you, Michael!

board

The second gift, is a copy of the latest cookbook by David Lebovitz,  My Paris Kitchen…. If you are familiar with his style, you’ll know this book is a must-have.  Paris is obviously a place very dear to my heart, it’s where Phil and I met, and where we spent a sabbatical year together later. Visiting often is not possible, but cooking French food is one way to keep the memories alive.  This book is a virtual passport to the city we love.  To enter the giveaway, just leave a comment on this post.

pariskitchen

Everyone is welcome to enter, I will draw two names on July 1st, 2014 an announce the winners right then. Entries will close on June 30rd at midnight.  Good luck, and a big thank you for all who make the interactions in comments, private emails, and Facebook so much fun!  I invite you all to join me in the journey of my 6th Bewitching year! There will be bread, sous-vide, and pies. There will be macarons, dog tales, and when the mood strikes, pull-ups, push-ups, and sit-ups.   Maybe this will be the year I get to finally conquer the crane pose that I’ve been working on for as long as I’ve been blogging….

It’s the road that matters, not the destination. I firmly believe that.   😉

sunsetwalk1

ONE YEAR AGO: The Bewitching Kitchen turns Four!

TWO YEARS AGO: The Bewitching Kitchen Turns Three!

THREE YEARS AGO:  The Bewitching Kitchen turns Two!

FOUR YEARS AGO:  Bewitching Birthday!

FIVE YEARS AGO: Welcome to my blog!


SECRET RECIPE CLUB: DULCE DE LECHE CHEESECAKE BARS

Where is 2014 going in such a big hurry?  It acts as if it’s desperately searching for 2015 or something, hard to believe we are in the end of May already!  Still, each month closes with the secretive deliciousness of Reveal Day in the Secret Recipe Club. For those who may not know, it is that super fun event in which bloggers pick are assigned a blog in secret, choose a recipe to cook from it, and blog about it on the exact same day (and time!).  This month I went through several cycles of hyperventilation from the moment I got my assignment. Why, you may ask?  Because I received the blog of our group’s moderator!  Can you imagine that?  It’s like having to present a seminar on the research topic of the Head of your department!   Hummmm, come to think of it, I’ve done that a few times in the past couple of years.  No wonder I hyperventilate so much…  (inside joke, laugh if you get it).

Our moderator, Sarah, is the gorgeous hostess of the blog Fantastical Sharing of Recipes. She is the Mom of two kids, 7-year-old Matthew and 6-year-old Cambria, and also has two kittens, Bella and Muffin. That seems busy enough for me, but she talks about getting a dog to join the fun! Let’s hope she will think twice before getting a Jack Russell Terror…  😉  Apart from taking care of two young kids, she also supervises 37 grownup kids in Group D of The Secret Recipe Club. For the most part, I suppose we are well-behaved,  but undoubtedly there’s a lot of responsibilities on her shoulders. I went through her site with desserts and sweets in mind, hoping to bake something to take to our graduate students.  But a lot of savory options tempted me like her Atomic Hashbrowns (with a name like that, they gotta be awesome!), her Tamale BallsPhilly Cheesesteak Egg Rolls (fusion cooking, anyone?), and her Jalapeno Popper Turkey Chili.  After struggling with several options for sweets, I could not decide between her Blueberry Breakfast Braid. and the Dulce de Leche Cheesecake Bars.  I tossed a coin. Yes, I did.  And here is what the coin told me to do:

Bars1


DULCE DE LECHE CHEESECAKE BARS
(from Fantastical Sharing of Recipes)

for the crust:
1 sleeve graham crackers
2 Tbsp. sugar
3 Tbsp. butter, melted

for the filling:
12 oz. dulce de leche
2 (8 oz.) package cream cheese, room temp
1/2 cup sugar
2 eggs
2 tsp. vanilla

for the glaze:
4 oz. bittersweet chocolate, chopped
4 Tbsp. butter
2 tsp. corn syrup
1 Tbsp. heavy cream

Prepare an 8-inch square pan with parchment paper and non-stick spray.

Grind crackers with sugar in a food processor. Stir in butter. Cover the bottom of the pan pressing the crumbs well with your fingers. Bake at 325* for 10 minutes and cool on a wire rack for 5 minutes. Pour dulce de leche on the crust and refrigerate.

Make the filling:  beat cream cheese for 3 minutes. Add sugar and beat another 2 minutes. Add eggs and vanilla; beat just until incorporated. Spread filling on top of dulce de leche layer. Bake for 45 to 55 minutes. Cool for 2 hours.

For glaze: Heat all ingredients in a saucepan or double broiler, stirring until smooth. Cool for 10 minutes and pour over cooled filling. Chill for at least 30 minutes. Let sit at room temp for 10 minutes before cutting.

ENJOY!

to print the recipe, click here

composite

 Comments:  This was my first time making a cheesecake type dessert, so I was excited to try it, but a bit worried about my inexperience. My goal was to take these bars to our lab meeting, which happens early on Thursdays.  I laid out a nice schedule to make everything the evening before, taking in account that I had to meet Phil and a guest speaker for dinner at 8pm.  On my way home I stopped at the store to get the ingredients, arrived home and got busy. Each step was planned to the minute,  I was following along flawlessly. Flawlessly? Not so fast, Silly Sally… not so fast.  When making my list for the grocery store, I did not notice the recipe called for TWO cream cheese packages. TWO. I brought home only one.  Can you imagine the shiver up and down my spine? Can you picture my kitchen at that very moment? Can you, really?  Yeap.  Best laid plans.

Considering all my options and how fast the clock was ticking, I rushed back to the grocery store, faced the same cashier with a sheepish smile, and brought the second package of cream cheese home.  Drove like a maniac to the restaurant, joined the gentlemen for dinner, and…  found myself baking way past bedtime.  Best laid plans. Story of my life.

CheesecakeBars22


But, as usual, it all had a happy ending, although I should have remembered to bring a good knife to the lab to cut the squares.  The knife available at the department was definitely not up to the challenge, and my production did not look nearly as good as that from Sarah. I think the best way to cut a cheesecake is a very sharp knife, dipping it in hot water at each cut, and cleaning the blade with a paper towel as you go. Keep that in mind if you make this decadent dessert.   Decadent is a good way to define it, we are talking major caloric intake, but a little piece should satisfy even those with a very sweet tooth…   I wish I had made my own dulce de leche from scratch like Sarah did,  but that will have to wait for another opportunity.

Sarah, I had a blast with my assignment this month, I know it was not a secret for you, but that is part of the life of a moderator, right?  I also want to take this opportunity to thank you for always sending the assignments very early, giving us more than enough time to stalk, cook, and blog. I know that everyone from our group certainly appreciates that… 😉

If you want to check the labor of love of my fellow Group D members, click on the blue entity smiling at you at the end of the post.


ONE YEAR AGO: Penne with Trapanese Pesto

TWO YEARS AGO: Superman

THREE YEARS AGO: Spring Pasta

FOUR YEARS AGO: Ice Cream Melts for Mango