A BRAZILIAN HUMMINGBIRD

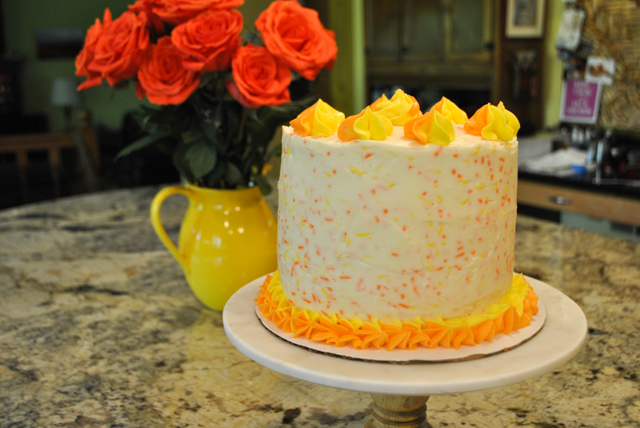
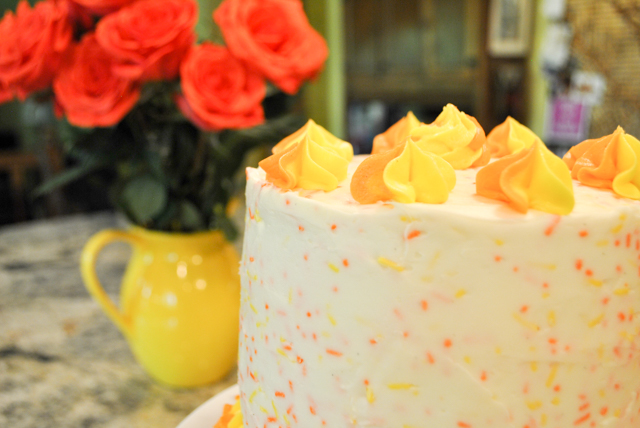
Hummingbird Cake is a classic concotion quite common in Southern regions of the US. Today I share with you my Brazilian take on this classic, which I am calling Beija-Flor Cake. As you may have guessed, Beija-Flor is Portuguese for hummingbird. A three-layer cake very moist with banana, mango, and passion fruit, with a bit of texture given by Brazil nuts. Everyone loved it, including the resident critic, grandson and son of fantastic bakers, the man I married 19 years ago.  He actually said (and I should have captured it in a video) that the frosting was as good as his Grandma’s.  My heart missed 3 beats in a row. Obviously, I am very happy with this bake!

BEIJA-FLOR CAKE
(from the Bewitching Kitchen, inspired by this recipe)

recipe is enough for 4 cakes,  only 3 cake layers were used for the final dessert)

1 + 1/4 cup chopped Brazil nuts
3 cups (370g) all-purpose flour
1 teaspoon baking soda
1 and 1/2 teaspoons mixed spice (or use cinnamon plus a touch of cloves)
1/2 teaspoon salt
1 cup mashed banana
1 cup mango coarsely pureed
½ cup passionfruit pulp
3 large eggs, at room temperature
1/2 cup grapeseed oil
1 cup (200g) packed brown sugar
3/4 cup (150g) granulated sugar
1 teaspoons vanilla paste   

Heat the oven to 300°F. Spread Brazil nuts onto a lined baking pan. Toast for 8 minutes. Remove from the oven. Turn oven up to 350°F, then grease and lightly flour four 6-inch cake pans.

Whisk the flour, baking soda, mixed spice and salt together in a large bowl. Whisk the rest of the cake ingredients in a medium bowl. Pour wet ingredients into dry ingredients and whisk until completely combined. Fold in the nuts. Spread batter evenly between the 4 prepared cake pans. Bake for 25-30 minutes or until a toothpick inserted in the center comes out clean.

Remove cakes from the oven and allow to cool completely in the pans set on a wire rack. Once completely cooled, remove cakes from pan and level the tops off if necessary to make them completely flat.

CREAM CHEESE FROSTING
(adapted from Sweet Bake Shop)  

2 cups (450 g) unsalted butter, room temperature
½ cup (110 g) cream cheese, softened
5½ cups (700 g) confectioners’ sugar
1 teaspoon pure vanilla extract
2 to 3 drops yellow and orange gel food dye
¾ cup yellow and orange sprinkles

In the bowl of a stand mixer fitted with the paddle attachment, beat together the butter and cream cheese on medium speed until smooth.

With the mixer running on low-speed, slowly add the confectioners’ sugar. Add the vanilla, then turn the mixer up to medium speed and beat until light and fluffy, about 2 minutes. Stop the mixer and scrape down the sides and bottom of the bowl, then beat again on medium speed again for a few seconds. Use immediately or store in the fridge for a couple of days.

CAKE ASSEMBLY:  Place 3/4 cup frosting in a small bowl and dye it yellow. Place 3/4 frosting in another small bowl and dye it orange. Prepare two small piping bags (with no icing tips) containing the two colors, each in one bag. Carefully cut the tips with scissors, and place them delicately in a larger piping bag fitted with a 1M tip or any other tip of your choice. Make sure the opening of both bags are at the same distance of the 1M tip. Test that both colors are coming out together. Reserve.  Add sprinkles to the rest of the frosting that was not dyed.

Place the first cake on a board, cut side up.  Add a layer of frosting with sprinkles. Add another cake on top, cut side up.  Spread a bit more frosting, top with the final cake, cut side down (this makes sure that the top will be smooth and leveled).  Add a thin layer of frosting and refrigerate the cake for 30 minutes, or place in the freezer for about 10 minutes to set the frosting.

Frost the cake, top and sides, then use the two-color frosting to pipe decorative swirls on the bottom and top.  Refrigerate and bring to room temperature 30 minutes before serving.

ENJOY!

to print the recipe, click here
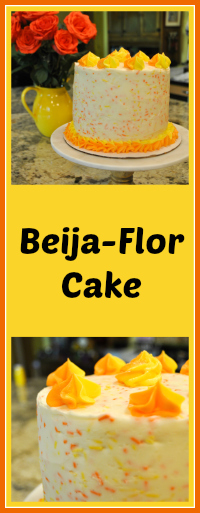
Comments: Hummingbird Cake originated in Jamaica, containing banana and pineapple as the main flavors, plus pecans and spices such as cinnamon and cloves. It is normally covered with cream cheese frosting. I wanted to make a version with Brazilian flavors, so I used mangos and passionfruit. I kept the banana component since I imagined it would be important in the texture of the cake.  Brazil nuts seemed a natural choice, and with that in mind, my “Beija-Flor Cake” was born. In the composite below, you can see that the cake is not as massive as it might seem.  It is not a small cake, but definitely not humongous. See the little yogurt bottle next to it for perspective.

Traditionally, Hummingbird Cakes have a homey, rustic look which I find quite appealing, but I wanted to try something a bit different, and opted for a smooth frosting with yellow and orange sprinkles to reflect the fruits used in the cake. A small amount of sprinkle-free frosting was dyed in the same two colors and used for piping. The frosting is very easy to make and much more forgiving to spread than a classic buttercream, so if you are absolutely paranoid about a bit afraid of frosting a cake, this is a very good starting point.

My apologies for not showing the picture of a slice. We cut one slice to “test-taste” it the evening before, but the first slice never cuts too well. We took the cake to the department next morning, and I completely forgot all about it. By the time I got to the mail room hoping to snap a picture, it was too late. It was a big hit with our colleagues and graduate students. I liked how moist and flavorful it turned out, but in my opinion the passionfruit flavor was not prominent enough. Next time I will skip the banana, and maybe stick with two fruits only, for instance mango and passionfruit. Those are the ideas floating in my mind for a new version. The frosting will stay exactly the same.  A total winner, that will show up again in future bakings. You can count on that.

ONE YEAR AGO: A Cookbook Review

TWO YEARS AGO: Air-Fried Carrots, Two Ways

THREE YEARS AGO: Sweet Potato Crust Quiche

FOUR YEARS AGO: Chicken Thighs with Artichokes and Capers

FIVE YEARS AGO: Pea Pancakes with Herbed Yogurt

SIX YEARS AGO: Mushroom Stroganoff

SEVEN YEARS AGO: Tomato Sourdough

EIGHT YEARS AGO: Gamberetti con rucola e pomodori

NINE YEARS AGO: Flirting with Orzo


EXTREME CHOCOLATE CUPCAKES

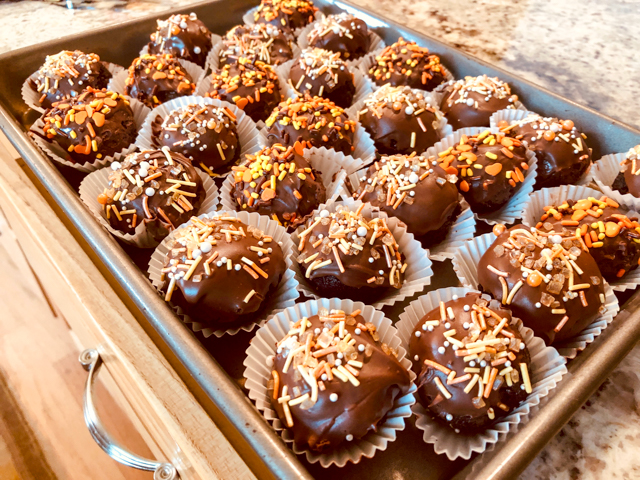
This is chocolate going where no chocolate has gone before. Total cocoa intensity. With each bite of these babies your mind will  buzz a little. A buzz of joy, that only real chocolate lovers will understand. If you join this cake with a good cup of java the world will be yours to conquer. Or at least it will feel like it.

SUPER-MOIST CHOCOLATE CUPCAKES
(slightly modified from Sally’s Baking Addiction)

3/4 cup (95g) all-purpose flour
1/2 cup (42g) natural cocoa powder (not Dutch-processed)
3/4 teaspoon baking powder
1/2 teaspoon baking soda 
1/8 teaspoon salt
2 large eggs at room temperature
1/2 cup (100g) granulated sugar
1/2 cup (100g) light brown sugar
1/3 cup (80ml)  canola oil
2 teaspoons vanilla paste  
1/2 cup (120ml) milk soured with a squirt of lemon juice (or commercial buttermilk)
frosting (recipe follows)
sprinkles to decorate (optional)

Heat the oven to 350°F. Line a 12-cup muffin pan with cupcake liners. If you have a second pan, line two more muffin tins, the recipe will likely make 14 cupcakes.  

Whisk the flour, cocoa powder, baking powder, baking soda, and salt together in a large bowl until thoroughly combined. Set aside. In a medium bowl, whisk the eggs, granulated sugar, brown sugar, oil, and vanilla paste until completely smooth. Pour half of the wet ingredients into the dry ingredients. Then half of the home-made buttermilk. Gently whisk for a few seconds. Repeat with the remaining wet ingredients and buttermilk. Stir until just combined; do not overmix.

Spoon the batter into the liners. Fill only halfway.  Bake for 18-21 minutes, or until a toothpick inserted in the center comes out clean. Allow to cool completely before frosting.

BLACKOUT CHOCOLATE FROSTING
(from Kara’s Couture Cakes)

1/2 cup butter 
2/3 cup black cocoa powder 
3 cups powdered sugar
a little less than 1/2 cup heavy cream
1 teaspoon vanilla paste
black gel food color (I used Chefmaster)

Melt the butter and stir in the cocoa with the paddle attachment on a stand mixer.
Add powdered sugar and mix on low-speed. Start with 1/3 cup heavy cream and add it to the mixer. Increase the mixer speed to medium. Add 2-4 tablespoons more heavy cream till you reach the desired icing consistency.
.
Add vanilla extract and black food color and turn the mixer to medium high and beat for 90 seconds.
.
Ice the cupcakes once they are completely cold. Have fun with sprinkles!
.
ENJOY!

to print the recipes, click here

Comments: Sally’s Baking Addiction is a fantastic site for bakers. I’ve mentioned before that one of my nieces in Brazil is a great cake baker, to the extent that for a while she was doing it professionally. She baked super fancy and decorated cakes for birthday celebrations, in a special-order kind of deal. One day we were talking about blogs and cookbooks, and she mentioned Sally’s blog (not mine, mind you) as one of her favorite sources exactly for the reason that her recipes are so reliable. It was fun to learn that we subscribed and faithfully the same site for years without knowing we both did. But I digress. Sally’s chocolate cupcakes deliver exactly what she promises: moist, decadent, and perfectly shaped little concoctions. The most important instruction in her recipe is to fill the muffin tins only halfway to the top. Not a teaspoon more. It will seem inadequate, but resist the temptation to add more batter.  They will bake perfectly, without a super inflated dome that always sinks in unflattering ways as the cake cools.


The frosting. Normally, I am not wild about American buttercream, but this is not your regular kind. For starters, the black cocoa powder is so intense, that it can stand up to the extra sugar. Also, the addition of heavy cream is a game changer. If you are counting calories or saturated fat, this is not your best option for dessert. But if your life-style allows some room for indulging, this might very well be your best option for dessert.  The cake with the dark cocoa icing is a match that will rock that world you are about to conquer.

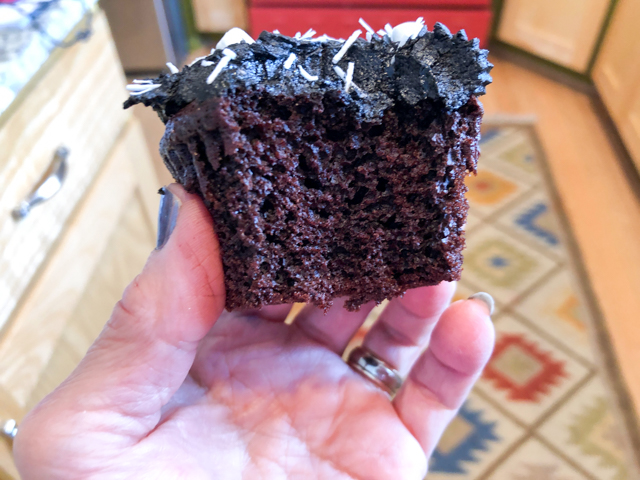
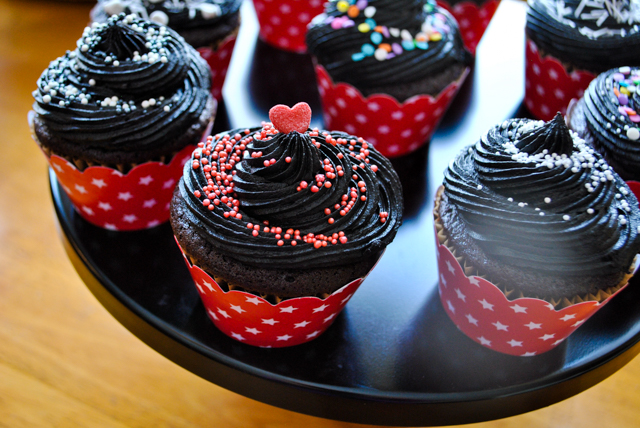
I hope this photo conveys how deliciously moist this cupcake turns out. You can pile the icing higher if you dare, but I think a bit of moderation is in order. It is very rich and satisfying. As to decoration, I pretty much opened my box of sprinkles and had a blast with them. The dark background is friendly to so many color combinations! Pure white (those tiny marshmallows looked adorable on the cake), red, pink, coral, bright mixed colors, or you can use a color scheme geared to a particular occasion. Come to think of it, St Patrick’s Day could showcase some of these with green and white sprinkles…

I close this post with a daring statement. Ready? Here we go: these are the best chocolate cupcakes I’ve ever had. There. I said it. You must bake a batch…


ONE YEAR AGO: Sunflower Seed Kamut Sourdough

TWO YEARS AGO: The Joys of Grating Squash

THREE YEARS AGO: Auberge Pecan-Walnut Bread

LEMON-BLUEBERRY ENTREMET CAKE: A SHOUT FOR SPRING

Don’t even get me started on my thoughts about this winter. It drags, it is unbearably cold, snowy, pathetic. You may be reluctant to take the word of a Brazilian about it, but I quote my beloved husband, the Michigander: this is the worst winter we’ve had in 10 years. So there. He said it. I had no choice but to make a cake that brings the colors and brightness of Spring to the table, hoping to coach the weather into following suit. A cookie base, a chocolate genoise layer, a blueberry compote, all surrounded by a smooth lemony mousse. Want to know what makes me very happy? It is my very own recipe. Take THAT, former cake-o-phobe self!

Since there are so many components, I am giving each recipe separately so that if you like to make a single component, it will be easier to follow. Little advice for you:
Make. The. Mousse.  

LEMON-BLUEBERRY ENTREMET CAKE
(from the Bewitching Kitchen)

equipment needed:
Silikomart Universo mold (or a springform type pan with 8 inches in diameter)
round cake ring, around 7 inches (to cut cookie base and freeze the insert)

for the cookie base:
80 g of softened butter
65 g powdered sugar
5 g vanilla sugar
1/8 teaspoon vanilla extract
2 egg yolks
90 g all purpose-flour
10 g almond flour
1/4 teaspoon of baking powder

Heat the oven to 350 F.  In a bowl beat the butter, the powdered sugar and the vanilla sugar until light and fluffy. Add the egg yolks, one by one, constantly beating. In another bowl sift the flour and baking powder and add to the previous mixture. Finally, add the almond flour. Stir very well. The dough does not get too thick or too liquid, the texture must be creamy.

Spread the dough as a circle, about 1/8 inch thick, smooth the surface with a spatula. Bake for about 15 minutes (depending on the oven) or until golden brown. Remove from oven and let cool slightly. Then, cut a circle just slightly smaller than the diameter of your silicone mold. Make sure it fits snuggly into the opening of the mold.

for the chocolate genoise:
113 g unsalted butter
2 tsp vanilla extract
140 g cake flour
55 g Dutch process cocoa powder
8 large eggs
225 g granulated sugar

Heat the oven to 350 F. Line the bottom of two 8″ cake pans with a parchment round.  Melt the butter in a small saucepan, transfer to a bowl and reserve.

Sift together the flour and cocoa, set aside. Put the eggs and sugar in a mixer bowl. Set the bowl over a pan of simmering water and whisk until the eggs are lukewarm. Put the bowl onto the mixer and whisk until the eggs are tripled in volume.

Sift half the flour/cocoa over the egg mixture and use a balloon whisk to fold, repeat with the remaining flour/cocoa. Whisk a little bit of the batter into the melted butter, and add the vanilla extract. Fold the butter mixture into the rest of the batter. Fold gently to avoid deflating the mixture too much. Divide the batter evenly between the pans.

Bake until the cake springs back when pressed in the center, about 30 minutes. Cool in the pan for 10 minutes before turning out onto a cooling rack. Slice the cake in half lengthwise to the thickness you want for your entremet. I cut it a little less than 1 inch thick. Leftover cake can be frozen for a few months, well-wrapped in plastic.

for the blueberry insert:
150 g blueberry puree (blueberries processed in food processor until reasonably smooth)
6 g gelatin (Gold, about 3 sheets)
16 g granulated sugar
2 drops bergamot essence oil (optional)

Add the gelatin sheets into a bowl with very cold water and let it sit for 10 minutes.  In a small sauce pan, cook the blueberry puree with the sugar until the sugar is fully dissolved. Add the bergamot essence, check that the temperature is below 175 F, then add the softened gelatin sheets, well-drained from the water.  Mix well.

Add the puree inside a 7 inch cake ring lined with plastic wrap and placed over a baking sheet and freeze it. You can also use any other type of mold you like, as long as it is smaller than the Silikomart mold used to assemble the entremet later. Also keep in mind that you’ll need to easily un-mold the blueberry compote after it’s frozen solid, so choose your gadget carefully. You can leave it in the freezer for 3 hours or several days.

When the compote is frozen, place a layer of genoise chocolate cake on top of it, press gently to form the final insert of the entremet.

for the lemon mousse:
2 eggs
juice of 2 lemons
100 g granulated sugar
30 g butter, cold
6 g gelatin (Gold, about 3 sheets)
280 g whipping cream

Place the gelatin sheets inside a bowl with cold water and leave it for 10 minutes.

In a sauce pan, preferably non-stick, add the eggs, sugar and lemon juice. Cook stirring often over gently heat, until it thickens slightly . Aim at a temperature of 170 F, do not let it go higher than that, or you will scramble the eggs and ruin it completely.

Remove from the heat, pass it through a sieve into a glass bowl. Once the temperature is below 175 F, add the gelatin and the pieces of cold butter. Mix gently.  Put a plastic over the surface and allow it to cool to room temperature.

Once it is almost cooled, beat the whipping cream to soft consistency. Add it to the lemon curd, folding it gently. Your mousse is ready to use.

for the yellow mirror glaze:
100 g glucose
100 g granulated sugar
100 g white chocolate, cut in small pieces
50 g water
65 g condensed, sweetened milk
6 g gelatin (about 3 sheets)
1/2 tsp titanium oxide (optional, but worth it)
yellow food dye 

Place the gelatin sheets inside a bowl with cold water for 10 minutes as you prepare the other ingredients.

In a sauce pan, heat the glucose, sugar and water until boiling. Make sure the sugar is fully dissolved. Let it cool slightly, and add to a bowl with the white chocolate in small pieces. After a few minutes, use a spatula to dissolve the chocolate. Add the gelatin and the condensed milk, and mix gently, try to avoid incorporating air bubbles. Add the titanium oxide and the yellow food dye. Place the mixture in a tall, plastic container and use an immersion blender to fully emulsify the glaze. At this point, you can either wait for it to cool to the pouring temperature (about 96 F), or place it in the fridge overnight, with plastic film touching the surface.  In both cases, right before glazing the cake, pass the mixture through a fine sieve to burst any small bubbles that might interfere with the mirror effect.

for the spider web effect:
2 tablespoons neutral glaze (store-bought or prepared from scratch, recipe here, omit the cinnamon)
purple food dye

Heat the neutral glaze to 150 F.  Add the purple color. Mix well. Keep hot until needed, with a hot spatula ready to go.

FINAL ASSEMBLY: The dessert is assembled inverted, that is the top will be at the bottom of the Silikomart mold. Start by spreading about 1/3 of the lemon mousse inside the Universo mold. Make sure to use the back of a spoon to smooth the sides of the mousse all around, to avoid large bubbles to stay near the surface.

Remove the blueberry-genoise insert from the freezer and place it gently over the mousse, with the cake facing up. Add a little more mousse all around the sides, then finish with the cookie layer. Use any leftover mousse to fill all gaps, press the cookie gently to make it leveled with the opening of the mold. Wrap it all in plastic and freeze at least 6 hours, preferably overnight.

Have the yellow mirror glaze at 96 F, with bubbles removed by sieving. Have the purple neutral glaze ready at 150 F. Un-mold the frozen cake, place it elevated over a rack so that the glaze can freely drip from the sides. Smooth the surface with your hands, but work quickly to avoid condensation of water on the surface.  Pour the yellow glaze on a circular motion, making sure all cake is covered by glaze. Immediately grab some purple neutral glaze with the hot spatula and smear over the surface, preferably a little off-center.  The effect will depend on many factors, including how much pressure you apply to the spatula, and the temperature differential between the two color glazes.  Once the glaze stops dripping, you can use a knife to clean the bottom, and carefully move it to a serving platter.  Defrost it in the fridge for at least 2 hours before serving.  Use a hot knife to slice into pieces.

ENJOY!

to print the recipe, click here

Comments: This dessert was planned in a very unusual way. Instead of choosing cake or mousse flavors, I started with the colors of the glaze. I know, crazy! I wanted bright, contrasting colors in a spider-web style. Yellow and purple popped in my mind. Only then I decided on the flavors of lemon and blueberry. Entremets join several components of contrasting textures, but to simplify it  I opted for a single element with a crunchy nature, the cookie base from this blog post by Miúda. To cut the sharpness of the lemon and add another type of texture, a chocolate genoise was included. Confession: I had it in the freezer from another baking project. With those components in mind, I went to work, using some bits and pieces found online, and some general instructions from “The Pastry Chef’s Little Black Book “ which I highly recommend. It is a very extensive list of basic formulas and variations. If you want to come up with a mousse, a compote, a genoise, you can find all the do’s and don’ts in that book.

The spider-web effect: I’ve been flirting with the idea of trying it for a long time. In theory, it is quite simple. If you are comfortable mirror-glazing a frozen mousse cake, you are 80% of the way there.  The method was created by Gerald Sattler, and is based on the non-miscibility of water and oil.  Mirror glazes are oil-based (cocoa butter, sometimes condensed milk and other types of dairy) while neutral glaze is water-based. You use the neutral glaze at a higher temperature not only to spread it easily, but because it slows down the gelling of the mirror glaze and the setting of the cocoa butter present in it.  The combination of a water-based environment with the shock of temperatures generates the interesting effect, making each cake unique. The process is absolutely fascinating. Take a look at one of Sattler’s videos here, and be ready to be amazed. The effect can be achieved in ways other than the spatula. Yes, yours truly is already planning her next adventure…

The purple color became more “purple” once the glaze set. If you look at the composite picture, taken right after pouring, you’ll notice a more “brownish” color, which made me at first a bit hysterical worried. But it definitely changed as it cooled, and the real nature of the dye I used came through. Happy ending… always a nice thing.

Here you see the slice showing the layers. The cake changed a bit by sitting in the fridge overnight.  I added the glaze around 2pm, and cut a test-slice in the evening. At that point, the cookie base was very crunchy and the cake was more on the dry side. Genoises are usually moistened with some type of syrup, but since this was going to be surrounded by a mousse and a compote, I used it without any added moisture. Next morning I cut the cake to take to the department and it was considerably improved. The cookie base not as tough, very easy to cut through and with a more melt-in-your mouth characteristic. Similarly, the cake was more moist and tender.

All in all, I’m very happy with this dessert. The lemon mousse component was the real winner.  In fact, if you’d like to serve a mousse by itself, maybe with a small cookie as adornment, consider this exact lemon version. Very refreshing, bright in the palate, smooth and with the right amount of sweetness.

I hope you enjoyed my first adventure in Spider Glaze Territory. I wanted a more prominent spider effect, but I was going absolutely crazy and losing my composure it’s hard to figure out what to do on a first time. Details such as how much neutral glaze to add, how hard to press the spatula, the exact temperature of the glaze when spreading it, they all have a huge impact on the final look. It’s such a fun technique, though. I can hardly wait to try it again. Stay tuned…


Grab a pin before you leave….


ONE YEAR AGO: Walk Strong3: A review of Jessica Smith’s latest workout program

TWO YEARS AGO: Pork Medallions with Black Berry Compote

THREE YEARS AGO: Indian-Spiced Chicken with Chickpeas and Spinach

FOUR YEARS AGO: Curry Cardamon Cookies

FIVE YEARS AGO: In My Kitchen, March 2014

SIX YEARS AGOBoeuf Bourguignon for a Snowy Evening

SEVEN YEARS AGO: Chickpea Salad

EIGHT YEARS AGO: Soft Spot for Chevre

NINE YEARS AGO: Roasted Onion and Asiago Cheese Miche


RASPBERRY ANGEL FOOD CAKE

I admit I am passionate about many things. If that’s a crime, I plead guilty without thinking twice. Currently, my list of passions include all things designed by the brilliant patissière Ekaterina (aka Miúda) from the blog verdadedesabor. I have attempted one of her recipes in the past, and dream over every single of her creations. Every time I get an email notification of a new post in her blog, I cannot wait to see what it is all about. It still amazes me that she keeps her site all the way from Russia in two languages, one of them being Portuguese. Too cool! Recently she shared two desserts using Angel Food Cake as a starting point. One of them seemed way too complex for my level, but the second one I thought that maybe I could do without losing whatever is left of my mental sanity. I had a few issues here and there, cannot say I hit it perfectly, but I am happy with the way it turned out. A nice mixture of flavors and textures, this might be a perfect cake to celebrate Valentine’s Day…

RASPBERRY ANGEL FOOD CAKE
(slightly modified from Verdadedesabor)

for the cake:
125 g cake flour
75 g powdered sugar
240 g egg whites
a pinch of salt
1/4 tsp cream of tartar
135 g superfine sugar
15 g vanilla sugar (I used this one)

for the raspberry confit:
150 g raspberry puree (seeds sieved out)
90 g of sugar (or to taste)
3 g pectin NH

for the raspberry mousseline:
125 g milk
125 g raspberry puree (seeds sieved out)
90 g of sugar
3 g vanilla sugar
6 g cornstarch
8 g flour
1 egg
130 g softened butter

for the mini-meringues:
35 g egg white
35 g of superfine sugar
35 g powdered sugar
a pinch of cream of tartar
pink food coloring

Make the cake: heat the oven to 350 F. Line a baking sheet with parchment paper or a silicone mat. Place a 8 in x 8 in square frame on top.  Sift flour and powdered sugar together. Reserve.

In the large bowl of the mixer, using the wire whisk, beat the egg whites until they begin to froth. Add the cream of tartar and a pinch of salt. Gradually add sugar and vanilla sugar. Continue to beat until firm peaks form. Turn off the mixer. Sieve the flour with the powdered sugar again on top of the beaten egg whites. With the help of a silicone spatula, gently mix the batter.

Transfer the batter to the prepared ring, smooth the surface. Bake for about 35-40 minutes until the cake is lightly golden and a toothpick inserted in the center of the cake comes out clean. Remove from the oven and allow to cool in the ring. Remove the ring, and if you like, shave the sides to show the white crumb.

Make the raspberry confit: In a pan, heat the puree with half the sugar until it reaches 104 F (about 40 C). Add the rest of the sugar mixed with the pectin. Cook for 1 minute, stirring constantly. Remove from heat, transfer to another container, cover with plastic film touching the surface, let it cool to room temperature then place in the fridge.

Make the mousseline: In a small saucepan, combine the sugar, vanilla sugar, cornstarch and flour. Stir well with a wire whisk. Add the milk and the raspberry puree stirring constantly. Add the egg and incorporate well. Heat the mixture for about 5 minutes, until the cream thickens, and the temperature reaches about 180 F. Remove from heat, transfer to another container and cover with plastic film touching the surface. Allow to cool to room temperature, place in the fridge.

Thirty minutes before making the mousseline, remove the cream from the fridge. Beat the butter until creamy. Gradually add the cream (it is important that the cream and butter have the same temperature), continuing to beat until you get a fluffy cream. Transfer the cream to a confectioner’s bag with a 1M tip or another tip of your choice.

Make the mini-meringues: Heat the oven to 185 F. Line a tray with parchment paper or silicone mat. In a large bowl, beat the egg whites until firm, but do not let them dry. Slowly, add the sugar and beat at the top speed until it has dissolved. Reduce the speed to the minimum and gradually add the powdered sugar and the pink food dye.

With a piping bag fitted with a round tip, pipe very small meringues in the prepared tray, and bake for about 2 hours  or until they are dry and crunchy. Turn off the oven and let the meringues cool inside.

Assemble the cake: Apply a thin layer of confit to the top of the cake. Then, with the help of the pastry bag, spread the mousseline cream on top. Decorate with the mini-meringues, and sprinkles of your choice. Cut in squares and serve.

ENJOY!

to print the recipe, click here

Comments: This was my first time making Angel Food Cake, one of Phil’s favorite cakes. Ever since I met him he talks about his Grandma’s Angel Food Cake with a particular type of frosting that as far as I can tell might be a boiled frosting known as Ermine. Obviously, I have a mental block about baking that cake, how could I compete with sweet childhood memories? But perhaps this little adventure into angelic territory will give me a bit more confidence.

I made the cake and the mini-meringues on a Saturday, and also prepared the raspberry puree (sieving that stuff is not something I look forward to), reserving everything in the fridge. Sunday was dedicated to making the confit and raspberry mousseline (mousseline-virgin here).  There were moments of drama, as so often happens when Sally bakes cake. Mousseline: I was very careful monitoring the temperature of butter and raspberry custard component, I swear they were similar but still the whole mass turned grainy right in front of my eyes. I checked what time it was in Moscow – middle of the night. What would be the chances that Miúda suffers from chronic insomnia and checks her blog at 1:55am? Not very high, I’d say less than 5%. So, I took matters in my own desperate hands, and grabbed my personal life-saving device, the hair-dryer. Warmed up the side of the bowl, continued beating and sweating (from nerves, not the hair-dryer thing), and then, all of a sudden, I had the most beautiful mousseline ever seen in Manhattan, KS. My sense of relief was palpable.

I really loved how all the components worked together in this dessert. The angel food is a kind of a humble cake, with unique smooth texture but not much in the flavor department. The raspberry confit is quite the opposite, it’s all about flavor, hitting you intensely with the tart-sweetness of the fruit. Then it all gets mellowed down by the mousseline cream. The mini-meringues surprised me because at first I thought about skipping them, but they give this dessert an additional crunchy texture that is pure joy. If you make this cake, bake a batch of meringues, you will be glad you did.

Notes to self:
add a little pink food dye to the mousseline…
spread the confit layer a little bit thinner…
pipe meringues with slightly more pointy tops…

Thank you, Miúda, for your patience with my questions and your words of encouragement…  Looking forward to your upcoming baking adventures at verdadedesabor

ONE YEAR AGO: Caramel Chocolate Tartlets

TWO YEARS AGO: Chicken Korma-ish

THREE YEARS AGO: Sunday Gravy with Braciole

FOUR YEARS AGO: In My Kitchen, February 2015

FIVE YEARS AGO: Avocado and Orange Salad with Charred Jalapeno Dressing

SIX YEARS AGO: Green Olive, Walnuts and Pomegranate Salad

SEVEN YEARS AGO: Romanian Flatbreads

EIGHT YEARS AGO: Ziti with Artichokes and Meyer Lemon Sauce

NINE YEARS AGO: Blasted Broccoli, Stove-top version

LEMON ALMOND CAKE WITH CRANBERRY GLAZE

Fifteen years ago, if you arrived in our place anytime during the weekend, chances are the FoodTV would be on. Great selection of wonderful shows, a lot to learn in a very entertaining way. Not the case anymore. Even my favorite show, The Kitchen – which I still watch every Saturday – caters more and more to grocery store shortcuts, in a kind of indirect advertisement that irritates me. I am 99% sure Chef Geoffrey Zakarian does not fall for the stuff promoted in the show. It was not the case in the beginning, but obviously money speaks loud. Why do I still tune in? I like those four people together, they have a nice chemistry going on, and every once in a while I find a gem of a recipe (like Jeff Mauro’s eggplant parmigiana). But coming back to what matters, there is one show on the Food Network I like a lot: Girl Meets Farm, with Molly Yeh, a beautiful, super energetic and fun-loving girl who cooks pretty eclectic food, influenced by her Chinese and Jewish backgrounds.  And, she loves to bake. From scratch. No cake mixes and shortcuts. There you go. This delicious example came straight from one episode I watched last year. You know, back in 2018.

LEMON ALMOND CAKE WITH CRANBERRY GLAZE
(slightly modified from Girl Meets Farm)

for the cake:
1 + 1/2 cups all-purpose flour (180 g)
1/2 cup almond flour (48 g)
1 tablespoon poppy seeds
1 teaspoon baking powder
1/2 teaspoon kosher salt
1/4 teaspoon baking soda
Zest of 1 lemon
3/4 cup whole-milk Greek yogurt (185 g)
1/4 cup fresh lemon juice (from 1 to 2 lemons)
1 + 1/4 cups granulated sugar (250 g)
3/4 cup extra-virgin olive oil (about 160 g)
2 large eggs
1/2 teaspoon almond extract

for the glaze:
1/2 cup (50 grams) fresh or frozen cranberries
1 cup powdered sugar, plus more if necessary
Pinch kosher salt
sprinkles to decorate (optional)

Heat the oven to 350 degrees F. Spray a 9-inch round cake pan with cooking spray and line with parchment paper. I used a Silikomart mold called Water Drop, and 4 small cupcake type molds.

Whisk together the flour, almond flour, poppy seeds, baking powder, salt, baking soda and zest in a medium bowl. Mix the yogurt and lemon juice in a separate small bowl until very smooth. Whisk together the granulated sugar and olive oil in a large bowl until well combined. Add the eggs to the olive oil mixture, one at a time, whisking very well after each, then stir in the almond extract. Add the dry ingredients and yogurt mixture to the olive oil mixture in three alternating additions, whisking after each until just combined. Pour the batter into the prepared pan(s) and bake until a toothpick inserted in the center comes out clean, 35 to 45 minutes. Let cool in the pan for 10 minutes, then turn out onto to a wire rack to cool completely.

For the cranberry glaze: Combine the cranberries with 1 tablespoon water in a small saucepan and heat over low heat until the cranberries start to break down and release their juices, 5 to 10 minutes. Pour the cranberries and their juices into a fine-mesh sieve placed over a bowl. Press the mixture through the sieve with a spatula, making sure to scrape off the bottom of the sieve and adding that to the bowl as well. Add the powdered sugar and salt to the bowl and mix until it comes together into a spreadable glaze.  If the glaze is too thick, add a couple drops of water until it’s thin enough to spread. If it’s too thin, add more powdered sugar. Pour over the cooled cake.

Decorate with sprinkles or slivered almonds, if you like.

ENJOY!

to print the recipe, click here

Comments: This is a recipe for cake-o-phobes, simple, no need to even get your KitchenAid out to play. The cake is moist, satisfying, and don’t even think about omitting the glaze, it is just fantastic. The type of glaze that tempts you to go at it with a small knife when no one is looking and turn any leftover cake into its naked self. No, I did not do it. Just considered it. Very seriously so.

My glaze was a bit thick, so it did not show the ridges on the baking pans too well, but I still like the delicate effect, the suggestion of a pattern underneath. Lemon, almond, cranberries and poppy seeds. Keep this combination in mind, it’s a real winner!

Molds used in this bake: Silikomart Water Drop and Silikomart Parfum. If you have information on programs for recovering silicone mold-addicts, please be so kind and leave me their number in a comment.  Thank you.

ONE YEAR AGO: The Iron (Uptake) Chef Challenge

TWO YEARS AGO: Thank you!

THREE YEARS AGO: Salmon Rillettes, a Classy Appetizer

FOUR YEARS AGO: Linzer Cookies

FIVE YEARS AGO: Baked Ricotta, Take Two

SIX YEARS AGO: Pumpkin Uncanned

SEVEN YEARS AGO: Pork Ragu

EIGHT YEARS AGO: Friendly Kuri Squash

NINE YEARS AGO: Celery and Apple Salad