SOURDOUGH FOCACCIA, WITH A TWIST

(version updated on Dec 28th, to correct a mistake in the recipe)

This past week I got a very special gift: a jar of homemade chili jam, made by my stepson’s girlfriend Carly, a gorgeous actress, who is also smart, witty, and a great cook.  Yeah, some people have it all!   😉 She made the jam by adapting a basic recipe from Nigella Lawson, that you can find here.  It is very flavorful, and looks quite dramatic as you hold the jar against the light revealing red speckles dispersed throughout the jam.  I wanted to make something special with it, and my first “experiment” turned it into topping for a sourdough focaccia.   A successful experiment all the way!

SOURDOUGH FOCACCIA WITH CHILLI JAM
(adapted from Chilli and Chocolate)

for the sourdough sponge:
195 g liquid starter (3/4 cup at about 100% hydration)
125 g warm water (1/2 cup)
25 g olive oil (2 T)
10 g honey (1 + 1/2 tsp)
50 g flour (1/2 cup)

for the final dough:
all the sponge made as described
50 g olive oil (1/4 cup)
200 g all purpose flour (2 cups)
1 tsp sea salt

to bake the focaccia:
4 T olive oil
herbs of your choice, minced
2 T chili jam, preferably homemade
coarse or flake salt

Mix all the ingredients for the sponge in a medium size bowl, cover and let it ferment at room temperature for 1-2 hours, until the surface is covered with small bubbles.

Add the ingredients for the final dough and mix until they form a shaggy mass. Let it rest for 15 minutes, then knead quickly folding the dough on itself 10 times (no need to remove from the bowl). Let the dough rest 15 minutes, and repeat this quick kneading process. Repeat for a total of 4 cycles of kneading, each with 15 minutes rest.  Shape the dough into a smooth ball, place in a lightly oiled bowl, and let it rise until almost doubled (1.5 to 2 hours).

Alternatively, place it in the fridge overnight, transferring to room temperature 2 hours before baking.

Cover a 9 x 13 baking sheet with parchment paper, and add 2 T olive oil to the paper, spreading it well.  Put the dough in the pan and press gently until it covers the whole surface.   If the dough is resisting your attempts to stretch it, wait for 5 minutes until the gluten relaxes, and do it again.  Cover lightly and let it rise for 30 minutes, while you heat the oven to 450F.

Using the tip of your fingers, make indentations all over the dough, spread the remaining 2 T of olive oil all over, sprinkle herbs of your choice on half the focaccia.  If your chili jam is too thick, thin it slightly with a little olive oil, and spread on the other half of the focaccia.   Add salt all over the dough, and bake until golden brown on top, about 25 minutes.   If the jam seems to be burning,
reduce the temperature slightly.

Let it cool over a rack before you slice it in squares, and…

ENJOY!

to print the recipe, click here

Comments:  I’ve blogged before about my favorite  focaccia, very quick to put together. This version,  leavened exclusively with wild yeast, takes longer to prepare, but the flavor is exactly what I was hoping for to go along with the chili jam.   I had a few unexpected commitments during the preparation, so the dough went to the fridge overnight,  no harm done.  The focaccia, even baked in our small electric oven, turned out delicious!    The chili jam (thank you, Carly!) is hot, but not overly so, and the contrast of the slight sourness of the bread with the sweet heat of the jam made this simple focaccia quite addictive.  Make sure to add salt on top right before baking, it will intensify all flavors.

By the way,  chili and chilli are both accepted spellings for the word.   Pick your favorite spelling, but whatever you choose, make this focaccia, it’s a winner!

I am submitting this post to Susan’s  Yeastspotting

ONE YEAR AGO: Merry Christmas!


Add to FacebookAdd to DiggAdd to Del.icio.usAdd to StumbleuponAdd to RedditAdd to BlinklistAdd to TwitterAdd to TechnoratiAdd to Yahoo BuzzAdd to Newsvine

FESTIVUS DINNER ROLLS

A post dedicated to all the Seinfeld fans…  😉

Sometimes in a meal a bread grabs the spotlight.  Think about the glory of a rustic sourdough boule beside a bowl of lentil soup, or a slice of pain Poilane beneath a golden cheesy layer of Croque Monsieur.  But during a Thanksgiving or Christmas dinner feast the breads accept a more humble place.  Small rolls, soft and unpretentious, are the best choice. This recipe was published in Fine Cooking magazine in 2001, with Abigail Johnson Dodge behind it, which means it is flawless. You can make and shape the dough a day beforehand, place it in the fridge, and bake it while entertaining your guests on even a very busy cooking day.

CLASSIC DINNER ROLLS
(Abigail Johnson Dodge, Fine Cooking 2001)

18 oz. (4 cups) all-purpose flour
1 package (2-1/4 tsp.) rapid-rise yeast
1/3 cup sugar
1 tsp. salt
1 cup milk
4 oz. (8 Tbs.) unsalted butter
3 large egg yolks

Place the flour, yeast, sugar and salt in the bowl of your KitchenAid type mixer, mix to combine. Put the bowl in the mixer stand and fit it with the dough hook.

Heat the milk and butter in a small saucepan, stirring gently until the butter melts, and the temperature reaches 115F to 125F. Pour the mixture over the dry ingredients in the bowl, add the egg yolks, and mix with the dough hook in low speed until everything forms a shaggy mass. Increase the speed to medium high and mix/knead for about 8 minutes.

Remove the dough from the bowl, shape it into a ball, grease the bowl lightly with oil, and place the dough back inside, covering with plastic wrap. Let it rise until doubled in size (45 minutes if using rapid-rise yeast, a little longer for other types of yeast).

Lightly grease a 9×13-inch baking dish. Turn the dough onto a clean work surface (no need to flour; the dough is soft but not sticky) and gently press to deflate. Divide the dough into 16 equal pieces, form each into a ball, and place in the pan, with the seam side down.

Cover the pan with plastic and let the dough rise until almost doubled, about 30 min. Meanwhile, heat the oven to 375°F. Remove the plastic and bake the rolls until they’re puffed and browned, about 20 min. Serve warm.

ENJOY!

to print the recipe, click here

Comments: To make  this recipe in advance, cover the rolls with plastic wrap right after shaping and place them in the fridge.  Next day  remove the dish from the fridge, let it sit at room temperature for 2 hours, and then bake the rolls at 375 F.

I brushed the rolls right before baking with an egg wash (1 egg beaten with a couple of teaspoons of water), because I like the shiny look it gives to the bread.  However, you can also bake them without it, as the original recipe suggests.

Warm from the oven, these rolls are perfect to soak up that last bit of gravy on your plate. And they can return the next day sliced in half, for mini-turkey or prime-rib sandwiches, a holiday tradition in many American homes!

If you are hosting a big Christmas or New Year’s Eve dinner, these rolls will be a nice addition to your menu. They are very easy to make – even if you are a rookie bread baker – and absolutely delicious.

I am submitting this post to Yeastspotting.

ONE YEAR AGO: Lebanese Baked Kibbe (one of my favorite recipes ever!)

Add to FacebookAdd to DiggAdd to Del.icio.usAdd to StumbleuponAdd to RedditAdd to BlinklistAdd to TwitterAdd to TechnoratiAdd to Yahoo BuzzAdd to Newsvine

TARTINE BREAD: BASIC COUNTRY LOAF

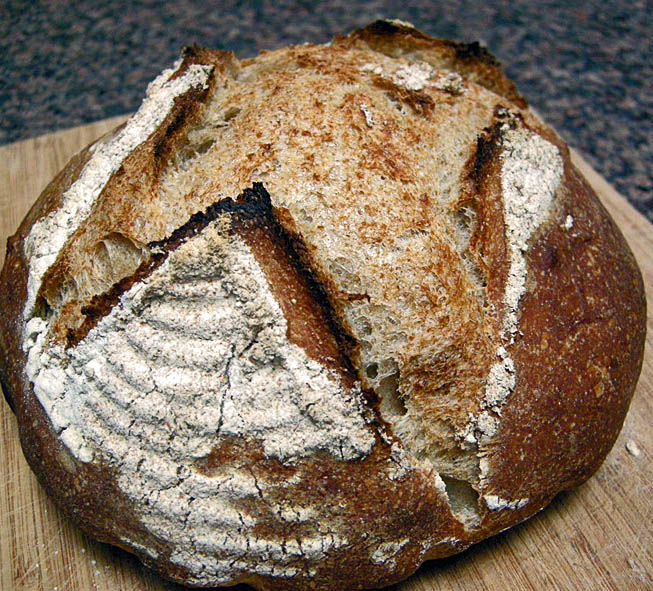
Since Tartine arrived in the mail weeks ago in the nano-house, I’ve counted the days to Thanksgiving week, knowing we would be in Oklahoma for a little while, where Arthur, my youngest sourdough starter, awaited me in the freezer since our last visit.  We arrived from the airport close to midnight, but before I went to bed I woke Arthur up and fed it with warm filtered water, and a nice helping of flour.  Two more days of tender loving care, and he was ready, all bubbly and active…

For the Basic Country Loaf, the starter must be prepared with a 50/50 proportion of white and whole wheat flour.  When we left for Los Angeles, all my flour went into the garage freezer for long term storage, and to my despair, here’s what I found: garbanzo, teff, barley, potato, corn, spelt, and  three kinds of white flour, but no regular whole wheat!  Undeterred, I decided that spelt would be a good substitute.  The bread turned out as one of the best loaves ever baked in the Bewitching Kitchen (those are my husband’s words, not mine…), so trust me: spelt flour rocks.

BASIC COUNTRY LOAF
(adapted from Chad Robertson’s Tartine Bread)

For the starter:
50g  spelt flour
50g white flour
100g/ml water at 78-80F
1 Tbs active sourdough starter

For the dough:
375g/ml water at approximately 80F (divided in 350g + 25g)
100 g starter (you won’t use the full amount made)
450g white flour (good quality all purpose is fine)
50g spelt flour
10g salt

In a large bowl, mix 350g of warm water with the starter (100g of it), and mix to dissolve. Add both types of flour, mix until all flour is mixed with water, without large dry bits present.  Let the dough rest for 25 to 40 minutes.

Add the salt and the rest of the water (25g), and incorporate by pressing the dough with your fingers. Fold the dough a few times, until if forms a homogeneous mass, but don’t try to knead it.  Leave it in the bowl, folding it again a few times – no need to remove it from the bowl – every 30 minutes, for the first two hours (you will be making 4 series of folds during this period).  After the last folding cycle, let the dough rest undisturbed for another full hour, for a total of 3 hours of “bulk fermentation.”

Remove the dough from the bowl and shape it gently as a ball, trying to create some surface tension (for a tutorial, click here).  Let it rest for 20 minutes, then do a final shaping, by folding the dough on itself and rotating it.  If you have a banneton, rub it with rice flour, line it with a soft cloth sprinkled with rice flour, and place the dough inside it with the seam-side up. If you don’t have a banneton, any round container – like a colander – will do. Let it rise for 3 to 4 hours at room temperature.  Twenty minutes before baking time, heat the oven to 450F.

Cut a piece of parchment paper that will completely cover a pie baking dish and place it on top of the banneton containing the bread dough.   Carefully invert the banneton  over the parchment paper, using the pie plate to support the dough.  The cloth will probably be sticking to the dough, so carefully peel it off.  Score the bread, and place the pie pan over baking tiles in the pre-heated oven.

Bake for about 45 minutes, covered during the first 20 minutes, remove the cover for the final 25 minutes.

Let the loaf cool completely on a rack before devouring it, and pay close attention to its music as it cools…  It will sing for you…

ENJOY!

to print the recipe, click here


Comments:   I gave you a very summarized version of the recipe. In the book, the instructions cover 11 pages, and every word is worth reading.   Plus, there are step by step photos that will guide you through the kneading and shaping of the loaf, and an extensive description on how to generate steam in a home oven.  His method of choice is what I’ve been using for months, but thanks to discussions over at The Fresh Loaf Forum, I went down a daring route and tried something a little unusual:   I placed my dough, after the final rise, over a COLD non-stick pie baking pan, lined with parchment paper.   The cold pan made it very easy to score the bread, without worrying about the 450-500F oven environment. Once the dough was scored, I transferred the pan to the oven,  over pre-heated tiles, and immediately covered it with a large roasting pan that had been previously filled with hot water.   I dump the water and invert the roasting pan, still moist, over the pie pan + dough, covering them completely.    Twenty minutes later, I removed the roasting pan, and finished baking the bread uncovered until it turned a deep golden brown.

The main advantage of the pie pan, is that it provides some support for the bread to rise up, and the fact that it works without pre-heating makes life a lot easier.   I have quite a few burn scars on my arms and hands in the quest for the perfect loaf of bread… 😉      The crust developed as nicely as any of my breads baked on a pre-heated pan, and the oven-spring of this “boule” was exceptional, as I barely had to touch it to place it inside the oven. Minimal handling = maximal preservation of gas in the dough = great oven spring.

This is all you will need to use my method for baking the bread (plus a sheet of parchment paper):

Very few things in the kitchen bring me as much happiness as baking a nice loaf of sourdough bread. The Country Loaf from Tartine Bread was my best welcome home ever!  We fly back to LA tomorrow, but I’m already looking forward to my next “homecoming bread.”  The Olive variation, maybe?   Sesame?  Country Rye?   Stay tuned: March is not too far away…  😉

I am thrilled to submit this bread to Susan’s  Yeastspotting.

ONE YEAR AGO: Pugliese Bread

Add to FacebookAdd to DiggAdd to Del.icio.usAdd to StumbleuponAdd to RedditAdd to BlinklistAdd to TwitterAdd to TechnoratiAdd to Yahoo BuzzAdd to Newsvine

CIABATTA, A CLASSIC ITALIAN BREAD

I’ve made it before during the Bread Baker’s Apprentice Challenge, but was not very happy with the way it turned out.   Hard to believe that it took me 17 months to bake another batch, but time tends to fly by me.   November?  Are we in November already?  What happened to 2010, that started just the other day?   😉

Ciabatta, take two: the recipe from  “The Italian Baker” calls for a mixture of flour, water, and yeast made the day before (the “biga“), and used as part of the final dough.  A total fermentation time of 3 hours allowed us to have the bread in time for lunch, as it bakes very quickly, less than 25 minutes.   I am quite pleased with this recipe, I suppose that it would work even better in a real oven, but my Breville rose to the challenge!

CIABATTA
(from The Italian Baker)

for biga:
1/8 tsp active dry yeast
1 cup + 1 Tbs water at room temperature
1 + 1/4 cup all purpose flour (165 g)

Dissolve yeast in water, add the flour and form a sticky dough.  Leave it covered at room temperature for 16 to 24 hours.

for the final dough:
2.5 Tbs milk
1/2 tsp active dry yeast
5.5 ounces water (1/2 cup + 1.5 Tbs)
1/2 T olive oil
1 cup biga (250 g)
250 g all purpose flour
1/2 Tbs salt (7.5 g)

If kneading in a mixer, stir the yeast in the milk  and let it stand for  a  couple of minutes in the bowl.  Add the water, oil, the biga, and mix to incorporate, dissolving the biga in the liquid. Add the flour and salt, and mix at low speed for a couple of minutes.   Change to the dough hook and knead 2 minutes at low speed, and 2 minutes at medium speed.  Finish kneading by hand on a well-floured surface, but adding as little extra flour as possible.

Place the dough in an oiled bowl, cover, and leave at room temperature for 1 hour and 15 minutes.  Divide the dough, which will be very soft and bubbly, in two equal pieces.  Place each half on a well floured piece of parchment paper, and shape each as a cylinder, keeping the seam side down.  Stretch it gently to give the ciabatta overall shape (a rectangle of 10 x 4 inches), and use the tip of your fingers to make deep dimples all over the dough. Cover with a damp towel and let them rise for 1.5 to 2 hours.

Bake in a pre-heated 425 F oven, spraying the bread with water three times in the first 10 minutes.   Total baking time should be 20 to 25 minutes.   Cool the loaves on a rack, and…

ENJOY!

to print the recipe, click here

Comments:  Carol Field advises against kneading this dough by hand, because it is very hard not to add more flour to prevent it from sticking.  However, if you are familiar with the way a high hydration dough behaves,  go ahead and give it a try.  Keep in mind that the less extra flour you add, the better.   She also keeps the seam side up during rising, which forces her to invert the dough on the baking sheet (or stone).  I prefer to shape them seam-side down, then transfer them gently to the oven with the parchment paper still underneath. I think that this method minimizes deflating the dough.

We enjoyed our ciabatta with mozarella and ham for lunch, and at dinner it complemented spaghetti with meatballs that shall be the subject of a post in the very near future (they were AWESOME!)…

I am submitting this post to Susan’s Yeastspotting event…

ONE YEAR AGO: Lamb Stew with Parsnips, Prunes and Chickpeas

Add to FacebookAdd to DiggAdd to Del.icio.usAdd to StumbleuponAdd to RedditAdd to BlinklistAdd to TwitterAdd to TechnoratiAdd to Yahoo BuzzAdd to Newsvine

SOUR CREAM SANDWICH BREAD

A simple but delightful sandwich bread, made with white flour, commercial yeast, and a bit of sour cream to provide a mildly tangy note, and a moist and tender crumb.   If you are baking under challenging conditions (that is, in a small oven), watch out for quite  an impressive oven spring: the bread might touch the heating element on top and… you don’t want that to happen.  Protect it with aluminum foil if needed.     The recipe comes from the one and only Dan Lepard, you can find it here.

SOURCREAM SANDWICH BREAD
(from Dan Lepard, published at The Guardian)

General method:
Sour cream is mixed with water, a little salt and sugar, and yeast.  Bread flour is added to form a sticky dough.

Dan uses minimal kneading, just 10 seconds every 10 minutes over half an hour, then the dough rises for 1 hour.

After shaping as a loaf, place in a pan and allow it to rise for 60 to 90 minutes.  The bread is baked in a 390F oven for about 45 minutes.

(for the detailed recipe, and printable version, click here)

Comments:  This is a great  recipe for those times in which you want a simple loaf for day-to-day sandwiches.  A slice, slightly toasted, with cottage cheese, salt and pepper, is a perfect way to start the day, next to a steaming cup of green tea.  Or, if you prefer to play on my husband’s team, make it a thin spread of blackberry preserves,.  Either way, Dan Lepard came up with yet another winner!

I am submitting this post to Susan’s Yeastspotting

ONE YEAR AGO: Pasta with Zucchini Strands and Shrimp