SOURDOUGH LOAF WITH CRANBERRIES AND WALNUTS

I blogged on a similar sourdough last year, but this is a slightly different version, with a bit of semolina and whole wheat flour. I baked this bread for a very special occasion, the visit of dear friends I had not seen in 15 years!  A cute story behind our friendship needs to be told.  Back in 1995. When I moved from Paris to Norman to join the University of Oklahoma, a colleague from our department insisted I should meet Denise, a Brazilian graduate student from the College of Education.  It so happens that I’m not that wild about this type of arranged meeting.  I don’t know exactly why, maybe I simply prefer to meet people naturally and make connections independently of the place where they were born. And guess what? Denise felt exactly like me about the whole thing. But we both liked that Professor very much, and decided what the heck, let’s just give this a try. To make a long story short, we “clicked” in a way that we could not have anticipated in a million years!  Our friendship continued after she, her husband Hélio and three kids (now three adults) emigrated permanently to England a few years later. Hélio now travels to Texas on a regular basis for work, and that made it easier for them to plan a quick visit to our neck of the woods. Fifteen years!  Hard to believe time passed so quickly… Denise loves cranberries, so this bread was a natural choice to welcome them to our home. She also loves white chocolate, but that story shall be left for another post…

denise-sourdough

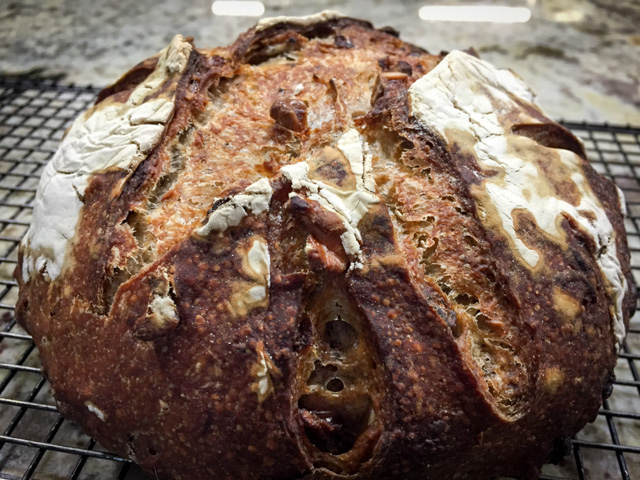
DENISE’S SOURDOUGH WITH CRANBERRIES AND WALNUTS
(from the Bewitching Kitchen)

For the starter (you won’t use everything)
30 g sourdough starter (at 100% hydration)
55 g water
45 g all-purpose flour

For the dough:
65 g starter (about half of starter prepared)
220 g water
160 g semolina flour
120 g bread flour
35 g whole wheat flour
7 g sea salt
80 g dried cranberries
50 g toasted walnut pieces

Make your starter 12 hours before you intend to prepare the dough. Let it ferment at room temperature.

To the appropriate amount of starter (65 g, remember you are not using the full amount made) add the water and mix gently to dissolve it. No need to completely dissolve the starter at this point. Add the flours and mix, allow it to sit with the water for 30 minutes at room temperature.

Sprinkle the salt over the dough, mix it by folding several times, to incorporate the salt. Add the cranberries and the walnuts, mix them gently. Allow the dough to ferment for 5 hours. Fold 5 times at 30 minute intervals. That will take you to 2.5 hours fermentation. Allow the dough to ferment for 2.5 more hours undisturbed.

Shape the dough as a ball, place it in the fridge overnight. Remove it from the fridge one hour before baking, as you heat the oven. Invert the shaped loaf on a baking sheet covered with parchment paper for easy transfer to the oven.

Bake at 450 F with initial steam for 20 minutes, reduce temperature to 425 F and bake for about 25 more minutes. Use your favorite method to generate steam, I like a covered Dutch oven with the lid moist with water before covering the bread. After 30 minutes I open the lid to allow the bread to brown. Cool completely on a rack before slicing.

ENJOY!

to print the recipe, click here

crumbshot222
Comments: I am always a bit anxious when it comes to baking bread for special friends. I want it to be perfect, delicious, awesome, but sourdough is a harsh mistress… You can make one perfect loaf, use the same starter, the same recipe a couple of days later and open the oven to find a bread that turned out more like a flat pancake. Usually still very tasty, but… well, you get my point. I made this bread the day before they arrived, so that if it was not worthy of my friends, I could have time for a plan B: a frantic drive to the grocery store. Imagine that!  But to my relief it all had a happy ending. A beautiful marriage between cranberries and walnuts, nice balance of whole wheat with regular flour so that the bread itself had a nice texture and taste.  Perfect with goat cheese, but even just a little butter will work well.  Honestly, even naked it’s great. The bread. Obviously.

I am submitting this post to Bread Box Round Up,
hosted by Karen, the Bread Baking Goddess.


cranberries-and-walnuts-sourdough-from-bewitching-kitchen

ONE YEAR AGO: Sichuan Pork Stir-Fry in Garlic Sauce

TWO YEARS AGO: Our Green Trip to Colorado

THREE YEARS AGO: Ditalini Pasta Salad

FOUR YEARS AGO: Celebrate Wednesday with a Thai Seafood Curry

FIVE YEARS AGO:  Post-workout Breakfast

SIX YEARS AGO: Semolina Barbecue Buns

SEVEN YEARS AGO: Lavash Crackers


TARTINE BREAD: BASIC COUNTRY LOAF

Since Tartine arrived in the mail weeks ago in the nano-house, I’ve counted the days to Thanksgiving week, knowing we would be in Oklahoma for a little while, where Arthur, my youngest sourdough starter, awaited me in the freezer since our last visit.  We arrived from the airport close to midnight, but before I went to bed I woke Arthur up and fed it with warm filtered water, and a nice helping of flour.  Two more days of tender loving care, and he was ready, all bubbly and active…

For the Basic Country Loaf, the starter must be prepared with a 50/50 proportion of white and whole wheat flour.  When we left for Los Angeles, all my flour went into the garage freezer for long term storage, and to my despair, here’s what I found: garbanzo, teff, barley, potato, corn, spelt, and  three kinds of white flour, but no regular whole wheat!  Undeterred, I decided that spelt would be a good substitute.  The bread turned out as one of the best loaves ever baked in the Bewitching Kitchen (those are my husband’s words, not mine…), so trust me: spelt flour rocks.

BASIC COUNTRY LOAF
(adapted from Chad Robertson’s Tartine Bread)

For the starter:
50g  spelt flour
50g white flour
100g/ml water at 78-80F
1 Tbs active sourdough starter

For the dough:
375g/ml water at approximately 80F (divided in 350g + 25g)
100 g starter (you won’t use the full amount made)
450g white flour (good quality all purpose is fine)
50g spelt flour
10g salt

In a large bowl, mix 350g of warm water with the starter (100g of it), and mix to dissolve. Add both types of flour, mix until all flour is mixed with water, without large dry bits present.  Let the dough rest for 25 to 40 minutes.

Add the salt and the rest of the water (25g), and incorporate by pressing the dough with your fingers. Fold the dough a few times, until if forms a homogeneous mass, but don’t try to knead it.  Leave it in the bowl, folding it again a few times – no need to remove it from the bowl – every 30 minutes, for the first two hours (you will be making 4 series of folds during this period).  After the last folding cycle, let the dough rest undisturbed for another full hour, for a total of 3 hours of “bulk fermentation.”

Remove the dough from the bowl and shape it gently as a ball, trying to create some surface tension (for a tutorial, click here).  Let it rest for 20 minutes, then do a final shaping, by folding the dough on itself and rotating it.  If you have a banneton, rub it with rice flour, line it with a soft cloth sprinkled with rice flour, and place the dough inside it with the seam-side up. If you don’t have a banneton, any round container – like a colander – will do. Let it rise for 3 to 4 hours at room temperature.  Twenty minutes before baking time, heat the oven to 450F.

Cut a piece of parchment paper that will completely cover a pie baking dish and place it on top of the banneton containing the bread dough.   Carefully invert the banneton  over the parchment paper, using the pie plate to support the dough.  The cloth will probably be sticking to the dough, so carefully peel it off.  Score the bread, and place the pie pan over baking tiles in the pre-heated oven.

Bake for about 45 minutes, covered during the first 20 minutes, remove the cover for the final 25 minutes.

Let the loaf cool completely on a rack before devouring it, and pay close attention to its music as it cools…  It will sing for you…

ENJOY!

to print the recipe, click here


Comments:   I gave you a very summarized version of the recipe. In the book, the instructions cover 11 pages, and every word is worth reading.   Plus, there are step by step photos that will guide you through the kneading and shaping of the loaf, and an extensive description on how to generate steam in a home oven.  His method of choice is what I’ve been using for months, but thanks to discussions over at The Fresh Loaf Forum, I went down a daring route and tried something a little unusual:   I placed my dough, after the final rise, over a COLD non-stick pie baking pan, lined with parchment paper.   The cold pan made it very easy to score the bread, without worrying about the 450-500F oven environment. Once the dough was scored, I transferred the pan to the oven,  over pre-heated tiles, and immediately covered it with a large roasting pan that had been previously filled with hot water.   I dump the water and invert the roasting pan, still moist, over the pie pan + dough, covering them completely.    Twenty minutes later, I removed the roasting pan, and finished baking the bread uncovered until it turned a deep golden brown.

The main advantage of the pie pan, is that it provides some support for the bread to rise up, and the fact that it works without pre-heating makes life a lot easier.   I have quite a few burn scars on my arms and hands in the quest for the perfect loaf of bread… 😉      The crust developed as nicely as any of my breads baked on a pre-heated pan, and the oven-spring of this “boule” was exceptional, as I barely had to touch it to place it inside the oven. Minimal handling = maximal preservation of gas in the dough = great oven spring.

This is all you will need to use my method for baking the bread (plus a sheet of parchment paper):

Very few things in the kitchen bring me as much happiness as baking a nice loaf of sourdough bread. The Country Loaf from Tartine Bread was my best welcome home ever!  We fly back to LA tomorrow, but I’m already looking forward to my next “homecoming bread.”  The Olive variation, maybe?   Sesame?  Country Rye?   Stay tuned: March is not too far away…  😉

I am thrilled to submit this bread to Susan’s  Yeastspotting.

ONE YEAR AGO: Pugliese Bread

Add to FacebookAdd to DiggAdd to Del.icio.usAdd to StumbleuponAdd to RedditAdd to BlinklistAdd to TwitterAdd to TechnoratiAdd to Yahoo BuzzAdd to Newsvine

THE BREAD WE LOVE

Two food items that I can’t survive without are bread and cheese.  When I lived in Paris I had a permanent smile on my face because it seemed like every street corner had a fantastic boulangerie, with wonderful fresh bread.  Often, not far away was a strategically placed  fromagerie wafting the intoxicating smells of cheese through the neighborhood, the best possible form of advertisement.
IMG_1633

My favorite bread is a sourdough loaf with delicate flavor, a hardy crust, and a creamy crumb with open, uneven holes. Simple to say, but a little harder to accomplish.   After more than a year of experimenting with different recipes I’m ready to share one of my favorites, not only because it delivers on all these counts, but because it’s excellent when prepared in the evening and baked the next morning.  To me, it’s the perfect way to make bread during the hot Summer months.

The recipe comes from a book that should be part of any bread baker’s library, called quite simply: “BREAD: A baker’s book of techniques and recipes,”  by Jeffrey Hamelman. You can find it here. This post will be my first submission to Yeastspotting.

VERMONT SOURDOUGH WITH WHOLE WHEAT
(adapted from Hamelman’s “Bread”)

Liquid Levain
2.4 oz bread flour
3 oz water
1 oz mature liquid levain (see comments at the end of the post)

Final dough
12 oz bread flour
1.6 oz whole-wheat flour
7.4 oz water
5.4 oz Liquid levain
0.6 oz salt (1/2 T)

Make the liquid starter (levain) 12 to 16 hours before preparing the dough, and let stand uncovered at room temperature. If you don’t have a sourdough starter, follow this link for a great lesson on how to make it.

Add all the ingredients for the dough (except the salt) in the bowl of an electric mixer. Mix on first speed (or by hand) just until they are combined into a shaggy mass. Cover the bowl and let it sit at room temperature for 20 minutes to 1 hour (this is called autolyse). At the end of autolyse, sprinkle salt all over and mix with the dough hook on second speed for 1 to 2 minutes (or knead by hand about 4 minutes).

Let it rise (ferment) at room temperature for 2.5 hours, folding the dough at 50 and 100 minutes (see my photos after the jump).

Shape the dough into a ball ( “boule”; great youtube video for shaping all kinds of bread can be found here), place it with the seam up  in a round container (banettons are your best option) lined with a fine cloth and transfer to the refrigerator for 8 to 12 hours. Remove from the fridge a couple of hours before baking (Hamelman says it is not necessary, that you can bake it straight from the fridge).

If using a clay baker (my favorite way), place the baker in the cold oven and turn it on to 440F. Allow the oven to warm to that temperature for at least 10 minutes. Using mittens, open the lid and quickly transfer the dough to the baker, so that the seam is now down, then slash the surface according to your liking, and close the lid.

Bake covered for 30 minutes, open the lid (don’t forget the mittens), and allow it to bake for at least 15 more minutes. You want a dark crust and internal temperature of at least 200F. Allow it to completely cool on a rack before cutting the bread (2 hours should be enough).

IMG_1627

Continue reading