CELEBRATE WEDNESDAY WITH HOMEMADE CALZONES!

baked111Do you think it would be too hard to enjoy calzones made from scratch right in the middle of the week?  Trust me, it is doable with just a little bit of advance prep.  First, the day before (or early in the morning), make your favorite pizza dough.  Place it in the fridge.  Also the day before, prepare the fillings, and reserve in the fridge, right next to the dough.  When you arrive home from work,  take the dough off the fridge and let it warm a little as you heat the oven.   Roll the dough out, add the filling, close the calzone, and bake!
ingredients

SPICY CHORIZO CALZONES
(from The Bewitching Kitchen)

1 recipe for pizza dough (click here for my favorite)
3 chorizo sausages, casings removed
1 can (14.5 oz) diced fire roasted tomatoes
1/2 Tbs olive oil
1 box (10 oz)  frozen spinach, defrosted, squeezed dry
1 cup ricotta cheese
1 egg
salt and pepper
1 cup mozzarella cheese, grated
egg wash (1 egg beaten with a little water)
homemade tomato sauce to serve alongside (optional)

Prepare the dough the day before or early in the morning.  Place it in the fridge until dinner time.   Make the filling:  heat the olive oil, and add the chorizo sausage, crumbling it into pieces. Saute the sausage until it starts to get browned, drain the diced tomatoes, and add to the sausage.   Reduce the heat, cover the pan and cook for 5 minutes.  Let it cool, and place in the fridge.

Remove the dough from the fridge, cut it in four pieces, and turn the oven at 400 F.  Squeeze as much water as you can from the spinach, add it to ricotta cheese, season with salt and pepper, add the egg and mix.

Roll out each ball of dough to a 7-inch diameter round.  Add a little bit of sausage mixture, the ricotta/spinach, and grated mozzarella.   Fold the dough over,  pinch the edges to seal, brush the surface with egg wash. Cut three slits with a sharp knife, place it in the oven.  Bake for  25 minutes until golden brown.   Serve with tomato sauce and a salad, and you are all set!

ENJOY!

to print the recipe, click here
composite

These will turn any dinner into something special and festive, and they are sooo easy to make!  I used a very spicy chorizo, but the ricotta mellowed it down quite a bit. Sometimes I do not add any egg to the ricotta, but in this version I did, to make sure the filling would have a bit more body. If the filling is too liquid, the bottom of the calzone might get soggy.  Of course, this is a perfect recipe to improvise, coming up with different ingredients: sautéed mushrooms, black olives, a little Gorgonzola cheese, artichoke hearts, anything goes!

doublet111I like my calzones either plain, or with a little bit of tomato sauce, but others are known to go for the kill… 😉

I am submitting this post to Susan’s Yeastspotting

ONE YEAR AGO: Plum-Glazed Duck Breasts

TWO YEARS AGO: Holiday Double-Decker

THREE YEARS AGO: New York Deli Rye

SOURDOUGH MINI-ROLLS

Those who follow my baking adventures know that my favorite type of bread is a sourdough boule, medium to large size.  For some odd reason, when I want to bake small rolls, I always opt for recipes that use  commercial yeast, and result in a softer, more buttery bread.  That is now changed.  I used one of my favorite basic sourdough recipes to bake 6 small rolls, shaped exactly like a large one, and similarly scored.   They turned out so good, I might switch to this type of format for a while. Plus, each roll can be frozen for later, brought to room temperature for a few minutes, then placed in a very low oven (250 F) for 15 minutes or so.  Perfect bread whenever you feel like it!  😉
mini1

SOURDOUGH MINI-ROLLS
(adapted from Hamelman’s Bread)

for starter mixture (make 12 hours in advance)
100 g bread flour
80 g rye flour
110 g water
40 g active sourdough starter (at 100% hydration)

for the bread:
all sourdough made as above
700 g bread flour
20 g rye flour
470 g water
15 g salt

Prepare your sourdough mixture about 12 hours before making the dough.  Heat the water slightly in a microwave until it is lukewarm, and place it in the bowl of a KitchenAid type mixer.  Add the sourdough into the water and mix with your hands to dissolve it. Add both flours, and mix at low-speed until the ingredients form a shaggy mass.

Cover the bowl and let the dough rest for 20 minutes.   Sprinkle the salt over, turn the mixer back on low-speed and knead for about 4 minutes.  Transfer the dough to an oiled bowl and let it rise for about 2 and a half hours, folding the dough every 50 minutes. For a more detailed explanation on folding, click here. You will do a first folding cycle at 50 minutes, another one at 1 hour and 40 minutes, then leave it undisturbed for additional 50 minutes, for a total of 2 and a half hours fermentation.

Heat your oven to 450 F. Divide the dough in 6 equal pieces.   Shape each one as a small boule.  Place over floured parchment paper on a baking sheet, flour the surface lightly and cover.  Allow the rolls to proof for 45 minutes.  Score the surface,  and bake for 25 minutes (with initial steam) or until golden brown and the internal temperature over 205 F.   Cool completely on a rack.

ENJOY!

to print the recipe, click here

risingComments:  Depending on the method of steam you use for your oven, these rolls can be a breeze to bake.  I decided to use my usual method of inverting a damp roasting pan over the rolls, and to do that I needed to bake three rolls at a time.  Let’s say it was a bit too convoluted and the second batch was slightly over-proofed.  Next time I might just go for a less complicated method, and use a baking pan with hot water at the bottom of the oven.  Whatever method you choose, the steam provides a nicer crust.

The crumb was moist and creamy, the way we like it, and the crust reminded us of the fantastic baguettes we used to enjoy while living in Paris…  What’s not to like?   😉
crumb

I am submitting this post to Susan’s Yeastspotting

ONE YEAR AGO: Do you eat your books?

TWO YEARS AGO: Mediterranean Skewers

THREE YEARS AGO Fettuccine with Shrimp, Swiss Chard, and Tomatoes

BEETROOT SOURDOUGH FOR THE HOLIDAYS

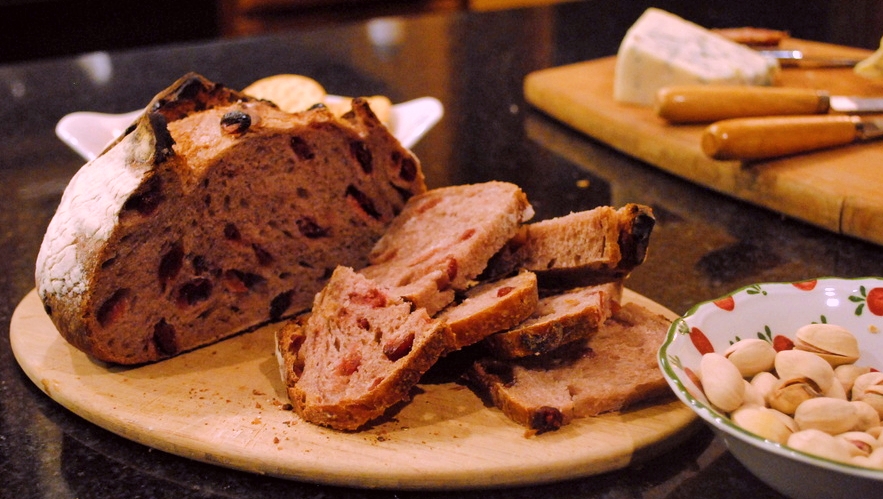
This gem of a recipe comes from one of my favorite bread books, which I reviewed in a not too distant past: How to Make Bread. Such a simple and straightforward title, but it says all that matters.  You will learn how to make great bread following the careful instructions of Emmanuel Hadjiandreou.    This bread is perfect for the holiday season, its crumb decorated with intensely red dots of beets, that are coarsely grated and incorporated raw in the dough.

You may wonder if the bread turns out too sweet or with a strong flavor of beets?  Not really. It is a sourdough still, but with a background of sweetness that is just enough to surprise your palate and act as the perfect supporting actor for a slice of Roquefort cheese.  Sharp cheeses,  eggplant relishes, anything with a nice bite and some saltiness will go extremely well with this bread.  I happen to like it all by itself, slightly toasted.

For this large boule I used two beets, one medium, one small.  One of the things I loved about this dough was the change in color as the dough proofed, starting with a gorgeous, intense purple, and getting more and more subtle as the fermentation went on.

The recipe for beetroot sourdough is very similar to the one I published with Emmanuel’s permission last May, except for the inclusion of grated, raw beets in the dough.  But a more detailed step by step photos of the full process of making this bread can be found with a quick jump to Garlic Buddha blog, a nice virtual spot!

I like a plain and simple sourdough, but every once in a while it is nice to explore different flavors and stretch the horizons a little.  Beets… who would imagine? 😉

I am submitting this post to Susan’s Yeastspotting

ONE YEAR AGO: Cod Filet with Mustard Tarragon Crust

TWO YEARS AGO: Soba Noodles: Light and Healthy

THREE YEARS AGO: Potato-Rosemary Bread

CINNAMON WREATH

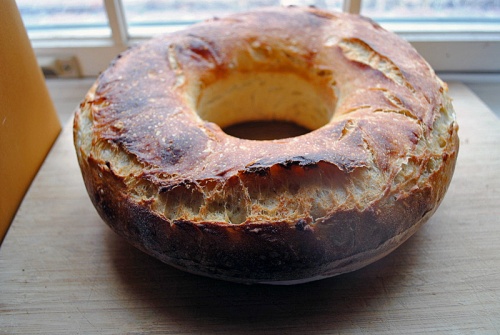
What if I told you that this bread is one of the easiest breads I’ve ever made, and that it is ready in less than 2 hours from the time you grab your bag of flour?  Hard to believe, but true.   I first marveled at the recipe over at Baker Street, a blog I got to know earlier this year and now follow very closely, since it’s full of tempting recipes…

CINNAMON WREATH
(from Baker Street)

for the dough:
2 cups flour
½ tsp salt
½ cup lukewarm milk
1 envelope active dry yeast (2 + 1/4 tsp)
⅛ cup melted butter
1 egg yolk
1 tbsp sugar
for the filing:
¼ cup melted butter
4-5 tbsp sugar
3 tsp cinnamon
Mix the yeast and sugar with the lukewarm milk and let it sit a few minutes while the yeast bubbles and foams up.
.
Add the egg yolk, the melted butter, the flour and the salt, then knead the dough and shape into a ball. Place the dough in a large, greased bowl, then cover and place in a warm space and let rise until doubled in size (about 1 hour).
.
Heat the oven to about 400 degrees Fahrenheit. Roll the dough out to a thickness of 1cm (1/4 inch).  Spread the melted butter across all of the dough, then sprinkle the cinnamon and sugar mixture.  Reserve a small amount of melted butter for the top of the bread.
.
Roll up the dough, and using a knife, cut the log in half length-wise. Twist the two halves together, keeping the open layers exposed (see photos on Baker Street site). Give a round shape, then transfer to a lightly buttered baking tray.
.
Brush a little butter on top and sprinkle some sugar and cinnamon mixture. Bake for 30 to 35 minutes, until the bread is golden brown. Reduce the oven temperature to 350 degrees Fahrenheit after 5-10 minutes to stop it burning.
.
ENJOY!
.
to print the recipe, click here
.
Comments: This bread would be outstanding for a brunch. It’s almost like a cinnamon roll, but with a different texture.  Your whole house will smell like cinnamon while it bakes and later sits on the counter, cooling.   I don’t have photos of the bread after slicing, because I made it for a departmental potluck and in this type of event it’s better not to turn into a typical food blogger: the person who would snatch a slice of bread from the lips of a guest just because it shows the perfect crumb structure, and run away with it, camera in hand.  😉
.
Phil loved this bread, and already requested that I make it again on a Sunday morning, as it will be even better still warm from the oven.  I had to bake it in the evening and we only tried the bread at lunchtime next day.   Not the ideal situation, but when you must be  in the lab by 8am, some accommodations are in order.
.
Next time I will make sure to roll out the dough a bit thinner, and form the cylinder a little tighter, to have more layers.  I confess that I forgot the final step of adding butter, sugar and cinnamon on top.  In other words: I must make it again to perfect it!
.
Please stop by Baker Street to see her masterpiece, as well as a tutorial on rolling and slicing the dough.  By the way, this bread is also known as Estonian Kringel.  Whatever its name, it is worth having it in your bread repertoire.
.
I am submitting this post to Susan’s Yeastspotting.
.
ONE YEAR AGO:  Yeastspotting 11.11.11
.
TWO YEARS AGO: Oven-baked Risotto
.

OCTOBER 16: WORLD BREAD DAY!

Six years ago, Zorra started an event called “World Bread Day“. Bakers from all over the world would bake a loaf of bread and blog about it.  This year I am thrilled to participate and chose my favorite type of bread to join the party.  The recipe comes from a very nice book, Artisan Baking, written by Maggie Glezer.  A country French-style loaf called Essential’s Columbia.   The formula comes from George DePasquale, from Seattle’s Essential Baking Company.

The perfect Sunday starts with a batch of sourdough starter all puffed up from getting fed 12 hours earlier.  Before I even have my morning capuccino, the kitchen still dark, I look at my ingredients waiting, and get all excited anticipating the thrill of getting a nice loaf of bread from our oven.   It does help a lot to weigh it all the night before, all you have to do is heat the water in the microwave for 30 seconds or so,  and you are ready to go…

In Glezer’s book, this bread is listed as “advanced”, but it’s actually quite simple to prepare.  It calls for all purpose flour, bread flour, whole wheat, and a little rye.  Also in the formula a small amount of toasted wheat germ, and barley malt syrup.   It uses a very firm starter, probably the firmest I’ve ever seen in a recipe, it is actually more like a dough that ferments for 12 hours and then is incorporated in the mixture of flours, salt, and water.    A very slow and long fermentation, with the help of my bread proofing box.  Amazing how the two banettons fit just right inside!

After shaping, the oblong loaf proofed for 3 hours, and the round one for almost 4 hours, as I could not bake them at the same time.  Not much difference in the crumb, which was a bit surprising to me. I expected the round loaf to have a slightly more airy inner structure.  But bread is bread,  its temperamental nature one of the things I love the most about it.

I could not find a way to contact Maggie Glezer to get her official ok to publish the full recipe, but it is available online in a couple of blogs, so you can find it.  But the book is a must-have for anyone with a passion for wild yeast, so consider providing that little boost on the economy.

My batard shaping was a little better than usual, but still needs improvement… gotta keep going at it!

The perfect Sunday ends with a couple of loaves resting on the counter….

and the perfect Monday starts with a small gift to the Department!   😉

I am submitting this post to Susan’s Yeastspotting…    and I invite you to visit the roudup of breads at Zorra’s site!

ONE YEAR AGO: The US Listeria Outbreak 2011

TWO YEARS AGO: 36 Hour Sourdough Baguettes

THREE YEARS AGO: October 16 is World Bread Day