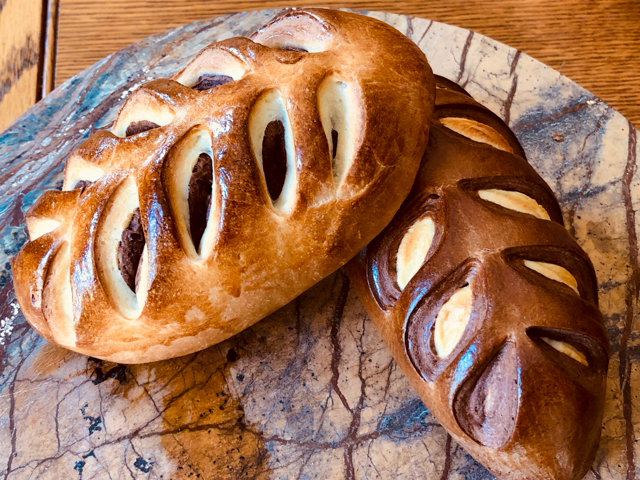
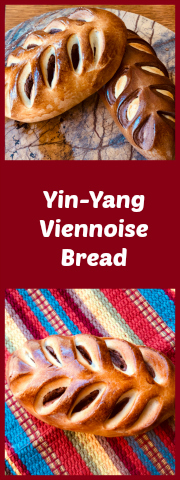
YIN & YANG VIENNOISE BREAD

Staying safe in Corona virus time: read the guest blog post by Phillip Klebba here. 

During difficult times we often see the best coming out of people. Acts of kindness, generosity, and love try to counteract the fear and uncertainties that surround us. This bread, with its dual nature of darkness and lightness brings this image to my mind. I enjoyed the process of making it, and hope you consider baking a batch in your kitchen, trying to focus on all the positive things we do have.


YIN & YANG VIENNOISE BREAD
(slightly modified from Bake-Street)

300 g bread flour
200 g all purpose flour
3 g osmo-tolerant yeast (or regular instant dry)
255 g milk
40 g egg (whisk one egg and weigh the amount needed)
50 g granulated sugar
75 g butter, at room temperature
10 g salt
20 g cocoa powder + 15 g brown sugar
1 egg, beaten + pinch of salt

Add the flours, yeast, egg, salt, and 3/4 of the milk to a KitchenAid type bowl.  Using the dough hook, mix until the ingredients are incorporated, then decide if you need to add the rest of the milk. Once the milk is added, with the machine still running, add the sugar in two additions. Knead for about 4 minutes at low-speed, then add the butter, one tablespoon or so at a time.  Wait until each  piece disappears into the dough before adding more butter. Knead until you get good gluten development, probably 4 to 5 minutes longer. The dough should stretch smoothly without tearing.

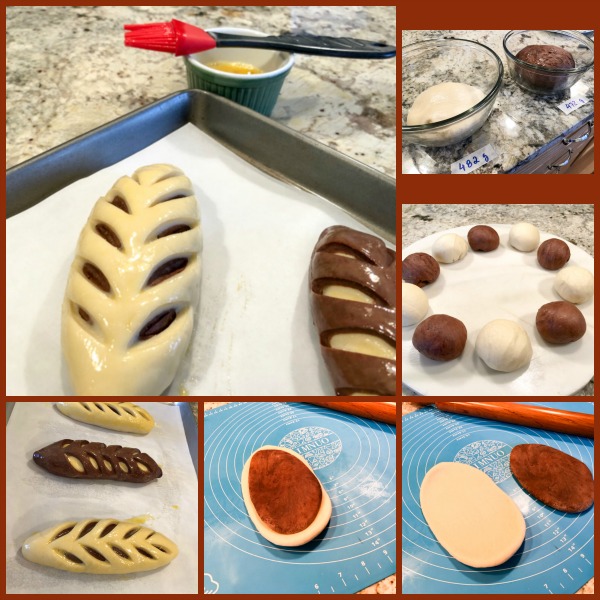
Divide the dough in two portions, one weighing 40 g less than the other. To the smaller batch, add the cocoa powder and brown sugar and knead by hand or in the machine until the cocoa is fully distributed. It will take a little time and effort. Place both balls of dough in separate oiled bowls, and allow them to proof at room temperature for 2 and a half hours.

Divide each dough in five portions, each between 90 and 95g. Form each as a little ball and let rest for 10 minutes. Roll each as a long oblong shape about 4mm thick. Place different colors of dough on top and bottom, form as little loaves, seam at the bottom.  Use a very sharp blade to make slashes on the surface, being very determinate. Any hesitation and the cut won’t be sharp enough. You need to see the different color of dough showing underneath. Place the shaped and cut loaves over parchment paper and let them proof at room temperature for 1 hour and 15 minutes.

Heat the oven to 400F.  Paint each loaf with an egg wash, and bake for about 16 minutes. Cool completely on a rack before slicing.

ENJOY!

to print the recipe, click here

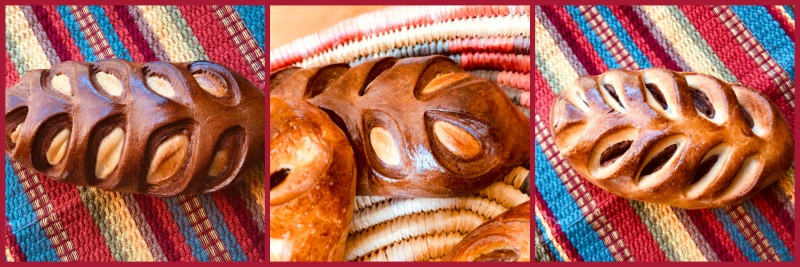
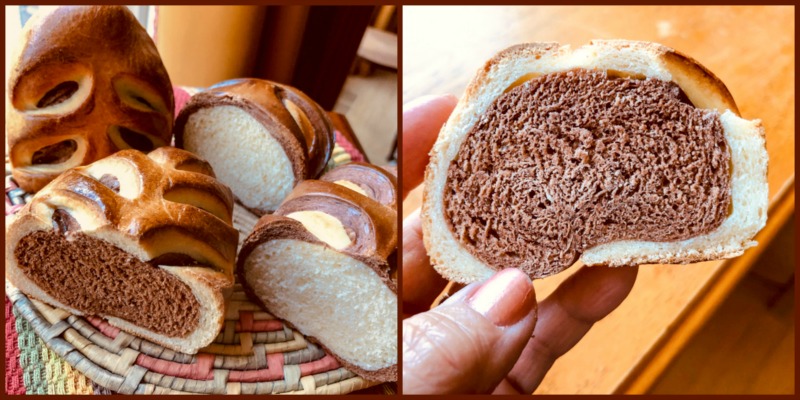
Comments: The most interesting aspect of this bread is how the cocoa powder affects texture and resulting oven spring. The white dough is very smooth, stretches easily, and wraps around the dark dough like a soft blanket. The cocoa-containing dough resists rolling a lot more and has a dry feel to it. When it is inside, it will have less oven spring, so the outer dough is not going to open as dramatically as when the dough placement is reversed. As far as taste goes, it will depend on your goal for the bread. If you will enjoy it plain or with a little butter, the light dough inside is the way to go. But if you toast it and enjoy it with jam (orange jam would be awesome according to Eva from Bake-Street), the cocoa kind will be hard to beat.


Yin and Yang. Focus on the positive. We know how to deal with this pandemic. Imagine what it was like on the times of the Black Death, when not only people were dying left and right, but nobody knew why. Nobody knew what to do. Focus on the positive. Do everything you can to maintain social distance and to keep your personal environment clean.

The bread is soft, the cocoa crust slightly harder than the lighter version, but not much. These little loaves would be perfect for a brunch on a Sunday morning, or with a nice cup of tea as the sun sets. Focus on the positive, we will beat this.

I am very fond of Eva’s blog Bake-Street, having made quite a few of her recipe over the past few years, they are very detailed and always work as expected. Make sure to stop by and subscribe, you will be glad you did!

ONE YEAR AGO: Extreme Chocolate Cupcakes

TWO YEARS AGO: Sunflower Seed Kamut Sourdough

THREE YEARS AGO: The Joys of Grating Squash

FOUR YEARS AGO: Auberge Pecan-Walnut Bread

TWELVE YEARS OF SOURDOUGH BAKING

March 11th, 2020
Twelve years of sourdough and 60 years alive and kicking!

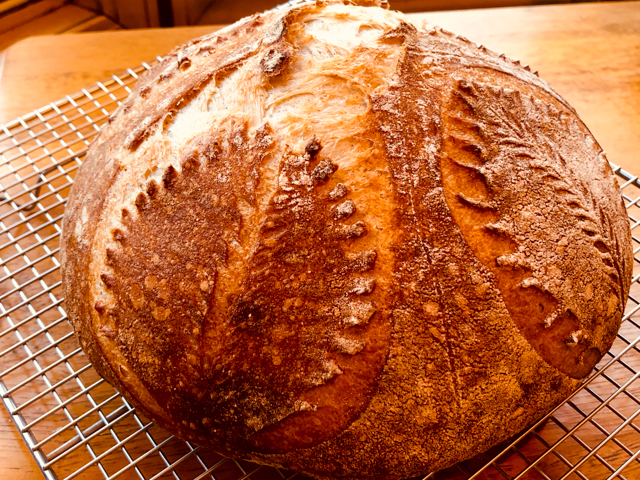
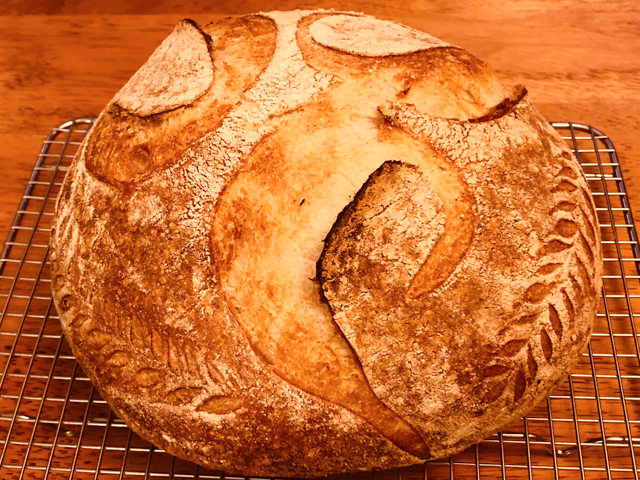
The other day I found a little notebook with handwritten notes about the very beginning of my sourdough days, when I did not have a blog yet. No photos, just remarks about what to avoid, what to improve, the favorite recipes. The notebook is 12 years old, the age of my oldest starter, Dan. I wish I knew how many loaves I’ve baked over these years. What I realize is that I streamlined the process quite a bit, and now settled on a timeframe that works perfectly for me. Mix the dough around 4pm, shape and refrigerate around 9pm and bake next morning, straight from the fridge, into a cold Dutch oven type container, sitting on parchment paper. No more arm burns trying to deal with a screaming hot pan. Sometimes I throw a bit of water or an ice cube inside the pan, sometimes I forget and the fact that the pan is covered tightly with a lid seems to generate enough moisture for a nice crust. In this post, I share two loaves in which I played with color, razors and scissors. I also modified slightly how I mix the dough, and must say that I love the effect it has on the overall “strength” of the crumb. Purists, prepare to be disappointed.


SALLY’S SCISSORHANDS SOURDOUGH
(from the Bewitching Kitchen)

110g sourdough starter at 100% hydration
380g water
50g whole-wheat flour
450g bread flour
10g salt

Make the levain mixture about 6 hours before you plan to mix the dough. It should be very bubbly and active.

When you are ready to make the final dough, place the water in the bowl of a KitchenAid type mixer and dissolve the sourdough in it, mixing with a spatula briefly, then add all flours and salt.  Turn the mixer on with the hook attachment and knead the dough for 4 minutes at low-speed all the time. You will notice the dough will gain quite a bit of structure even with just 4 minutes in the mixer. Remove from the machine, and transfer to a container lightly coated with oil, cover lightly with plastic wrap and allow it to ferment for 4 hours, folding every 45 minutes or so. Because the dough is already a bit developed from the initial time in the mixer, you should get very good structure after 3 and a half hours, or even sooner than that.

After four hours bulk fermentation, shape the dough as a ball, and place, seam side up, in a lightly floured banetton. Place in the fridge overnight, from 8 to 12 hours.

Next morning, heat the oven to 450F.

Invert the dough on a piece of parchment paper and lightly, very lightly coat it with flour, then rub all over the surface with the palm of your hand. Use a string to make four lines to mark regions of the bread to facilitate drawing the patters. Use a new razor blade to slash the dough in a leaf pattern, one leaf per quadrant. Then, with very small scissors, clip the outside lines of the leaves. Decorate the inside region with more razor blade slashes.

Bake at 450F for 45 minutes, preferably covered for the first 30 minutes to retain steam. You can generate additional steam by spraying the inside of the lid with water before closing the pan.  Cool completely over a rack before slicing.

ENJOY!

to print the recipe, click here

Loved scoring the bread with scissors! I cannot take credit for it, just noticed a few breads like that in instagram feeds and pinterest, and decided to give the technique a try. I think I could have been a bit more assertive, but to tell you the truth, after I butchered Paul Hollywood’s Cob Loaf in front of the cameras because of excessive enthusiasm, I became slashing-shy. I need some more time to recover and find my mojo.

Moving on…  A similar sourdough loaf with two additions: peanut butter and butterfly pea flower powder. I was so thrilled by the taste and looks of this bread, I cannot wait to bake another loaf.

NUTTY BUTTERFLY PEA FLOWER SOURDOUGH 
(from the Bewitching Kitchen)

110g sourdough starter at 100% hydration
380g water
50g whole-wheat flour
450g bread flour
1 Tablespoon butterfly pea flower powder
1/8 cup peanut butter (crunchy or smooth)
10g salt

Make the levain mixture about 6 hours before you plan to mix the dough. It should be very bubbly and active.

When you are ready to make the final dough, place the water in the bowl of a KitchenAid type mixer and dissolve the starter and the peanut butter in it, mixing with a spatula briefly, then add the flours, and salt. Turn the mixer on with the hook attachment and knead the dough for 4 minutes at low-speed all the time. You will notice the dough will gain quite a bit of structure even with just 4 minutes in the mixer. Remove from the machine, and transfer to a container lightly coated with oil, cover lightly with plastic wrap and allow it to ferment for 4 hours, folding every 45 minutes or so. Because the dough is already a bit developed from the initial time in the mixer, you should get very good structure after 3 and a half hours.

After four hours bulk fermentation, shape the dough as a ball, and place, seam side up, in a lightly floured banetton. Place in the fridge overnight, from 8 to 12 hours.

Next morning, heat the oven to 450F.

Invert the dough on a piece of parchment paper and lightly, very lightly coat it with flour, then rub all over the surface with the palm of your hand. Use a new razor blade to slash the dough in a decorative pattern.

Bake at 450F for 45 minutes, preferably covered for the first 30 minutes to retain steam. You can generate additional steam by spraying the inside of the lid with water before closing the pan.  Cool completely over a rack before slicing.

ENJOY!

to print the recipe, click here

Comments: I was a bit worried when the dough showed such intense blue color, but it gets quite a bit mellowed down during baking. The other thing that amazed me about the bread was the peanut smell during baking, very noticeable and pleasant. The idea of using a nut butter came from my friend, Bread Baker Queen, Elaine. She’s been doing it quite often with great results (check her post here) and I finally had a chance to do it myself. The additional fat in the peanut butter changes the texture of the crumb quite a bit. Try it, you might fall in love with it too.

Someone was very intrigued by the color of the loaf. Keep in mind that the blue color is lost on the crust as it gets dark in the oven, so don’t panic thinking that the blue was somehow ruined. Once you slice it, you’ll have a big smile in your face.

Did I say I was going to share two breads today? Well, here’s one more, same recipe as the first, but no scissors. Just some swirls.


I find  sourdough baking one of the most flexible and forgiving methods to make bread. When you use commercial yeast, things happen so fast, you need to be around and on top of it from beginning to end. Once you get a system in place for the slow approach of wild yeast, you will never look back.

As this post is published, we will be in Oahu, enjoying a double celebration trip, 20 years of our wedding anniversary and my Birthday. I feel lucky and grateful for so much. Having the blog to share recipes and thoughts, and friends that make it so special, is the icing on my Birthday cake. THANK YOU!

ONE YEAR AGO: Rainbow Carrots with Rose Harissa

TWO YEARS AGO: Deviled Eggs go Green

THREE YEARS AGO: Tiramisu

FOUR YEARS AGO: Pulled Pork, Slow-Cooker version

FIVE YEARS AGO: The Pie of the Century

SIX YEARS AGO: Bon Bon Chicken

SEVEN YEARS AGO: Leaving on a Jet Plane

EIGHT YEARS AGO: A Pearfect Drink

NINE YEARS AGO: Ming Tsai Under Pressure

TEN YEARS AGO: Paris, je t’aime!

BICOLOR CROISSANT AND PAIN AU CHOCOLAT


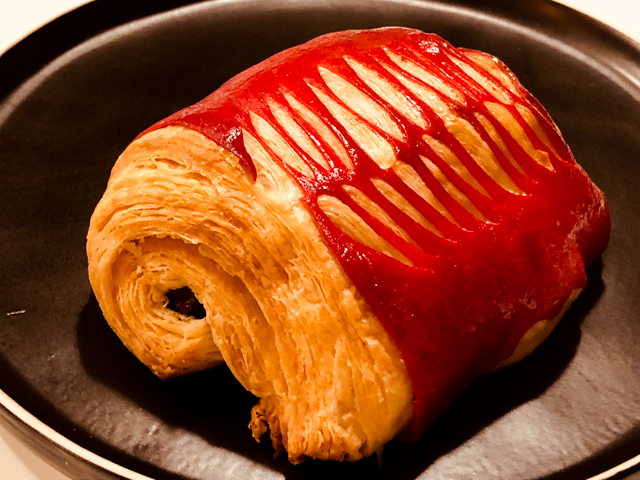
For the past few months, I could not get bicolor croissants and their close cousins – pain au chocolat – out of my mind. As you may already know, I tend to get obsessed about things. That means that two bad batches in a row did not prevent me from trying again. They were heavy and doughy, with almost no lamination.  You probably won’t find a detailed recipe in cookbooks, but youtube videos (some not in English) promise to show you how to succeed in a home setting. Keep in mind that for the most part, these are made in patisseries by bakers who have those incredibly efficient rolling machines (sheeters) at their disposal.  Fear not, I am ready to share a recipe and a method that worked well for me. My main advice: do not rush it. This is not the type of recipe to try and adapt for a tent-baking situation. Take your time. Keep the dough and yourself cool at all times.

BICOLOR CROISSANTS & PAIN AU CHOCOLAT
(adapted from many sources)

for main dough:
490g all-purpose flour
36g sugar
10g osmo-tolerant yeast (or regular instant  yeast, same amount)
16g salt
300g full-fat milk
70g butter, melted and cooled
for butter block:
340g butter cut in pieces, cold
(unsalted Land O’Lakes *see comments)
35g flour

Batons of chocolate
1 egg for egg wash
simple syrup (water and sugar, equal amounts by weight, dissolved by boiling and cooled)

Make the dough the day before.  Add all ingredients except butter to the bowl of a KitchenAid type mixer with a dough hook. Process for about 3 minutes, then add the butter, and mix for about 4 minutes longer, at low-speed. The dough should feel smooth and elastic.

Remove from the machine, knead by hand a few times, place in a bowl coated with a little butter, cover and leave at room temperature for 1 hour. Remove 110g of dough and add a few drops of red gel dye. Wearing gloves, knead the color into the dough, adding more if necessary. It will take a little while, the color will resist mixing at first. Make sure it is totally incorporated throughout the little ball of dough.  Reserve both doughs in separate bowls, covered, and place in the fridge overnight.

Make the butter block. Add cold butter and flour to the bowl of a KitchenAid type mixer fitted with the mixing blade. Process for about 2 minutes. Make an envelope for the butter using parchment paper. Fold 24-inch length of parchment in half to create a 12-inch rectangle. Fold over 3 open sides of rectangle to form 8-inch square, creasing the folds very firmly.  Unfold parchment envelope, add the butter/flour and refold the envelope. Roll gently until the butter is uniform in thickness and forms a perfect 8-inch square.  Refrigerate 30 minutes.

Roll the main dough (with no color) over a lightly floured surface to a rectangle about 9 x 16 inches, so that you can set the butter square in the center and fold the top and bottom parts over it, with a seam in the exact middle of the butter square. Gently glue the open sides of the dough so that the butter is all cozy inside. Turn the dough so that the seam is vertical now, perpendicular to you.  Roll again to the same general dimension (9 x 16 inches).  Make the first fold: divide the dough in three pieces (eye-balling is fine). Bring the top third down, and the bottom third up, in what is known as the envelope fold. Place the folded dough in the fridge covered with plastic for 45 minutes, transfer to the freezer for 20 minutes.

Roll the dough again to the same dimension (9 x 16 inches). Make the second fold, exactly like you did the first. Place the folded dough in the fridge, covered with plastic for 45 minutes, transfer to the freezer for 20 minutes.

Roll the dough again to the same dimension (9 x 16 inches). Make the third and final fold. Bring the top part down and the bottom part up to almost meet at the center, leaving a small space between the edges, so that you can fold the dough right there in the center.  That is known as the “book-fold.”  Refrigerate for 1 hour and freeze for 20 minutes.

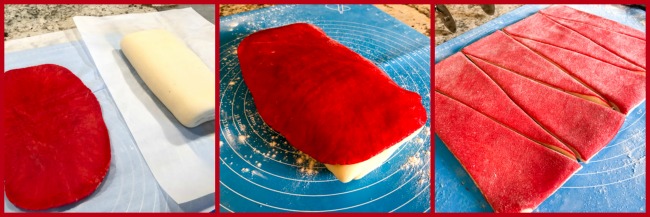
While the dough cools, it’s time to roll out the red dough. You need to make it thin and a little bigger than the dimension of the folded white dough, so that it sits on top of it. When the dough is out of the freezer, moisten it very lightly with water, place the rolled out red dough on top, and gently roll them both together (you can flip the dough to place the red one at the bottom after rolling a few times).

Roll both doughs together to a final dimension of 9 by 20 inches. Ideally, roll slightly bigger than that, then cut neatly to that final dimension. If for some reason some parts near the edges do not have the red dough on it, do not worry. Just proceed with cutting the pieces, it will not hurt the final look.

I used half the dough to make croissants and half to make pain au chocolat.  To make the croissants, I cut a 9-inch square from the dough and eye-balled triangles from it. With the rest of the dough I cut rectangles that were about 3 1/2 by 4 1/2 inches.  Shape croissants and enclose two chocolate batons per pain au chocolat, placing the red dough at the bottom in both cases.

Right after shaping the pain au chocolat, make parallel cuts with a razor blade on the red dough to expose the plain dough underneath. Some scraps from the dough I used to shape as a little flower. Allow the shaped pastries to proof for 2 and a half to 3 hours.

Heat the oven to 350F (higher temperatures will affect the red color).  Brush the pastries very lightly with egg wash, and place them in the freezer for 15 minutes to allow the butter to solidify a bit. Bake for 30 to 35 minutes. Cool on a rack. If desired, brush the surface with a simple syrup while they are still hot for a little shine.

ENJOY!

to print the recipe, click here

Comments: I used all-purpose flour and American butter, not the fancy 82% or higher fat butter than many recipes recommend. American butter has slightly more water, it resists better the rolling and pounding without incorporating into the dough, and it laminates well too. Particularly with the two-color dough, I felt it gave a lighter and better laminated final product. European butter made the croissants doughy and a lot of butter leaked during baking. It is possible that I need to improve my technique before using a higher fat butter with the two-color dough. If it works well for you, go for it. Freezing the dough before baking is a nice additional step that I learned in Artful Baker and decided to incorporate in the recipe. 

In theory, there are two ways to incorporate the red dough on the plain one. You can do what I did, or you can roll both doughs to the final dimension (9 by 20 inches) and place the red on top at that time. I tried both ways, and prefer the method I shared here. It is quite tricky to roll the red dough by itself as a large sheet and it is not as efficiently “glued” to the main dough since you simply place it on top and proceed to cutting the pieces. I should also mention that Philip, Baker Extraordinaire, makes a colored dough that does not contain yeast and it works very well. Check his method here. I am going to try that next time.

On shaping. As you roll the croissants or the little pain au chocolat, it is important to make it tight, by stretching a bit, generating tension as you roll. I was a bit worried about the layer of red dough and got too gentle with the shaping, so the pain au chocolat was not as tight as it should have been. Most were already unrolling during proofing. So that is definitely a detail to keep in mind.

Overall I am pretty happy with these babies. My previous attempts were  heavy and dense, with no open structure at all inside.  These had a nice crumbly crust, good butter flavor (even using American butter), and felt pretty light when handled. All I need to do next is optimize the shaping. And perhaps explore a different color scheme… Orange? Black?

ONE YEAR AGO: Lemon-Blueberry Entremet Cake

TWO YEARS AGO: Walk Strong3: A review of Jessica Smith’s latest workout program

THREE YEARS AGO: Pork Medallions with Black Berry Compote

FOUR YEARS AGO: Indian-Spiced Chicken with Chickpeas and Spinach

FIVE YEARS AGO: Curry Cardamon Cookies

SIX YEARS AGO: In My Kitchen, March 2014

SEVEN YEARS AGO: Boeuf Bourguignon for a Snowy Evening

EIGHT YEARS AGO: Chickpea Salad

NINE YEARS AGO: Soft Spot for Chevre

TEN YEARS AGO: Roasted Onion and Asiago Cheese Miche

UTTAPAM, WHITE LENTIL AND RICE FLATBREAD


I am back with another recipe using ivory lentils (in case you’ve missed the first one, click here). I had never heard of uttapam, but learned about it in the website of the very company I got the lentils from. They are described as flatbreads, but I suppose little pancakes (or fritters) could work equally well if not better. After all, it is more a batter than a dough, that is poured instead of rolled, and cooked over a griddle, not an oven. In my mind, that gravitates to pancake territory. But flatbread, pancake, fritters… it’s irrelevant. They are delicious. Dangerously so, I should add.

UTTAPAM
(slightly modified from Woodland Foods)

(makes 8 little pancakes)

1 cup Basmati rice
1/2 cup Ivory lentils
3/4 teaspoon sea salt
1 teaspoon sugar
1/2 teaspoon baking soda
1 cup peas (fresh or frozen)
1 Jalapeno pepper, minced
1/2 cup fresh cilantro, chopped
vegetable oil (I used grape seed)

Thoroughly rinse rice and lentils separately. Place each in large bowl of fresh water and soak for 2 hours.

Drain rice and lentils, and place in blender. Add salt, sugar and baking soda and grind mixture into paste. Add about 1/2 cup water, and continue blending to create thick batter. Transfer mixture to bowl, and set aside to ferment at room temperature for at least 4 to 12 hours.

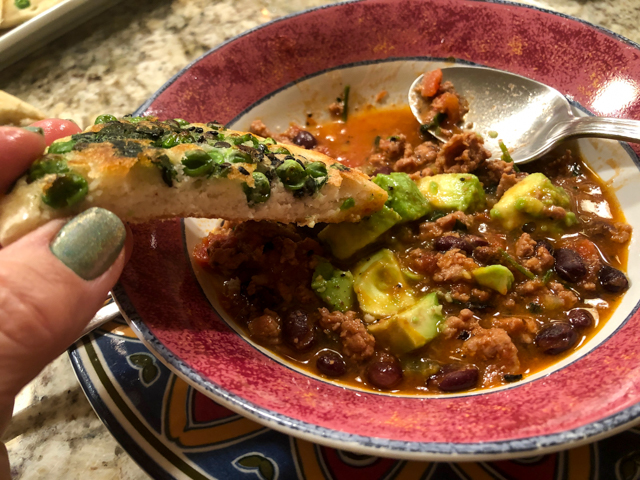
Combine peas, Jalapenos and cilantro in a small bowl. Heat griddle or nonstick skillet over medium heat and brush with oil. Pour in 2 to 3 tablespoons batter and spread out with back of spoon to create circle 4 inches in diameter. Sprinkle some of pea mixture evenly on top. Cook until small bubbles appear on surface, then flip and cook other side until crisp and golden.

ENJOY!

to print the recipe, click here

Comments: I always feel a bit insecure making ethnic recipes I have zero experience with, but I must say this one turned out excellent, no problems, every step seemed to happen exactly as expected. Plus we both loved the texture and the taste of the little pancakes, that were served with a turkey chili. Sally again takes a ton of liberties with her dinner preparations. Chili made with turkey. Served with little flatbreads from India.  All enjoyed with no remorse whatsoever!


Pin me, pin me!


ONE YEAR AGO: Valentine’s Day Sweetheart Cookies

TWO YEARS AGO: Fesenjan, Fast-Food Style

THREE YEARS AGO: Lavender Macarons with White Chocolate Ganache

FOUR YEARS AGO: Raspberry Chocolate Truffles

FIVE YEARS AGO: Red Velvet Cupcakes

SIX YEARS AGO: Happy Valentine’s Day!

SEVEN YEARS AGO:  A Few Blogging Issues

EIGHT YEARS AGO: Dan Dan Noodles

NINE YEARS AGO:  Sophie Grigson’s Parmesan Cake

TEN YEARS AGO: Antibiotics and Food

PUFF BREAD BALLS, TWO SALADS AND A COOKBOOK REVIEW

Do people need cookbooks these days? Just think about it. You can find pretty much any recipe you want with a click of your mouse. Endless content online by food bloggers and food sites, free for you to grab and enjoy. Some virtual spots might annoy you a bit with pop-ups and advertisement, but it is a small price to pay to get that recipe to put your bottle of pomegranate molasses or the jar of rose harrissa to good use. I have a different view, though. I buy cookbooks because I want to support the authors and honor their hard work. For that reason, I never share a recipe from a cookbook unless I get permission to do so. Last month I bought  “DOUGH: Simple Contemporary Bread”, from Richard Bertinet, and immediately fell in love with it. His approach to making bread is straigthforward and very creative. It takes a lot for a cookbook to impress me enough to write a review about it. However, I could not wait to share my views on Bertinet’s and in fact I loved it so much I had to also bring his book “CRUMB: Bake Brilliant Bread” into  my life.  If you love bread baking and want to have recipes that make you go “why I never thought of this?” – this one is for you!

(to see a video of his slap and fold technique, click here)

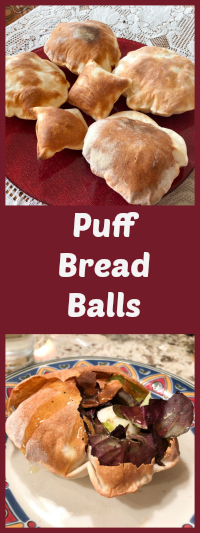
PUFF BREAD BALLS
(published with permission from Mr. Richard Bertinet)
from his cookbook DOUGH: Simple, Contemporary Bread)

10g yeast (fresh if possible) (I used 6 g dry instant yeast from King Arthur Flour)
500g bread flour
10g Salt
350g water

Heat oven to 475F.

If using fresh yeast, rub it into the flour using your fingertips as if making a crumble. Add the salt and water. Hold the bowl with one hand and mix the ingredients around with the other for 2–3 minutes until the dough starts to form. Knead the dough according to his method (see video link above) or use a KitchenAid type mixer for 2 minutes, then turn up to the next slowest speed and mix for a further 6-7 minutes until the dough becomes smooth and elastic.

Remove the dough from the bowl, transfer to a lightly floured surface and shape into a ball. Rest the dough  for about 20 minutes (the puff balls don’t need extensive proofing time).

Divide it into equal pieces (about 40g each).  Round each piece of dough into a small ball, cover with a tea towel and leave to rest for a further 5 minutes. Make sure there are no tiny pieces of dried dough on your work surface or rolling pin, as any particles that get into the dough will stop it from puffing up. Dust your work surface with some sifted flour (the idea is to avoid large particles at all cost).  

Roll out each piece of dough into a disc, turning it over a few times, and flouring well as you go. Continue rolling until the dough is very thin (1–2mm). You will need to bake the puff balls one or two at a time, depending on the size of your oven. I rolled them over parchment paper and simply carried the paper into the oven. It gets a bit yellow at the end of the baking time, but it does not burn. I find that if I try to place the thin dough over a wooden peel, it gets totally messed up in shape. If you are better at it, try it that way, which is the way Bertinet recommends. Bake for about 3–4 minutes. The puff balls should inflate very quickly and are ready when they are completely puffed up, golden brown and sound hollow if you tap them.

If you like to make pillows, use a square cutter, they puff just like the round balls, and are very cute.

Carefully remove each one from the oven and cool on a wire rack. The puff balls are at their best about 3–4 hours after baking, but can be kept for a couple of days in an air-tight container.

ENJOY!

to print the recipe, click here

These were so much fun to bake! I managed to stick three at a time in our oven, but they bake so fast, it’s not big deal if you need to bake one or two only. The balls would be fun to serve at a cocktail party, especially if you make the little pillows, and let your guests break them in half, or small pieces, using them as spoons to dig into hummus or other dips. I will definitely be making this often, as they are ready so quickly.
SALAD IN A BREAD BALL

Greens of your choice
Diced Tomatoes
Diced Cucumbers
simple salad dressing (olive oil, lemon juice, mustard, salt and pepper)

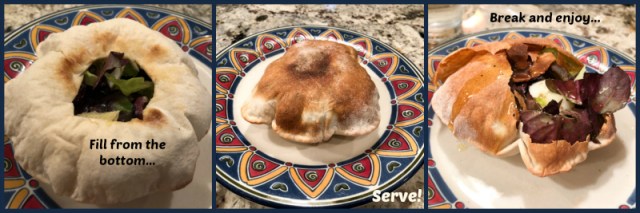
Brush a small circle of the base with water to soften the crust, then carefully cut out this softened disc with a sharp knife. Just before serving push a good quantity of salad gently into each puff ball. Let everyone break the tops with a spoon or fork, add dressing, and eat with the pieces of broken bread ball.

FATTOUSH-LIKE SALAD
(from the Bewitching Kitchen)

a couple of bread balls shattered into pieces
olive oil
1/2 tsp sumac
baby lettuce leaves
1/2 cup canned garbanzo beans, rinsed
smoked paprika
tomato pieces
cucumber pieces
for vinaigrette:
juice of 1 lime
1/4 cup olive oil
salt and pepper to taste
1/2 tsp sumac
1/8 tsp ground allspice

Heat the olive oil in a non-stick skillet, add the pieces of bread and sautee for a few seconds. Season with the sumac and reserve over paper towels to remove excess oil.

Prepare the garbanzo beans: coat them very lightly with olive oil, add smoked paprka, a touch of salt and microwave for 30 seconds. Remove from microwave and allow it to cool  before adding to the salad.

Make the vinaigrette by emulsifying all ingredients together. Assemble the salad in a large bowl, add the vinaigrette and pieces of seasoned bread.  Serve right away.

ENJOY!

to print the recipe, click here
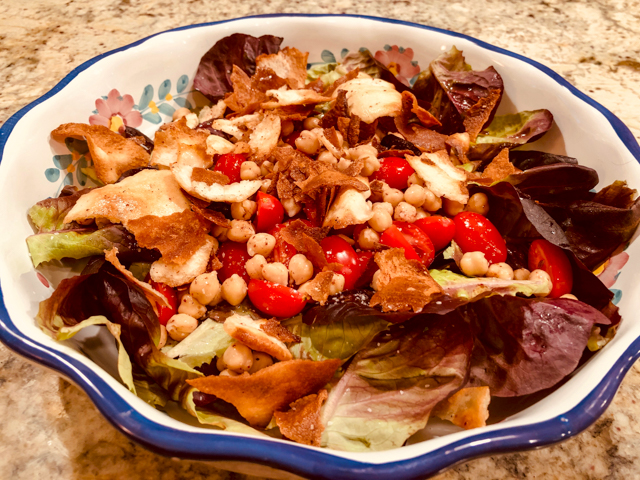
Comments: This salad was a winner, all the way. Normally made with pita, I think the broken bread balls worked even better, they developed a very nice flavor, and got super crunchy. The garbanzo beans straight from the can, benefit from a quick visit to the microwave, a trick I saw somewhere online and stayed in my memory. You can use other spices, the idea is to just break that boring canned feel. It works!  You could saute them briefly in a pan but the microwave makes it even easier.

And now, without further delay, my thoughts on a great cookbook. Thank you, Mr. Bertinet for so quickly answering my request to publish this recipe. You made the life of this food blogger a lot easier!


REVIEW OF RICHARD BERTINET’S DOUGH: Simple Contemporary Bread

The book is based around the kneading technique favored by  Bertinet, which is quite more energetic than folding, because you will be slapping the dough around with considerable enthusiasm, but he does so in a way that incorporates air into the dough much more efficiently. It is almost like a dance, I cannot help but think of samba as I go through those moves. You get into the rhythm, and  soon the dough starts developing structure right under your fingers. Fascinating and fun.

He organizes the book in 5 chapters according to the type of dough: White,  Olive, Brown, Rye, and Sweet Dough. Every bread in each chapter uses a single recipe for dough that he takes into unique directions, some will be familiar to you, others will intrigue and make you dream.  He uses fresh yeast, I have a hard time finding it where I live, so I use about 60% of the amount of instant dry yeast. I will list the recipes that called my attention in each of the chapters.

WHITE DOUGH. From this group I got the recipe for the cute bread puffs I shared today. But I loved the idea of “Bread Shots”, Sesame and Aniseed Breadsticks, Spicy Moroccan Rolls (OMG),  and also his Saffron Rolls.

OLIVE DOUGH. A departure from the first chapter, in this variation he adds a small amount of olive oil to the dough, which gives it more elasticity and softness.  Maybe you think that Tomato, Garlic and Basil Bread is too “common?” Wait until you see how he shapes it, and you will definitely re-consider.  How about making a soup bowl with your bread? He explains how, I cannot wait to try that soon, while soup weather is with us. I want to make a smoky tomato soup and serve it inside a cute bread bowl. And no, it’s not a round loaf with the crumb removed. This chapter has one cute idea after another, I was also taken by his Parmesan, Parma Ham, and Pine Nut Slices, they are shaped almost as cinnamon rolls. So so clever.

BROWN DOUGH. Honey and Lavender Loaf…. Cardamom and Prune Bread… Do I have your attention yet?  Those are two of the loaves that I definitely want to try, using what he calls brown dough as a starting point. As you may have guessed, it is a straightforward dough with a high proportion of whole-wheat flour in it. Once again his creativity shines in cute ways to shape bread, like his Poppy Seed Stars. Just lovely and you can definitely use that shaping in any bread dough you’d like.

RYE DOUGH. I really like his approach to rye. It is a tricky flour to work with, and the higher the proportion of rye in a dough, the worst it gets. Gummy, heavy, unpleasant to work with and not always ending on a happy note after baking. He uses a low proportion of rye so that you profit from its taste but it still handles as a regular dough during kneading and shaping. His Walnut Bread and Olive Bread are two that called my name pretty loud. They look hearty, rustic, and are both quite beautiful. Aniseed and Guinness Bread seems very intriguing and he also shares a recipe for Dark Rye Bread that flips the formula around, it is mostly rye with a touch of white flour. I should really give it a try, particularly with his kneading method. Could be fun…

SWEET DOUGH. I thought about showcasing one of the recipes in this chapter but the puff bread was too cute not to share. The thing with his sweet dough is that it works both for sweet and savory concoctions, because it is not overly sweet. I love that. I am fascinated by all recipes in this chapter, so I will give you just the top four: Orange and Mint Loaf, Chocolate Buns (they look amazing!), Apricot and Almond Tart (yes, he uses his sweet dough to line a tart!), Pain Viennois.

Every recipe in the book is also adapted for a KitchenAid type mixer, so don’t worry if you prefer not to go the Samba-Knead route. There are no sourdough recipes in the book, so all you need is some commercial yeast and a little time. He shares a nice method to increase flavor, in which part of the dough is stored in the fridge and “refreshed” pretty much like a sourdough starter would.  Bakeries use that trick very often and it’s a simple way to pump flavor in the home kitchen.

If you love to bake bread, or if you would like to start but feel a bit intimidated, get his books (links to amazon in the beginning of the post; I make no profit from your acquisitions).
ONE YEAR AGO: Pistachio-Caramel and Apple Mousse Cakes

TWO YEARS AGO: La Couronne Bordelaise

THREE YEAR AGO: A Special Birthday Dinner

FOUR YEARS AGO: Duck Confit for a Special Occasion

FIVE YEARS AGO: Tuscan Grilled Chicken and Sausage Skewers

SIX YEARS AGO: Celebrate Wednesday with Pork Tenderloin & Apples

SEVEN YEARS AGO: Salmon Wellington

EIGHT YEARS AGO: The Green Chip Alternative

NINE YEARS AGO: Weekend Pita Project

TEN YEARS AGO: Let it snow, let it snow, eggs in snow