TANGZHONG HAMBURGER BUNS

There are hamburger buns, and hamburger buns with Zen. These will Zen you out. Tanzhong is a method of Japanese baking in which part of the flour is cooked before being incorporated into the dough. What that does is create quite a unique crumb, with more moisture and tenderness. Perfect for hamburger and hot dog buns in which the crust is secondary. All you want is pillowy bread. You will need about 30 minutes of extra time before mixing the dough, but the outcome it totally worth it.

TANGZHONG HAMBURGER BUNS
(slightly modified from Domestic Gothess)

for tangzhong:
20 g (2tbsp) strong white bread flour
100 ml water

for the dough:
350 g strong white bread flour
7 g (2 tsp) fast-acting dry yeast (or regular instant yeast, but expect longer rising times)
1 tsp salt
50 g (1/4 cup) sugar
125 ml (1/2 cup) full fat milk
1 large egg
35 g softened butter

to glaze:
1 egg, beaten with a splash of milk
sesame seeds

To make the tangzhong, place the flour in a small saucepan and gradually whisk in the water. Place over a medium heat and cook, whisking constantly until it has thickened to a wallpaper paste-like consistency. Remove from the heat, scrape into a bowl and cover with clingfilm directly on the surface, set aside to cool.

Place the flour, yeast, salt and sugar in the bowl of a stand mixer fitted with the dough hook, lightly stir together and make a well in the center. Add the egg, milk and tangzhong to the well and mix on a low speed until it comes together into a dough.

Add the butter and mix on medium-high speed until the dough is very stretchy and comes away from the sides of the bowl, about 10 minutes. Transfer the dough to a lightly greased bowl, cover with clingfilm and either place somewhere warm to rise until doubled in size, about 1-2 hours (dough can be refrigerated overnight at this point if you prefer).

Line a baking sheet with baking parchment. Divide the risen dough into 8 equal pieces (or fewer if you like bigger buns) and shape each piece into a ball on a lightly floured surface. Spread the balls out well spaced apart on the baking sheet and loosely cover with oiled clingfilm. Leave to rise for about 1 hour until puffy.

Heat the oven to 400F. Brush the risen buns with the beaten egg and sprinkle with sesame seeds. Bake for 20 to 25 minutes until deep golden. Transfer the buns to a wire rack to cool. They are good for couple of days stored in an airtight container, or for a few months frozen.

ENJOY!


to print the recipe, click
here

Comments: Mitsuo Ayano was the person who first came up with the idea of making a water roux (yu-dane) and use it to bake bread. Later the process was simplified by a baker from Taiwan. In the US and Europe it is more widely known by its Chinese name, Tangzhong. At any rate, it is a nice technique to have in your repertoire, and pretty much all kinds of breads can be adapted to take some cooked flour in the formula. Check out this great version, made a few years ago by my friend Karen.


The crumb is so tender and flavorful! I’ve been making this recipe regularly, the moment we have 2 buns left in the freezer, another batch gets started. They can be shaped of course as regular buns or oblongs for hotdogs. I now settled on shaping each bun with around 110g dough, because the husband likes to slice each large roll in four thin slices crosswise, so it’s easier if the buns start big. I get about 6 large buns from one batch buy doing so.

ONE YEAR AGO: Potato Soup with Spicy Shrimp

TWO YEARS AGO: Rose-Harissa Chicken Thighs

THREE YEARS AGO: Caramel-Chocolate Tartlets

FOUR YEARS AGO: Chicken Korma-ish

FIVE YEARS AGO: Sunday Gravy with Braciola

SIX YEAR AGO: In My Kitchen, February 2015

SEVEN YEARS AGO: Avocado and Orange Salad with Charred Jalapeno Dressing

EIGHT YEARS AGO: Green Olive, Walnuts and Pomegranate Salad

NINE YEARS AGO: Romanian Flatbreads

TEN YEARS AGO: Ziti with Artichokes and Meyer Lemon Sauce

ELEVEN YEARS AGO: Blasted Broccoli, Stove-top version

SMOKED PAPRIKA SOURDOUGH

My sister Norma back in Brazil jokes that she would add smoked paprika to her toothpaste if at all possible… If you are in her team, this bread is for you. I did not add a lot, and feel that the bread could stand even more, as you will see in the comments. The scoring style, “Multiple Leaves”, was inspired by the one and only Morgi, from Israel. Check his quick video tutorial here.

SMOKED PAPRIKA SOURDOUGH
(from the Bewitching Kitchen)

370g water
110g sourdough starter at 100% hydration
470g white bread flour
30g spelt flour
2 tsp smoked paprika
10g salt

Make the levain mixture about 6 hours before you plan to mix the dough. It should be very bubbly and active.

When you are ready to make the final dough, place the water in the bowl of a KitchenAid type mixer and dissolve the starter in it, mixing with a spatula briefly, then add the two types of flour, paprika, and salt.  Turn the mixer on with the hook attachment and knead the dough for 4 minutes at low-speed all the time. You will notice the dough will gain quite a bit of structure even with just 4 minutes in the mixer. Remove from the machine, and transfer to a container lightly coated with oil, cover lightly with plastic wrap and allow it to ferment for 4 hours, folding every 45 minutes or so. Because the dough is already a bit developed from the initial time in the mixer, you should get very good structure after 3 and a half hours, or even sooner than that.

After four hours bulk fermentation, shape the dough as a ball, and place, seam side up, in a lightly floured banetton. Leave at room temperature one hour, and then place in the fridge overnight, from 8 to 12 hours.

Next morning, heat the oven to 450F.

Invert the dough on a piece of parchment paper and score with a new razor blade, if so desired, or simply make a cut on the surface in the shape of a cross with a very sharp knife. 

Bake at 450F for 45 minutes, preferably covered for the first 30 minutes to retain steam. You can generate additional steam by spraying the inside of the lid with water before closing the pan.  Cool completely over a rack before slicing.

ENJOY!

to print the recipe, click here

Comments: If you are into sourdough baking, I urge you to follow Morgi’s instagram page. His talent with artistic scoring is something! For many of his styles, he includes not only a photo of the finished bread, but a short video of the slashing, start to finish. It goes a little fast, but you can pause and even draw a sketch on paper as he goes, if necessary. For the multiple leaves, you can pretty much do whatever you like as far as spacing the leaves or keeping them close. I liked this scoring a lot because since the edges of the leaves are cut more deeply, and the veins very lightly, the bread will not ruin the design as it bakes: it will naturally open around the edges of the leaves. Very clever.

The smoked paprika gave a delicate pink hue to the crumb and crust, next time I might add three teaspoons instead of two, to intensify the flavor.

This bread was once again made with my basic method, which starts with a 4 minute kneading in the KitchenAid. The only modification I’ve incorporated was leaving it at room temperature for one hour before placing it in the fridge overnight. I notice a slightly more open crumb and more oven spring when I do that.

ONE YEAR AGO: A Cake to say I Love You, from Kim-Joy’s cookbook

TWO YEARS AGO: Lemon-Almond Cake with Cranberry Glaze

THREE YEARS AGO: The Iron (Uptake) Chef Challenge

FOUR YEARS AGO: Thank you!

FIVE YEARS AGO: Salmon Rillettes, a Classy Appetizer

SIX YEARS AGO: Linzer Cookies

SEVEN YEARS AGO: Baked Ricotta, Take Two

EIGHT YEARS AGO: Pumpkin Uncanned

NINE YEARS AGO: Pork Ragu

TEN YEARS AGO: Friendly Kuri Squash

ELEVEN YEARS AGO: Celery and Apple Salad

FOR THE LOVE OF SOURDOUGH

It is amazing how a bread formula can be tweaked slightly and result in totally different outcomes. I share today nine versions of sourdough. They all start with the same composition (90% white bread flour; 10% whole-wheat, salt and sourdough starter). From this starting point, some get added flavor components, and the final outcome depends on how they were handled for scoring.

BASIC SOURDOUGH FORMULA
(from the Bewitching Kitchen)

470g white bread flour
30g whole-wheat flour (regular whole-wheat, spelt or rye)
10g salt
75g sourdough starter at 100% hydration
375g water

Make the levain mixture about 6 hours before you plan to mix the dough. It should be very bubbly and active.

When you are ready to make the final dough, place the water in the bowl of a KitchenAid type mixer and dissolve the starter in it, mixing with a spatula briefly, then add all flours and salt.  Turn the mixer on with the hook attachment and knead the dough for 4 minutes at low-speed all the time. You will notice the dough will gain quite a bit of structure even with just 4 minutes in the mixer. Remove from the machine, and transfer to a container lightly coated with oil, cover lightly with plastic wrap and allow it to ferment for 4 hours, folding every 45 minutes or so. Because the dough is already a bit developed from the initial time in the mixer, you should get very good structure after 3 and a half hours, or even sooner than that.

After four hours bulk fermentation, shape the dough as a ball, and place, seam side up, in a lightly floured banetton. Place in the fridge overnight, from 8 to 12 hours.

Next morning, heat the oven to 450F.

Invert the dough on a piece of parchment paper and score with a new razor blade, if so desired, or simply make a cut on the surface in the shape of a cross with a very sharp knife.

Bake at 450F for 45 minutes, preferably covered for the first 30 minutes to retain steam. You can generate additional steam by spraying the inside of the lid with water before closing the pan.  Cool completely over a rack before slicing.

ENJOY!

to print the recipe, click here

PANCH PHORON SOURDOUGH

To the basic recipe above, add 1 to 2 tsp Panch Phoron, a five spice mixture from Eastern India, often used in Bengali cuisine. It is a mixture of equal parts of seeds of fenugreek, nigella, cumin, black mustard and fennel. I shaped this bread as an oblong loaf, and scored a pattern of leaves.

We loved this bread, in fact it was the first loaf that got us into a path of sourdough flavored with Middle Eastern spices.

VADOUVAN CURRY SOURDOUGH

In these three loaves, 1 + 1/2 tsp of Vadouvan curry mix was added together with the flour and incorporated in the dough. The bread in the center had spelt as the minor flour component, the other two regular whole-wheat.

For the final decoration, I covered the first loaf with red beet powder, marked with a string a symmetry of 8 guide lines and then scored as shown. The beet color faded a bit during baking but still gave it a little hint of purple. The second loaf got a dusting with charcoal powder, the string marked 6 guide lines to create a slightly different type of design. Finally, the third loaf was dusted with flour, marked with 8 lines and scored as a flower. A little center of pearl dust was added but the color faded during baking (is that a recurring pattern for this baker?).

I love the charcoal and the beet powder effects, but be warned: they stain your fingers as you handle the bread, so when you cut a slice, make sure you don’t touch your face right after. No further questions on this subject. Please and thank you.

RAS-EL-HANOUT SOURDOUGH

Exact same recipe using rye as the minor flour component, and 1+1/2 tsp Ras-El-Hanout in the formula. One of our favorite breads in this series. I should give credit to a baker from Israel who is a true magician with scoring. I follow him on Instagram (check him out here) and often try to make one of his cool designs. This is one example, that starts with a little square as shown below.

I am very fond of geometric-type scoring. I find it easier to do if I make a drawing on a piece of paper with the different steps because once that razor blade hits the surface of the bread… is game over! There is no “erasing” possible. Of course, during baking the design will be affected in unpredictable ways. I am still trying to figure out ways to minimize explosions.

ZA’ATAR SOURDOUGH

Basic recipe using spelt flour as the minor component and 1 + 1/2 tsp za’atar. The bread was coated with charcoal and I followed one of Mogi’s Dough Engineering scoring designs which he calls “reverse spiral”. Mine did not turn out as beautiful as his, but I still like it a lot. Here is what it looks like before baking.

He uploaded a video showing how to do it. It goes very fast, but after watching it (in awe) a few times, I felt ready to do it.

TAHINI SOURDOUGH

To the basic formula (with whole-wheat flour as minor component), I added 25g tahini, and adjusted the consistency with a little more flour after the initial mixing with the Kitchen Aid, as the tahini I used was reasonably fluid. The tahini gives a wonderful flavor. The scoring made the round loaf end up with a square shape after baking, pretty interesting.

You can see it starts pretty round, but the way the slashing opens up during baking substantially affects the final shape. I love using nut butters in sourdough, they bring a bit of fat to the composition and the crumb feels moist and tender. Along those lines I share another favorite version….

PEANUT BUTTER SOURDOUGH

Basic formula with spelt flour and 25g creamy peanut butter. This was one delicious bread, the smell during baking is something! The scoring was once again inspired by Mogi’s Instagram feed, and this time I used a powder red food dye that is fat-soluble (appropriate for chocolate work). That seemed to stand better during baking.

Very simple scoring, I used 8 guide lines made with a string, but you could definitely just improvise.

CELEBRATION OF LOVE SOURDOUGH

My final adventure following the footsteps of Mogi. This is a bread called Tu B’av (ט״ו באב), the Jewish holiday of love, similar to our Valentine’s Day. I made a simple sourdough with full white flour, and 1 tsp turmeric in the dough. The surface was dusted with white flour, a shower of turmeric, and the center was dyed with pitaya powder, which next time will be replaced by red dye powder. A round cookie cutter comes in very handy to contain the red dot. I am still struggling with how heavy a hand to use when adding colors, particularly the subtle ones as turmeric that might end up too similar to the crust. Once again my results are not as gorgeous as Mogi’s, but there is always next time!

So that’s all for now, my friends… This post, entitled For the Love of Sourdough, had to end with a bread to celebrate love, that feeling that keeps us together, staring at the future without fear.

ONE YEAR AGO: Brazilian Pao de Mel

TWO YEARS AGO: Stir-Fried Chicken in Sesame Orange Sauce

THREE YEARS AGO: Monday Blues

FOUR YEARS AGO: A New Way to Roast Veggies

FIVE YEARS AGO: Two Takes on Raspberries

SIX YEARS AGO: Spice Cake with Blackberry Puree

SEVEN YEARS AGO: Own Your Kitchen with Cappuccino Panna Cotta

EIGHT YEARS AGO: Chicken Parmigiana, the Thriller

NINE YEARS AGO: Wild Mushroom Risotto

TEN YEARS AGO: Tartine Bread:  Basic Country Loaf 

ELEVEN YEARS AGO:  Pugliese Bread


SUNBURST PUMPKIN SOURDOUGH

OCTOBER 16th: WORLD BREAD DAY!

It is that time of the year, when leaves turn orange and red, pumpkins pop up in every recipe (including many where they don’t belong, but let’s not get into a sour mood).  I share with you today a sourdough bread to celebrate Fall. It does have a little canned pumpkin in the formula, but I promise you the taste is very mild, it just contributes moisture and it slightly changes the final texture of the crumb. We loved this bread and hope you’ll also like it if you make it.

SUNBURST PUMPKIN SOURDOUGH
(from the Bewitching Kitchen)

475 g white bread flour
25 g whole wheat flour
120g starter at 100%
100 g canned pumpkin
340g water
10g salt

Add all ingredients to the bowl of a KitchenAid type mixer and using the dough hook, work the dough for 4 minutes at low speed. Adjust flour if necessary, it should still stick to the bottom of the bowl not cleaning it completely as the dough moves.

Remove from the bowl, knead briefly by hand and let it ferment for 3 and a half hours folding every 45 minutes. Shape as a round loaf, refrigerate overnight, seam side up.

Heat the oven to 450F, invert the dough on parchment paper, so that the smooth side is now up. Dust the surface with regular flour, lightly but uniformly. Score with a brand new razor blade, in concentric arcs from the center. Bake for 45 minutes in a Dutch oven, covered for 30 minutes, removing the lid for the final 15 min.  Let it cool completely before slicing.

ENJOY!

to print the recipe, click here

Comments: I’ve been really in love with this method of starting the kneading in the KitchenAid and finishing with foldings. It gets a nice jump start on gluten formation, and it has the advantage of being very “clean”.  When you do the whole incorporation by hand, the two initial foldings can be pretty messy, the dough gets on the fingers, sticks to the sides of the bowl… it’s not too big a deal, but allowing the KitchenAid to do that initial work makes clean up so much easier. I know bread baking purists will turn their noses but… it works for me.

This bread was a loud, loud singer as it cooled down. And the crumb had the kind of structure we like. Not too open, not too tight.

As I mentioned, you cannot taste pumpkin, it is just a very mellow sourdough, with a creamy texture given by the pumpkin puree. If you like a more orange hint to the crumb, adding turmeric is a good option, but not too much, I’d say 1/2 tsp for this size loaf.

ONE YEAR AGO: Sourdough Four-Play

TWO YEARS AGO: World Bread Day 2018

THREE YEARS AGO: Slow-Roasted Tomatoes

FOUR YEARS AGO: Spicy Cotija and Black Olive Sourdough

FIVE YEARS AGO: Apple Cinnamon Oatmeal Cake

SIX YEARS AGO: Sourdough Rye Bread with Flaxseeds and Oats

SEVEN YEARS AGO: PCR and a Dance in the Mind Field

EIGHT YEARS AGO: October 16: World Bread Day

NINE YEARS AGO: The US Listeria Outbreak 2011

TEN YEARS AGO: 36 Hour Sourdough Baguettes

ELEVEN YEARS AGO: October 16 is World Bread Day


CHEESE AND PESTO EMMER ROLL-UPS, AND A SPECIAL COOKBOOK REVIEW

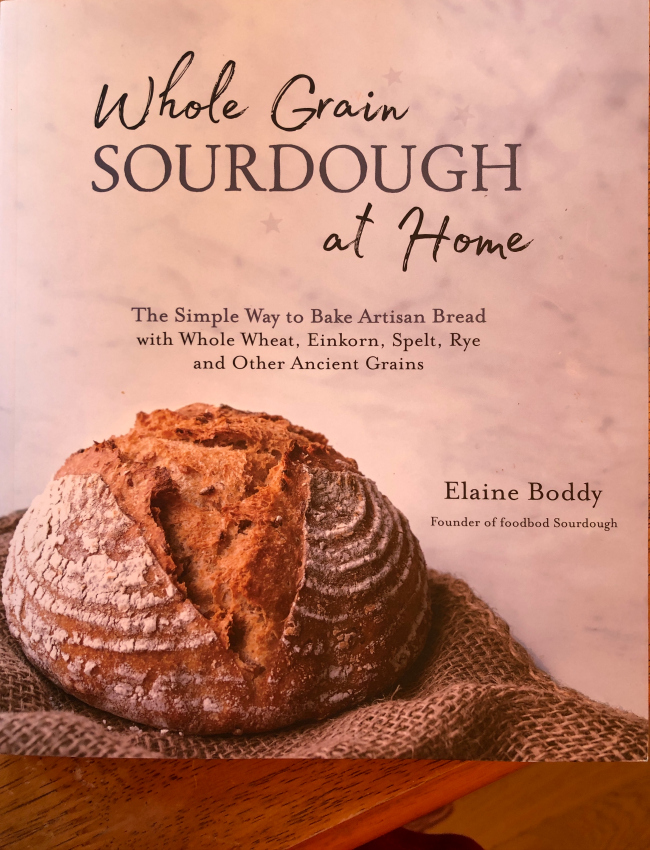
I don’t think I stopped smiling from the moment I started writing this post, to the time I hit publish… The cookbook I am reviewing today was written by a dear friend of mine, Elaine, who bakes and blogs from the UK. I had the pleasure of meeting her in person last year when the biggest adventure of my life took me to a certain tent. At that time, right in her kitchen, she broke the news that she was going to write a cookbook, the final negotiations were just taking place. And now, a little over one year later, it is out there for the world: Whole-Grain Sourdough at Home, by Elaine Boddy!  She gave me permission to share one recipe here in my little virtual spot, so without further ado, let’s get to it…

CHEESE AND PESTO EMMER ROLL-UPS
(published with permission from Elaine Boddy)

makes 8 rolls

for the dough:
50g active starter (at 100% hydration)
300g water
400g bread flour
100g emmer flour
7g salt (I used 10g)

for the filling:
100g pesto of your choice
200g grated cheese of your choice
(my addition: black kalamata olives in pieces)

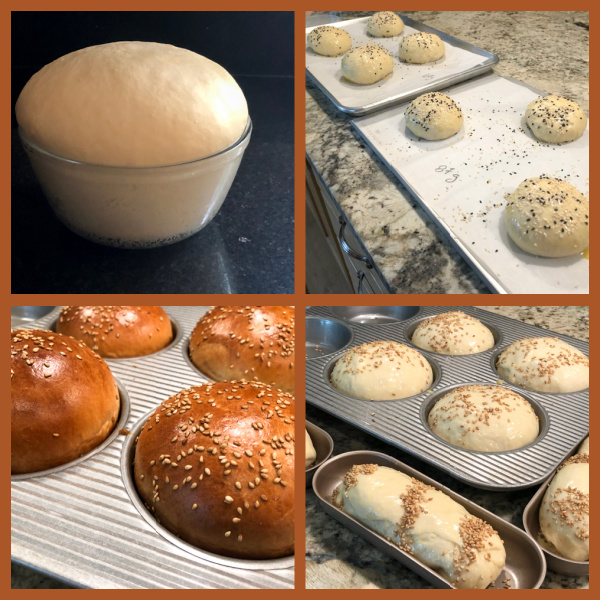
In the early evening, in a large mixing bowl, roughly mix together all the dough ingredients, leaving the dough shaggy. Cover the bowl and leave it on the counter for 1 hour.

After an hour or so, perform a set of pulls and folds on the dough, inside the bowl. It will be sticky, but stretchy. Cover the bowl and leave it on the counter.

Over the next few hours (3 hours or so), complete 3 more sets of pulls and folds on the dough, covering the bowl after each set. The dough will be nicely stretchy and will easily come together into a firm ball each time. Complete the final set before going to bed.

Leave the covered bowl on the counter overnight, typically 8 to 10 hours, at 64 to 68F.  The next morning, the dough is ready to be used to make the rolls. Use immediately or refrigerate to use later.

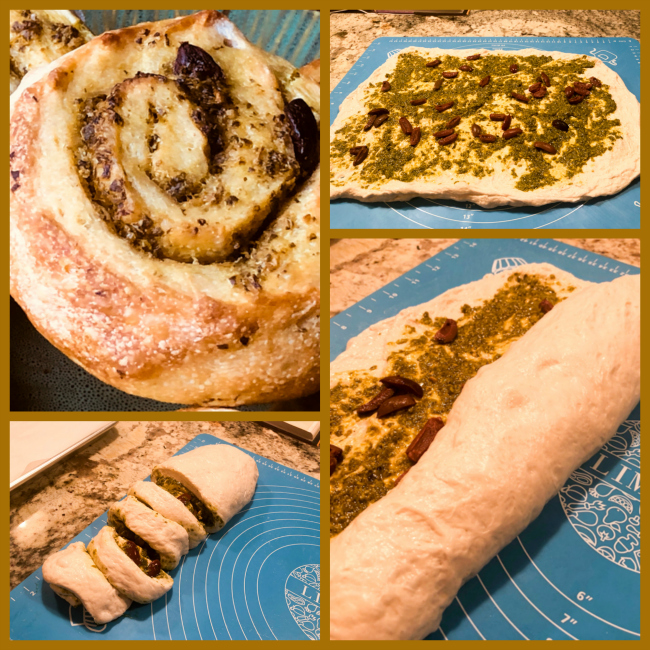
When ready to bake, heat the oven to 400F (convection) or 425F (regular oven). Sprinkle water over your countertop, using a bowl scraper of your hands, gently ease the bubbly risen dough from the bowl onto the counter. Use your fingertips to start stretching and pushing out the dough, until it becomes a rectangle that measures about 16 x 20 inches, and has even thickness all over.

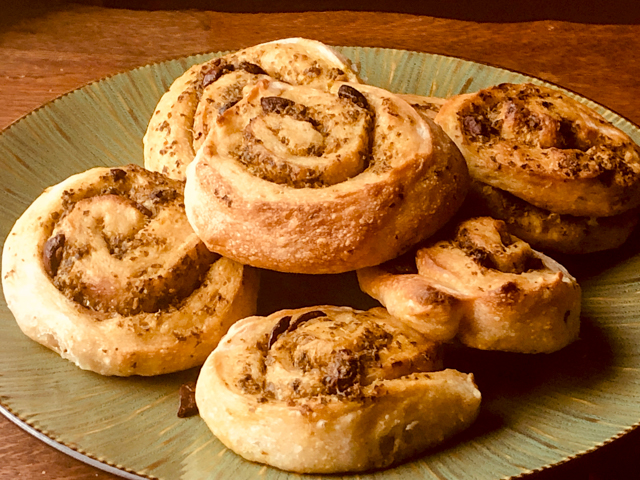
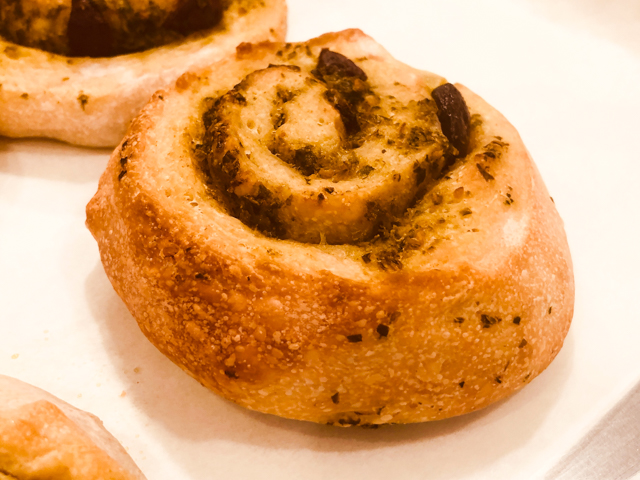
Dot teaspoons of pesto over the dough, spread the cheese and kalamata olives (if using). Roll up the dough from one of the longer edges toward the other to make an even roll of dough. Using a sharp knife cut the dough into 8 pieces. Place them gently, cut side down, on a baking sheet lined with parchment paper.

Bake for 20 to 25 minutes, or until nicely browned. Remove from the oven, and enjoy while still warm.

ENJOY!

to print the recipe, click here

Comments: When it comes to sourdough, I am for the most part pretty conservative. With this recipe, I realized I’ve been missing a whole universe of goodies that sourdough can bring to the table. Elaine shares several options of fillings for these fun coiled creatures, but of course the possibilities are endless. Spices, nuts, meats, roasted veggies, anything you fancy, just spread, roll, bake and enjoy! Pay attention to the level of liquid included, refrain from adding too much oil or stuff that might get a bit watery, because that might interfere with the bake. But using her basic recipes as starting points, you will have no issues.

The roll-ups were delicious, they smell absolutely amazing during baking, and the texture is quite a bit softer than a regular sourdough bread (which turns someone who wears braces into a very happy camper!).  Elaine says they are best enjoyed fresh on the day they are baked, but I can tell you that they freeze very well and if you warm them in a low oven, they come back to life in excellent shape…

I made two additional recipes from her book, which I will share as “teasers”.  Just the pictures and a brief overview.

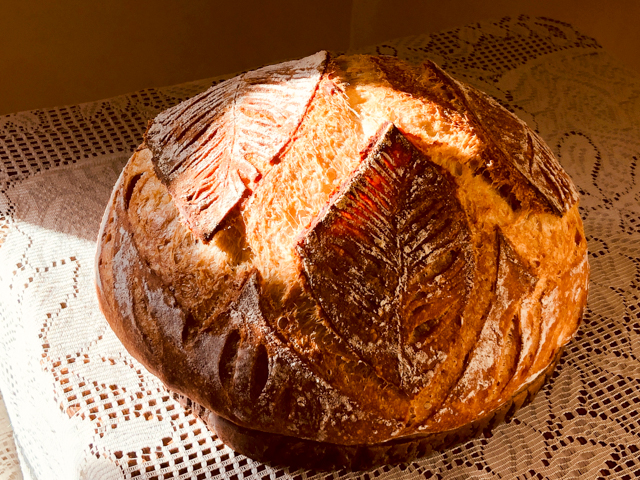
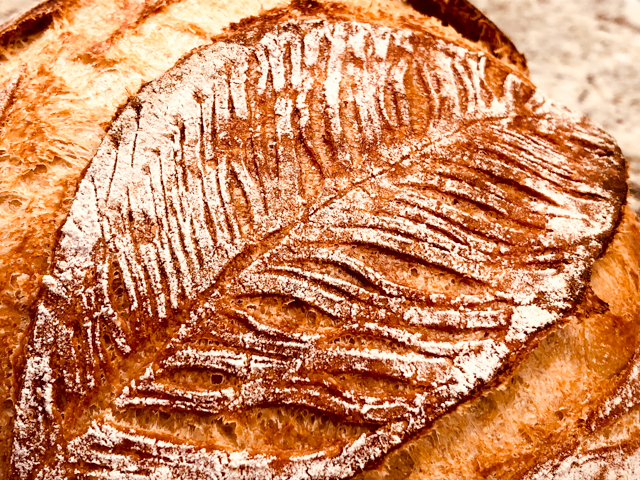
THE WHOLE-WHEAT AND EINKORN MASTER

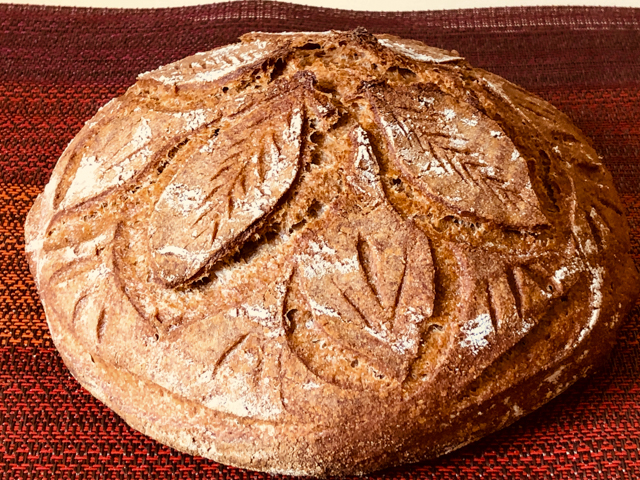
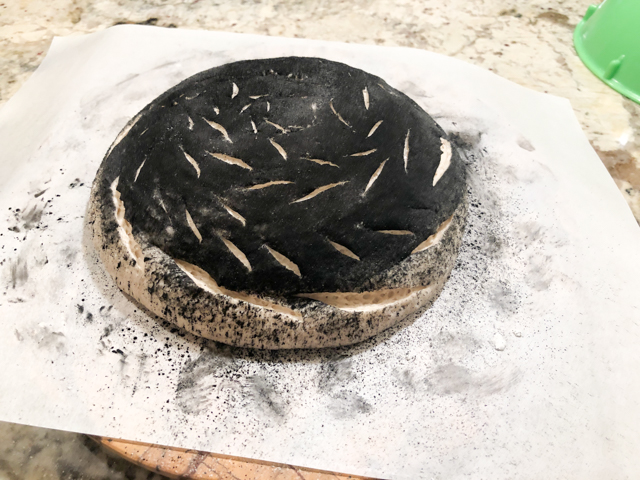
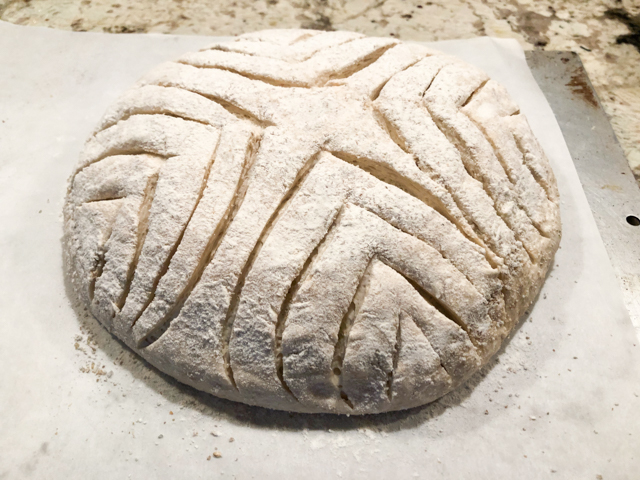
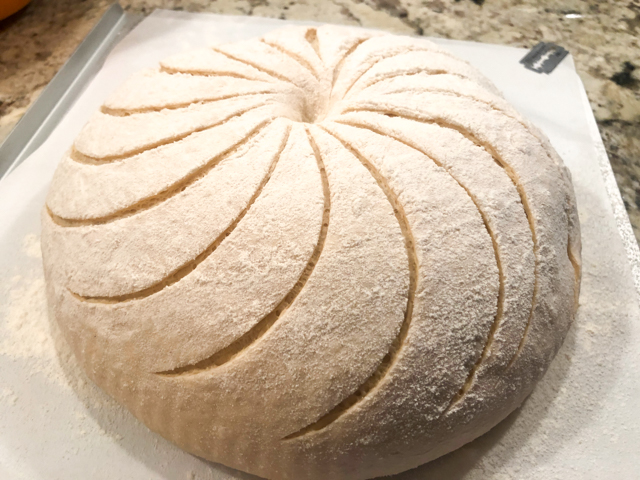
I am always weary of recipes that use a high proportion of whole-wheat flour, because it is so easy to get hockey-pucks and heavy loaves. But I decided to give this one a try, even though it has almost 56% whole-wheat in its formula.

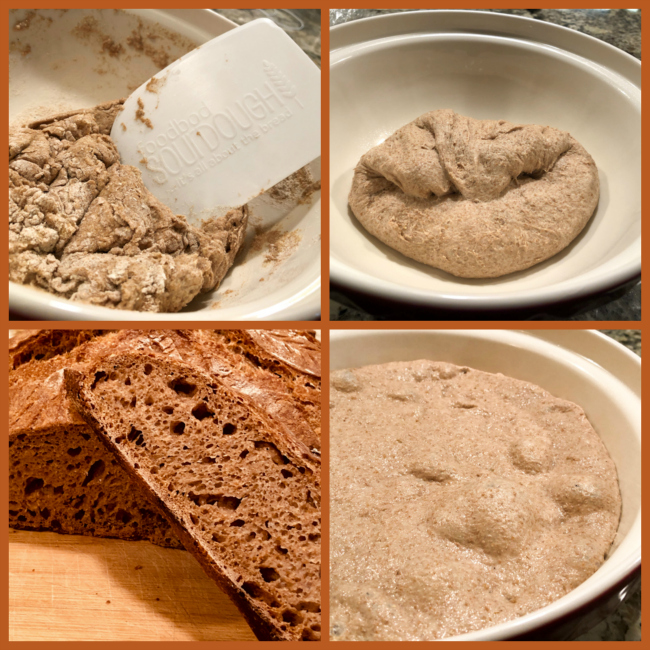
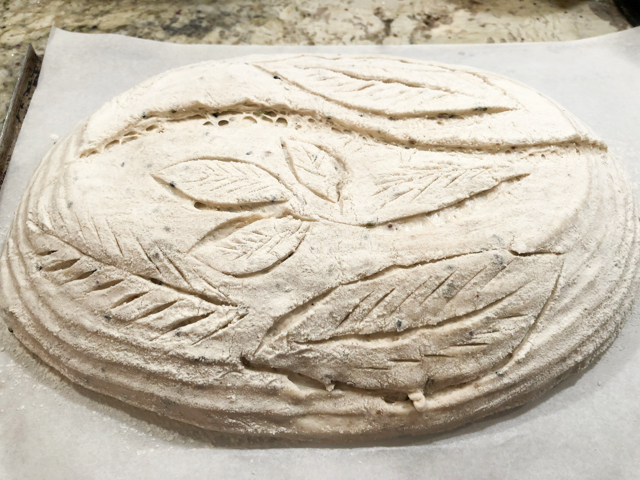
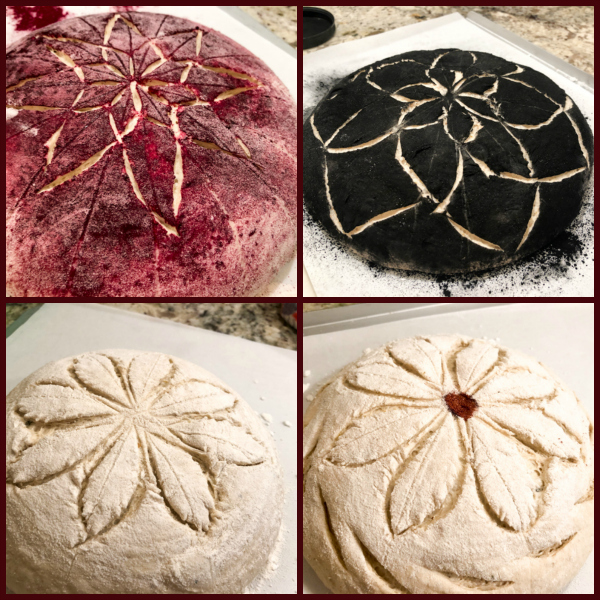
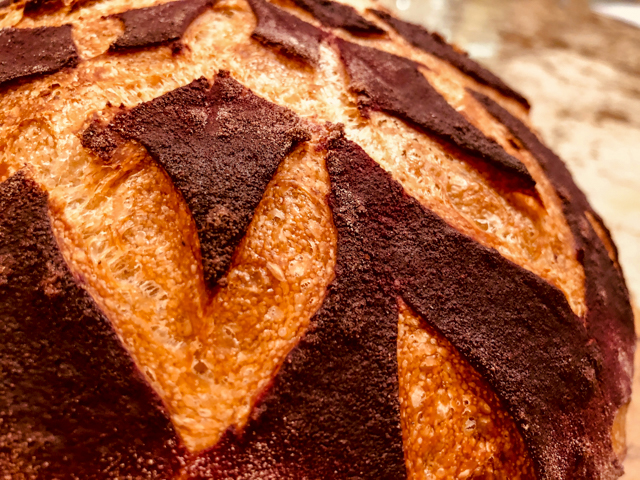
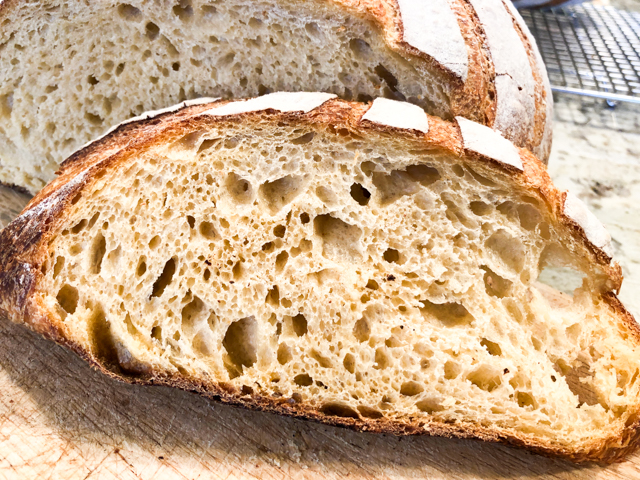
In this composite picture you can see the beginning of the dough (cute scraper available on her site), with the typical, coarse texture given by the whole-wheat. It mellows with the foldings, and next morning it will be all bubbly and ready to be shaped and baked.  The bread is AMAZING (yes, all caps), particularly with smoked salmon. In fact, there is something about the combination of whole-wheat with einkorn flour that reminded both Phil and I of a nice rye bread. Excellent! It definitely exorcized my fear of hockey-pucks… Thank you, Elaine!

And now, for the third recipe I made from her book…

SPEEDY SEED AND OAT CRACKERS

Aren’t they the cutest things? Super simple recipe, your starter does not even have to be at its peak, you can use it and have these crackers ready in no time!  Plus, you can change the seeds according to your taste. Apart from oats, I used pumpkin seeds, black and white sesame seeds.

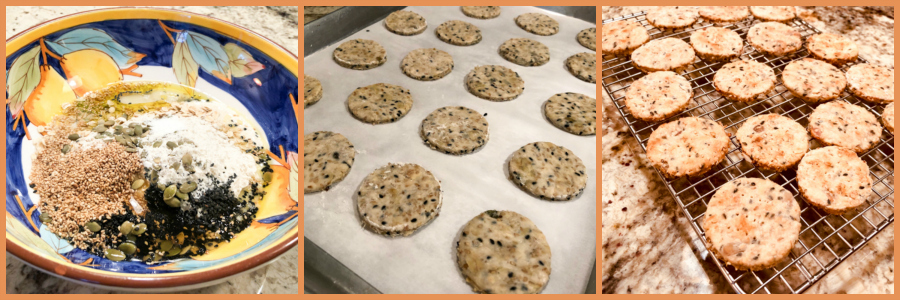
I baked them slightly less than I normally would, so that they ended up softer. Because… braces… (sigh). Definitely a great recipe to have in my repertoire.

Overview of Elaine Boddy’s book

Elaine breaks all the rigid rules you might have heard before on sourdough baking. First, if you use her method, you will not discard any starter ever. I know, who could imagine that?  Second, she shows you can bake excellent bread without pre-heating the Dutch oven (which I also never do), and without pre-heating the oven!  She bakes most of her loaves (the oval and round ones, not the crackers and coils) starting from a COLD oven. As she says, it takes a bit of a leap of faith, but try it and see how you like it.  My oven heats extremely slowly, so what I did with that Einkorn loaf was to turn it on, and just finish preparing the bread to bake. By the time I stuck it in the oven, I think it was around 175F inside, not fully cold, but definitely not blazing hot.  It is a great energy-saving method, no doubt.

The book starts with a description of the flours and how to make a sourdough starter, both using regular white flour and all sorts of whole-grain variations. That is followed by a series of questions and answers that cover pretty much all those nagging doubts that might scare a beginner sourdough baker.  Great introductory chapter!

Welcome to my Master Recipe… In this chapter she covers her basic, uncomplicated, unfussy method, with plenty of pictures so you can have a clear understanding of how to succeed in your own kitchen. She offers two basic approaches, a “Same-Day-Sourdough” and a “Super Lazy” version. The chapter ends with a troubleshooting section, that will be very useful if you are a beginner, but also might give some pointers to those who bake sourdough regularly but might run into ‘issues.”

The Master at Work… In this chapter Elaine offers many variations of her basic recipe, by adding seeds, nuts, cooked grains, and playing with different combinations of flours. From this chapter I baked the Whole-Wheat and Einkorn loaf, which she made in oval shape, I went with round. I might even consider going for her 100% Whole Wheat (I need a bit of psychological preparation to try that one, though). From this chapter, my eyes are set on the White Spelt Poppy Seed Master and the  Oat-Crusted Einkorn Master. They are two beautiful examples of sourdough baking…

Baby Master Sourdough Boules… In this chapter she offers recipes to make smaller breads, they all contain 300g flour and are proofed in a small banneton, but any round container will do. They are all adorable and perfect for a household with two people.  My favorites in this chapter are: Khorasan and Golden Flaxseeds, Roasted Cashew (looks amazing), and Einkorn Chia Seed Baby Master.

Master Sourdough Focaccia… All recipes in this chapter should ideally begin the day before you intend to enjoy your gorgeous focaccia. Spelt and Cheese is calling my name, although Whole-Wheat, Tomato and Garlic Focaccia is also tempting.  I would use kalamata olives in place of the garlic, but I bet she would not be mad at me… She ends the chapter with an alternative time-table in case you really want to make the whole thing in the same day. By following that method, you can have your focaccia at the table around 6pm. Perfect!

Buttermilk Sourdough Biscuits… In this fun chapter, all recipes can use highly bubbly starter, or even a dormant version that has been sitting in the fridge for a while, up to 7 days. Since the recipes contain baking soda, they rise faster and the sourdough starter will have less impact on the rise, but of course it will add a nice flavor and texture. I absolutely MUST make the Emmer and Za’atar Buttermilk Biscuits. Because… za’atar… But Einkorn, Cinnamon and Cranberry sounds like a perfect Christmas brunch addition…

Sandwich Loaf Sourdough Masters… All recipes in this chapter can be baked in a loaf pan, and end up with that perfect shape to slice and make sandwiches. My favorites are: Oat Milk and Whole Wheat, Coconut Milk and Rye (!!!!), and Almond Milk and Khorasan Sandwich Loaf.

The Simplest Sourdough Rolls… Brilliant, just brilliant!  She uses her basic master recipe all the way through shaping and placing in the banneton, but right before baking she inverts the loaf and cuts into wedges, which makes the cutest little rolls ever!  I intend to bake the Sesame Seed Emmer version in the near future. The chapter ends with an alternative version for “Same-Day Sourdough Wedge Rolls.”

Coiled Filled Sourdough Rolls… From this chapter I picked the recipe featured in this post. I remember when Elaine was developing recipes for the book, she raved about Almond Butter and Banana Khorasan Coils, and now I see the picture and the description in the book… seems like another great one to try this fun preparation.

Swap the Water…  Very interesting chapter, in which she plays with different liquids replacing water. It starts with a Buttermilk White Spelt Master Loaf that might very well be one of the most beautiful breads ever! The picture took my breath away… Note to self: make it. Potato cooking water and beer are other examples found in this section.

Crackers…  Love them all!  What can I say? I was very tempted to use the crackers as featured recipe, but in the end decided to leave them as little teasers. They look adorable and taste great. But I also want to try her Whole Wheat Sesame and Oat Crackers.

Elaine, thank you so much for allowing me to publish a recipe from your first cookbook, hopefully not the last!  Your book is beautiful, the pictures are amazing, and I can sense passion and love for all things sourdough in every sentence of every chapter. I know fully well the amount of work, the commitment and energy you put into it. I can say it totally paid off, and I know everyone who gets your book will lear a lot and have a blast baking from it.

For those who want to order the book, click here.

ONE YEAR AGO: Mango-Hazelnut Entremet Cake

TWO YEAR AGO: Lebanese Lentil Salad and a Cookbook Review

THREE YEARS AGO: Cottage Loaf

FOUR YEARS AGO: Sourdough Loaf with Cranberries and Walnuts

FIVE YEAR AGO: Sichuan Pork Stir-Fry in Garlic Sauce

SIX YEARS AGO: Our Green Trip to Colorado

SEVEN YEARS AGO: Ditalini Pasta Salad

EIGHT YEARS AGO: Celebrate Wednesday with a Thai Seafood Curry

NINE YEARS AGO:  Post-workout Breakfast

TEN YEARS AGO: Semolina Barbecue Buns

ELEVEN YEARS AGO: Lavash Crackers