CLAY POT PORK ROAST

This recipe brings me nice memories!  It was featured in my favorite cooking show of all times, David Rosengarten‘s Taste, that aired on the FoodTV from 1994 to 2002.  Because of this particular episode I bought my first clay pot, a nice unglazed Romertopf, that unfortunately ended up shattered to pieces during a move.   This recipe, low in fat but full of flavor, was one of the first dinners I cooked for Phil when we were dating.  As I said, it brings me wonderful memories…  😉

ANCHO & CHIPOTLE RUBBED PORK LOIN
(from David Rosengarten)

3 dried ancho chilies
2 chipotles canned in adobo sauce
1 teaspoon minced garlic
1 tablespoon olive oil
1 tablespoon ground cumin
pinch of ground cloves
2 teaspoons salt
1 teaspoon freshly ground black pepper
1 boneless loin of pork (about 1 1/2 to 2 pounds)
1 medium white onion, very thinly sliced

Toast the dried ancho chilies by putting them in a preheated 200°F oven for 3 minutes, do not let them burn. Remove the toasted chilies from the oven and open them up. Remove and discard the seeds and stems. Place the chilies in a bowl and cover with very hot tap water.

When chilies are soft (after about 15 minutes), remove them from the water and place them together with the chipotles in the work bowl of a food processor, along with the garlic, oil, cumin, cloves, salt, and pepper. Pulse to make a rough paste. Rub the paste all over the pork loin with your fingers. Cover the rubbed pork and refrigerate for 8 hours. Remove it from the refrigerator 1 hour before you want to start cooking.

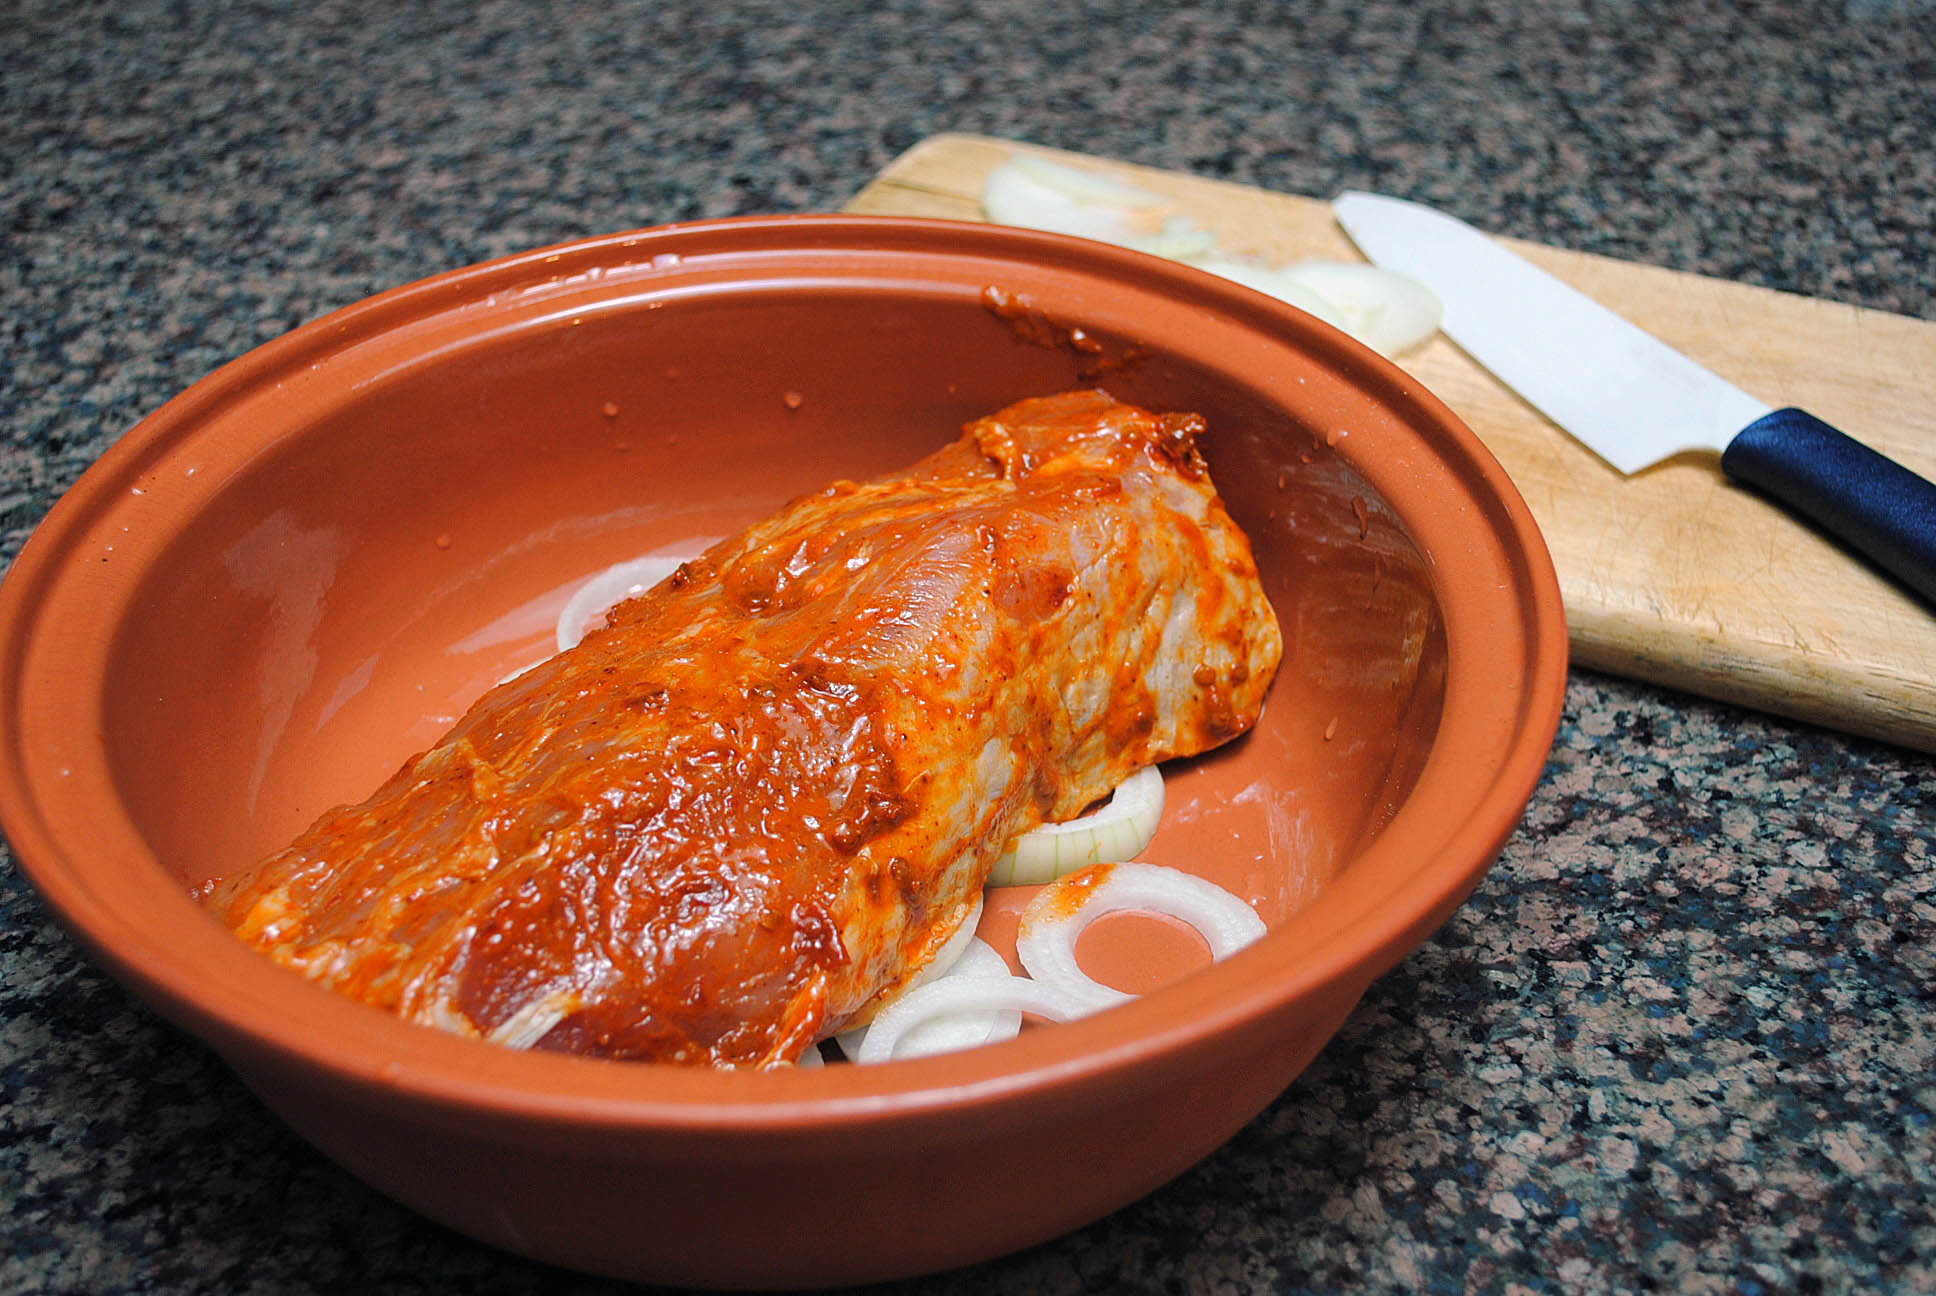
Make a bed of half the sliced onion in the clay pot. Lay the marinated pork loin over it. Cover the pork with the remaining onion. Do not add any liquid.   If your clay pot is unglazed, you may have to soak it (or only its lid) in water before using.  Follow the instructions for your clay pot, but almost any brand needs to go in a cold oven, so place it in the oven and turn it to 300F.  Once it reaches the temperature,  cook, covered for one hour. Do not open the pot. After one hour, remove the roast from the oven. Let it sit in its broth, still covered, for 10 minutes. Slice the roast thinly and serve.

“Life is a matter of taste…”  ENJOY!

to print the recipe, click here

I cannot praise this recipe enough!  The color in the photo was not enhanced by Photoshop or any other trick.   The chilies give the onions an amazing red/orange tint, and the clay pot locks in moisture, so that the dish creates its own juices.   I left the onions whole around the side of the serving dish, because Phil prefers to avoid them, but you could remove them together with some of the cooking juices and process, making a spicy sauce to spoon over the meat. Thickening it with some type of starch would be optional. I like this preparation on the lighter side.    Whatever you choose to do, the key is to cut the pork in very thin slices.  They will be tender and juicy, almost as if you brined the meat before cooking.

I’ve made this exact recipe without marinating for several hours, and it was still delicious, but if you have 8 hours to spare, do as David suggests.  He knows what he’s talking about…

Almost ready to go into the oven….

I now use a glazed clay pot, and actually prefer this kind because it cleans better.  Neat freak that I am, using cast iron pans and clay pots that should not be washed with soap and water is a bit of a problem.    So, a glazed pot suits me much better!  😉

ONE YEAR AGO: Panmarino

TWO YEARS AGO:  A Classic Roast Chicken (still the most popular blog post in this site!)

Add to FacebookAdd to DiggAdd to Del.icio.usAdd to StumbleuponAdd to RedditAdd to BlinklistAdd to TwitterAdd to TechnoratiAdd to Yahoo BuzzAdd to Newsvine

CHIARELLO’S CHICKEN CACCIATORE

Last week’s winner meal in our home, two thumbs up from both of us, this recipe is a bit unusual for a “cacciatore,” as it contains very few ingredients, and omits the traditional peppers and onions that most versions are loaded with.  Two little twists in the recipe:  the use of porcini mushrooms and the way it handles the parsley.  Normally, parsley is added at the end of cooking to preserve its freshness, but in this case Chiarello adds most of it right at the initial stage, and saves some for sprinkling on top of the dish at serving time.  My main modification, as often happens with braised chicken thighs, was to increase cooking time by a long shot.

CHICKEN CACCIATORE PRONTO
(from Michael Chiarello – Casual Cooking)

1/2 oz dried porcini mushrooms
1 cup hot water
6 chicken thighs
1/2 teaspoon salt
1/4 teaspoon freshly ground pepper
2 tablespoons olive oil
1 clove garlic, minced
3 tablespoons finely chopped Italian  parsley
3/4 cup tomato puree
1/2 cup  chicken broth
1/2 cup water

Place the dried porcini mushrooms in a small bowl or glass, and add the hot water. Leave them sitting in the water for 30 minutes.  Remove the mushrooms with a slotted spoon; finely chop. Strain the liquid through cheesecloth to catch any dirt or solids, and reserve.

Sprinkle chicken with salt and pepper. Heat the olive oil on a large skillet, add the chicken, skin sides down; cook 8 to 10 minutes or until golden brown, turn and cook the other side for 3 to 4 minutes.  Transfer chicken to a platter; remove all but 1 tablespoon of oil from skillet.

Add garlic to oil in skillet; cook over medium heat about 30 seconds, stirring occasionally, until fragrant. Stir in 2 tablespoons of the parsley; cook for a minute, stir in mushrooms, tomato puree, chicken broth, 1/2 cup water and reserved mushroom liquid; heat to a simmer. Add chicken, skin sides up; reduce heat to low. Cover; cook until done to your liking (I cooked for 50  minutes in a very gentle heat, turning the pieces a couple of times during cooking, ending with them skin side up).

Transfer chicken to a serving platter. Increase heat for sauce to high; boil sauce 6 to 8 minutes, stirring occasionally, until thickened. To serve, spoon sauce over chicken; sprinkle with remaining 1 tablespoon parsley.

ENJOY!

to print the recipe, click here

(click to enlarge the images)

Dried porcini mushrooms are one of my favorite ingredients. They wait patiently inside the bag, and once you add warm water, they soak it, turn all soft, and fill your kitchen with that intense mushroom-y smell that is a sure sign of a fantastic meal ahead.   Michael Chiarello hit the jackpot when he combined porcini and parsley, in  a sort of minimalist approach that needs nothing else to shine.   According to his recipe, you only need to cook the thighs for 20 to 25 minutes.  I always go for a “falling off the bone” tenderness, and that is not even close to happening in less than half an hour. Use your own favorite method.

This was a very tasty recipe, perfect to make ahead for entertaining.  We enjoyed it with some orecchiette soaked in the cacciatore’s sauce, and stove-top blasted broccoli.

For another version of this delicious dish, jump to Rufu’s blog clicking here…

ONE YEAR AGO: Donna Hay’s Thai-Inspired Dinner

TWO YEARG AGO: Panettone

Add to FacebookAdd to DiggAdd to Del.icio.usAdd to StumbleuponAdd to RedditAdd to BlinklistAdd to TwitterAdd to TechnoratiAdd to Yahoo BuzzAdd to Newsvine

A MUST-MAKE VEGGIE PUREE

Those who are familiar with low-carb diets know that cauliflower is the number one choice as a substitute  for potatoes, and even rice.  Indeed,  I’ve seen recipes in which the florets are grated and used in what it’s called  “cauli-rice.”   I don’t think it would fool me, though, I love rice way too much!  😉  Now, back to puree…

Potatoes have enough starch to produce a creamy and smooth texture when cooked and mashed.  Other veggies like cauliflower, broccoli, even parsnips, end up with a more watery and grainy texture.  For that reason, most recipes will coach you into adding a lot of butter, heavy cream, or some type of cream cheese.   Sally Schneider, author of  “The Improvisational Cook,” came up with a very clever twist: she cooks the veggie in milk (low fat is fine), and adds to the cooking liquid an apple and a little bit of pasta (like angel hair).  The result is amazing.  Never in a million years I expected Phil to urge me to blog about a cauliflower recipe. His exact words were:  “make sure you really pump this recipe up, it’s awesome”!

CAULIFLOWER AND APPLE PUREE
(adapted from “The Improvisational Cook“)

1 medium cauliflower, core and leaves removed
1 small apple, peeled and cored, chopped
1/2 quart low fat milk
1/2 quart water
1/2 ounce angel hair pasta, broken in pieces
1 tsp salt
pinch of sugar
ground white pepper

Cut the cauliflower florets and stems roughly into pieces. Add the pieces to a pan with the milk/water, apple, bring to a gentle boil.  Add the pasta, salt, and sugar.   Cook, stirring every once in a while, until the cauliflower is tender (25 minutes).

Remove 1/4 cup from the cooking liquid and reserve. Strain the vegetables (the rest of the milk/water can be used for soups later), place them in a food processor and puree for a couple of minutes, until completely smooth.  Make sure to stop and scrape down the sides of the bowl once or twice.  If too thick, add some of the reserved cooking liquid.

Return the puree to the pan, place it over very low heat, add white pepper, taste, and adjust the seasoning with more salt and pepper.

ENJOY!

to print the recipe, click here

Schneider’s book is perfect for those who like to use recipes as a starting point instead of a rigid set of rules.  She opens each subject with a section called “Understanding,” explaining the reasoning behind the recipes in that section.  Finally, she offers  suggestions to improvise on your own.
I absolutely love this approach!

This puree is silky-smooth, you won’t taste the apple, but it really does something to “tame” the cauliflower flavor, so even those with “cauliflower issues” will be pleased.   Of course, because there’s a small amount of pasta in it, this dish won’t be as low in carbs as a pure cauliflower version, but it is still  much lighter than mashed potatoes.   Sometimes, it’s exactly what we crave…

ONE YEAR AGO: Vegetarian Lasagna

TWO YEARS AGO:  Brazilian Pao de Queijo (Cheese Breads)  – a classic!

Add to FacebookAdd to DiggAdd to Del.icio.usAdd to StumbleuponAdd to RedditAdd to BlinklistAdd to TwitterAdd to TechnoratiAdd to Yahoo BuzzAdd to Newsvine

SAN FRANCISCO SOURDOUGH

Talk about an American classic!  The sourness of this bread is quite unique,  but not everyone is fond of it.  For some, it’s a little excessive, but I happen to love it.  In fact, I’ve considered buying a commercial SF sourdough starter  to try and mimic this bread at home.  However,  the fact that soon that population would change by incorporating yeast and bacteria present in our own environment, made me reluctant to go for it.   Sure, it would be nice to bake a few loaves with a “close to the original” taste, but then I’d be left babying three starters instead of the two I own… and I already take care of way too many strains of bacteria in the lab!  😉

Browsing through the pages of “Bread Alone,” I spotted a recipe for San Francisco Sourdough, and almost did not pay attention to it, thinking that it would involve the authentic starter.  Nope.  Daniel Leader developed his own recipe for it, coaching a regular starter into a slightly increased level of acidity, resulting in a bread that, according to him, would be very  close to the original.

SAN FRANCISCO SOURDOUGH
(from Daniel Leader’s Bread Alone)

for the poolish
4 oz starter (mine was at 100% hydration)
4 oz bread flour
4 oz water

for the dough
8 oz water
all the poolish
13.5 to 16 oz bread flour
1/2 Tbs salt

Make the poolish the day before you want to bake the bread, by combining all the ingredients in a small bowl and leaving at room temperature for 24 hours, preferably from 74 F to 80 F, covered with plastic wrap.

Next day, pour the water at room temperature in the bowl of a KitchenAid, mixer, and add the poolish, breaking it up gently with a wooden spoon, and stirring until dissolved.  Add about 1 cup (5 oz)  of the total flour and the salt, and stir until combined.   Place the dough hook in, keep adding the rest of the flour (you may not need all of it), and knead for about 12 minutes at the second speed of the machine.

Remove the dough to a slightly floured surface, knead it by hand a few times, place it in an oiled bowl, cover loosely with plastic wrap, and let it rise for 2.5 hours, with quick cycles of folding after 45 minutes and 1 hour and 30 minutes. After the second folding cycle, leave the dough undisturbed for the final 60 minutes of bulk fermentation.

Place the risen dough over a slightly floured surface, and without de-flating it too much, form it into a ball.  Let it rise 45 minutes.  Shape the dough as a boule or any other shape you prefer, place it in an appropriate container for the final rise, and leave it at room temperature for 1 hour.

Bake it in a pre-heated 450 F, with steam, for a total of 45 minutes, decreasing the temperature to 425 F after 10 minutes of baking.  If using a cover to create steam, remove the cover after 30 minutes.    Let it cool over a rack for a couple of hours before slicing it.

ENJOY!

to print the recipe, click here

My main modification of the recipe was to include two folding cycles after kneading in the KitchenAid because I felt the dough lacked structure and strength.   I used regular, supermarket bread flour, so it’s possible that it behaved differently from the book’s description.   For the most part, I tend to bake my breads with regular bread flour, not going out of my way to find the one with “a touch of germ,”, or “harvested during Spring, under a full moon.”    😉

Did the bread deliver the promise in the taste department?  YES!  When I tried a piece all by itself to get the real taste of the crumb, it immediately hit me as VERY similar to a San Francisco sourdough, so if you live hundreds of miles away from the Bay Area and develop a craving for that bread, this recipe will soothe you.

A more authentic shape would  be a torpedo type loaf, but I have a weakness for round bread, so that’s how I shaped mine.  Round, oblong, it doesn’t really matter. It hit the spot.  Awesome bread!

I am submitting this post to Yeastspotting…

ONE YEAR AGO:  A Real Oscar Winner  

TWO YEARS AGO: Pane Siciliano

Add to FacebookAdd to DiggAdd to Del.icio.usAdd to StumbleuponAdd to RedditAdd to BlinklistAdd to TwitterAdd to TechnoratiAdd to Yahoo BuzzAdd to Newsvine

THE US LISTERIA OUTBREAK, 2011

As some of the regular readers of this blog may know, our lab has been working on Listeria monocytogenes since 2003, studying how it transports iron from the environment (or from the human body) into the cell. After the recent outbreak involving cantaloupes from Colorado, I thought it would be worth writing about it.

First, how do bacteria contaminate a cantaloupe? Listeria normally exists  in the environment living on dead organic material in the soil (fallen leaves, rotting wood, dead plants … it’s called a saprophyte), and also in many different species of animals from birds to fish.  Indeed, some proportion (around 10%) of healthy humans have listeria in the intestinal tract, without causing any problems. Contamination of foodstuff happens in many ways. For instance, a worker involved in packaging fruits or handling equipment that harvests and packages fruits (or other foodstuff) may contaminate the produce if he or she has poor basic hygiene procedures.  But this source is quite limited in scope, and more likely, contamination results from fields that are treated with infected manure.

Where are the bacteria in the contaminated food? In the case of cantaloupes, bacteria can only infect the outside of the fruit.  Unless the husk or skin of the product is broken, the inside will remain sterile.   However, keep in mind that when  you cut the fruit open with a knife, you may transfer bacteria from the outside to the interior, edible part of the fruit.  One of the interesting characteristics of listeria, which is crucial to its contamination of food, is that unlike most bacteria it grows very well at low temperatures, like in the refrigerator (4 C). Therefore, if food is contaminated by this organism and refrigerated for later consumption, listeria will simply go on happily multiplying.  Another unfortunate characteristic of this nasty pathogen is that it has no odor, and so it doesn’t seem to affect the taste of the food. Some outbreaks in France were linked to chocolate milk, and people were drinking milk heavily contaminated by listeria without any noticeably bad flavor.

Can you get rid of Listeria by washing the fruit?
  Yes.  You can use dish-washing detergent and a soft brush, followed by a good rinse and blotting with a paper towel.  However, if  the fruit was bruised during transport, breaking the natural barrier provided by its skin, then the bacteria gain access to the fruit’s flesh.  Since refrigeration doesn’t slow its multiplication, in this case you are better off discarding any fruit that originated in the region suspected of contamination.

Why is it so hard to pinpoint the source of contamination? Most enteric bacterial pathogens, E.coli O157, Shigella dysenteria , and Salmonella typhimurium for examples, rapidly induce symptoms (within 12 to 24 hours) after ingestion of the contaminated food.   Listeria begs to differ.  It may take a couple of weeks, sometimes more, for symptoms to appear. You can imagine how tricky it becomes for epidemiologists to trace the origin of the outbreak.  Do you remember exactly what you ate 2 weeks ago, and where it was?  If you’re a food blogger  you might have a higher chance of answering yes to this question, but even then, it’s not easy.  😉  Also, the listerial incubation time differs from person to person, complicating the issue even further.

How dangerous is listeria anyway? It depends on who you are. Most healthy individuals will not even develop symptoms or become infected.  It takes a huge dose (about a billion) of bacteria to infect a healthy person.  However, the very young, the very old, pregnant women, and immunocompromised individuals (undergoing steroid treatments, HIV-infected) are at much higher high risk, because their immune systems are not up to the challenge. In France, where unpasteurized cheese is considered (as it should be) a delicacy, pregnant women are advised to avoid them because they are a source of listerial contamination.

What makes Listeria so deadly?  Once you eat contaminated food, the bacteria passes to the intestine, where it invades the epithelial cells,  white blood cells, and then reaches the bloodstream. It releases toxins, which make you sick with similar symptoms to those of other enteric pathogens like E.coli and Salmonella: fever, intestinal cramps, diarrhea, general discomfort. But that’s just the beginning. If your immune system can’t contain the bacterial growth, the strain has one more deadly trick up its sleeve: it can cross the delicate (and normally powerful) barrier between the blood and the brain. Once that happens, meningitis occurs, as well as other serious neurological problems like brain abscesses and paralysis.  Again, for the most part these problems don’t happen with healthy individuals, only those at high risk – young kids, aging people, pregnant women, and immunocompromised patients.

Can listerial infections be treated by antibiotics?  That’s the good side of this pathogen.  Most strains are sensitive to antibiotic treatment, so many  weapons are available to deal with it.  However, once the strain crosses the blood-brain barrier, antibiotics have difficulty clearing the infection, resulting in a high mortality & morbidity rate.

Some cool facts about listeria.   Like many other species of bacteria, listeria can swim because they have little organelles called “flagella”  that propel them in the direction of food and other attractants.   However, it is not able to make flagella at the body temperature of mammals and humans – 37 C – so in our bodies, they cannot swim.   How do they move from cell to cell?  In a fantastic mechanism, that almost seems like the product of a science fiction movie director:  once inside our cells, the bacteria induces some of our own proteins to gather together  (in biochemical terms they  induce these proteins to “polymerize”) forming structures that act like jet propellers, and literally push each bacterium across the cell, making it go through the membrane and reach the neighbor cell.    In a classic cartoon depiction, here is what it looks like:

In this figure from Wikipedia (which originated from the laboratory of Dan Portnoy at UC Berkeley), we see in the outer edge images from electron microscope of the “real thing.”  In the center,  a cartoon depiction of what is taking place.  The bacterium is represented as a black, rod-shaped structure. InlA and InlB are two genes necessary for the initial invasion of epithelial cells.   Once inside the cell, the bacterium is briefly contained inside a little vesicle.  But listeria escapes this small “prison cell” by digesting the vesicle’s membrane with an enzyme called  listeriolysin (LLO).   It is then free inside the cell, and immediately starts the process of polymerizing actin (through the action of proteins like ActA), that act to propel the bacterium across the cell, allowing it to reach the cell adjacent to it.  And the process goes on, and on, and on…

What are we specifically working on?   For listeria to go on multiplying in our body, it needs iron.  It steals iron from us by several different mechanisms.  We are trying to understand what are the most important sources of iron, and how could we prevent listeria from using it.  By interfering with its iron uptake mechanism, we hope to prevent it from multiplying to a level that will cause disease.  Some of our published work can be found jumping here and here.

I hope you found this small overview helpful…

Add to FacebookAdd to DiggAdd to Del.icio.usAdd to StumbleuponAdd to RedditAdd to BlinklistAdd to TwitterAdd to TechnoratiAdd to Yahoo BuzzAdd to Newsvine