Something different for you today, a little glimpse on all that happened this past month in my little cookie blog. If you like to learn more about the different designs, click on the link above each photo.
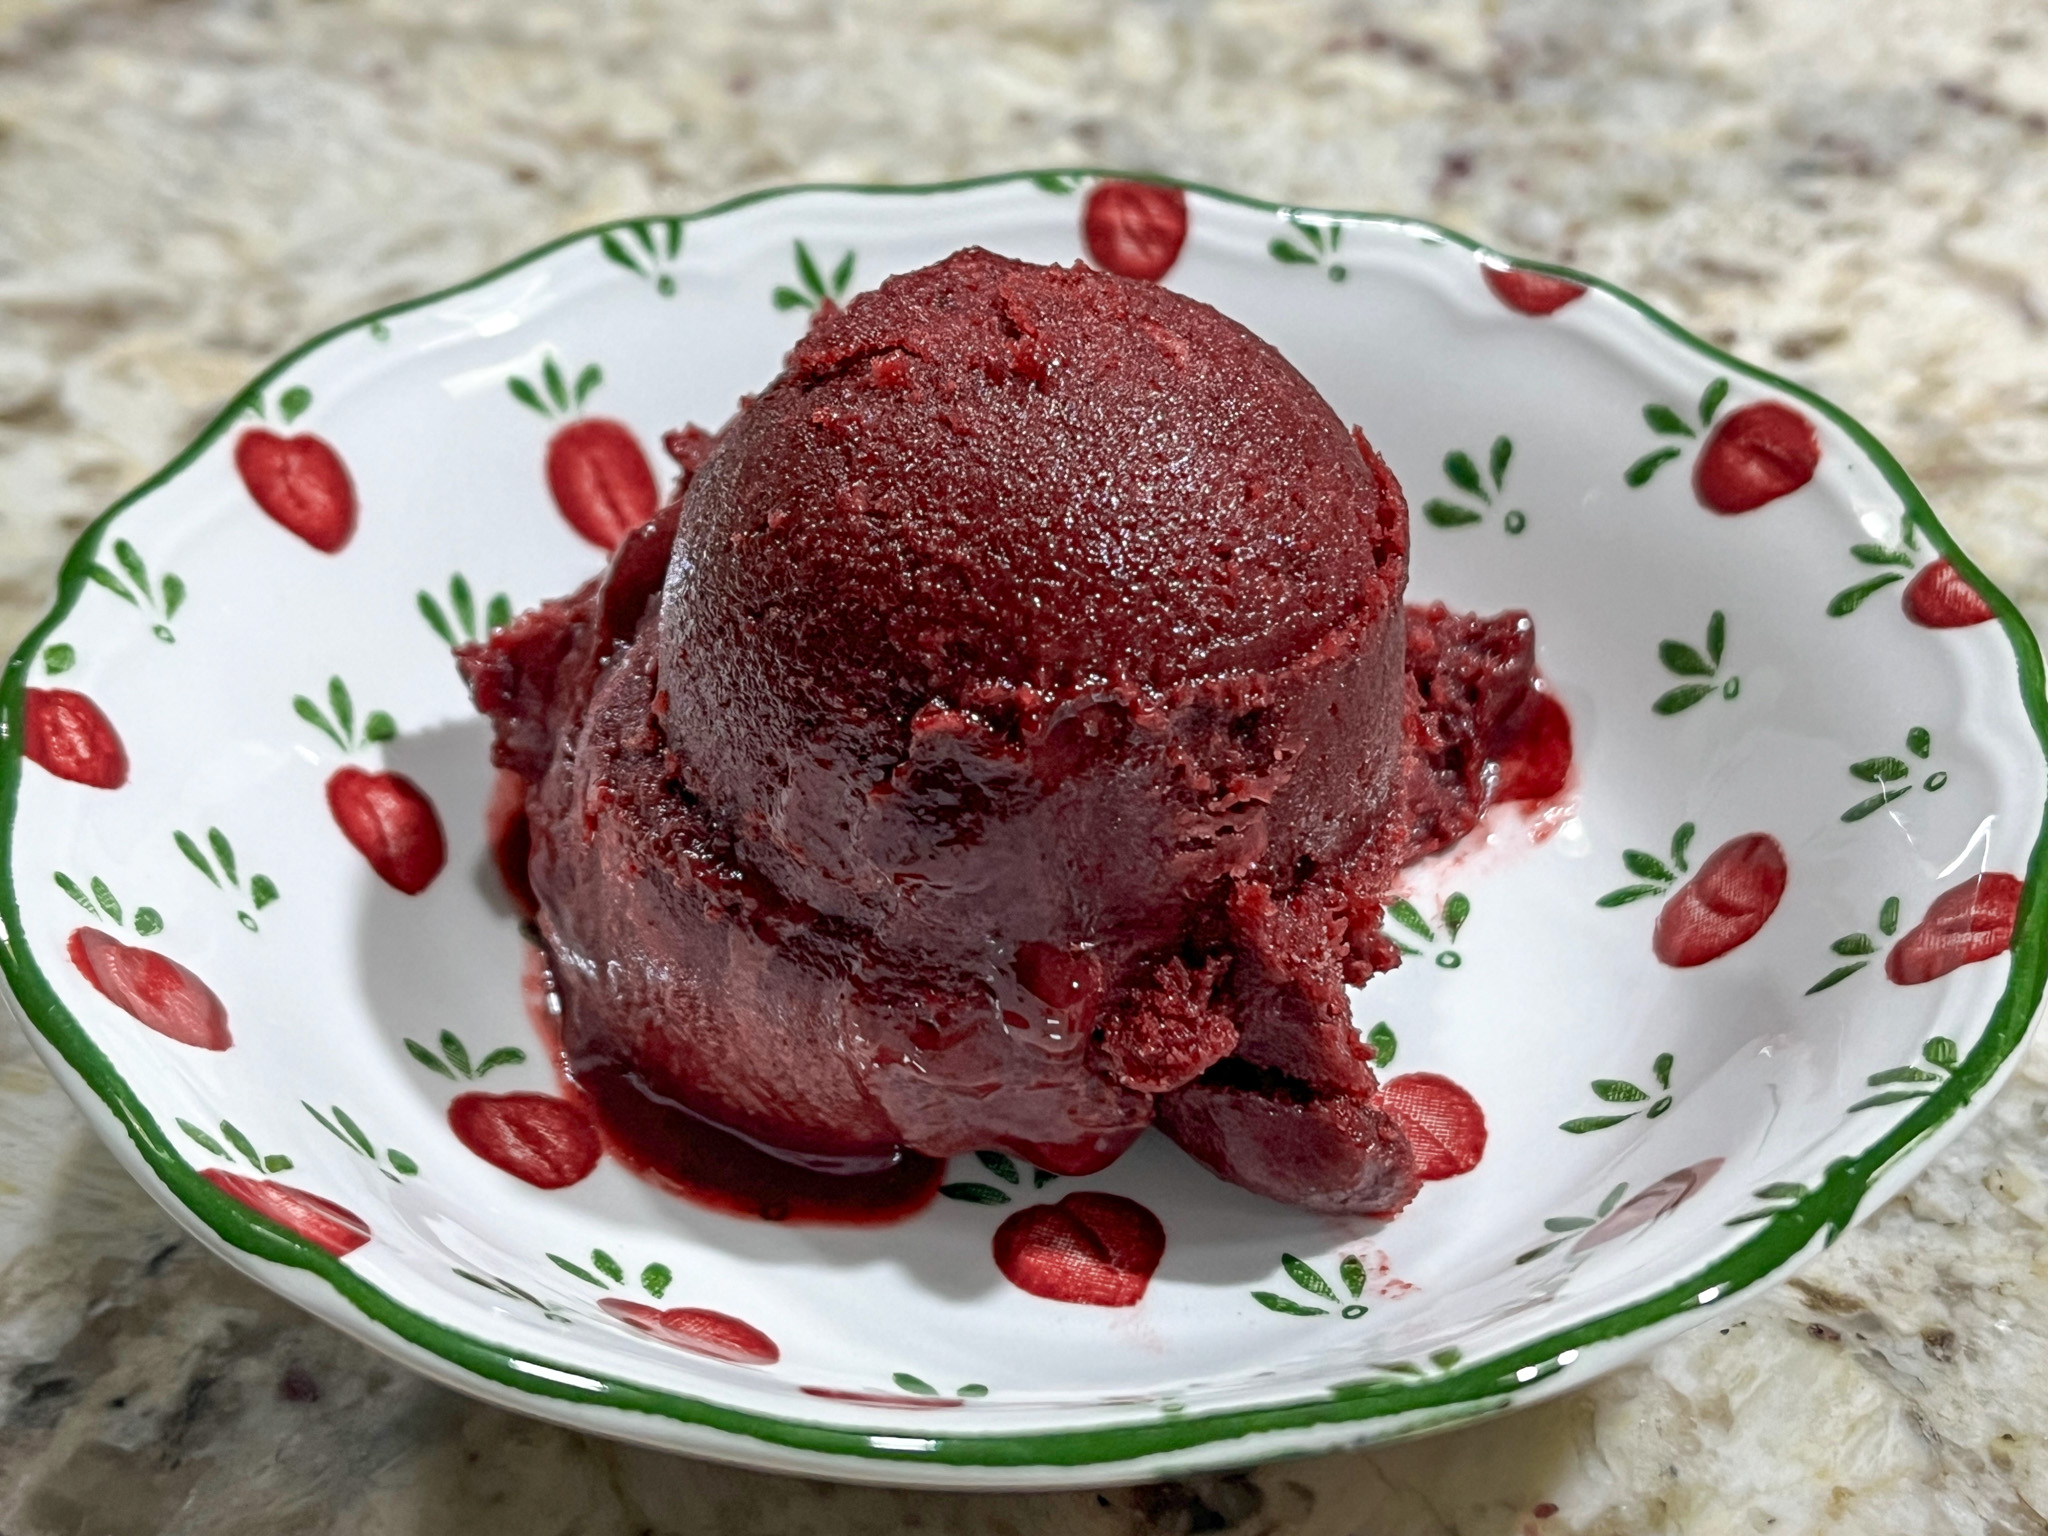
Sorbet is Phil’s area of expertise, I rarely make it or eat it, but I have to tell you, this one turned out so spectacular that I find myself craving it and going for a little bowl at the end of the night. I urge you to give it a try, as açaí is readily available these days in most supermarkets. Recipe was conceived by the amazing man I married, and I am just here to share his greatness.
AÇAÍ-BLACKBERRY SORBET (from The Bewitching Kitchen)
4 cups blackberries 300g frozen açaí pulp (3 sleeves of Sambazon brand) 1/2 cup sugar 1 banana juice of 1 lime 2 Tablespoons vodka 2 Tablespoons creme de cassis (or another liqueur of your choice)
Mix all ingredients in a Vitamix type blender. We don’t mind the seeds of the blackberries, so no need to sieve them out. Process until fully smooth, let it sit in the fridge overnight, covered.
Next day, mix it briefly with a spoon, churn in your ice cream machine.
Comments: Above you see the two recent productions of the husband. The first one is already in the blog for many years, he adapted the Cantaloupe Cayenne to make it with two kinds of melons (Cantaloupe and Santa Claus). For my taste, the açaí-blackberry is a total winner, very complex flavor, not very sweet, excellent texture. Keep in mind that the small amount of alcohol is never cooked out, so this is not appropriate if you are serving dessert for people who cannot consume it. You can also omit it, the texture will suffer a bit, but it will still be delicious.
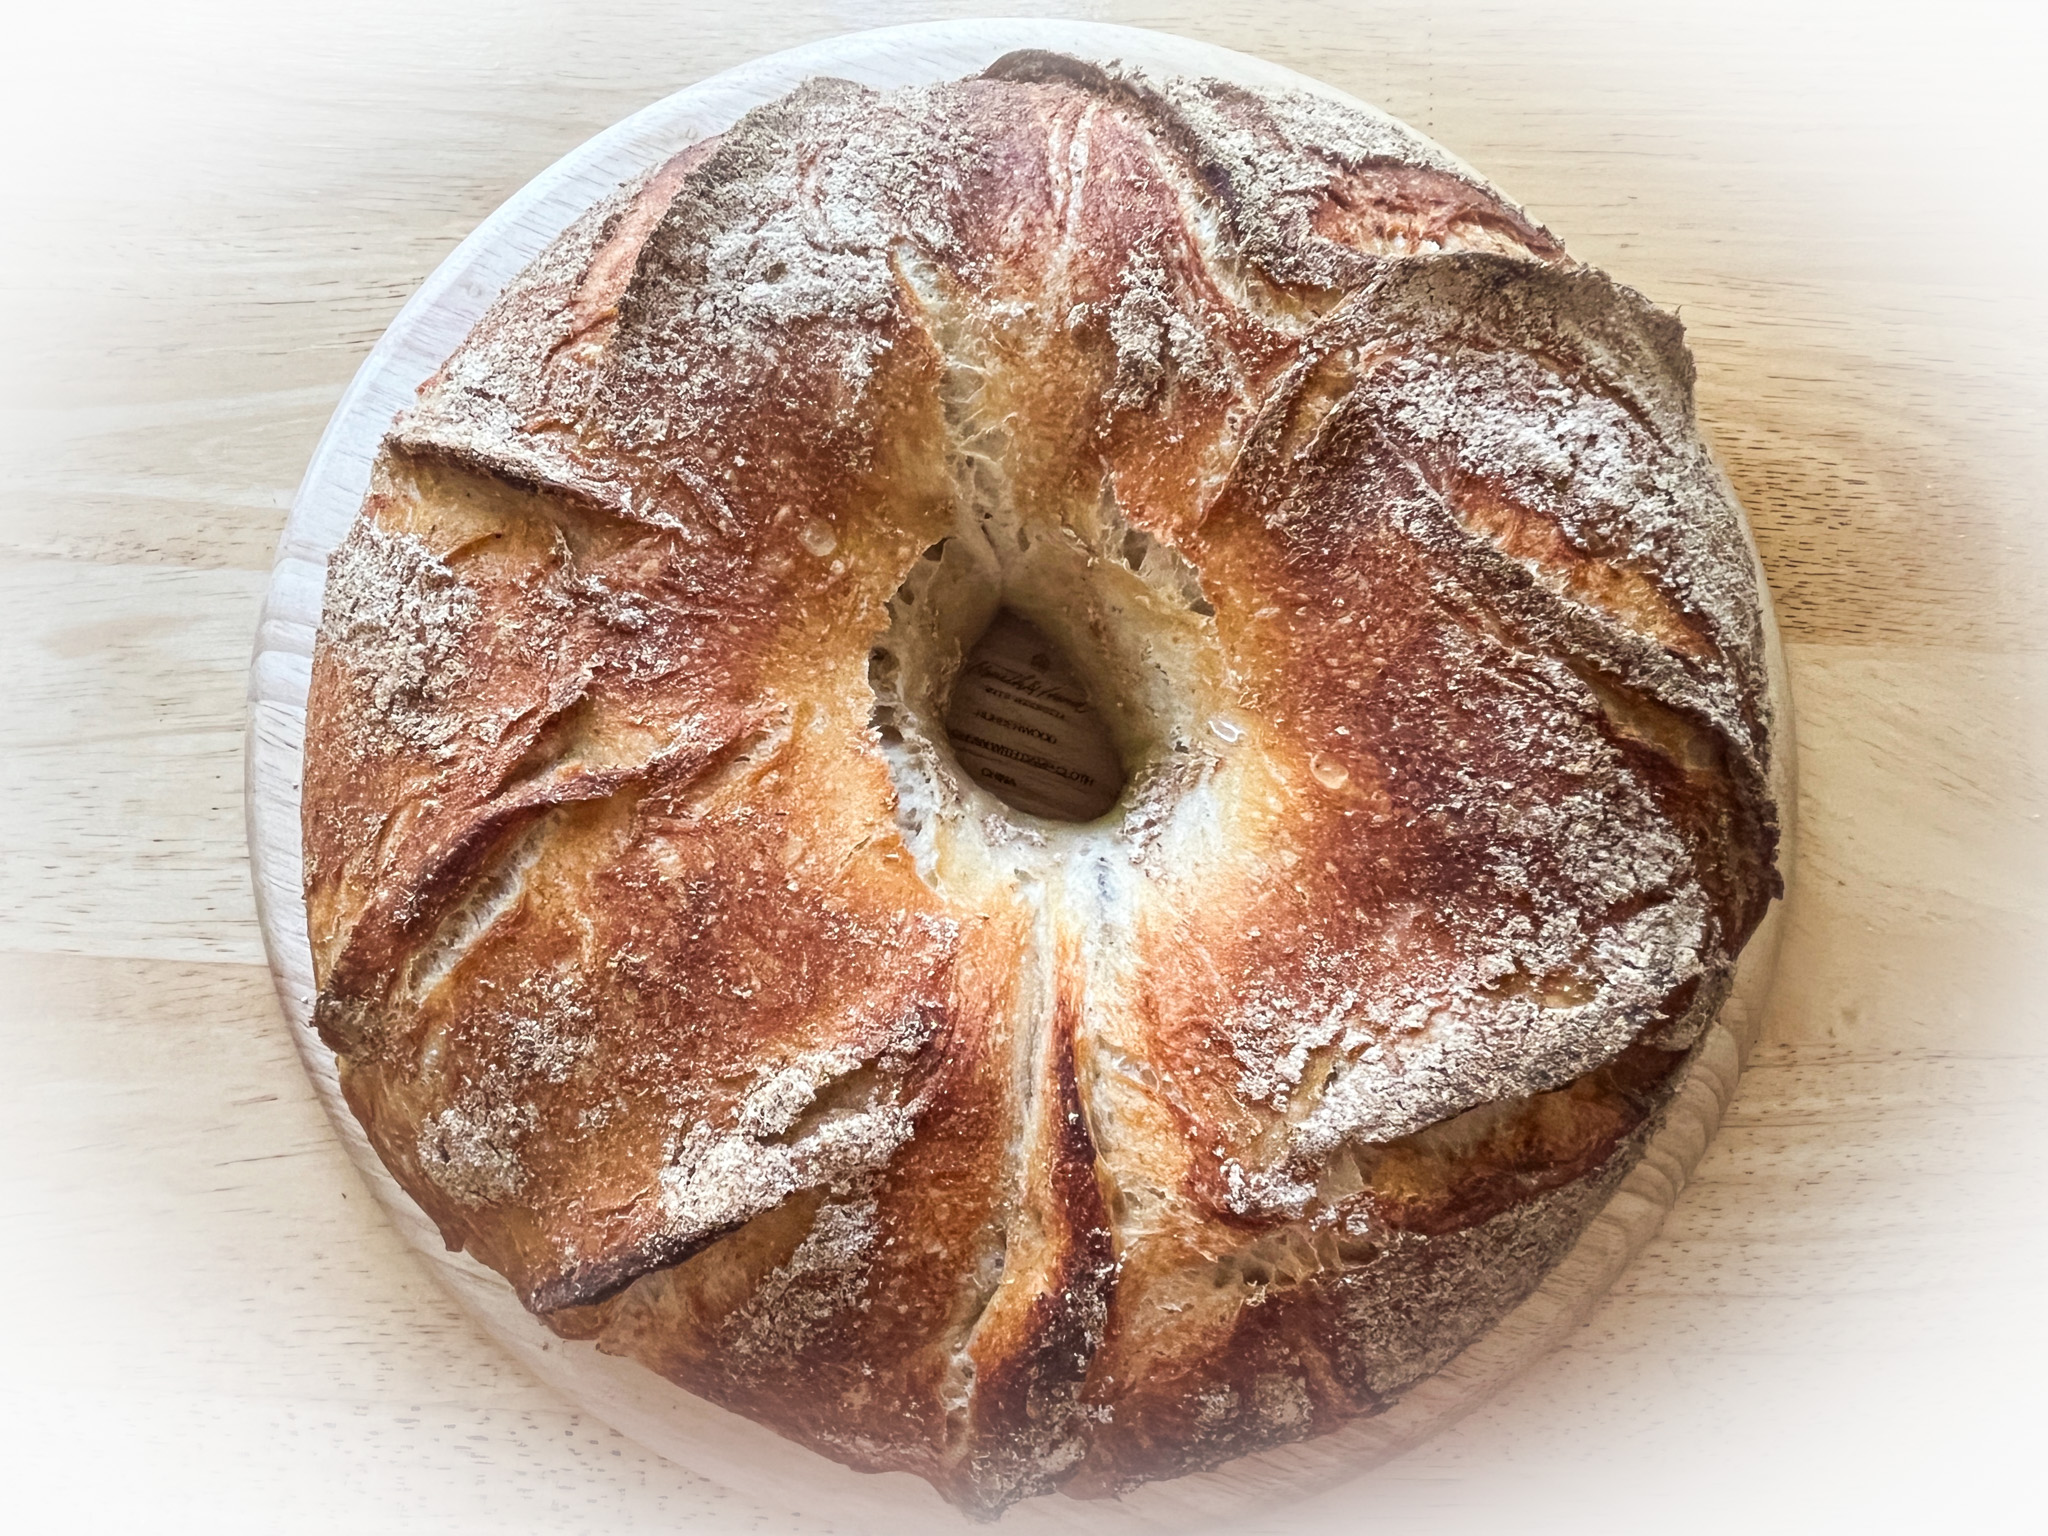
This bread originates in Lyon, and is shaped as a crown, therefore the name “couronne”. However, there are several ways to gild this lily. I am sharing two methods, the first one worked exactly the way I hoped, the second I consider a work in progress. So, yes, I will be back, hopefully with improvements on the second version…
530g bread flour 10g salt 160g sourdough starter at 100% hydratioin 300g water rye flour for dusting
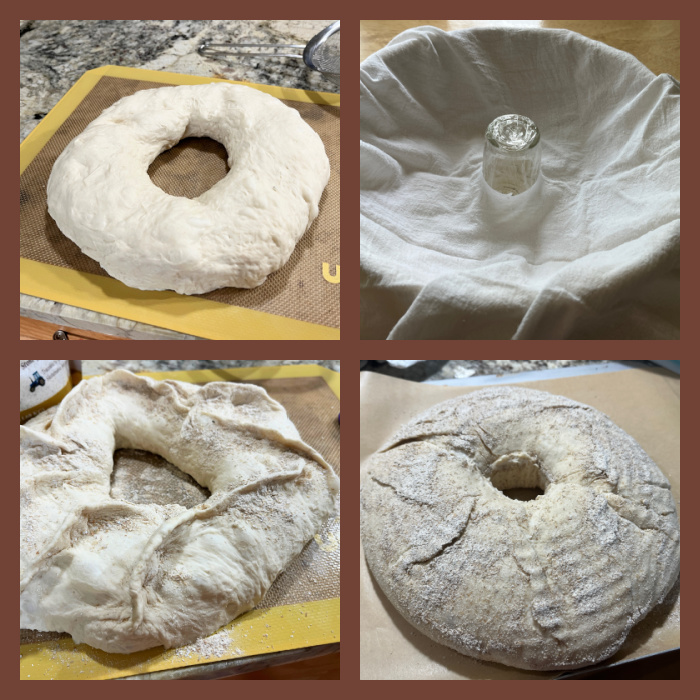
Mix sourdough starter in water and whisk to distribute well. Add bread flour and salt, incorporate either by hand or with a KitchenAid type mixer fitted with a hook dough for a few minutes. Proof at room temperature for 4 to 5 hours with folds at every 45 minutes.
Prepare your round banetton to proof a crown, by placing a small glass or plastic container in the center. Cover with a cloth and flour it lightly with rye flour.
Pre-shape the dough as a round ball. Allow it to relax for 15 minutes. Make a hole in the center (traditionally bakers use their elbow, do what you feel is right…). Enlarge the whole until you get to the size of your round banetton. Now grab some rye flour with your fingers and pinch a series of alternating straight lines on the surface. Pinch the dough well to make a super sharp line of dough raising up. Then flour the surface lightly again and invert the dough on the banetton. Side with the ridges should go down. Proof at room temperature for 2 hours. Place a parchment paper on top, invert the bread over it and slide into the hot oven right away.
Bake at 450F over a stone with steam for 20 minutes, then remove the steam (I used a large roasting pan inverted over the stone as a lid). Bake for 20 to 25 minutes longer. If the bread darkens too much cover it with foil. Internal temperature should be around 210F.
Comments: This was such a fun bread baking adventure! I loved making the ridges and the way they gave the bread that incredibly nice rustic look once it baked. Make sure to use rye flour to dust the surface, it is going to make a big difference if you skip it. White flour won’t have the same effect.
.
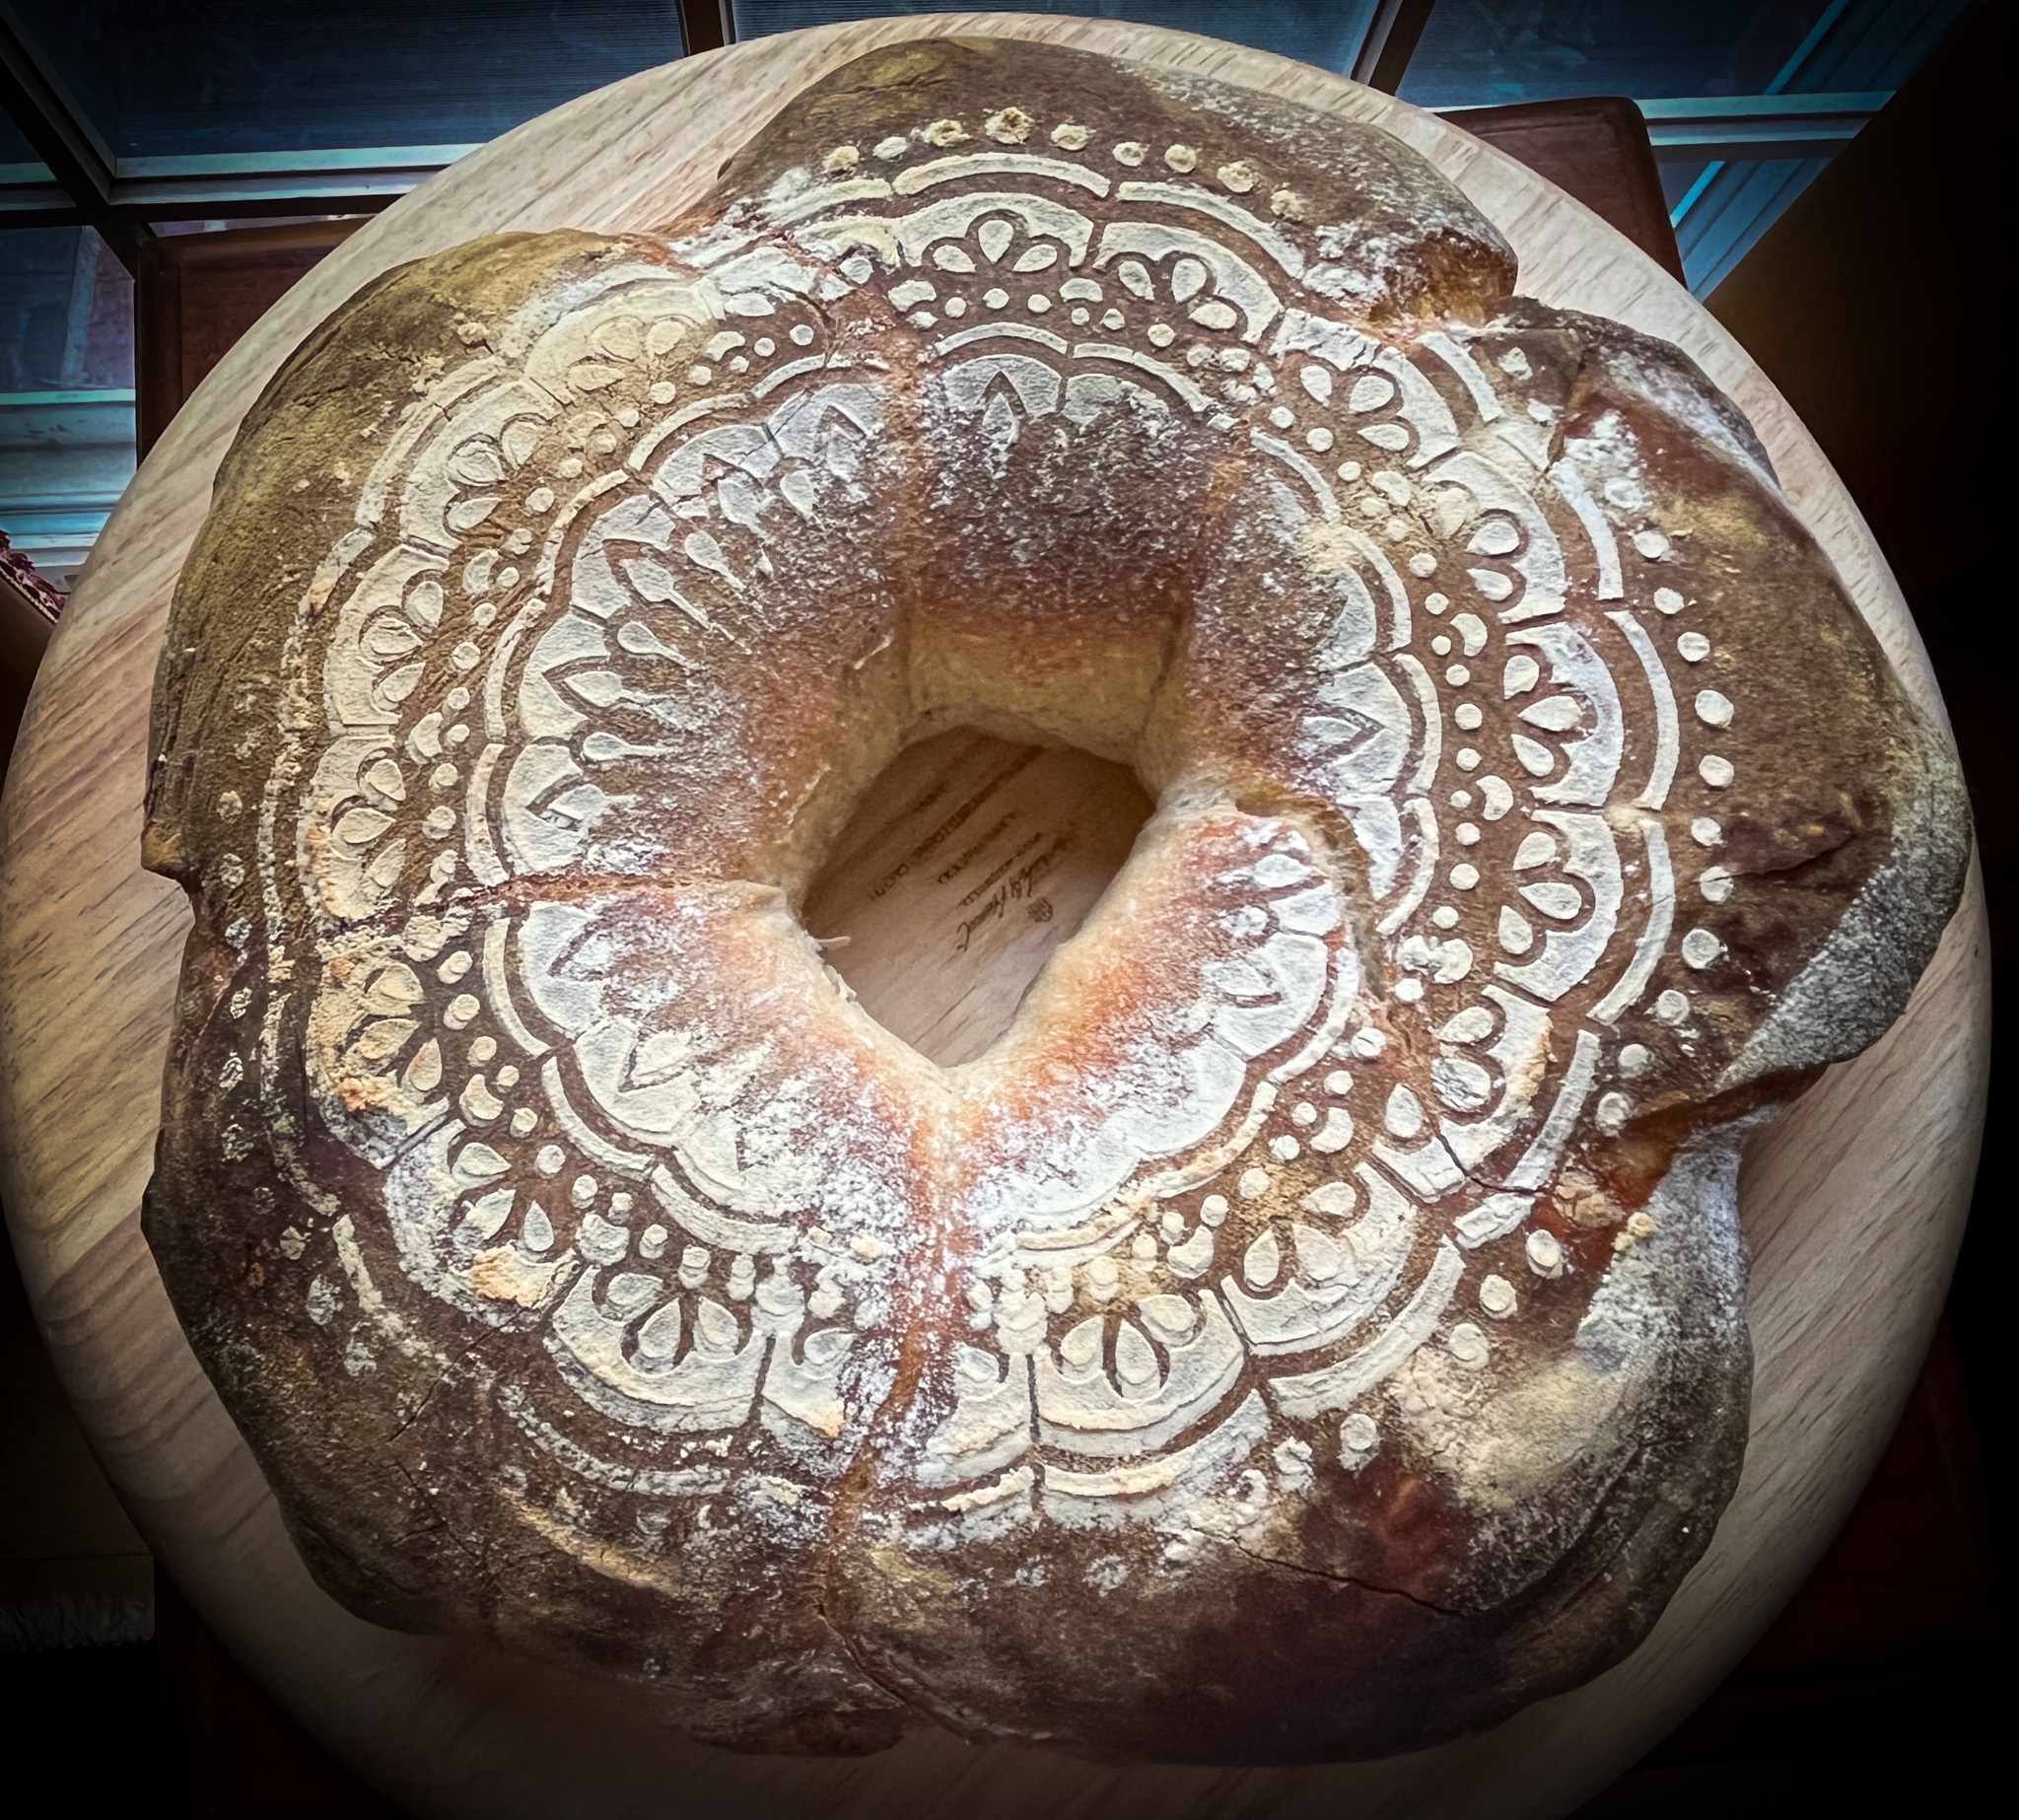
METHOD TWO COURONNE WITH FLAPS
The flaps were a big flop. What can I say? The real beautiful version would have them all lifted up from the surface of the bread, mine stayed more or less glued to the surface. This was my second attempt, the first one was worse, so you won’t be seeing that (wink, wink). The shaping is quite a bit more elaborate. You form pieces of dough that are about 200g in weight, then roll a flap coming out of it, and roll the ball into it. Place to proof with the flap down, open side to the edge of the banetton. Before closing the flap over the ball of dough, a little olive oil is used to brush the edge, so the dough won’t stick and will instead lift during baking. Pictures below give you a general idea of the shaping method.
I had several issues, including the fact that 200g per ball of dough was probably too much. I will revise the whole thing and try again, because I really REALLY want to make it work right. I love the stencil decoration made right before baking (I will share info on the stencil and banetton in my upcoming In My Kitchen post, on October 1st).
I hope you enjoyed this post, and maybe you can give this method a try. If you get your flaps not to flop, let me know your secret!
One of my favorite condiments, gochujang, that gorgeous bright red Korean paste that adds a ton of flavor when it joins any party… Brown food is not exactly photogenic, so don’t let the looks deceive you, these were delicious, and quite easy to prepare.
GOCHUJANG GRILLED CHICKEN THIGHS (from The Bewitching Kitchen)
6 to 8 chicken thighs, boneless, skinless For marinade: 1/4 cup gochujang 1/4 cup soy sauce 1 tablespoon brown sugar Juice of 1/2 lime 1/2 tsp salt 1/2 tsp ground black pepper
Combine all the ingredients for the marinade in a small bowl.
In a large bowl or Ziploc bag, add the chicken thighs and the marinade. Toss well to combine until all the pieces are well coated. Marinade in the fridge for a couple of hours if you have the time, if not, 30 minutes will do.
Grill the chicken thighs 5 to 7 minutes per side, until fully cooked. Remove the pieces to a serving platter, cover with aluminum foil and allow to rest for 10 minutes before slicing.
Comments: In that particular evening, I grilled half of the pieces of chicken using this marinade and half using a simpler concoction (olive oil, lemon juice, salt and pepper), which is Phil’s favorite. We were both very happy with our meals, for my taste the gochujang marinade is near perfect, spicy but not too much, super flavorful.
I hope you consider keeping a jar of gochujang in your fridge, you won’t regret it!
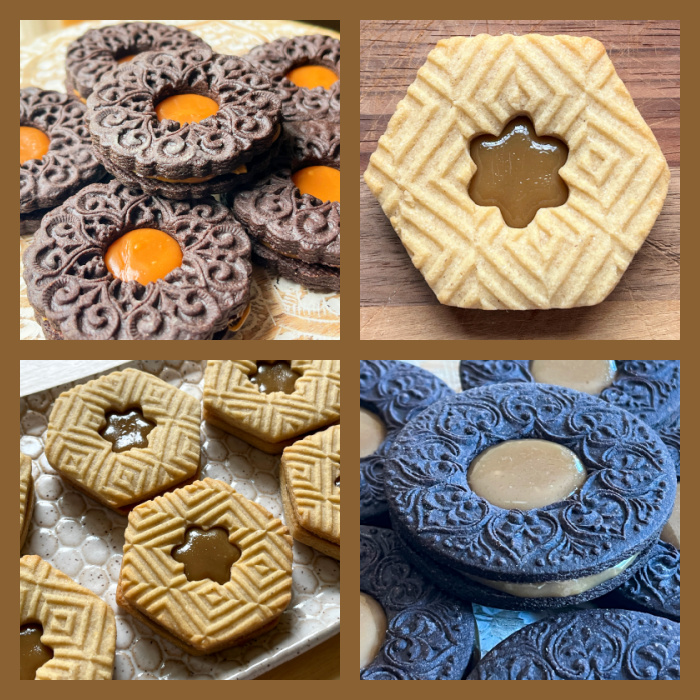
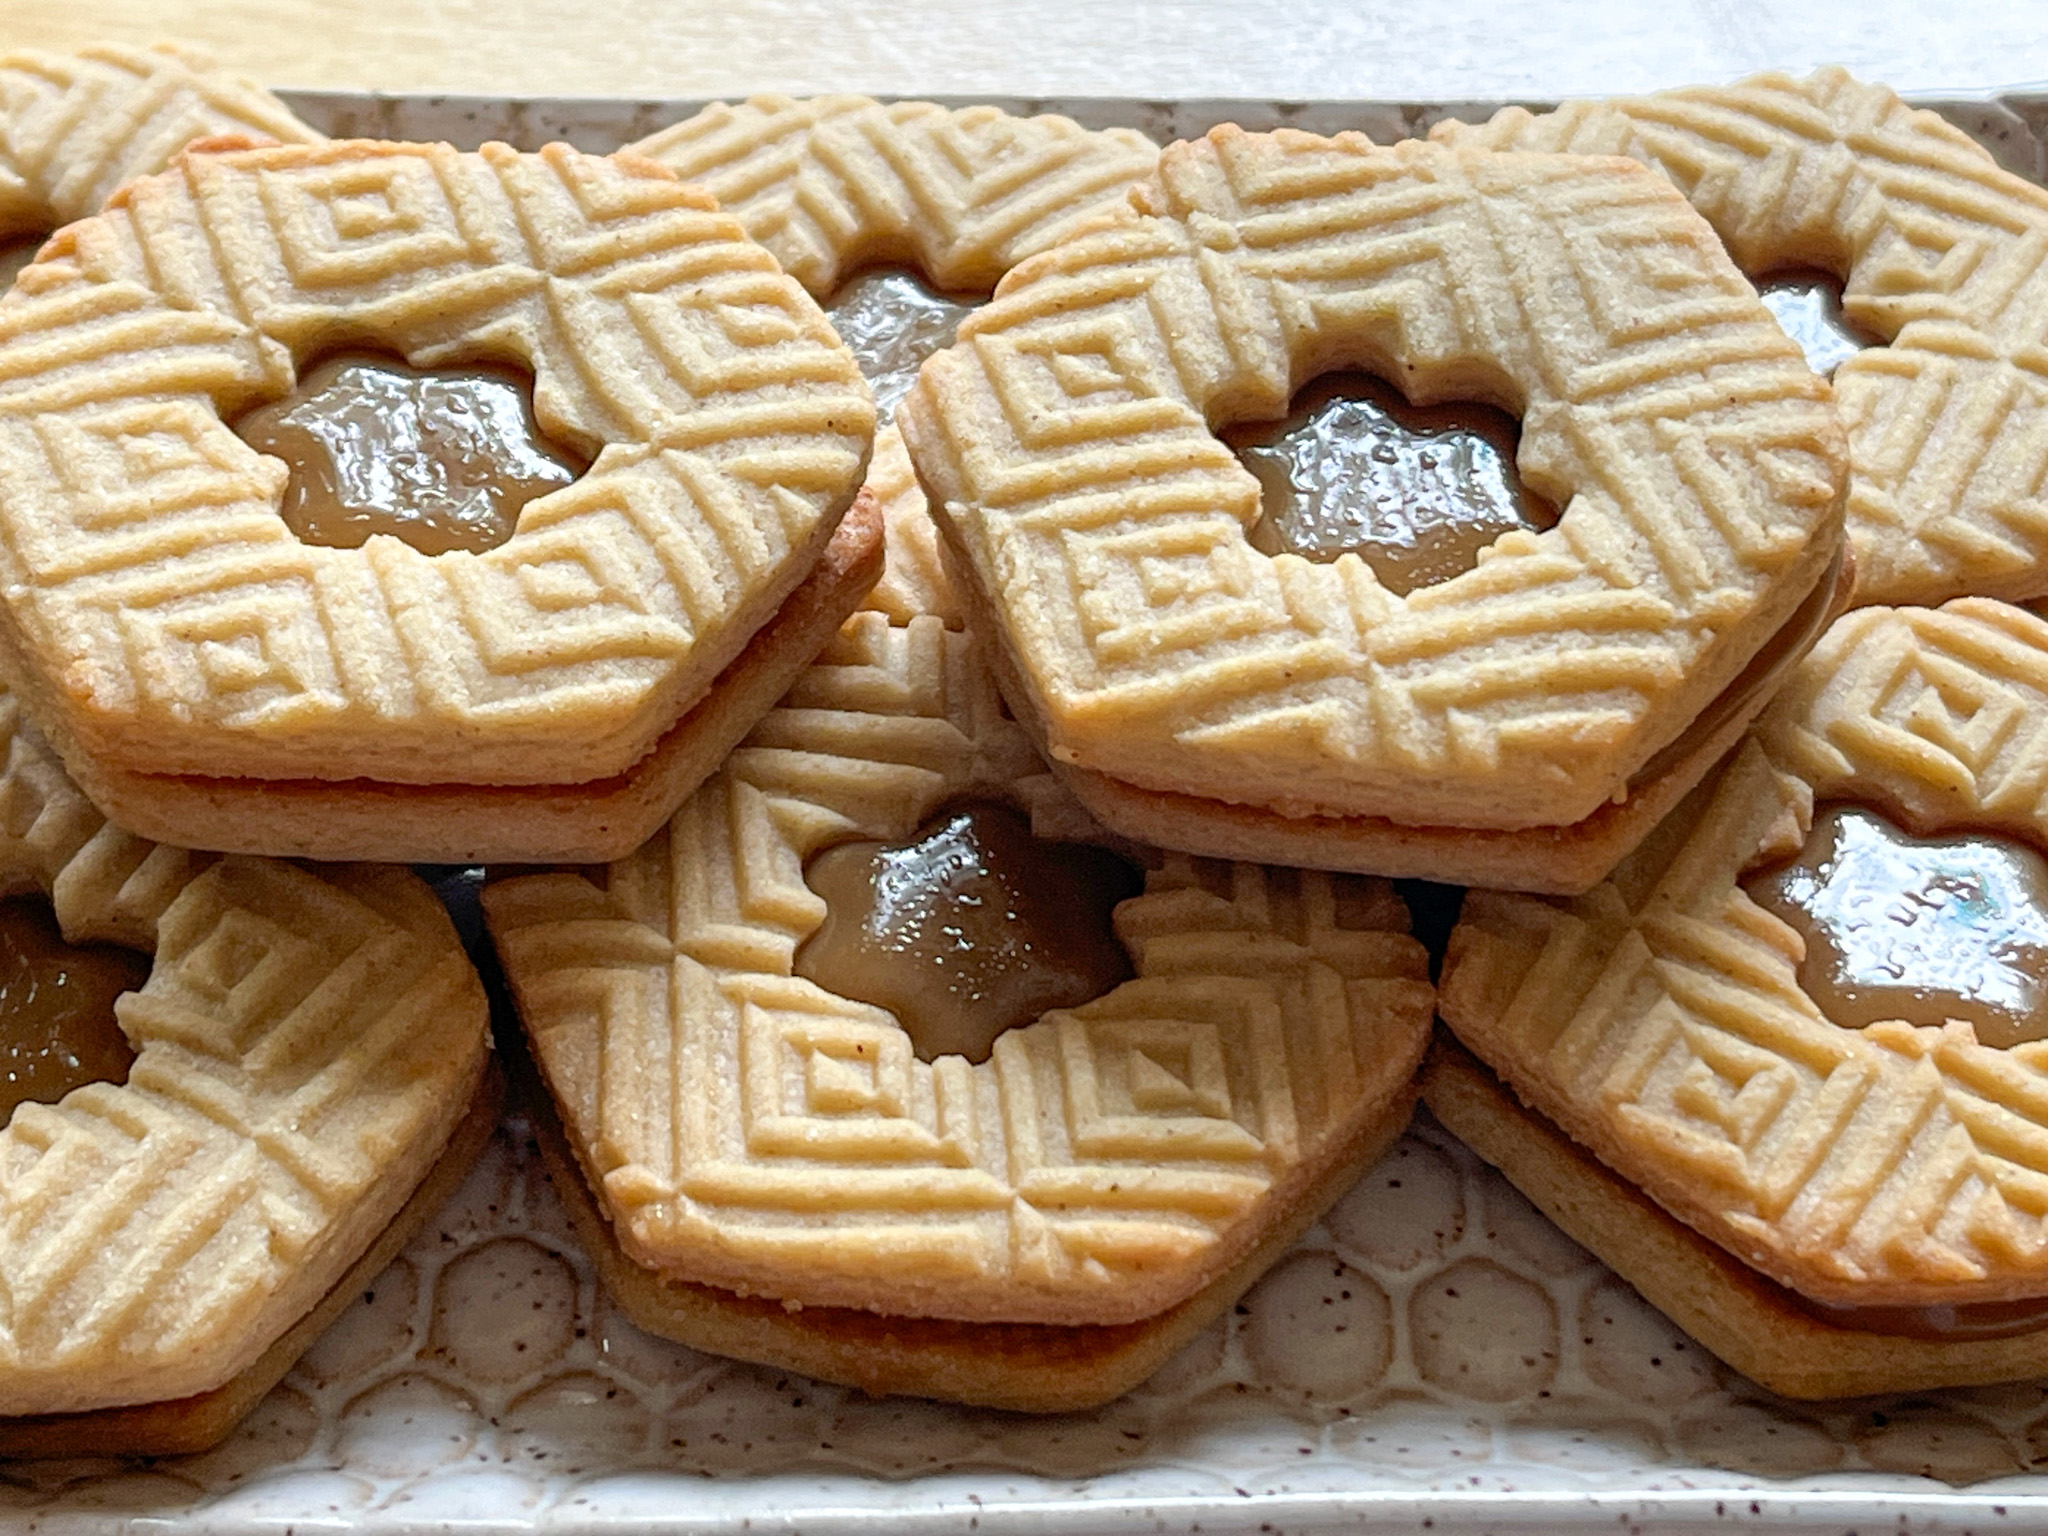
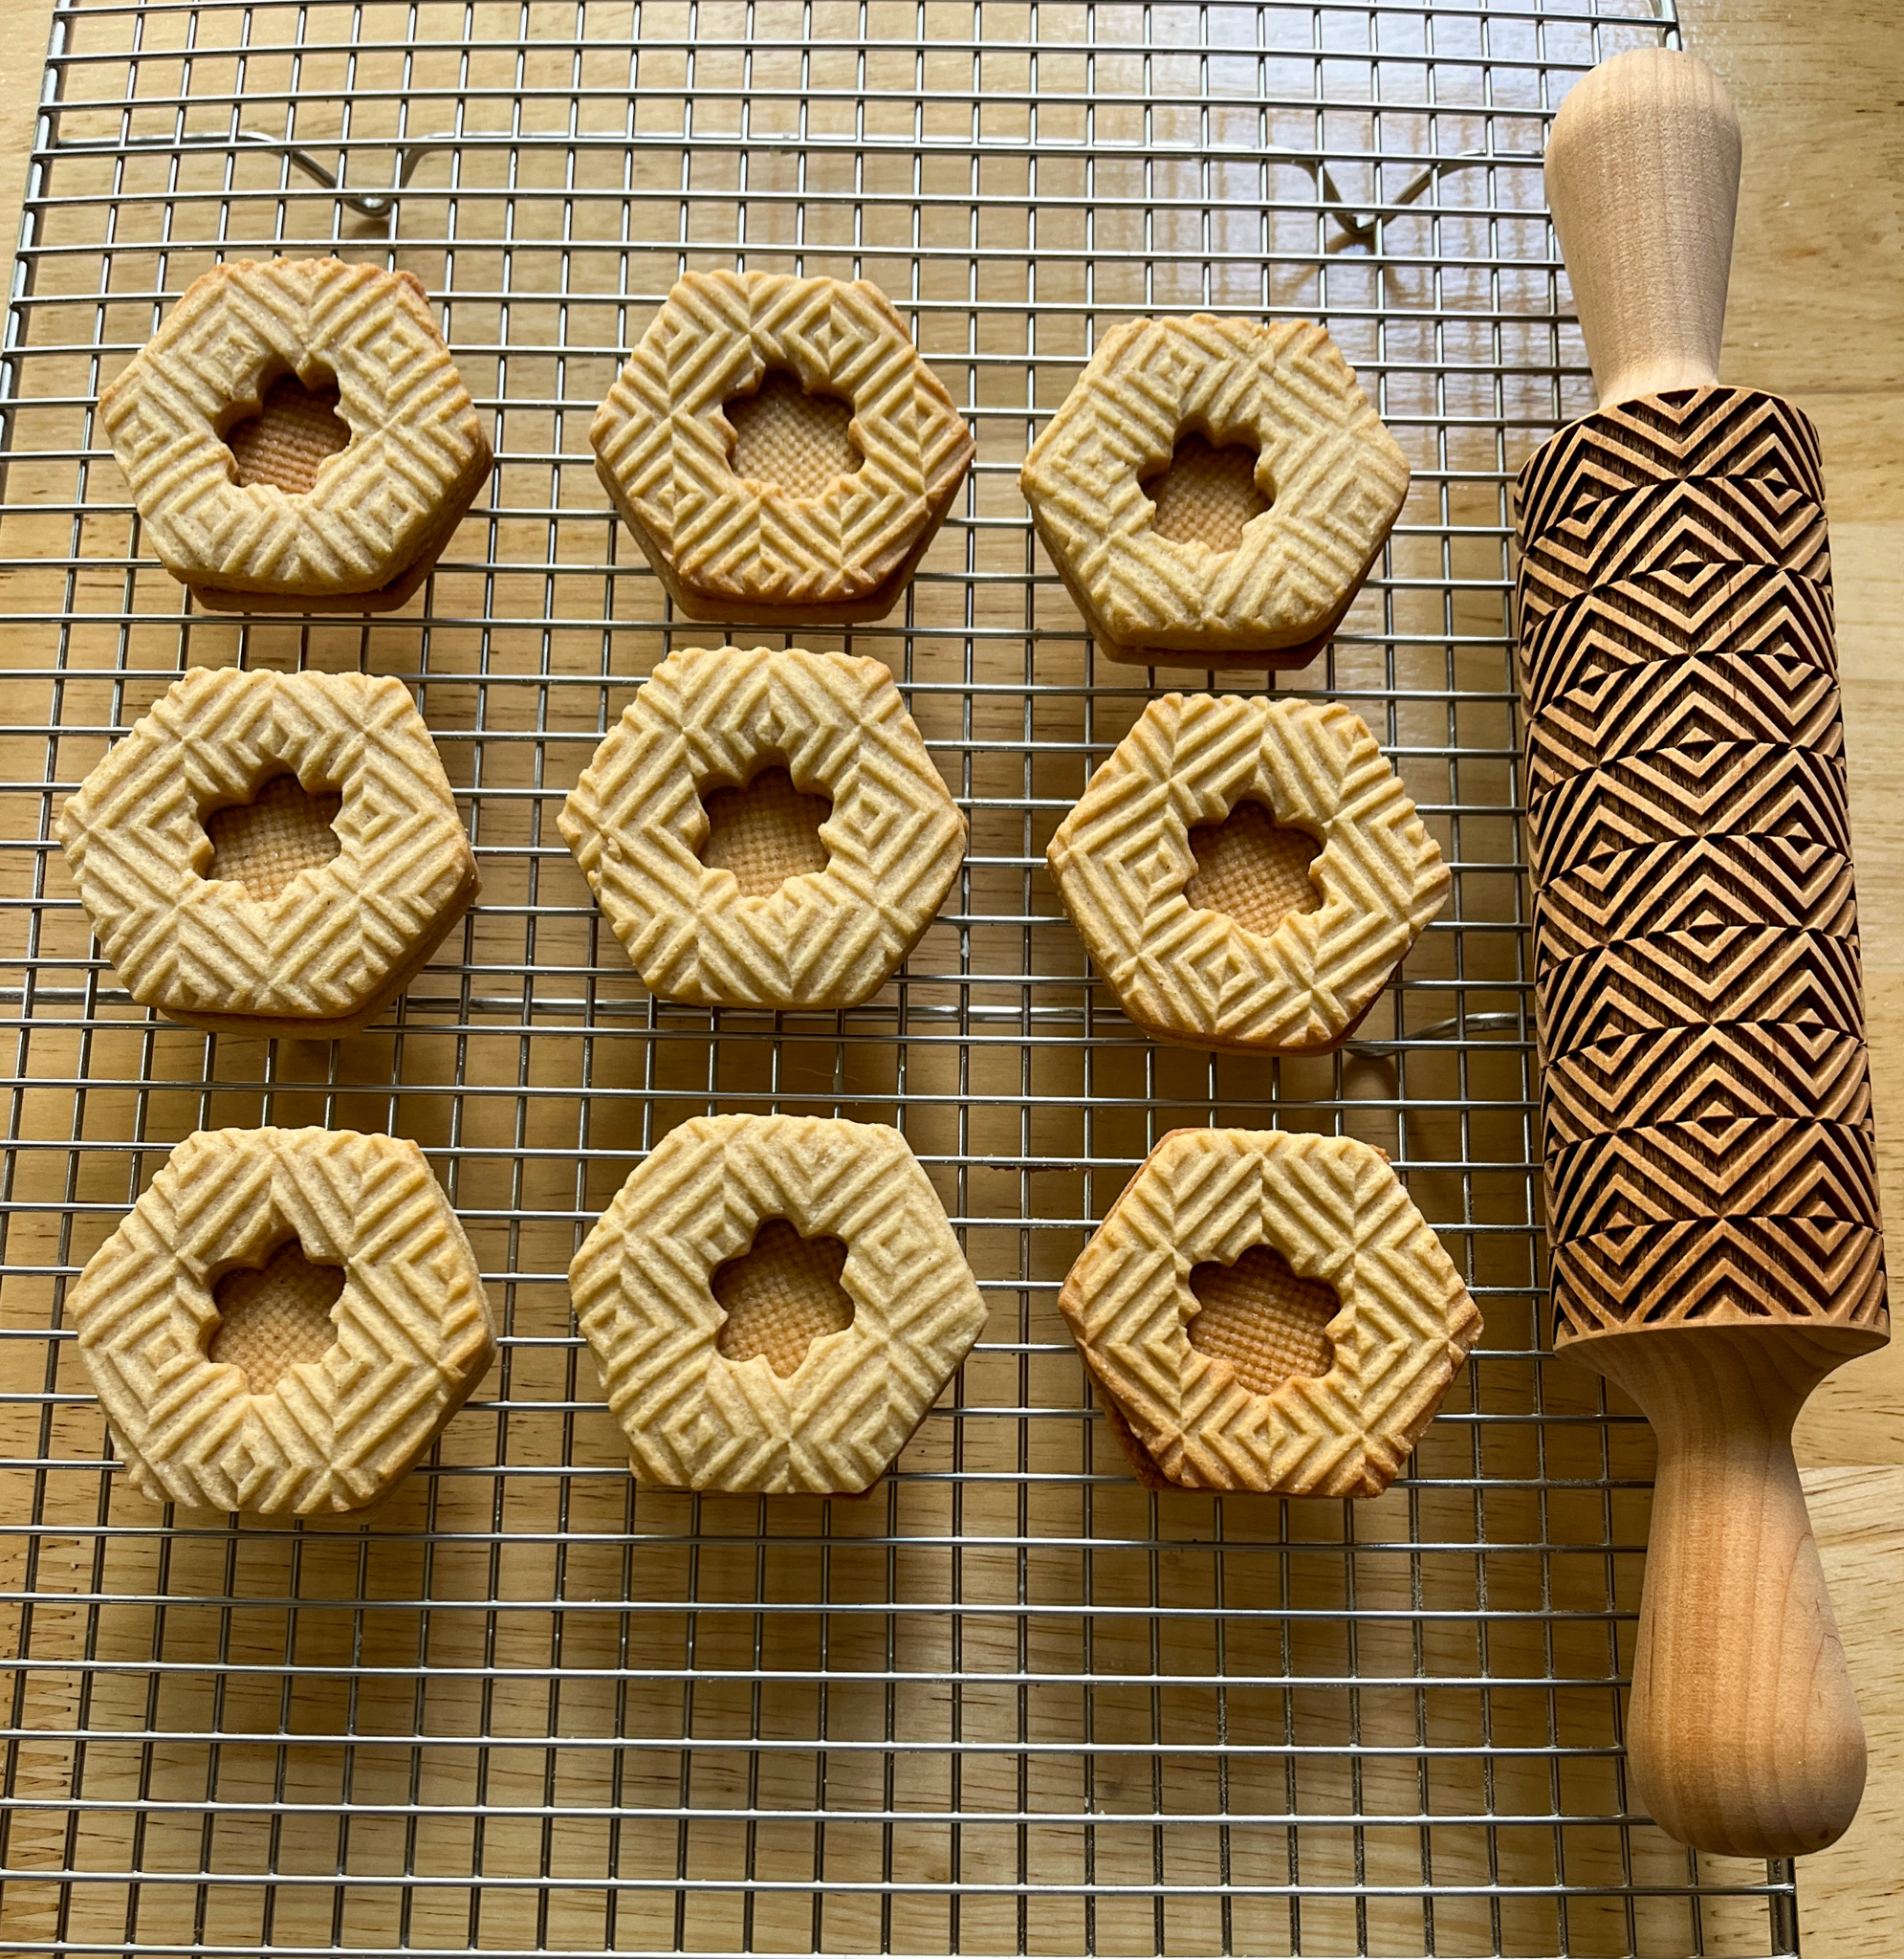
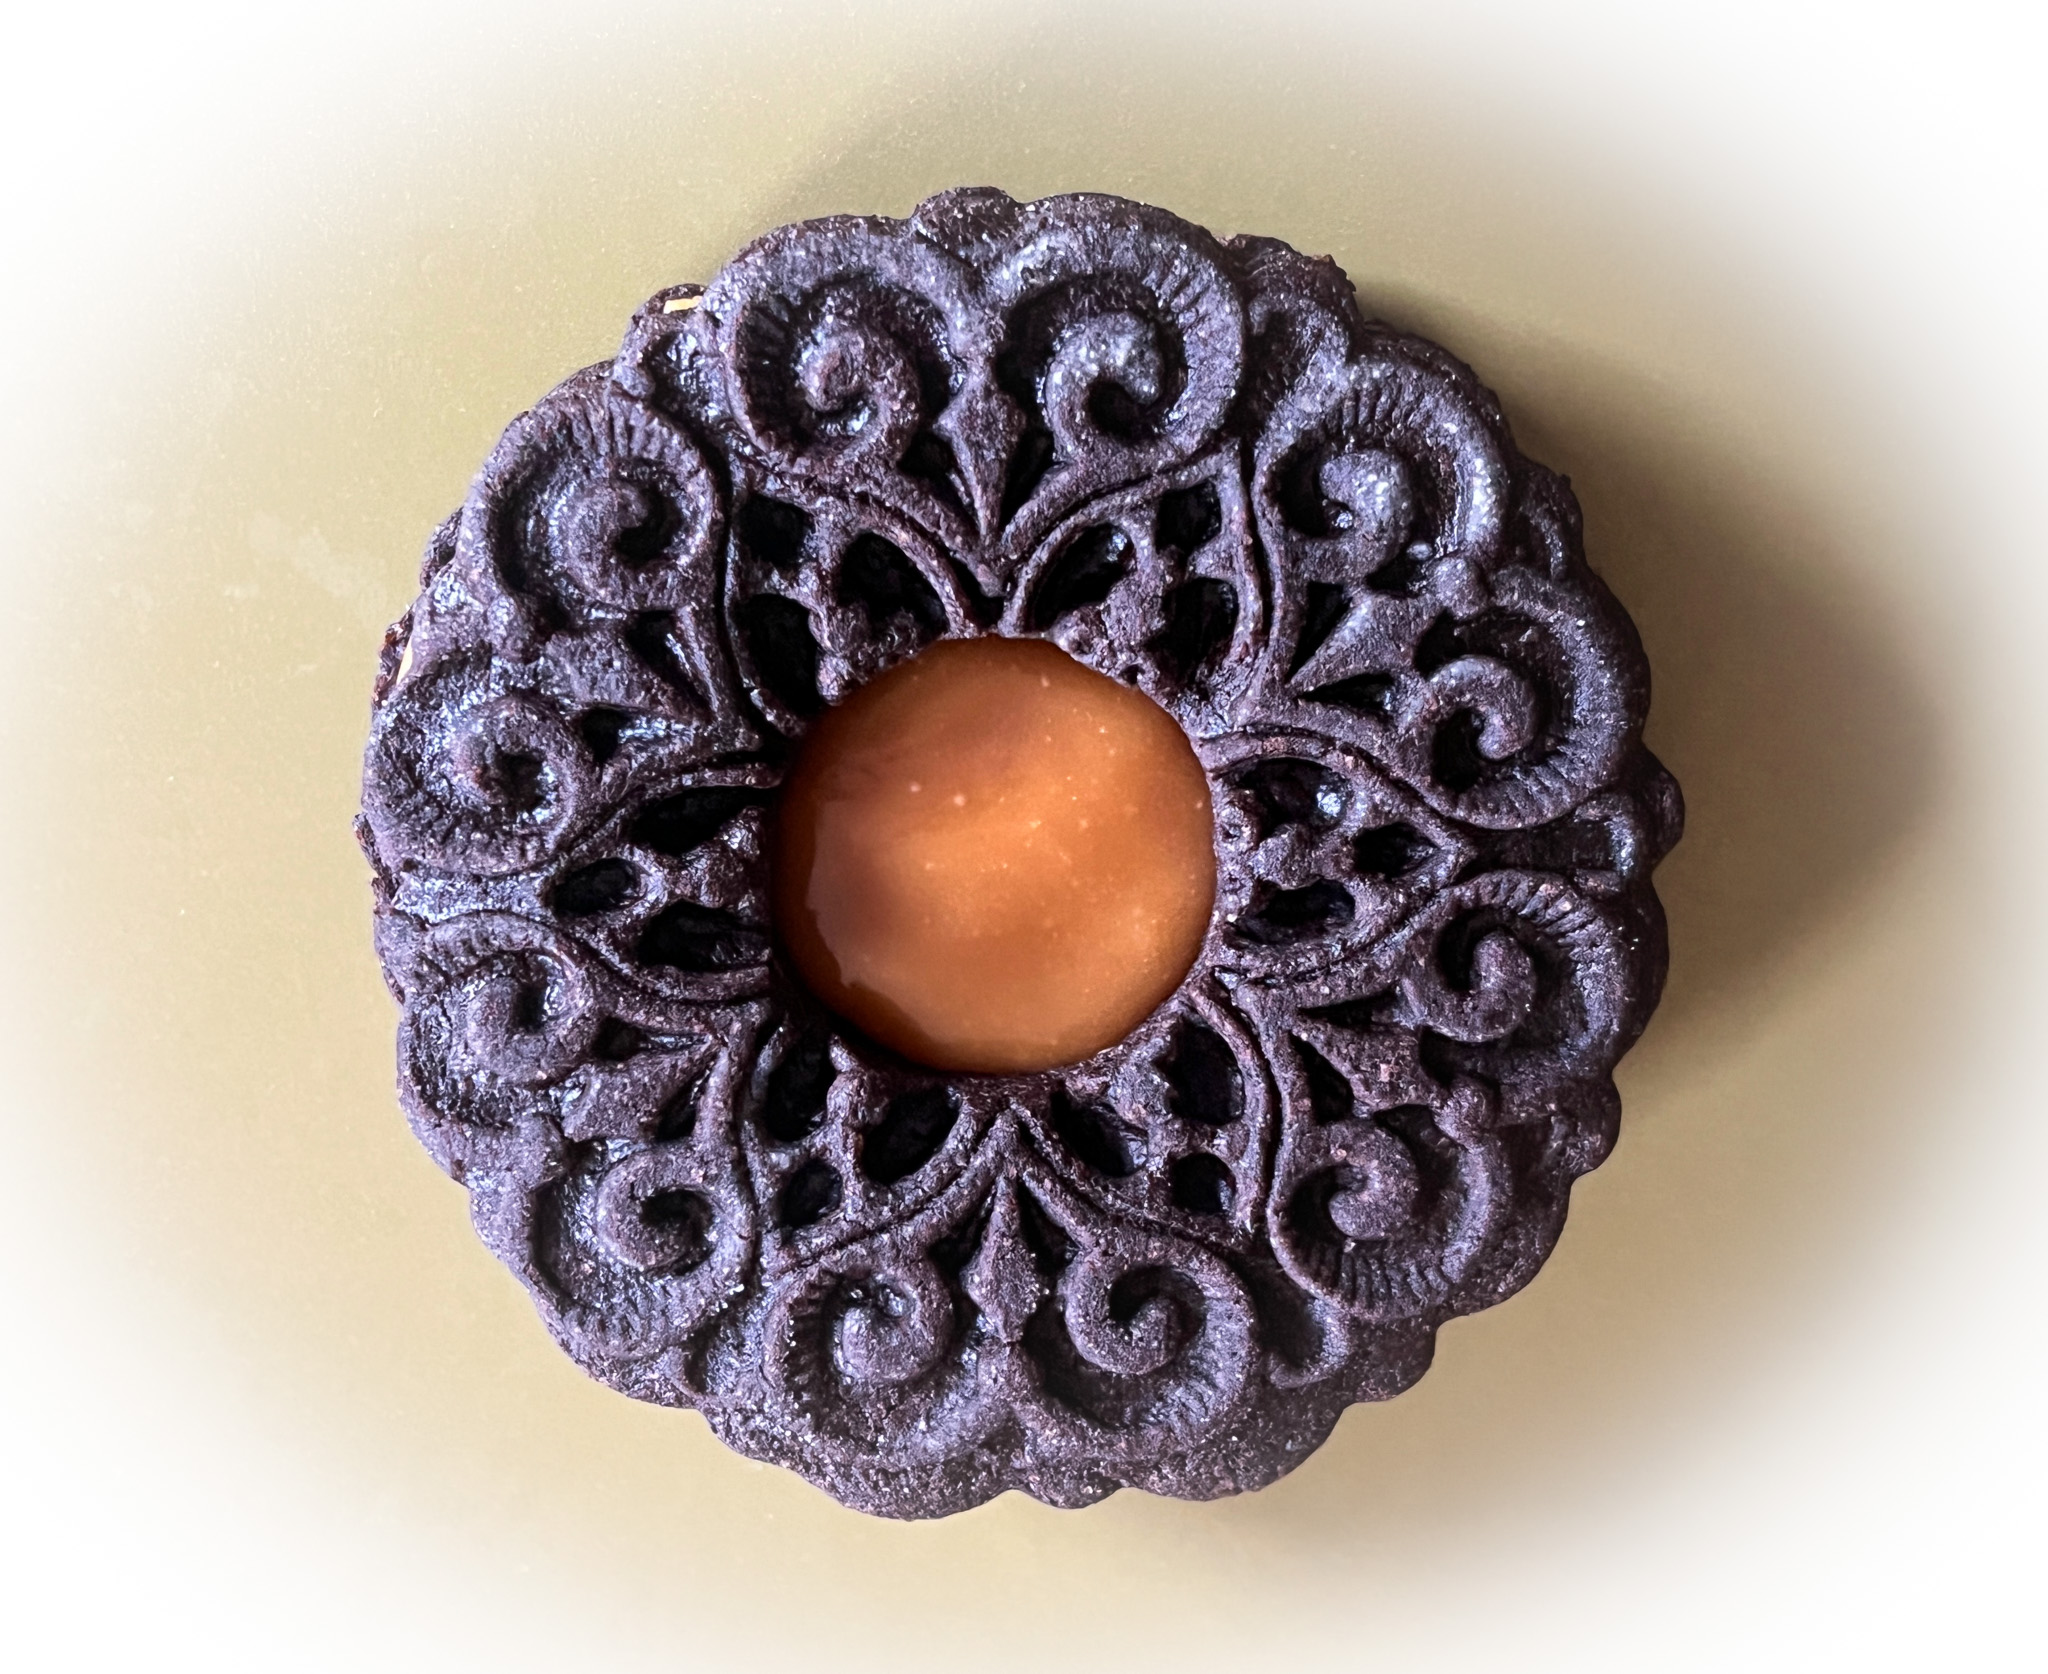
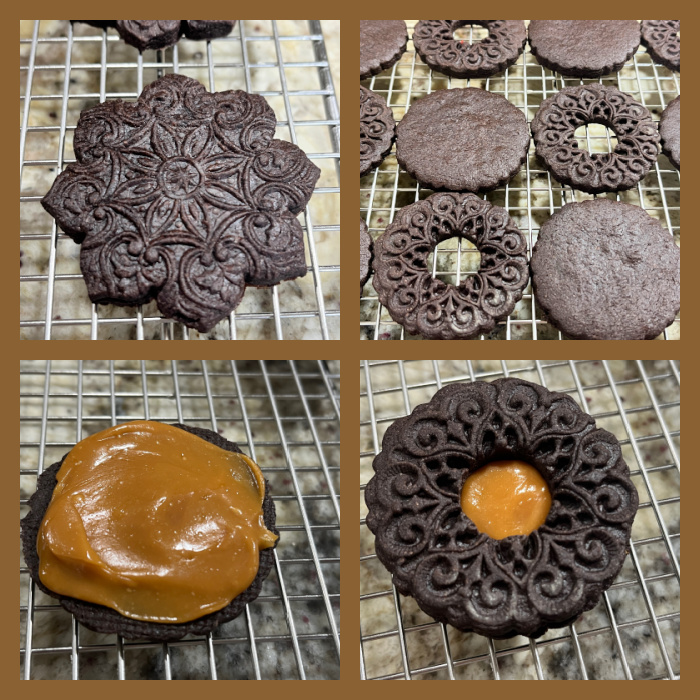
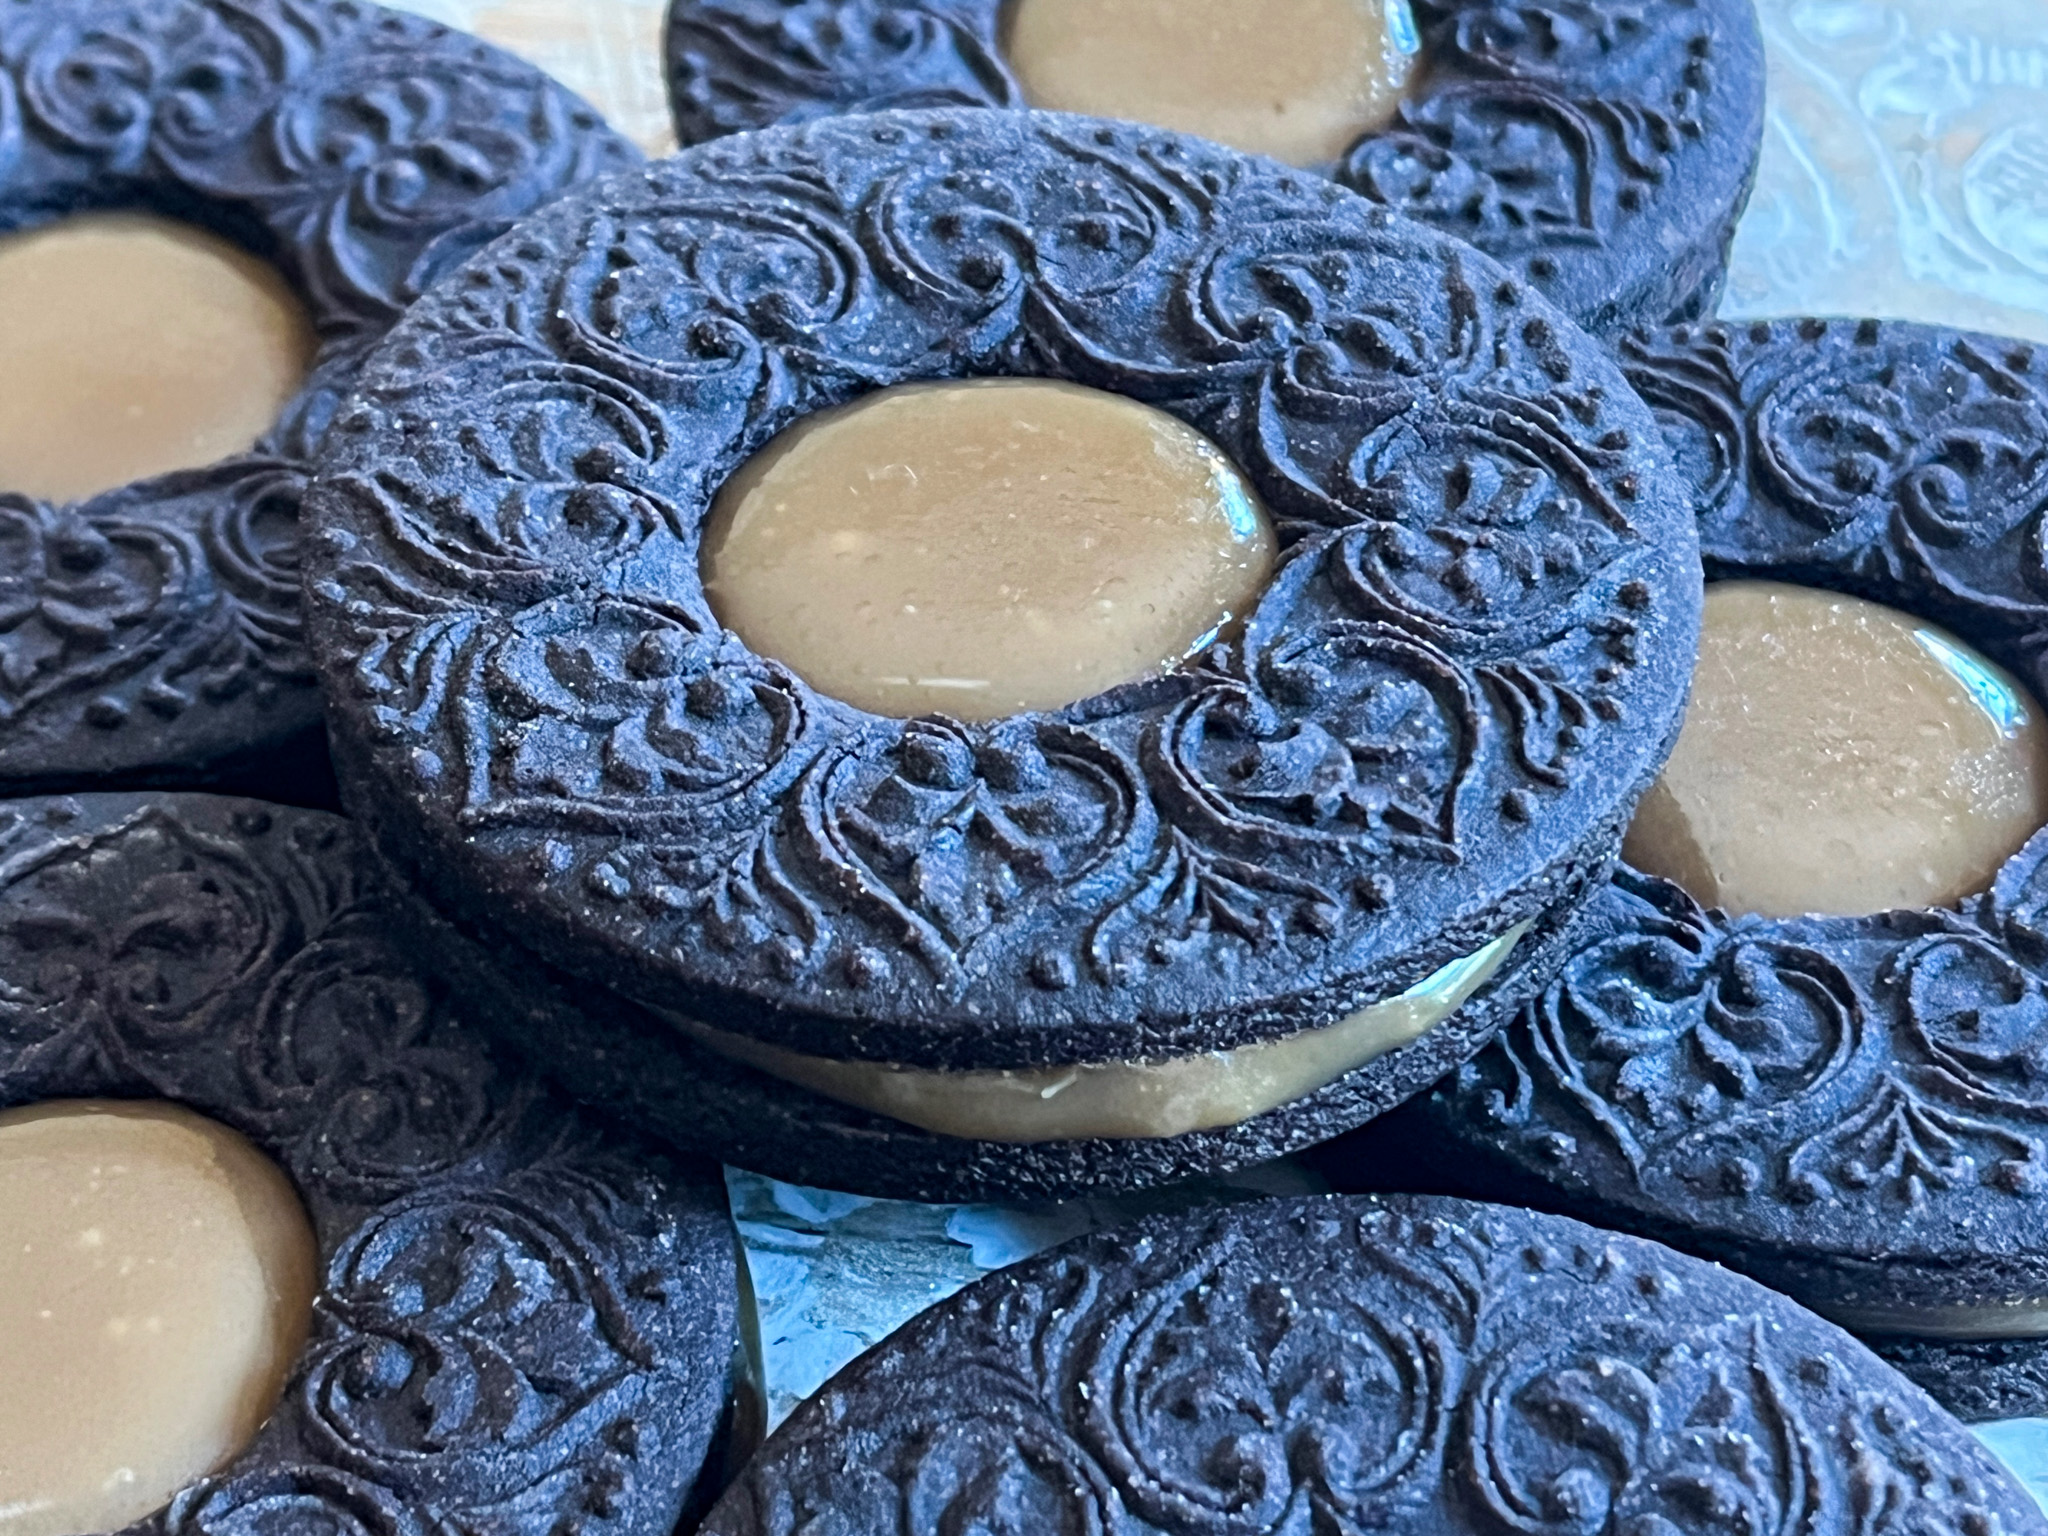
Today I share three versions of Caramel Sandwich Cookies. The first recipe (top left) is my default (Chocolate Chipotle Cookies that you can find here). The second version (bottom right) was made using Sweetapolita Bakebook recipe for Dark Chocolate Cutout Cookies which I won’t share due to copyright issues. At any rate, as written the recipe is a bit too strong for my taste, I would advise using less dark cocoa powder particularly if you are baking for kids. The lighter cookie (bottom left) is Cinnamon Orange, and the recipe is below.
CINNAMON-ORANGE SUGAR COOKIE (from The Bewitching Kitchen)
1 cup butter (226 g), at room temperature 1 cup sugar (200g) zest of half a large orange 1/4 cup agave nectar 2 eggs 1 tsp orange bakery emulsion or orange extract of your choice 575 g all-purpose flour (about 4 cups) 1 tsp cinnamon 1/2 tsp salt 1/4 tsp baking powder
Heat the oven to 350 F and line baking sheets with parchment. Mix the flour, cinnamon, baking powder and salt, and set aside. Mix the sugar with the zest rubbing it well to release the oils. Cream the butter with the flavored sugar, just until smooth and combined. Add the agave nectar and continue mixing for a minute or so.
In a small bowl whisk the eggs and orange emulsion. Add to the butter-sugar mixture and mix at low speed until combined. Add the flour mixture on low-speed, until it forms a dough.
Remove the dough from the bowl, cut in two pieces and wrap them in plastic. Refrigerate for one hour, then roll, cut shapes and bake in 350 F oven until golden at the edges, depending on the size of the cookies, 10 to 15 minutes. For these cookies, I used a patterned rolling pin.
For both chocolate cookies, I used a stamp to create the design on the top portion of the cookie. One of them is available here, the other I could not find any longer, had it for many years.
I have tried two different recipes for caramel filling, but the second one was far better in terms of texture and flavor. You can find it here. I made half the recipe published in the site.
The caramel filling complements quite well both the chocolate and the orange cookies, very versatile, and it has the perfect texture to bite into. I think that embossed rolling pins and springerle-type stamps are a very nice way to embellish sandwich cookies.