DOG COOKIES

This is a very simple recipe based on peanut butter and pumpkin puree, super easy to put together, and it will receive two-paws up by the most discriminating canine palates out there. Woof, woof!


DOG COOKIES
(from this site)

1 Cup Pumpkin Puree
1/3 Cup Peanut Butter, smooth
2 large Eggs
2 + 1/2 Cups Whole Wheat Flour
¾ Teaspoon Cinnamon

Heat the oven to 350° and line a baking sheet with parchment paper.

In the bowl of a mixer use the paddle attachment to combine the pumpkin, peanut butter, and eggs at medium-high speed. Add in the flour and cinnamon and mix until a stiff dough has formed. Turn the dough out on a lightly floured surface and roll out to ¼ inch thick. Use cookie cutters to cut your desired shapes.

Bake for about 20-25 minutes, until the edges begin to turn golden brown. Cool on a rack.

(paws were painted with Sugarprism after baking)

Share the pup love with cookies!

to print the recipe, click here


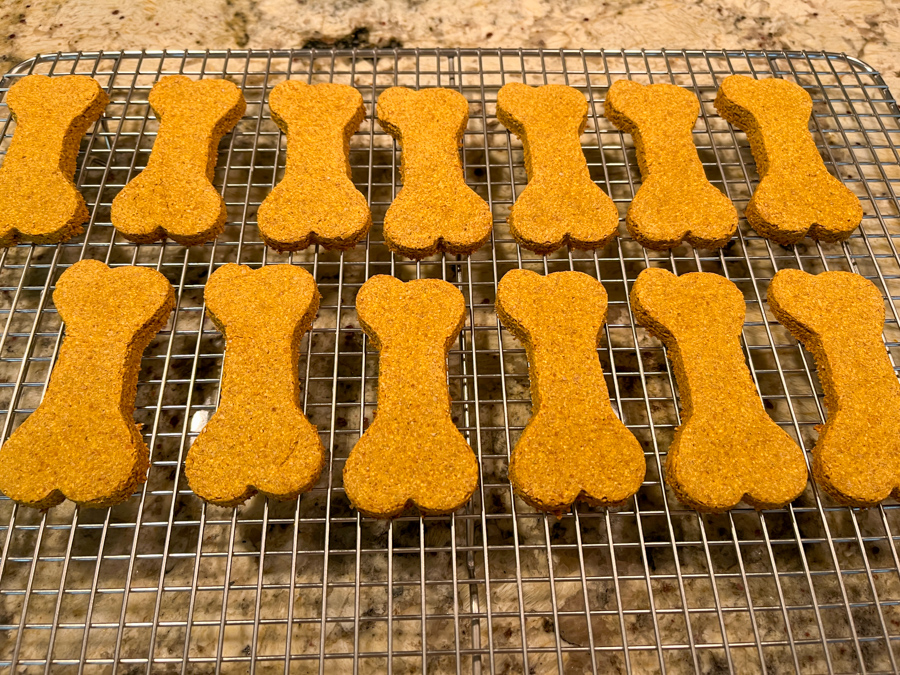
Comments: Make sure to use peanut butter that contains only peanuts and salt, no additives. Xylitol, which is present in some brands, is very toxic for dogs, so do not use it. The classic shapes are obviously bones and paws, but you can cut in squares, even using a knife or bench scraper and it will be even easier and faster. Pups won’t mind!

ONE YEAR AGO: Sugarprism Watercolor Macarons

TWO YEARS AGO: Dutch Macarons and a cookbook review

THREE YEARS AGO: Yogurt Tart

FOUR YEARS AGO: Grilled Lamb-Stuffed Pita Bread

FIVE YEARS AGO: Elderflower Macarons

SIX YEARS AGO: A Duet of Sorbets

SEVEN YEARS AGO: Sobering Peach Sorbet

EIGHT YEARS AGO: Spiralizer Fun

NINE YEARS AGO: Beer-Marinated Grilled Skirt Steak

TEN YEARS AGO:  Secret Recipe Club: Corn Chowda

ELEVEN YEARS AGO: Page-A-Day Calendar (Pits and Chief 5 minutes of fame…)

TWELVE YEARS AGO: Home Sweet Home (our beloved Pits in one of his last photos)

THIRTEEN YEARS AGO: Marbled Rye

CAULIFLOWER TACOS WITH CHIPOTLE ROMESCO SAUCE

I debated whether to insert the “V” word into the title, but yes, this is vegan. And delicious with a big “D.” The sauce packs a huge hit of flavor. I used the smallest recommended amount of chipotle pepper in Adobo sauce, if you are a braver soul, go for the kill and add more. Obviously, you can use meat instead of cauliflower and please all the omnivores at your table. But whatever your gastronomic inclination, MAKE THE SAUCE.


VEGAN CAULIFLOWER TACOS WITH CHIPOTLE ROMESCO SAUCE
(adapted from Minimalist Baker)

for the cauliflower:
1 large cauliflower head, cut in small pieces
2 Tbsp canola oil
1 tsp ground cumin
1 tsp chili powder
1 tsp smoked paprika
1 tsp salt

for the sauce:
1/4 cup raw almonds
1 15-ounce can fire-roasted tomatoes (drained)
2 Tbsp olive oil
1 medium lime, juiced
1/4 tsp smoked paprika
1/2 tsp cumin
1/4 tsp sea salt (plus more to taste)
1 Tbsp maple syrup (plus more to taste)
1-2 whole chipotle peppers in adobo sauce (more for spicier sauce)

for serving:
corn tortillas
Lime juice / wedges
Fresh cilantro (optional)
shredded cheese (vegan, if you prefer)

Coat the cauliflower pieces with the oil and the spices. Either roast it in a 400F oven, or air-fry it for 15 minutes. Reserve.

Toast the almonds in a dry non-stick skillet until they start to get fragrant and get a bit of color, but do not move away from the stove and move them constantly to prevent them from burning. Add them to a blender (Vitamix works best) together with all other ingredients for the sauce. Blend until very smooth. Taste and adjust seasoning with salt, or maple syrup, depending on your preference.

To serve, warm up tortillas, add the sauce and the warm cauliflower on top, then more sauce, and any toppings you like.

ENJOY!

to print the recipe, click here

Comments: This sauce will definitely show up in our kitchen regularly because it is so easy to make, and absolutely perfect for our taste. When I first made it I thought it was too spicy, but it is not, it mellows down as you add it to the other components, and matches all sorts of protein or veggies. I enjoyed it next day with some leftover grilled chicken breasts.


ONE YEAR AGO: One gift, one dough, two recipes

TWO YEARS AGO: Rocking the Zucchini Boat

THREE YEARS AGO: Polenta Bites with Spicy Tomato Sauce

FOUR YEARS AGO: Vague Mousse Cake

FIVE YEARS AGO: Cottage Loaf, my very own technical challenge

SIX YEARS AGO: Pork Ribs: Sticky, Spicy and Awesome

SEVEN YEARS AGO: Sobering Peach Sorbet

EIGHT YEARS AGO: Buttermilk-Blueberry Breakfast Cake

NINE YEARS AGO: Silky Cauliflower Puree with Almond Milk

TEN YEARS AGO: Beef and Broccoli Stir-fr

ELEVEN YEARS AGO:Wheat Germ and Sage Sourdough Bread

TWELVE YEARS AGO:Popeye-Pleasing Salad

THIRTEEN YEARS AGO:Summer’s Finale

CHOCOLATE-HAZELNUT TARTLETS

I’ve made this recipe twice, first time I thought they looked pretty nice but the filling was too dry for my taste. So I tweaked the recipe and now share with you the winner. Compared to the first attempt, they baked a little more flat, but the texture and taste were spot on, in my opinion. A big thank you to Matt Adlard, who helped me optimize it. As to the crust, it is my favorite. Very easy to handle, bakes like a dream. It goes in the oven as soon as the filling is piped in, no need to blind bake if using this type of filling. Easy as pie. Or, if you prefer, easy as tartlet.

CHOCOLATE HAZELNUT TARTLETS
(from the Bewitching Kitchen, inspired by Carole Bloom)

makes about 8, depending on the size of your molds

for the shells:
120 g cup all-purpose flour
2 tablespoons granulated sugar
1/8 tsp baking powder
pinch of salt
zest of 1/2 orange
45 g butter, cut in small pieces and very cold
1 egg yolk
1 tablespoon heavy cream (or a little more depending on the final texture of the dough)

for the filling:
100g unsalted butter, softened
100g powdered sugar
75g eggs
12g cornstarch
80g hazelnuts flour
60g mini chocolate chips (the smallest you can find)

to decorate (optional)
drizzle of candy melts or chocolate
sprinkles of your choice

Add to a food processor the flour, sugar, baking powder, salt, and orange zest. Pulse until all is combined and the orange zest very fragrant. Add the chilled butter, pulse a few times until the butter is cut in small pieces. Whisk the egg yolk, and one tablespoon of cream in a little bowl. With the processor running, pour this mixture and wait until the mixture starts to form a dough. If needed, add a little more heavy cream. Shape the dough into a flat disk and place in the fridge for 15 minutes. If you prefer leave it longer, I like to use it while it is still very pliable.

Roll out the dough until it is about 12 inches in diameter, and cut circles that will allow it to fit inside and all the way up your molds. Place the filled molds in the freezer for 20 minutes or longer, as you make the filling and heat your oven to 350F.

Make the filling: Beat the butter and sugar until smooth. I used a handheld mixer. Slowly add the eggs and beat again. Add the cornstarch and hazelnut flour and mix to combine, then finally fold in the chocolate chips. Pipe that mixture into the unbaked, frozen tart shells and then bake until the filling is set, about 25 minutes, but check at 20 minutes.

ENJOY!

to print the recipe, click here

Comments: I am really happy with the way these turned out. The recipe for the shells is definitely my favorite because it is very easy to handle. Plus, the inclusion of orange zest is a nice touch. Most recipes will tell you to chill a pie dough for hours or even overnight. It does not work well for me. I much rather roll the dough while it is still pliable and then freeze before baking. But do what works for you, as I often say… your kitchen, you rules. The combination of hazelnut and chocolate is fantastic and perfect for the Fall and upcoming Thanksgiving. Keep that in mind…

ONE YEAR AGO: Turkey Taco Salad

TWO YEARS AGO: Cheese and Pesto Emmer Roll-ups and Elaine’s Cookbook Review

THREE YEARS AGO: Mango-Hazelnut Entremet Cake

FOUR YEARS AGO: Lebanese Lentil Salad and a Cookbook Review

FIVE YEARS AGO: Cottage Loaf

SIX YEARS AGO: Sourdough Loaf with Cranberries and Walnuts

SEVEN YEARS AGO: Sichuan Pork Stir-Fry in Garlic Sauce

EIGHT YEARS AGO: Our Green Trip to Colorado

NINE YEARS AGO: Ditalini Pasta Salad

TEN YEARS AGO: Celebrate Wednesday with a Thai Seafood Curry

ELEVEN YEARS AGO:  Post-workout Breakfast

TWELVE YEARS AGO: Semolina Barbecue Buns

THIRTEEN YEARS AGO: Lavash Crackers

POILANE-STYLE BREAD, A SIMPLIFIED VERSION

Pain Poilane might very well be one of the most famous breads made in France. The process to make it is convoluted and slow. The bread has a crumb that is not very open, with deep, complex flavor. All in all, a super hearty bread. I’ve made a few versions since I started playing with sourdough 15 years ago, but today I share one of the simplest ways, in which time does most of the work for you. Handling the dough is reduced to a bare minimum. If you are searching for a light tasting bread with very open crumb, this is not it. It is a superb bread to make Croque Monsieur or to enjoy with toppings such as smoked salmon or the very best ham you can find. 

POILANE-STYLE BREAD
(adapted from several sources)

for the fermented sourdough component:
200g water
120g sourdough starter (at 100% hydration)
240g whole-wheat flour

for the dough:
275g water
85g light rye flour
170g spelt flour
250g bread flour
12g salt

If you have a chance to turn your regular sourdough into a rye-based, you can do that by feeding it for about 3 days with rye flour instead of regular white flour. If you don’t have any, just use your regular sourdough.

In the evening, mix all the ingredients for the fermented component in a medium-size bowl. Leave it at room temperature for 12 hours. It won’t rise much, but you should notice fermentation next day.

On the morning of the next day add the water to your starter and mix well. Add all the flours and salt, and knead with the KitchenAid for about 3 minutes. Remove from the KitchenAid, place in a large bowl, and leave at room temperature for 90 minutes. Knead by hand for a couple of minutes at the 30 minute and 90 minute mark. Cover and place the dough in the fridge overnight.

Remove the cold dough from the fridge, form into a ball, and place in a lightly floured banneton, with the seam side up. Leave at room temperature for 5 to 6 hours. Heat the oven to 450F, invert the dough on parchment paper, score the surface and place in a Dutch oven, with the lid on. Bake for 30 minutes, remove the lid and bake for further 20 to 25 minutes.

Allow the bread to cool completely before slicing, preferably overnight.

ENJOY!

to print the recipe, click here

Comments: Contrary to regular sourdough, this version that contains so much whole-wheat and rye flour, is not appropriate to fold and stretch. It is – if I am to be honest – not very nice to handle. There is a harshness associated with the coarser nature of the whole-wheat component, which in this case is a pretty substantial part of the formula. So, instead of folding, I opted for minimal kneading, a technique Dan Lepard is quite fond of. It is actually the basis for all his breads in The Handmade Loaf, which was my personal introduction to sourdough baking. This bread turned out super flavorful! It was a huge hit with the husband, who already requested that slices of “Poilane” be found in the freezer at all times…

ONE YEAR AGO: Broccoli Salad with Pomegranate Seeds and Tahini Dressing

TWO YEARS AGO: Turkey-Spinach Meatballs with Cardamon-Tomato Sauce

THREE YEARS AGO: British Baps, a Technical Challenge

FOUR YEARS AGO: Japanese-Style Cupcakes with Cherry Blossom Icing

FIVE YEARS AGO: Quick Weeknight Soups

SIX YEARS AGO: Sourdough Loaf with Cranberries and Walnuts

SEVEN YEARS AGO: Sichuan Pork Stir-Fry in Garlic Sauce

EIGHT YEARS AGO: Our Green Trip to Colorado

NINE YEARS AGO: Ditalini Pasta Salad

TEN YEARS AGO: Celebrate Wednesday with a Thai Seafood Curry

ELEVEN YEARS AGO:  Post-workout Breakfast

TWELVE YEARS AGO: Semolina Barbecue Buns

THIRTEEN YEARS AGO: Lavash Crackers

MOONCAKES FOR MID-AUTUMN FESTIVAL

Happy Mid-Autumn Festival, for those who celebrate! Every year, around July, I promise myself I will try to bake mooncakes. And every year I find excuses not to do it, because it seems so intimidating! Finally, I decided to woman-up, and go for it. I used the recipe from a great cookbook, Mooncakes and Milk Bread, by Kristina Cho. The copyrighted recipe is available online (click here), in case you don’t have the cookbook. I will share my experiences as a mooncake-virgin.

To make mooncakes, you will need molds (either plastic or wood will work). I used molds similar to these. You will also need Lyle’s Golden Syrup and a special type of water that can be made from baking soda, but I decided to get the commercially available (click here). You will only use 1 tsp of alkaline water per batch of dough. Molds come in two common sizes, 50g and 100g. I used the larger ones, make sure to adjust the amount of dough + filling to the size of mold you have.

The dough is surprisingly easy to work with, due to the high fat content. It stretches easily and I had no issues forming the balls with the filling inside. I used 48 g dough per ball, and about 35g filling of two kinds, the pistachio-honey described in the original link, and my second batch was simpler, just almond paste (8 oz) with 1/4 cup mini chocolate chips.

My problems started during baking. For many of the mooncakes, the pattern was almost fully lost during the second stage of baking. Maybe I used too much egg wash, or maybe some other tweaking in my technique was needed. At any rate, you can see in the picture below that my first batch was not as good as the second.

I suppose that making mooncakes is a bit like baking macarons, you’ll get better the more you make them. At any rate, I will definitely be using my molds with other types of cookie dough, as long as they don’t spread too much and have a higher chance of retaining the beautiful designs. Stay tuned… And if you celebrate…

HAPPY MID-AUTUMN FESTIVAL!

ONE YEAR AGO: Almond-Raspberry Triangles and a Special Cookbook Review

TWO YEARS AGO: Sweet and Spicy Roasted Cauliflower

THREE YEARS AGO: Roasted Cauliflower Salad over Hummus

FOUR YEARS AGO: Queen of Sheba

FIVE YEAR AGO: Brunch Burger

SIX YEARS AGO: Mango Salsa with Verjus

SEVEN YEARS AGO: Raspberry Bittersweet Chocolate Chunk Brownies

EIGHT YEARS AGO: Scary Good Pork Burgers

NINE YEARS AGO: Review of exercise program Focus25

TEN YEARS AGO: Celebrate Wednesday with a Thai Seafood Curry

ELEVEN YEARS AGO:  Post-workout Breakfast

TWELVE YEARS AGO: Semolina Barbecue Buns

THIRTEEN YEARS AGO: Lavash Crackers