MINI-PULLMAN SOURDOUGH BREAD

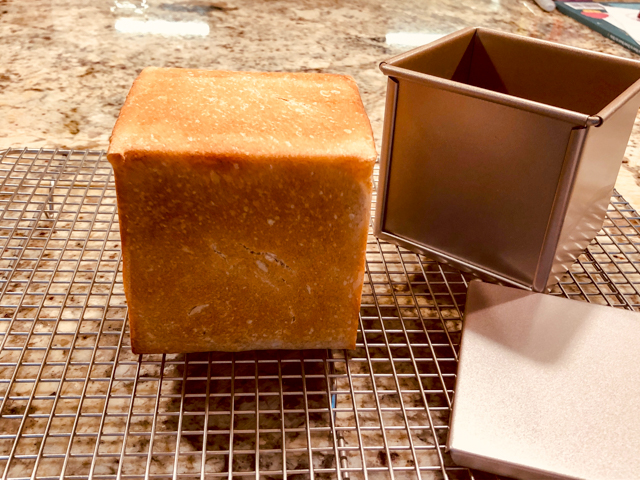
First things first. Full credit to my dear friend Elaine, for inspiring me to use a pan I had bought a few months ago and was sitting in the basement, feeling neglected (the pan, not the baker). The gadget is a mini-loaf, Pullman style, that makes a cute cube-shaped bread. You can use any type of dough you like, but I went with a simple sourdough.

MINI-PULLMAN SOURDOUGH BREAD
(adapted from Elaine’s master recipe)

225g white flour
25g whole-wheat flour
40g sourdough starter at 100% hydration
175g water
5g salt

Lay a piece of parchment paper in the mini-loaf pan with a little overhang to make it easier to pull the baked bread later. Reserve.

Mix all ingredients for the dough in a medium-size bowl. Cover and let sit at room temperature for 1 hour.

Do a series of foldings every 45 minutes or so until you reach 5 hours bulk fermentation (so do folds for 4 more hours, don’t worry about timing, try to make 4 more cycles of folding. Shape it loosely as a ball, and place in the mini-loaf pan. Cover loosely with plastic and place in the refrigerator overnight. It should fill a little more than half the volume of the pan.

Next morning, heat the oven to 425F. When it reaches that temperature, remove the plastic cover, shut the pan with the metal lid, and bake for 30 minutes. Open the lid, and leave in the oven for another 5 to 10 minutes.

Cool in the pan for 5 to 10 minutes, and invert to remove the bread. Cool completely on a rack before slicing.

ENJOY!

to print the recipe, click here

Comments: For this size of pan, you need to have enough dough so that during baking it will reach the top. However, if you add too much it will end up badly compressed at the top, and the texture of the crumb won’t be homogeneous. The picture above shows the dough before it went into its final fermentation in the fridge. It is perhaps 70% full.


I don’t think you need to add the parchment paper, but it was my first time using this method and I was afraid of the dough sticking to the pan. Not at all the case. I did not grease the pan, and the dough stayed inside overnight in the fridge without any issues.

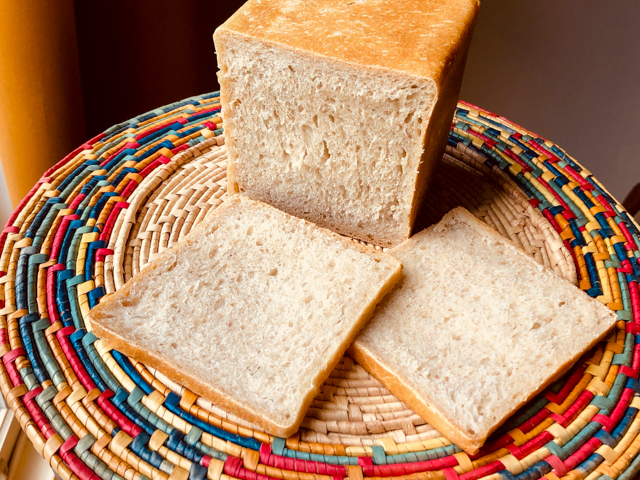
This recipe makes a small loaf perfect for a family of two or three. Another great advantage is that leftovers will be perfect for cutting as croutons, something we do often. I know I will be using my pan all the time now, not only with sourdough but other types of bread too. I am thinking a marbled charcoal and white in the near future..

Elaine, thank you for that much needed push to put my baking toy to good use!

ONE YEAR AGO: Gibassier

TWO YEARS AGO: Sundried Tomato Twist Bread

THREE YEAR AGO: And now for something completely different….

FOUR YEARS AGO: Parsnip, Coconut, and Lemongrass Soup

FIVE YEARS AGO: In My Kitchen, October 2016

SIX YEARS AGO: Paleo Moussaka

SEVEN YEARS AGO: In My Kitchen, October 2014

EIGHT YEARS AGO: In My Kitchen, October 2013

NINE YEARS AGO: Crimson and Cream Turkey Chili

TEN YEARS AGO: Taking a break from the nano-kitchen

ELEVEN YEARS AGO: Chocolate Chip Cookies

PASSION FRUIT MILLIONAIRE’S SHORTBREAD

Millionaire’s Bars are undoubtedly a classic. This version brings a bright tropical twist that works quite well. Very rich, a small piece will satisfy even those with a super sweet tooth.

PASSION FRUIT MILLIONAIRE’S SHORTBREAD
(inspired by this article)

for the shortbread base:
2½ cups (312g) all-purpose flour
½ cup (100g) granulated sugar
¾ teaspoon salt
16 tablespoons (226g) unsalted butter, melted

for the caramel:
1 can (396g)sweetened condensed milk
1 cup (210g) brown sugar
1/4 cup heavy cream
1/4 cup corn syrup
1/4 cup passion fruit pulp
1-2 tsp passionfruit flavor from Amoretti (optional)
8 tablespoons (113g) unsalted butter
½ teaspoon salt

for the topping:
225g dark chocolate
1/4 cup Candy Melts, white dyed orange with food gel

Heat oven to 350F. Butter a 9 x 13 baking pan and line it with foil, leaving pieces hanging on both the long and short sides of the pan, for easy lifting of the bar later. Make the shortbread by combining flour, sugar, and salt in medium bowl. Add melted butter and stir with a silicone spatula until no dry crumbs of flour remain. Crumble the dough evenly over the pan, and pat into even thickness with your fingers. Pierce with a fork many times all over the surface. Bake until light golden brown and firm to touch, 25 to 30 minutes. Transfer pan to wire rack. Let crust cool for 20 to 30 minutes.

Make the caramel: Stir all ingredients together in large, heavy-bottomed saucepan. Cook over medium heat, stirring frequently, until mixture reaches 238 F. This will take around 20 minutes. Pour over crust and spread to even thickness. Let cool completely, a couple of hours.

Once set, melt the chocolate in the microwave in 30-second bursts until glossy and smooth. Place the dyed candy melt in a piping bag and make a small hole. Smooth the chocolate over the caramel shortbread, then quickly add lines of the dyed candy melts. Do a feathering effect with a toothpick or a needle. Leave it set, then cut into squares.

ENJOY!

to print the recipe, click here

Comments: I made this quite some time ago, March 2020 to be precise. It was one of the last items I was able to share with our department before Covid-19 hit. I hoped to have intense passion fruit flavor in the caramel, and that was not very easy to achieve. By mixing fruit pulp with a touch of Amoretti flavor, I think I got it as intense as it could possibly be without affecting the caramel texture. If you don’t have Amoretti products hanging around, just omit it. The passion fruit by itself will be a nice touch, taming the sweetness of the caramel layer. But, as I mentioned in the opening paragraph, this is rich. They call it Millionaire’s Shortbread for good reason!

ONE YEAR AGO: Chai-Mango Rosette Macarons

TWO YEARS AGO: Common Table, Something New in My Life

THREE YEAR AGO: The Daisy, a Bread with Brioche Alter-Ego

FOUR YEARS AGO: Pork Tenderloin, Braciole Style

FIVE YEARS AGO: Raspberry Buckle

SIX YEARS AGO: Seafood Gratin for a Special Dinner

SEVEN YEARS AGO: Cooking Sous-Vide: Sweet and Spicy Asian Pork Loin

EIGHT YEARS AGO:  Farewell to a Bewitching Kitchen

NINE YEARS AGO: In My Kitchen. June 2012

TEN YEARS AGO: Goodbye L.A.

ELEVEN YEARS AGO: 7-6-5 Pork Tenderloin

HONEYED JALAPENOS ON SPELT PIZZA

This could very well go in the Incredibly Easy files, or in the “Follow Joanne” files, as once again I trusted her tastebuds and made a very simple ingredient she raved about: honeyed jalapenos. There is absolutely nothing to it. You slice jalapenos, add them to honey, boil gently until they start to get all mushy and a bit darker. Let it cool. Your job is done. They topped a simple veggie pizza and we both could not believe how much flavor and pleasure they brought to the party.

SPELT PIZZA DOUGH
(adapted from this post)

1 package (2 + 1/4 tsp) active dry yeast
1 +1/2 cups very warm water (110F)
14 ounces all purpose flour
4 ounces spelt flour
(total flour amount about 4 cups)
1 + 1/2 t salt
2 T olive oil

Measure the water in a pyrex bowl, sprinkle the yeast on top, and mix gently to dissolve. Add the flours and salt to the bowl of a food processor and process for a few seconds to mix well.  With the processor running, add all the water/yeast mixture. Process for about 5 seconds, open the lid and add the olive oil.  Close the processor again and mix for about 20 seconds longer.  You want the dough to form a tacky ball, but don’t over process it or it may get too hot.

Remove the dough from the processor, knead it a few times by hand and form a ball. If you want to make a  large pizza, leave it whole. If you want to make individual pizzas, quarter it, place them in a large plastic bag and refrigerate until ready to use (from a few hours to a couple of days).

Remove the dough from the fridge 1 hour before shaping the pizzas.  Roll it out with a floured rolling pin, top with your favorite home-made tomato sauce, and the toppings of your choice.

HONEYED JALAPENOS
(slightly modified from Joanne’s blog)

1/2 cup honey
2 jalapenos, sliced thin

Add the honey to a small saucepan. Place the jalapeno slices, seeds and all inside. Bring to a boil, cook a few minutes, stirring constantly. Pay attention because the honey tends to boil furiously and rise up in the pan. You might have to remove the pan from the heat, let it calm down and simmer it again. Cook until the jalapenos get soft and a little darker. Remove from heat, let it cool. Use the slices to top your pizza, drizzle the spicy honey on top too.

ENJOY!

to print the recipes, click here

Comments: If you are not a pizza person (is there such a thing?), I still urge you to make these jalapenos and use them in other ways. Over mashed cauliflower, with rice and beans, and also you can process one little slice, some of the honey, and incorporate in a salad dressing. As to the spelt pizza, I advise you not to use more than 25% of spelt in your recipe, as it changes the texture a bit, it will be less airy than a pizza made with all-purpose flour only. I do love the flavor and the slightly denser texture. You can always use my original recipe (blogged in 2009) if you prefer.

Joanne, thanks for another winner recipe!


ONE YEAR AGO: Bulgur and Chickpea Salad with Pomegranate Seeds

TWO YEARS AGO: Purple Star Macarons

THREE YEARS AGO: Smoked Salmon, Fait Maison

FOUR YEARS AGO: Kouign-Amann, Fighting Fire with Fire

FIVE YEARS AGO: In My Kitchen, Yin and Yang

SIX YEARS AGO: Chocolate Toffee Banana Bread

SEVEN YEARS AGO: In My Kitchen, June 2014

EIGHT YEARS AGO:  Strawberry Frozen Yogurt

NINE YEARS AGO: Baked Coconut and “The Brazilian Kitchen”

TEN YEARS AGO: Honey-Glazed Chicken Legs

ELEVEN YEARS AGO: French-Style Rolls

GROWN-UP SPICY CHOCOLATE COOKIE

I bake cookies often. So often that I ended up starting a new blog just to document my adventures in the subject. But whenever I want to share a new recipe, it will be here, in the good old Bewitching Kitchen. This cookie is super versatile. It is so flavorful and complex that it can stand on its own without icing, without filling. But I’ve used it in many different formats, as you will see in my post published simultaneously in my baby blog. It resembles an Oreo in texture and basic taste. But then the chipotle and cinnamon kick in… and all of a sudden you are in love.

GROWN-UP SPICY CHOCOLATE COOKIES
(from the Bewitching Kitchen)

226g butter
200g sugar
1/2 tsp vanilla extract
1 large egg
380g flour
12 g cocoa powder
12g BLACK cocoa powder
1/2 tsp salt
1/4 to 1/2 tsp chipotle pepper
1/2 tsp cinnamon

Mix flour, both types of cocoa powder, chipotle pepper, cinnamon and salt in a large bowl. Reserve.

Cream butter with sugar with a Kitchen Aid type mixer. Add vanilla and egg. Mix until incorporated, then add the dry ingredients in three portions, mixing on low speed. When the dough starts to glue together, stop, check if it holds well when you press a small amount of it with your fingers. Adjust with more flour if needed. Pat the dough into a disc and place in the fridge. It can also be rolled out immediately if you did not have the butter too soft in the beginning.

Roll to desired thickness, cut in shapes, freeze for 10 minutes before baking at 350F. Baking time will depend on size of the cookies, usually 12 minutes.

ENJOY!

to print the recipe, click here

Comments: I did something totally different to get the pattern on these cookies. I used a fondant impression mat, laid it on top of the rolled cookie and then cut the rounds and baked. Inspiration came from the great Dawn Williams, a virtual friend from Facebook, aka Queen of Molded Cookies.

This is the mat… Available on amazon.com

And this is the dough after imprinted with it (dough is rolled over parchment, mat goes on top, then a rolling pin presses it gently over the dough. Peel the mat off, and you are left with this:

Cut rounds, freeze for 10 minutes and bake straight from frozen…

The cookies will be ok without any further adornment. But you know I cannot resist some bling, so I used gold luster dust mixed with vodka and brushed lightly on the design. The suspension needs to be a bit on the thick side, so that it won’t puddle inside the whole pattern.

For the dough, you can also skip the cinnamon and use orange extract + orange zest. Works great too. If you don’t have black cocoa, simply use the full amount of Dutch cocoa. I find that mixing some black with it makes it perfect for my taste. I’ve done in countless times, tweaking the recipe a bit and pretty much anything works.

Now, I invite you to visit my baby blog
to see how versatile this simple dough can be…

See you there!

ONE YEAR AGO: The Home Bakers Collective, May Project

TWO YEARS AGO: Purple Star Macarons

THREE YEAR AGO: Smoked Salmon, Fait Maison

FOUR YEARS AGO: Kouign-Amann, Fighting Fire with Fire

FIVE YEARS AGO: In My Kitchen, Yin and Yang

SIX YEARS AGO: Chocolate Toffee Banana Bread

SEVEN YEARS AGO: In My Kitchen, June 2014

EIGHT YEARS AGO:  Strawberry Frozen Yogurt

NINE YEARS AGO: Baked Coconut and “The Brazilian Kitchen”

TEN YEARS AGO: Honey-Glazed Chicken Legs

ELEVEN YEARS AGO: French-Style Rolls

BULGUR PORK TOMATILLO PLATTER

Some call it bowls, but I will go with platter. It is one of my favorite ways to enjoy a meal, all components served together. Not too long ago “sheet dinners” were a thing. It seemed like every popular food blogger was showcasing them. I never joined that party, because I find it hard to perfectly time the cooking of different items on the same sheet pan. You have to do a lot of rearranging and/or adding ingredients in stages. It never appealed to me. But in this preparation, items are cooked each to their optimal stage, and then simply placed together for the finale.

BULGUR PORK TOMATILLO PLATTER
(from the Bewitching Kitchen, inspired by many sources)

for pork:
1 pork tenderloin, trimmed
2 tablespoons olive oil
2 tablespoons soy sauce
1 tablespoon honey
salt and pepper to taste

for veggies:
1 tablespoon olive oil
6 oz asparagus stalks, cut in pieces
1 yellow or orange bell pepper, sliced thinly
splash of water
salt and pepper to taste

to serve:
1 cup bulgur wheat
tomatillo salsa (store-bought)
blood orange segments (or regular orange)

Marinate the pork. Mix olive oil, soy sauce, honey, salt and pepper, emulsify with a whisk. Cover the pork with it and leave for several hours in the fridge. I like to butterfly the pork tenderloin, but you can leave it whole. Grill the pork to your liking, when butterflied I like to grill it for a total of 16-18 minutes. We do not like pork pink in the center, so do as you prefer.

Cook the bulgur in 2 cups slightly salted water, boil, reduce to simmer, cover and cook for 5 to 10 minutes, until water is absorbed and grain is cooked. Reserve.

Heat the final tablespoon of olive oil in a large non-stick skillet. Add asparagus, bell pepper, water, salt and pepper. Cover, and cook for 2 minutes, then remove the lid, increase the heat and cook until the bell pepper starts to get some golden color.

Assemble the dish. Place the cooked bulgur on a platter, top with the cooked veggies. Cut slices of the grilled pork and arrange on top. Add orange segments, and drizzle a nice amount of tomatillo salsa all over the dish. You can process the salsa in a small food processor to make it smooth, or use it straight from the bottle.

ENJOY!

to print the recipe, click here

Comments: This was one delicious meal! I know you can make your own tomatillo sauce from scratch, but we often use bottled and don’t mind it at all. It makes life easier and there is no compromise of flavor. You can use freekeh, quinoa, couscous, in place of the bulgur. Bulgur cooks so fast, it is a great option. The blood orange gives that burst of freshness, and goes perfectly well with the tomatillo salsa. This will be incorporated in our regular rotation, no doubt. I hope you’ll give it a try!

ONE YEAR AGO: Baking through the blogosphere

TWO YEARS AGO: Chickpea Burgers, Vegan and Delicious

THREE YEARS AGO: Macarons with Ganache Noisette

FOUR YEARS AGO: Quiche with Asparagus and Fennel

FIVE YEARS AGO: Fakebouleh

SIX YEARS AGO: Yellow Squash Soup

SEVEN YEARS AGO: Grilled Chicken with Tamarind and Coconut Glaze

EIGHT YEARS AGO: Chicken-Apricot Skewers

NINE YEARS AGO:  Asparagus Quiche

TEN YEARS AGO: Two-stage Pea and Prosciutto Risotto

ELEVEN YEARS AGO: Mellow Bakers: Corn Bread