KAREN’S FOUR HOUR FRENCH BREAD

My mile-long list of breads “to make soon” was shaken up by a recent post published by my friend Karen. It passed in front of all others, elbowing a Rustic Sourdough here, a Danish Rye there, a couple of Pretzel Loaves, and a few Crumpets. I could not get it off my mind, because not only her bread looked amazing, but she developed the recipe to make it happen in four little hours! Four hours from the time you grab the flour to watching the bread cool down and sing back to you…  I simply had to try it. With just a little adaptation, using spelt flour instead of regular whole-wheat. Why? My whole-wheat was in the freezer and I had just a small amount of spelt left in the pantry, which turned out to be exactly the 50g needed for the recipe. It is called flour fate.

four-hour-bread2

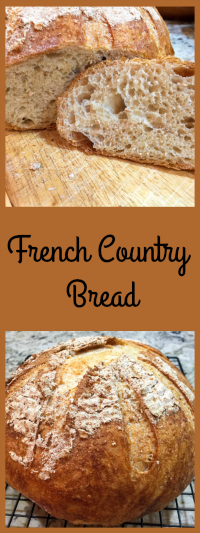
KAREN’S FOUR HOUR FRENCH COUNTRY BREAD

overview of the recipe

450 grams bread flour
50 grams whole wheat flour (I used spelt flour)
380 grams 90 to 95 degrees F water
10.5 grams fine sea salt
4 grams instant yeast

Flours are combined with water and mixed. Autolyse 20 minutes. Salt and yeast sprinkled on top. Incorporated by folding

Rest the dough 20 minutes. Fold. Rest 20 minutes. Fold. Bulk proof 2 hours.
(I proofed for 3 hours due to unforeseen circumstances).

Shape. Final rise 1 hour. Heat oven to 450F.

Bake for 40 minutes at, 30 minutes covered, generating initial steam using your favorite method.

Cool completely before slicing.

ENJOY!

to print the full, detailed recipe, visit Karen’s site

slash

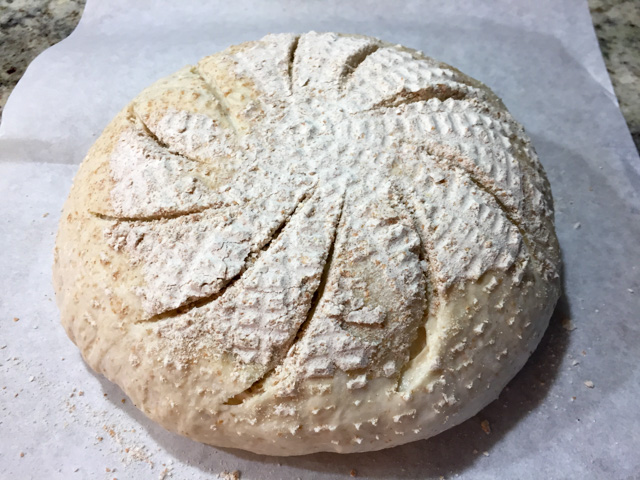
Comments: As you can see, I went with a different pattern for slashing the dough, but when it opened, it had a mind of its own. I did not get a star-shaped pattern, but it’s ok. I definitely want to keep practicing.  The bread had excellent oven spring, and made all sorts of nice noises while cooling, something that never fails to make a baker happy.
.
The bread was out of the oven a little after 5:30pm on Saturday, and my original plan was to slice it next day. However, when Phil saw the bread he gave me two options: slice it right away and hand him a slice, or witness him going at it with his hands and teeth. I chose the first option, and contrary to all my principles, sliced the bread while it was still warm.  The crumb suffers a little, but truth be told, nothing beats the taste of bread fresh out of the oven!

crumb

This would be an ideal bread for those a bit afraid of all things yeast. No sourdough starter needed, pretty straightforward method, and wonderful results. Plus it all happens in a reasonably short time, as far as bread baking is concerned.

Karen, you outdid yourself with this one!
Thanks for another great recipe…

french-country-bread

Add to FacebookAdd to DiggAdd to Del.icio.usAdd to StumbleuponAdd to RedditAdd to BlinklistAdd to TwitterAdd to TechnoratiAdd to Yahoo BuzzAdd to Newsvine

ONE YEAR AGO: The Siren’s Song of the Royal Icing

TWO YEARS AGO: Blog-worthy Roasted Butternut Squash

THREE YEARS AGO: Chocolate Currant Sourdough Loaf & Roasted Beet Hummus

FOUR YEARS AGO: Sesame and Flax Seed Sourdough

FIVE YEARS AGO: Spanakopita Meatballs

SIX YEARS AGO: Saturday Morning Scones

SEVEN YEARS AGO: Pain de Mie au Levain

FIRST MONDAY FAVORITE: FEBRUARY 2017

First Monday of the month, and it’s time to share with you my favorite recipe from January. It was fun to look back at the month and realize there were so many great things happening in the Bewitching Kitchen. I had a tough time picking my favorite, but here it goes, The Carioca Cake! How could I not pick that one? One of the most stressful adventures I faced in the kitchen, but at least it had a happy ending…

If you missed it, here is the link back to it…

carioca-cake

First Monday Favorites is the blog event started by Sid. Participants share their favorite recipe from the previous month. Not necessarily the most popular by views or comments, but our own favorite. Click on the link below to see everyone else’s favorite recipe. And, if you’d like to participate, visit Sid’s website and drop her a line, we firmly believe that the more, the merrier!

 .

STAY TUNED FOR NEXT MONTH’S FAVORITE! 

😉

https://static.inlinkz.com/cs2.js

ZESTY FLOURLESS CHOCOLATE CAKE

VALENTINE’S DAY IS COMING UP!

Flourless Chocolate Cake is one of our favorite desserts. Creamy, chocolate-y, sweet, intense, decadent but not too much. Not until I took it to a new level, that is. First, I added orange zest to the batter. Not a lot, but enough to give the cake a brighter flavor. Chocolate and orange is another one of those culinary matches made in heaven, if you ask me. This cake proves it.  But what really took care of decadence was adding a ganache on top, and then shaving Valrhona chocolate all over. OMG, this was stupendously good.

flourlesschoccake


ZESTY FLOURLESS CHOCOLATE CAKE
(adapted from this recipe)

7 oz extra bittersweet chocolate
14 Tbs unsalted butter  (1 + 3/4 sticks)
5 large eggs, separated
1 Tbs vanilla extract
3/4 cup granulated sugar
zest of half a large orange
pinch of salt
2 Tbs unsweetened cocoa powder
for the ganache:
1 cup heavy whipping cream
8 ounces semi-sweet chocolate, cut in small pieces
1/4 teaspoon vanilla extract

Shaved chocolate to taste for final decoration

Heat the oven to 350F. Grease a 10-inch springform pan.

In a small bowl, sift the sugar and combine it with the orange zest. Rub the zest with your fingers to release the oils into the sugar. Reserve.

Combine the chocolate and butter in a double boiler over simmering water, heating until fully melted and smooth.  Transfer to a bowl, let it cool slightly for a few minutes, and whisk in the egg yolks and vanilla.  Add the sugar/orange mixture,  salt, and cocoa powder, while constantly stirring.

Whip the egg whites to soft peaks.  Gently mix about one-third of them into the chocolate mixture, fold the remaining whites trying to deflate them as little as possible. Pour the mixture into the prepared springform pan.  Place in the lower rack of the oven and bake for 25-28 minutes.

Remove the cake to a rack and immediately loosen the sides of the pan. Allow the cake to cool before icing. If the cake is too uneven, shave the protruding parts with a serrated knife to even out the surface, but no need to make it perfectly flat. Usually the edges will be a bit too high, with a collapsed center.

Make the ganache by heating the whipping cream in a small saucepan until bubbles appear along the sides. Place the chocolate in a small bowl, and add the hot whipping cream and the vanilla on top. Mix gently until the chocolate is fully incorporated, very smooth. Let it cool for 10 minutes, then pour over the cool cake. I like to do that by placing the cake back in the springform pan, so that the icing is contained. Refrigerate for a couple of hours. Open the pan and remove the iced cake to a serving platter, leaving it at room temperature for half an hour or so before slicing it (a wet knife is a must).

ENJOY!

to print the recipe, click here

banner

Comments: I’ve always been partial to a classic flourless cake in which at most a delicate shower of powdered sugar would be added for cosmetic reasons. The surface of a flourless cake tends to be a bit cracked and uneven, as the cake puffs up in the oven, but then collapses in all its fugdy glory.  A dollop of whipped cream would show up in real special situations. But those who follow my blog might remember that my husband firmly believes that a cake is not a cake without frosting. Or icing. Or whatever indulgent concoction is added on top of it. Powdered sugar would not suffice. I made this cake the day before we would be hosting a reception at home, and Phil started his Movement For Frosting right away. I caved. Made a simple ganache and poured all over it early next morning. Then shaved some Valrhona chocolate on top. Decadent? Perhaps. But I tell you, this was one awesome cake.  Try it, serve it for your friends, sit back and wait for the compliments. Once they stop moaning, that is…

I apologize for not sharing a picture of the sliced cake, but I do not like to take pictures when we are having a get-together. Just imagine a very dense, moist, perfect slice, that when you cut with your fork, will leave a nice coating of slightly melted chocolate on its tines. You then use your lips – with as much elegance as humanly possible –  to clean the fork, and repeat the process. Ad libitum.

flourless-chocolate-cake-from-bewitching-kitchen

Have I mentioned that Valentine’s Day is coming up?
(wink, wink)

Add to FacebookAdd to DiggAdd to Del.icio.usAdd to StumbleuponAdd to RedditAdd to BlinklistAdd to TwitterAdd to TechnoratiAdd to Yahoo BuzzAdd to Newsvine

ONE YEAR AGO: Maple Pumpkin Pecan Snacking Cake

TWO YEARS AGOSilky Gingered Zucchini Soup

THREE YEARS AGO: Sweet Fifteen!

FOUR YEARS AGO: Sesame and Flaxseed Sourdough

FIVE YEARS AGO: Green Beans with Miso and Almonds

SIX YEARS AGO: Saturday Morning Scones

SEVEN YEARS AGO: White Bread


CHICKEN KORMA-ISH

Chicken Korma is a classic Indian recipe, but due to the considerable amount of liberties I took with this classic, I must be upfront about it in the title, to avoid the Food Police coming after me.  For starters, I cooked it sous-vide. I know, what was I thinking?  But I tell you, the perfect texture is worth it. Perhaps you are familiar with the concept of velveting meat before stir-frying? It is widely used in Chinese cooking and does wonders for chicken breast, pork tenderloin, or shrimp, typical types of protein that will often dry up when submitted to the intense heat of the wok. Chicken Korma is not a stir-fry, but the improvement in texture offered by the gentle cooking in the water-bath made me think of velveting. To add insult to injury, I omitted several spices that make Korma a Korma. There you go. Rebel. My middle name. Inspiration came from this recipe at Anova Culinary, a great source for sous-vide cooking.

chicken-korma

SOUS-VIDE CHICKEN KORMA
(inspired by Anova Culinary)

2 tablespoons canola oil
1 shallot, cut into small dice
2 tablespoons tomato paste
1 tablespoon kosher salt
1 tablespoon minced fresh ginger
1 tablespoon garam masala
1 tablespoon Madras curry powder
1 teaspoon ground cinnamon
1 teaspoon ground turmeric
1 teaspoon freshly ground black pepper
1/3 cup heavy cream
1/3 cup Greek yogurt
1/3 cup cashews
2 tablespoons lemon juice
1 tablespoon honey
1 1/2 pounds boneless skinless chicken breasts, cut into 1/2-inch pieces
Fresh cilantro, for serving

Set the sous-vide to 150°F (65°C).

Heat the oil in a large non-stick skillet over medium heat. When the oil is shimmering, add the shallot and cook, stirring frequently, until softened and lightly browned, about 5 minutes. Add the tomato paste, salt, ginger, garam masala, curry powder, cinnamon, turmeric and pepper. Continue to cook, stirring constantly, until aromatic, about 2 minutes. Remove from the heat and let cool for 5 minutes.

Transfer the mixture to a food processor or blender. Add the cream, yogurt, cashews, lemon juice, and honey. Process until smooth, about 1 minute. Combine the pureed sauce with the chicken in a large zipper lock bag. Seal the bag using the water immersion technique and place in the water bath. Set the timer for 2 hours to 3 hours.

When the timer goes off, remove the bag from the water bath. Transfer the entire contents of the bag to a serving bowl and garnish with cilantro.

ENJOY!

to print the recipe, click here

served

Comments: We adored this recipe. Period. If you look at the original, you’ll notice I substantially reduced the amount of heavy cream. It was plenty rich this way already, and it had enough sauce in the bag to form a luscious sauce. Of course, if you prefer the extra richness given by more cream, go for it.  I also used fewer spices.  On my second time around, instead of cilantro I sautéed a few cashews until golden brown and sprinkled all over when bringing it to the table. Phil liked the second version even better, I cannot decide.  One thing is certain; this will go in our regular rotation of recipes. If you don’t have sous-vide, simply use a regular pan, saute the chicken pieces (you could velvet them before for better texture), then add the ingredients for the sauce and simmer very gently until cooked through.  Yogurt has a tendency to separate, something that might be a bit more likely cooking on the stove top. Indeed, that is another benefit of sous-vide, with such a gentle heat, the yogurt mellows down gently, without putting up a fight and curdling right in front of your eyes…

secondSecond time around… double cashews, ground in the sauce,
and sautéed for serving…


chicken-korma-from-bewitching-kitchen

Add to FacebookAdd to DiggAdd to Del.icio.usAdd to StumbleuponAdd to RedditAdd to BlinklistAdd to TwitterAdd to TechnoratiAdd to Yahoo BuzzAdd to Newsvine

ONE YEAR AGO: Sunday Gravy with Braciole

TWO YEARS AGO: In My Kitchen, February 2015

THREE YEARS AGO: Avocado and Orange Salad with Charred Jalapeno Dressing

FOUR YEARS AGO: Green Olive, Walnuts and Pomegranate Salad

FIVE YEARS AGO: Romanian Flatbreads

SIX YEARS AGO: Ziti with Artichokes and Meyer Lemon Sauce

SEVEN YEARS AGO: Blasted Broccoli, Stove-top version