PALEO ENERGY BARS

First of all, let me state upfront the name “energy bars” irks me a little. Obviously, any food item is a source of energy. What would make something worthy of being labeled as energy bar? Going above a certain threshold in the number of kcal provided per bite?  Well, that’s a bit silly, if you ask me. But, just for the sake of keeping up with the trend, here I am to share with you a recipe for made-from-scratch “energy bars.”   Of the many commercially available cereal bars I’ve tried, I am fond of three:  Nature Valley Granola Bars,  Health Warrior Chia Bars, and Kind. As far as taste goes, my favorite would be Kind,  but the snag is that they are not at all kind to me: I end up with a  stomach ache half an hour or so after munching on one. No idea why, so I’ve decided it’s best to resist them. Phil loves Kind bars and they love him back. Go figure.  But, I am not here to advertise stuff you can get at the grocery store. Instead, I’ll offer a recipe to make some delicious bars in the comfort of your home…

Energy Bars

PALEO NUT ENERGY BARS
(slightly modified from Tastes of Lizzy T’s)

2 cups chopped pecans
1 cup chopped walnuts
1 cup chopped almonds
20 dates, finely chopped
¾ cup egg whites (I used store-bought egg whites)
1 tablespoons cinnamon
1/4 tsp ground cardamon seeds
1½ teaspoons vanilla

Heat the oven to 350 degrees.
 .
In a large bowl, mix together all of the ingredients. To prepare the 9×13 pan, line it with parchment paper and spray it with cooking spray. Press the nut mixture into the bottom of the pan.
 .
Bake for 16-18 minutes. Allow the bars to cool for 5 minutes, then pull on the paper to remove them from the pan. Use a pizza cutter to slice the bars into rectangles or squares of the size you’d like.
.
ENJOY!
.
to print the recipe, click here
.
compositebars.
Comments: 
These bars turned out wonderful. Containing much less sugar than most home-made versions, they don’t have that heavy, overly sticky feel, and I tell you one thing, they give quite a burst of…. how should I put it… energy? Yeap, that’s about right. Well, maybe the name is not that silly after all…
.
They last quite some time in the fridge, wrapped in Saran wrap. I suppose they freeze well too, but we did not have to try that. They were gone in less than a week.  Not only they are great as bars, but you can also crumble them and enjoy with yogurt. Phil likes to warm them up in the Breville oven, but I don’t mind just taking them off the fridge, leaving at room temperature for a few minutes. You can also change the proportion of nuts or use different nuts to suit your taste. And guess what? Contrary to some popular brands, these were very kind to me…

😉

ONE YEAR AGO: Millet Couscous with Roasted Carrots

TWO YEARS AGO: Mozarella-Stuffed Turkey Burger

THREE YEARS AGO: Happy Halloween!

FOUR YEARS AGO: Clay Pot Roast Pork

FIVE YEARS AGO: Panmarino

SIX YEARS AGO:  A Classic Roast Chicken

SECRET RECIPE CLUB: CHOCOLATE ZUCCHINI CAKE WITH CHOCOLATE FROSTING

Chocolate Zucchini Cake Pieces
The last Monday of October is here in all its pre-Halloween glory, and chilly not-so-glorious mornings!  It is Reveal Day of The Secret Recipe Club, and here I am to disclose the blog I was assigned to cook from: The Colbert Clan, hosted by Kate. Now, I must confess that this month I almost decided to skip participating because we traveled so much.  I kept the blog going normally, but we barely stayed home. First a trip to Santa Monica, CA, back home for 24 hours, then we caught a plane to São Paulo, Brazil.  I knew that my only chance of sticking with the Secret Recipe Club would be to jump on the assignment right away.  So, I took a slightly different approach to it, and went straight with a search for a cake. Cake? Me, the anti-cake-baker? Yes, you got that right. I wanted to take a chocolate cake to the department and that’s what I searched for.  The choice was easy, painless, and very sweet: a Chocolate Zucchini Cake, adorned with a luscious buttercream frosting which yours truly made with only minor boo-boos. It was an almost painless baking experience, which is saying a lot. But let me tell yo a little bit about Kate. She is a young, stay-at-home Mom of three kids, and her blog reflects life-style of someone who needs to get good food at the table for a family of five.  I am sure it’s not easy, kids can be picky, and juggling everyone’s desires is like a full-time job!  Kudos for her…   I could not resist browsing a little bit through The Colbert Clan, and was tempted to make her Mini-snickers Cheesecakes, which are simply adorable with a drizzle of caramel on top. I am sure my colleagues at the department would be absolutely thrilled…  And, since we are on the subject of cuteness, how about these Macaroon Kisses? Definitely something to consider as a baking project…  But, chocolate cake was on my mind, and without further ado, let me share the recipe with you.

Chocolate Zucchini Cake

CHOCOLATE ZUCCHINI CAKE WITH CHOCOLATE FROSTING
(from The Colbert Clan)

for the cake:
1/2 cup oil
1 1/2 cups sugar
2 teaspoons vanilla
1 large egg
1/2 cup milk
2 cups shredded zucchini
2 cups flour
1/2 cup cocoa powder
1 1/2 teaspoons baking soda
1/2 teaspoon salt

for the frosting:
1 cup butter, softened
1/2 teaspoon vanilla
3-4 tablespoons milk
1/2 cup cocoa powder
3 1/2 cup powdered sugar

Heat oven to 350 and spray your 9×13 pan.

In one bowl mix together oil, sugar, vanilla, egg and milk until combines. Add grated zucchini.In a second bowl mix together flour, cocoa powder, baking soda and salt.

Pour dry ingredients into wet mixture and mix.

Pour into your 9×13 pan and bake for 28 to 30 minutes. Cool completely before frosting.

Make the frosting: Beat the butter until fluffy. Mix in vanilla and milk. Mix in cocoa and powdered sugar, whip until the mixture is smooth and creamy. I did not have to use all the powdered sugar mixture.

Cut in squares and serve.

ENJOY!

to print the recipe, click here

composite

Comments: I’ve always wanted to make a chocolate cake with zucchini in it, because it’s so intriguing! Of course, I am very fond of a particular type of carrot cake from my childhood, and zucchini is not too far from carrots as far as food is concerned. Plus, chocolate can make many things taste delicious and decadent, even the humble zucchini.  This cake is simple to prepare, the hardest part was shredding the squash.  Now, a piece of advice for novice bakers: if you are a neat freak like I am, and decide to rinse the sieve after making the cake batter, make sure it is 100% dry before you go sifting the cocoa powder for the frosting.  If there is water in it, you’ll have a big mess on your hands, especially if you are puzzled about the cocoa not going through and decide to “help” it with your fingers.  Enough said.

The cake was a big success with our colleagues, and of course Phil had to remind me of speeches he gave me in the past, like  “The Importance of Frosting on Any Cake,” and  “Why Cakes are Not Real Cakes If Not Smothered in Frosting.”  He is thrilled that I seem to be getting his point, after so many years of food blogging.  Our marriage only gets better and better.

Kate, I hope you had a great time cooking from your assigned blog!
I invite my readers to browse through the collection of goodies made by my fellow virtual friends from The Secret Recipe Club with a click on the blue frog at the end of the post.

ONE YEAR AGO: Pecan-Crusted Chicken with Honey-Mustard Dressing

TWO YEARS AGO: Bewitching Kitchen on Fire!

THREE YEARS AGO: Cashew Chicken Lettuce Wraps

FOUR YEARS AGO: Chiarello’s Chicken Cacciatore

FIVE YEARS AGO: Donna Hay’s Thai-Inspired Dinner

SIX YEARS AGO: Panettone

PULLING UNDER PRESSURE

Are you afraid of the pressure cooker? Are you so terrified that you don’t even own one and the thought of that thing in your kitchen gives you nightmares? I am here to help you out. As 99.99% of Brazilians, I grew up used to its noise a couple of times per week, making sure we never ran out of black beans, a staple in any Brazilian kitchen. Looking back, I am forced to admit that my Mom’s pressure cooker was scary. That thing had zero safety features and relied on the experience (and perhaps a little luck) of the user not to blow up. A wimpy-looking closing mechanism, a gasket that would definitely be worn out in a few months, and a tiny valve that danced the dance of the steam on top, but seemed ready to fly off any second. Basically, Mom’s pressure cooker was like a bomb in waiting. But, apart from one incident in which black beans tainted the kitchen’s ceiling, nothing serious ever happened.  Having said all that, today’s pressure cookers have absolutely nothing to do with the ones from my past. They have safety mechanisms in place that prevent building excessive pressure, and the lid simply will not open unless the pressure in versus out is equalized.  I don’t even hesitate to grab mine whenever I want to make black beans, but truth is, they are incredibly useful to cook many types of food, from soups to sauces, from meat to grains, veggies, and even desserts! But, let’s start with a favorite recipe of mine, Pulled Pork. An American classic made in a classic Brazilian cooking vessel, the one and only pressure cooker!

Pressure Cooker Pulled Pork22

PRESSURE COOKER PULLED PORK
(from The Bewitching Kitchen)

5 pounds boneless pork shoulder cut into large chunks
water
2 bay leaves
2 teaspoons ground cumin
1 tablespoon dried Mexican oregano
1/2 teaspoon Aleppo pepper flakes
1 tablespoon salt
1/4 cup apple cider

Place the chunks of meat in the pressure cooker, add water to just barely cover them, then add the bay leaves, and all other ingredients. Mix gently to dissolve the salt and incorporate the apple cider.

Close the pressure cooker and turn the heat on high until it builds pressure, then lower the heat and cook it for 45 minutes.  When the time is up, turn the heat off and allow the pressure cooker to come down naturally, it should take about 15 minutes, maybe a little less.

Open the pan once the pressure is equalized, and transfer the meat carefully to a baking dish. It will be very tender. You can save the cooking liquid, put it in the fridge to make it easier to remove the layer of fat that will form, using it as a base for sauce.

Shred the meat with two forks, discarding any fatty pieces or gristle. You can use the meat right away or save it for several days in the fridge.  When ready to use, you can saute it in olive or coconut oil to crisp up the edges, or warm it up gently in a pan and then spread the pulled meat on a layer and run it under the broiler (my favorite method).   Serve with tortillas, or over steamed rice and black beans, incorporate in sauces, improvise a Tex-Mex lasagna with it…  and…

ENJOY!

to print the recipe, click here

compositepulled

A word about pressure levels:  these days you can find regular pressure cookers and also electric ones. Many models will have two levels of pressure, the lowest around 6 psi (pounds per square inch), the highest from 13 to 15 psi. My pressure cooker delivers a single, powerful level of pressure of 15 psi. If yours doesn’t reach this level simply cook the meat 5 minutes longer. I have no experience with electric pressure cookers, but from what I see around they require longer times in general, perhaps 30% or even longer cooking times.  Use the specifications provided in the instruction booklet you have somewhere, or let google do the research for you…

Pulled pork is definitely one of our favorite meals, I’ve made it many, many times, as Phil’s kids also used to love it. My default recipe is in the blog and it is fantastic. However, I must say this one pleased me even more!  Something about the moisture retained by the meat cooked under pressure, and the way the seasoning is more uniformly present instead of concentrated on the charred surface made this dish a complete winner in my book…  The meat won’t look gorgeous as it comes out of the pressure cooker, so don’t be discouraged when you open the pan. Trust me on this. Get the meat out very gently, pull it and try a little piece… even without browning on a pan or under a broiler you will be amazed by how wonderful it is.

I like to serve mine over Romaine lettuce leaves, a bit of guacamole, shredded Queso fresco…

servedSally


But, of course, you can opt for a more authentic presentation that will include corn tortillas, and a serving of refried beans on the side…  It’s all good!

servedPEK


And you know what I love the most? Leftovers for lunch, so easy to put together… a quick saute of the meat, some tomatillo salsa, half an avocado, Queso fresco for good measure, and a nice sprinkle of the world’s best hot sauce, Sriracha!  Tell me, isn’t this a great lunch?

leftovers

I hope I convinced you to lose your fear of pressure cooking.  Pork shoulder is very forgiving and probably one of the best types of meat to inaugurate your pressure cooking adventures.  Second best type? My vote goes for chicken thighs.  Stay tuned, I’ve got a nice curry coming up sometime soon. Well, you know… soon enough.

😉

before I leave you, a little picture of me and Mom, who doesn’t cook anymore, but I am sure remembers fondly the days in which she prepared the best black beans in the known universe for her family! As this post is published, I’ll be almost leaving Brazil to fly back home…

IMG_1537

ONE YEAR AGO: Cooking Sous-vide: Two takes on Chicken Thighs

TWO YEARS AGO: Miso Soup: A Japanese Classic

THREE YEARS AGO: On my desk

FOUR YEARS AGO: A must-make veggie puree

FIVE YEARS AGO: Vegetarian Lasagna

SIX YEARS AGO:  Brazilian Pão de Queijo

ALL-AMERICAN POT ROAST FROM THE FOOD LAB

If you like a scientific approach to cooking, this new cookbook is a must-have:  The Food Lab, by J. Kenji López-Alt. I am quite fond of his blog Serious Eats, so of course I had the book pre-ordered and was anxiously waiting for its electronic delivery. Since I have no space in any bookshelf at home to store cookbooks, Kindle became my helpful friend.  The book is delightful to read, as the amount of “dry” information associated with perfecting a recipe is well-balanced by jokes and short stories.  In one of my favorite chapters (Soups, Stews and the Science of Stock) he shares a great recipe for Creamy Mushroom Soup.  In that recipe, Kenji tackles the persistent WRONG statement that they should not be washed under running water because “mushrooms are like sponges.”  I swear, every time I hear a reputable chef spitting this non-sense I scream at the screen. Who on Earth came up with that idea, and why, oh why it gets repeated over and over?  Kenji patiently goes over his experiments washing mushrooms and weighing them. Actually, you can soak them and after draining they will retain between 1 and 2% water, all on the surface. If you are paranoid about watering down your mushroom saute (keep in mind you don’t water down anything with 2% water), dry them slightly with a paper towel, or cook them 10 seconds longer…. Wash your mushrooms, folks! Toss that silly mushroom brush, it’s one big gadget scam. Ok, I feel better now.  So  much better that I will step off my soap box and share with you a great recipe for All-American Pot Roast, perfected in The Food Lab.

All American Pot Roast

ALL-AMERICAN POT ROAST WITH GRAVY
(from The Food Lab, published with permission from J. Kenji López-Alt)

1 boneless chuck roast (about 5 pounds), pulled apart at the seam into 2 large chunks
Kosher salt and freshly ground black pepper
2 tablespoons vegetable oil
4 anchovy fillets
2 medium cloves garlic, finely minced or grated on a Microplane (about 2 teaspoons)
1 teaspoon Marmite
1 tablespoon soy sauce
2 tablespoons tomato paste
2 large carrots, peeled and cut into 1- to 2-inch chunks
2 stalks celery, cut into 1-inch chunks
2 large onions, finely sliced (about 4 cups)
2 tablespoons all-purpose flour
1 bottle (750-ml) dry red wine
4 cups homemade or low-sodium canned chicken stock
¼-ounce (1 packet) unflavored gelatin
2 bay leaves
4 sprigs fresh thyme
1 pound russet baking potatoes (about 2 large), peeled and cut into 1- to 2-inch chunks

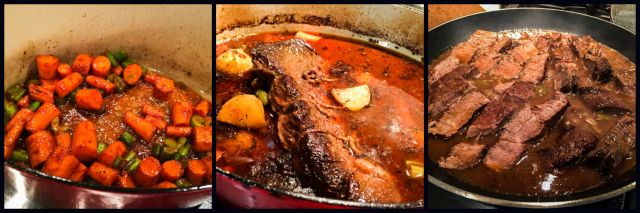
Adjust an oven rack to the lower-middle position and preheat the oven to 275 ° F. Pat the chuck roast dry and season it with salt and pepper. Tie kitchen twine tightly around each piece at 1-inch intervals to help it retain its shape. Heat the oil in a large Dutch oven over high heat until lightly smoking. Add the chuck and cook, turning occasionally, until well browned on all sides, about 8 to 10 minutes. Transfer the beef to a large bowl.

Meanwhile, combine the anchovy fillets, garlic, Marmite, soy sauce, and tomato paste in a small bowl and mash with the back of a fork until a smooth, homogeneous paste is formed. Return the pot to medium-high heat, add the carrots and celery, and cook, stirring frequently, until the vegetables begin to brown around the edges, about 5 minutes. Add the onions and cook, stirring frequently, until very soft and light golden brown, about 5 minutes. Add the anchovy mixture and cook, stirring, until fragrant, about 1 minute. Add the flour and cook, stirring, until no dry flour remains, about 1 minute. Increase the heat to high and, whisking constantly, slowly add the wine. Bring to a simmer and cook until the wine is reduced by half, about 15 minutes.

Pour the chicken stock into a large liquid measuring cup or a bowl and sprinkle the gelatin on top. Allow it to hydrate for 10 minutes. Add the gelatin and chicken stock, bay leaves, and thyme to the Dutch oven, return the beef to the pot, and bring the liquid to a simmer. Cover, place in the oven, and cook until the beef is completely tender (it should offer little to no resistance when you poke it with a cake tester or thin knife), about 3 hours; add the potatoes to the pot about 45 minutes before the beef is done. Remove the pot from the oven and allow to cool for 1 hour.

Transfer the whole pot to the refrigerator and let rest at least overnight, or up to 5 nights. When ready to serve, carefully remove the hardened layer of fat from the top of the cooking liquid and discard. Transfer the meat to a cutting board. Discard the bay leaves and thyme sprigs. Bring the liquid to a boil over high heat and reduce it until coats the back of a spoon but doesn’t taste heavy. Season to taste with salt and pepper.

Meanwhile, remove the twine from the beef and slice it against the grain into ½-inch-thick pieces. Place the pieces in overlapping layers in a 12-inch skillet and add a few ladles of sauce to moisten them. Cover the skillet and set over medium-low heat, shaking occasionally, until the meat is heated through, about 15 minutes. Transfer the meat to warmed serving plates or a large platter and top with the cooked vegetables and more sauce. Serve immediately.

ENJOY!

compositeflavor

Comments: The whole idea behind this recipe is to boost the amount of glutamates, creating what he calls a ‘umami flavor bomb.”  Kenji noticed that components that bring umami to a dish act in fact synergistically, so by adding several of them to the dish, you’ll get a real boost in flavor.  In this version, two very unexpected items are included: anchovies and Marmite, the “love it or hate it” ingredient more commonly found in light smears over buttered toast.

composite2

I confess to modifying his basic recipe a little. For starters, I added a lot more carrots because we adore them in our pot roasts. And I used only half a bottle of wine and half the amount of chicken stock/gelatin.  It covered the meat from the beginning and seemed perfect in the reduction stage of the sauce.  I also cooked the roast longer, for a total of 4 hours. By that time the meat was really tender the way we like it. My only other modification was to finish the dish with fresh parsley added right before serving.  It was absolutely wonderful. comfort food at its very very best!

served3

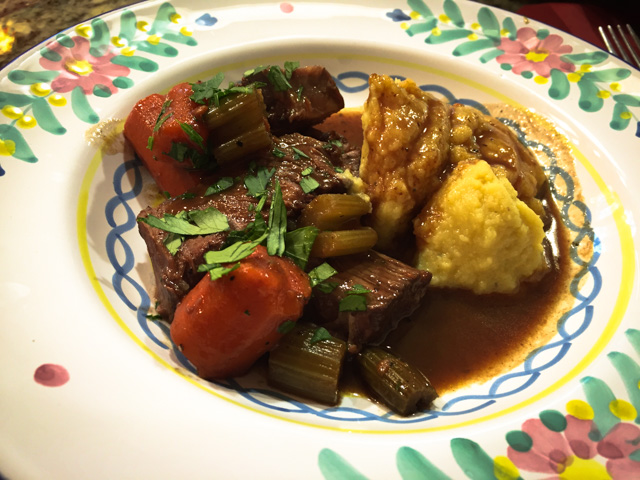
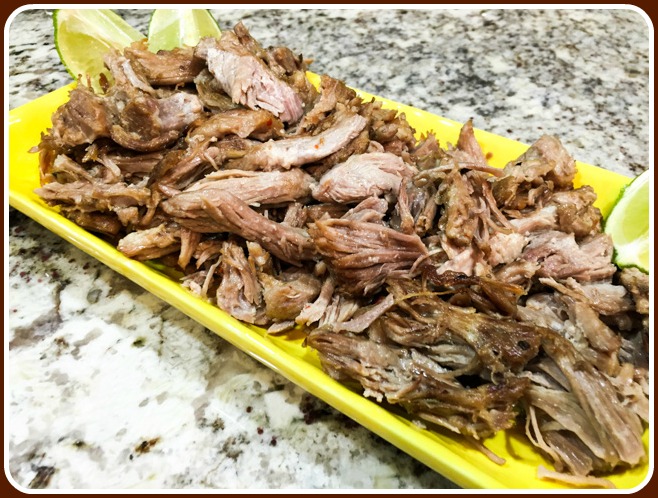
Dinner is served!  Pot Roast with Golden Cauliflower Puree….

 Kenji, thank you so much for giving me permission to blog on this luscious pot roast… I have way too many things I’d like to make from your book, like the Lemon Ricotta Pancakes. They are calling my name super loud! Of course, I will have to follow your instructions to make my own ricotta, which is a project I’ve been flirting with for a long time.

If you want to order the book or read more about it, click here.

ONE YEAR AGO: Chicken Marsala Meatballs with Mushroom Sauce

TWO YEARS AGO: PCR and a Dance in the Mind Field

THREE YEARS AGO: October 16th: World Bread Day!

FOUR YEARS AGO: San Francisco Sourdough

FIVE YEARS AGO:  A Real Oscar Winner   (Oscar joins our home!)

SIX YEARS AGO: Pane Siciliano

APPLE CINNAMON OATMEAL CAKE

Not too long ago I mentioned that apples and cinnamon make a perfect match. If you need any formal proof for the statement, look no further, this is it. Absolutely perfect for the season, this cake keeps the apples in chunks that get deliciously sweet and soft during baking. It reminded me a bit of a famous cake by Dorie Greenspan. But this version includes oats for a slightly more substantial cake. Let’s say it walks through a rustic path I am quite fond of. Complex flavors, delicious topping… The recipe comes from Pastry Studio, a blog I visit all the time and cook from regularly.  As usual, Gayle’s bench notes are perfect guidelines to highlight what is important when preparing the cake, as well as her rationale while designing the recipe.  A nice lesson in baking is what I always find when I stop by her site.

Apple Oatmeal Cake

APPLE CINNAMON OATMEAL CAKE
(from Pastry Studio)

for the streusel:
1/3 cup (1 5/8 oz) flour
1/3 cup (1 oz) old-fashioned oats
1/4 cup (1 3/4 oz) dark brown sugar, packed
1/2 teaspoon cinnamon
pinch allspice
2 oz (4 tablespoons) cold unsalted butter
1 1/2 teaspoons (8 grams) molasses

for the cake:
2 medium (about 13 oz) apples
1 teaspoon lemon juice
1 1/4 cups (6 1/4 oz) flour
3/4 teaspoon salt
1 teaspoon baking soda
1 teaspoon cinnamon
1/8 teaspoon allspice
pinch nutmeg
1 cup (3 oz) old-fashioned oats
3/4 cup (6 oz) apple juice
1/2 cup (4 oz) canola oil
1/2 cup (3 1/2 oz) dark brown sugar, packed
1/2 cup (3 1/2 oz) granulated sugar
2 eggs at room temperature
1 3/4 teaspoon vanilla
1/2 cup (4 oz) milk at room temperature

Heat oven to 350 degrees F.  Lightly grease a 9” square cake pan and line with parchment, leaving a short overhang on two sides.

To prepare the streusel, mix the flour, oats, brown sugar and spices.  Cut the cold butter into 1/4” pieces and add.  Toss until coated with the dry ingredients and drizzle the molasses.  Using your fingers or a fork, press the butter pieces until they break off into smaller pieces and the mixture clumps together and is crumbly with large and small chunks. Chill until ready to use.

Peel, core and cut the apples into small cubes.  You should have about 2 cups.  Toss the apples with lemon juice to prevent browning.  Set aside.

Whisk together the flour, salt, baking soda and spices.  Set aside. Combine the oats and apple juice and set aside for about 5 minutes.

In another bowl, whisk the oil, both sugars and eggs until thoroughly blended. Add in the vanilla and oat and apple juice mixture.  Mix in the dry ingredients in 3 additions, alternating with half the milk and beginning and ending with the dry ingredients.  Mix just until there are no dry streaks of flour.  Fold in the chopped apples.  Pour the batter into the prepared pan and spread it out in an even layer.  Sprinkle the streusel evenly over the top of the batter.

Bake until a toothpick inserted into the center comes out clean, about 34 – 36 minutes.  Remove from the oven and place on a wire rack to cool completely.

Run a thin-bladed knife around the edges of the cake.  Gently lift it out of the pan using the parchment overhang to assist.  Using a platter, flip the cake over and peel off the parchment.  Use another plate or platter to flip the cake right side up.

ENJOY!

to print the recipe, click here

applecakecomposite
Reading Gayle’s bench notes you can tell she worked hard to perfect this cake. The batter is much more liquid than most cakes I’ve ever made, and it smells amazing as it bakes. The aroma seems to only get better as the cake sits and cools. Which brings me to the only tricky part of this recipe. Keeping the cake intact for 24 hours. Not easy. At some point Phil said if I did not cut it he would take matters into his own teeth and bite it. I was unmoved. Defended the cake as if my life depended on it. And it was worth it, because it is a cake that profits from a little time to itself, 24 hours left to evolve into its maximal deliciousness.

Apple Oatmeal Cake Pieces

It was hard to wait for a full day before indulging, but worth it…
Look at the chunks of apple waiting for you…

ONE YEAR AGO: Sourdough Rye Bread with Flaxseeds and Oats

TWO YEARS AGO: Apricot-Raspberry Sorbet: A farewell to Summer

THREE YEARS AGO: Marcela’s Salpicon

FOUR YEARS AGO: Pork Kebabs

FIVE YEARS AGO: Fondant au Chocolat

SIX YEARS AGOGot Spinach? Have a salad!