SECRET RECIPE CLUB: AMAZING APRICOT BARS

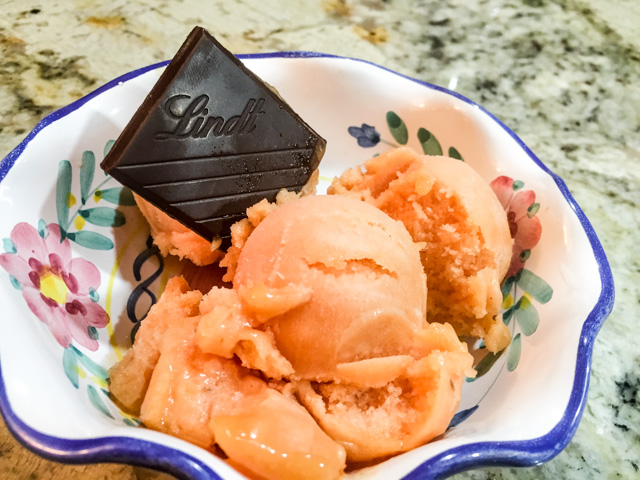
Here we are. Last Monday of September, which means Summer is gone. Over. Finito. Acabado. I could sit here and whine for hours, filling your screen with paragraph after paragraph describing in detail my despair, frustration, and overall gloom. Telling you how my interactions with human beings are affected as the average daily temperature goes down. You don’t want to be around me in January, even with all that New Year upbeat aura. But, enough with the negativity.

The last Monday of the month brings many reasons to be joyful, as it is Reveal Day for The Secret Recipe Club. This month I got a fantastic blog to stalk and cook from: A Palatable Pastime, hosted by Sue, who lives in Ohio with her husband and two lovely cats. She develops her own recipes – often with a Southern US flair – and not only has won several contests, but her productions have been featured in many top-notch sites like LDS Living, Mrs. Field’s and the Christian Science Monitor’s food section. I was thrilled to stalk her site, although a bit overwhelmed by the number of possibilities bookmarked to pick, cook, and share with my readers today.

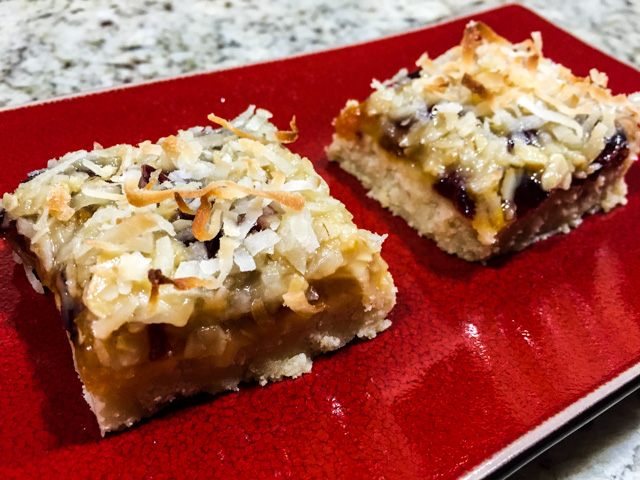
Twelve recipes made the final list, but to keep it manageable, I’ll just mention half of them: Sweet Potato Biscuits (I’ve always wanted to make them… was very close to choosing it for this assignment), Thai Salmon Curry….   Vegan Mushroom Pumpkin Chili (her description tells me it’s a winner of a recipe), Dutch-Baby Pancake (another recipe I’ve always wanted to try), Thai Larb Soft Rolls… and Sue’s Almost Famous Meatballs (great post!). There were so many tasty options to choose from, but in the end I made a batch of her Amazing Apricot Bars. No doubt 2015 is the year of the apricot in the Bewitching Kitchen…  These turned out spectacularly amazing!

Apricot Bars

AMAZING APRICOT BARS
(from A Palatable Pastime)

For shortbread crust:
3/4 cup unsalted butter, softened
1/2 cup granulated sugar
1 teaspoon vanilla extract
1/4 teaspoon salt
1-3/4 cups all-purpose flour (8-1/2 ounces)

For topping:
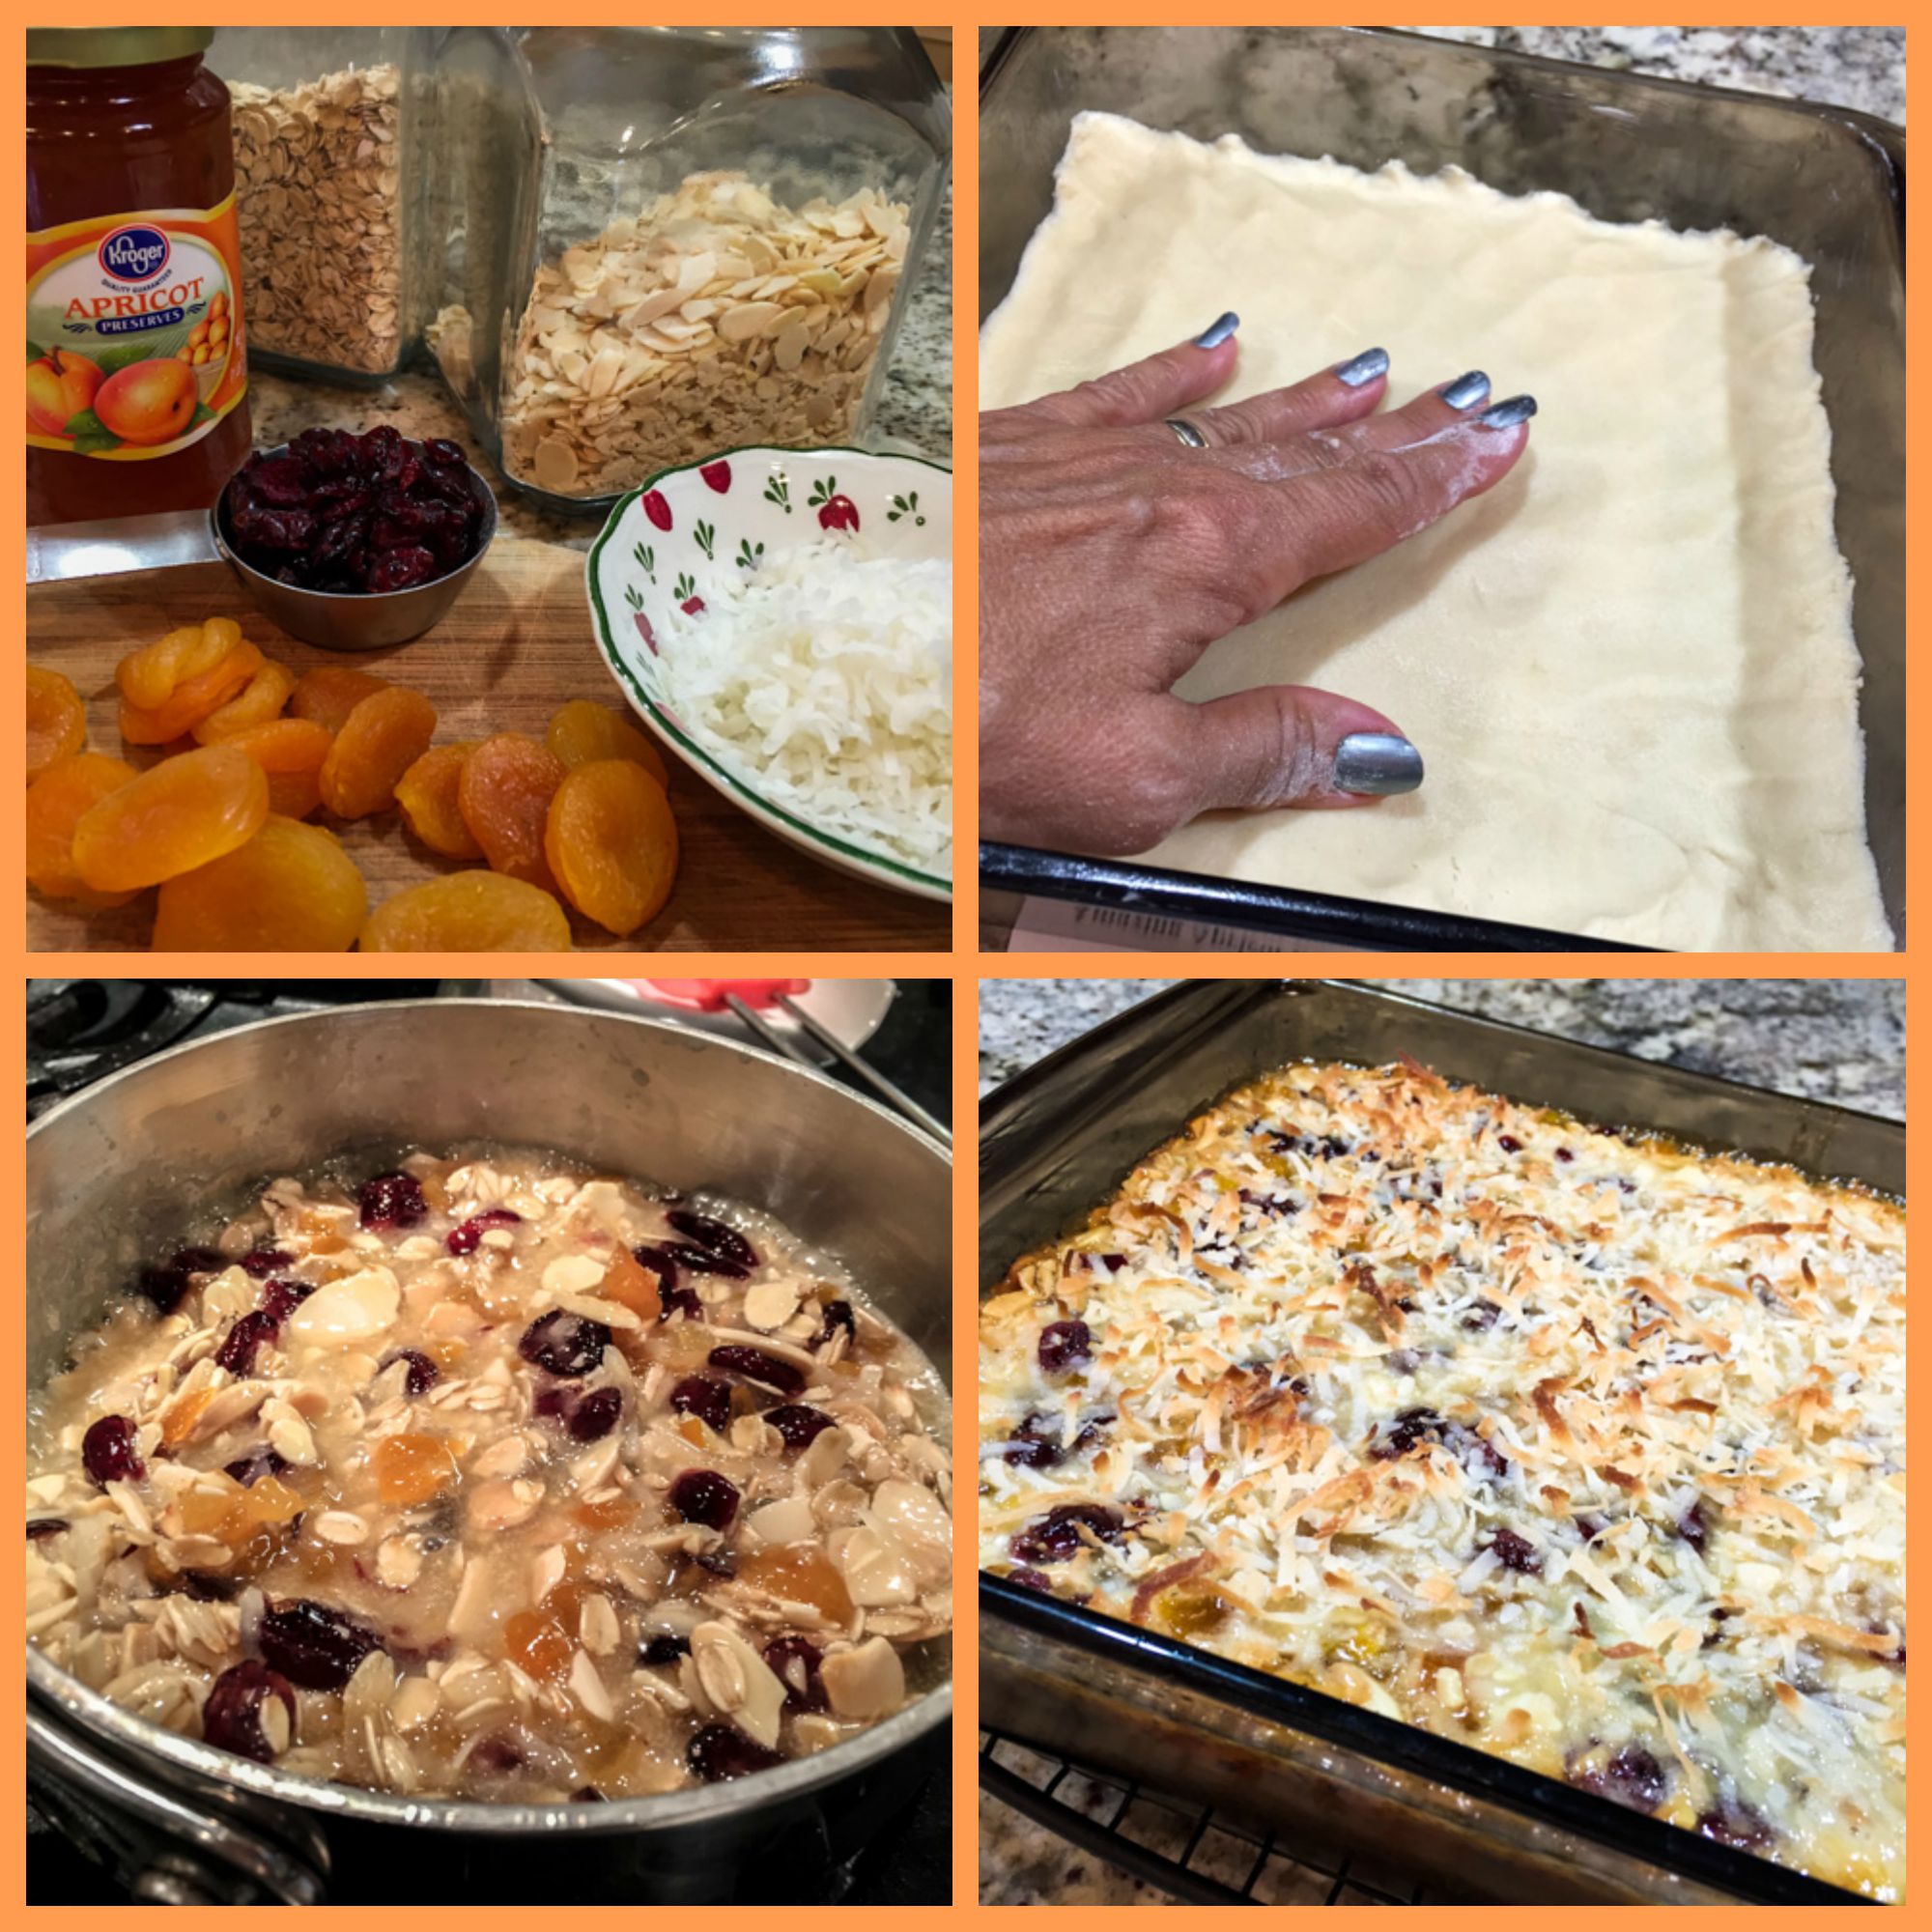
1/4 cup old-fashioned oats, toasted
1/4 cup sliced almonds, toasted
1/4 cup sweetened flaked coconut
1/4 cup dried cranberries (craisins)
1/4 cup dried apricots, chopped
1/2 cup unsalted butter (1 stick)
1/4 cup granulated sugar
3 tablespoons honey

For finishing:
1/3 cup apricot jam
3 tablespoons sweetened flaked coconut

Heat oven to 350F.

Butter the inside of a glass 8×8-inch square baking pan. Cream together the butter and sugar (thoroughly mix until sugar dissolves). Stir in the vanilla, salt and flour and mix into a dough. Press dough evenly into the bottom of the buttered baking pan, then chill in the refrigerator while you continue.

Mix the dry ingredients for the topping together in a small bowl. In a small saucepan, melt the butter with sugar and honey over low heat. Stir in the dry fruit topping mixture and bring to a boil; boil for 2 minutes then remove from heat. Take out the baking pan, and spread the top of the dough with the simply fruit apricot spread. Top the spread with the cooked fruit mixture.

Sprinkle the topping with an extra 3 tablespoons of sweetened flaked coconut. Bake in a preheated 350F oven for 20 minutes. Allow to cool completely before slicing into squares.

ENJOY!

to print the recipe, click here

ApricotComposite

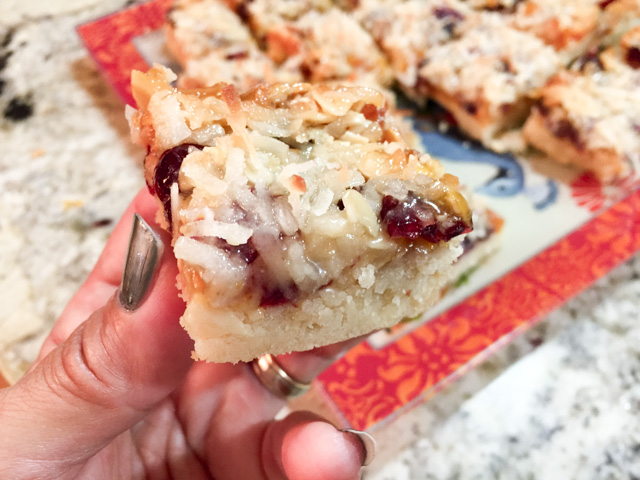
The bars were juicy, sweet, with a slight tang from the cranberries to balance flavors. The crust., which I find the trickiest component of this type of concoction was perfect: not too hard, not too crumbly.  As usual, I brought the whole batch to our department, and by 9:30 am, not a single crumb was left on the platter.  So, I advise that if you intend to share it friends, make sure to grab a square for yourself right away…  They are seriously addictive.

square

Sue, I thoroughly enjoyed stalking your site, I love the way you go the extra mile to explain the technique behind your recipes, so that even a novice cook will be able to make the many tasty things you share on your blog.  I hope you also had fun with your assignment this month. My readers are invited to browse through this month’s collection by poking the cute frog at the end of this post.

Apricot Bars2
ONE YEAR AGO: Spiralizer Fun

TWO YEARS AGO: Linguine with Cauliflower Pesto

THREE YEARS AGO: Carriage House Apple-Walnut Pie

FOUR YEARS AGO: Chicken Marsala

FIVE YEARS AGO:  Home, sweet home

SIX YEARS AGO: Levain Bread with Caramelized Onions

SOBERING PEACH SORBET

I don’t quite know how to soften the blow, so here it goes: this post brings  you my last sorbet of the year.  I know, it is cruel and devastating. The bleak reality is that we must wrap our minds around stews, soups, and braises. Maybe a chocolate bread pudding, or a batch of brownies topped with caramel sauce. But the clock is ticking for sorbets, so here is my contribution to sweeten up that brief period of bliss known as “Indian Summer.”

Peach Sorbet

PEACH SORBET
(from the Bewitching Kitchen)

4 to 5 peaches, peeled and cut in small chunks (two very full cups)
3/4 cup granulated sugar
1/3 cup orange juice
1/3 cup lemon juice
1 medium banana, very ripe
3 Tablespoons orange Curaçao

Add all ingredients to a food processor or blender.  Process at full speed until completely smooth, making sure no large pieces of banana are present.  Transfer the mixture to a bowl and refrigerate for several hours, preferably overnight.

Transfer the sorbet mixture to your ice cream maker and churn according to the manufacturer’s instructions. Store in the freezer.

ENJOY!

to print the recipe, click here

Comments: Sorbets are such simple desserts, since no cooking is involved. I like to include a banana in our sorbets because it improves texture and it also makes the sorbet slightly more substantial. You could leave it out. The same is true for the orange Curaçao, but unless you have something against using alcohol in your cooking, go for it. It won’t taste alcoholic at all, but it will boost the orange flavor.

I like this type of sweet served without any adornment, but the resident sorbet expert thinks that a small square of semi-sweet chocolate never hurts.  I must say he has a point…

LindtPlus
If you’re headed to winter misery like we are, make a batch of this sorbet as soon as possible. Enjoy it as you stare at your fireplace and try to figure out how many days you have before turning that thing on. If you live in Australia, Brazil, India, Jamaica, New Zealand, please invite me for a 3-month visit… What? Way too long? I beg you to re-consider: for the most part I am very well-behaved, and love doing dishes!

ONE YEAR AGO: Winner of the 1 million page give-away…

TWO YEARS AGO: Just married!

THREE YEARS AGO: Corn Chowda

FOUR YEARS AGO:  Oven-broiled Salmon over Saucy Spinach

FIVE YEARS AGO: Butterscotch Brownies

SIX YEARS AGO: First Soup of the Year

SICHUAN PORK STIR FRY IN GARLIC SAUCE

My love affair with America’s Test Kitchen only grows stronger and stronger… I’ve been making a lot of their recipes without a single disappointment (insert discreet knock on wood).  Pork stir-fry can be pretty tricky to prepare. More often than not the meat either turns out too dry or too greasy, and the flavors fail to mingle well.  Cook’s Illustrated to the rescue.  They tackle the many issues with this preparation by using boneless country-style pork ribs, and soaking the pieces of meat in a solution of baking soda. Baking soda acts by raising the pH (decreasing acidity), therefore affecting the charges present in protein molecules, which in turn changes the way the molecules interact with each other. With a raise in pH, the protein strands unfold and relax, in other words, the meat becomes considerably more tender. If you take the process too far, either by using a huge amount of baking soda or by allowing the meat to sit for too long in its presence, you’ll end up with mushy meat.  But when performed correctly it results in meat with fantastic texture. ATK also incorporated a coating with cornstarch before stir-frying, which helps retain moisture as the meat cooks. Genius, right? As to the sauce that finalizes the dish, they use ketchup and fish sauce to up the level of glutamates, giving it a boost in flavor.

Seems simple and straightforward enough. In fact, the dish comes together quite quickly once you do the initial prep of the meat, so have all your ingredients ready, and get busy… Dinner will be served in no time!

Pork Stir Fry ATK

SICHUAN PORK IN GARLIC SAUCE

(reprinted with permission from America’s Test Kitchen via Cook’s Illustrated)

for the sauce:
1/2 cup low-sodium chicken broth
2 tablespoons sugar
2 tablespoons soy sauce 
4 teaspoons Chinese black vinegar
1 tablespoon toasted sesame oil
1 tablespoon Chinese rice wine or dry sherry
2 teaspoons ketchup
2 teaspoons fish sauce
2 teaspoons cornstarch

for the meat:
12 ounces boneless country-style pork ribs, trimmed
1 teaspoon baking soda
1/2 cup cold water
2 teaspoons Chinese rice wine or dry sherry
2 teaspoons cornstarch

for the stir-fry:
4 garlic cloves, minced
2 scallions, white parts minced, green parts sliced thin
2 tablespoons Asian broad-bean chili paste
4 tablespoons vegetable oil
6 ounces shiitake mushrooms, stemmed and sliced thin
2 celery ribs, cut on bias into 1/4-inch slices

For the sauce: Whisk all ingredients together in bowl; set aside.

For the pork: Cut pork into 2-inch lengths, then cut each length into 1/4-inch match sticks. Combine pork with baking soda and water in bowl. Let sit at room temperature for 15 minutes. Rinse pork in cold water. Drain well and pat dry with paper towels. Whisk rice wine and cornstarch in bowl. Add pork and toss to coat.

For the stir-fry: combine garlic, scallion whites, and chili paste in bowl. Heat 1 tablespoon oil in 12-inch nonstick skillet over high heat until just smoking. Add mushrooms and cook, stirring frequently, until tender, 2 to 4 minutes. Add celery and continue to cook until celery is crisp-tender, 2 to 4 minutes. Transfer vegetables to separate bowl.

Add remaining 3 tablespoons oil to now-empty skillet and place over medium-low heat. Add garlic-scallion mixture and cook, stirring frequently, until fragrant, about 30 seconds. Transfer 1 tablespoon garlic-scallion oil to small bowl and set aside. Add pork to skillet and cook, stirring frequently, until no longer pink, 3 to 5 minutes. Whisk sauce mixture to recombine and add to skillet. Increase heat to high and cook, stirring constantly, until sauce is thickened and pork is cooked through, 1 to 2 minutes. Return vegetables to skillet and toss to combine. Transfer to serving platter, sprinkle with scallion greens and reserved garlic-scallion oil, and serve.
.
ENJOY!
.

to print the recipe, click here
 .

Comments: In the past, I’ve attempted a few recipes using boneless country-style pork ribs and was quite disappointed by how they turned out, particularly in texture. I had pretty much given up on them. When I noticed they used this cut for the stir-fry, I was intrigued. Could they possibly make it work? Never doubt ATK, my friends. They do their home work, or… should I say their kitchen work, testing every variable imaginable.

When Phil and I sat down to enjoy this stir-fry, we both had the same thought: this feels like a meal served at an upscale Chinese restaurant. Let’s be frank, Chinese restaurants can be a gastronomic disaster, every dish presented with the exact same gloppy, overly sweet soy-based sauce.  But when you find a place that offers truly authentic recipes, it’s an amazing experience! I had fantastic Chinese meals in São Paulo’s huge Chinatown during my college years. I can picture this recipe served in such a setting, or better yet,  in the comfort of our bewitching kitchen.

Sichuan Pork Stir Fry
I hope you give this recipe a try, don’t be intimidated by the number of ingredients or steps in preparing it.  As I mentioned, once the meat is out of its baking soda spa, the whole meal will be ready in lightning speed.  Nothing better to crown a busy working day…
😉
 .

FIVE YEARS AGO:
 Popeye-Pleasing Salad
.
SIX YEARS AGO: Summer’s Finale

CREAM CHEESE MINI-PANCAKES WITH SMOKED SALMON

Remember our Nobel Reception that happened a few months ago? I still have a few items from that event to share with you, as cooking goes by at a fast pace in the Bewitching Kitchen, but blogging takes a little longer. Good thing my readers seem to be quite patient…  Lucky blogger, yes I am.  These mini-pancakes were a big hit at the party. I’d say of all the things I prepared, they were the most involved, but quite a fun project to tackle.  I found the recipe during a session of Pinterest hopping on the week before our get-together, and the decision to make them happened in 3.8 seconds. A phrase that sums me up well: I am hip about time (be ready for a quiz).

MiniPancakes

CREAM CHEESE MINI-PANCAKES WITH SMOKED SALMON
(from Evil Shenanigans)

For the pancakes:
1 cup all-purpose flour
1 1/4 teaspoon baking powder
1/4 teaspoon kosher salt
1 tablespoon fresh chopped chives
1 ounce cream cheese, softened
1 tablespoon butter, softened
1 egg
3/4 cup milk
8 ounces cold smoked salmon
Freshly chopped chives, for garnish

For the sour cream sauce:
1/2 cup sour cream
1 teaspoon horseradish
1/4 teaspoon kosher salt

In a medium bowl whisk together the flour, baking powder, salt, and chives. In a small bowl cream together the cream cheese and butter until smooth.  Add the egg and whisk until completely incorporated.  Whisk in the milk.Pour the wet ingredients into the dry and whisk until just incorporated and no large lumps remain.  Do not over-mix.

Heat a non-stick skillet over medium heat.  Spray lightly with non-stick spray then scoop the batter by the tablespoon into the pan.  Cook for one minute on the first side, flip, then cook for an additional thirty seconds, or until the cakes are golden brown and spring back when gently pressed in the center.  Remove to a plate to cool while you prepare the rest.

While the cakes cool prepare the sour cream sauce by adding the sour cream, horseradish and salt to a small bowl.  Whisk to combine then let stand ten minutes.

To prepare, spoon a heaping 1/4 teaspoon of the sauce onto the center of the cakes.  Top with a piece of the salmon.  Garnish with the chives.  These can be assembled up to one hour in advance.  Serve at room temperature.

ENJOY!

to print the recipe, click here

compositepancakes

Comments: There’s something to be said about practicing recipes before a big event, however, it’s not always possible. Still, a recipe such as this makes me admire caterers, because small details are so important in that business. If I had to make these again, I would try to make each pancake a little smaller. They puffed up more than I expected, so in the end my appetizers were a tiny bit too big.  I was so involved in frying them that I did not realize the problem until it was time to assemble the sour cream topping and the salmon. So, if you make them for your next dinner or cocktail party, run a little test, fry different portions and settle on the amount that will be perfect for your topping. Of course, you don’t have to limit yourself to smoked salmon, but let’s face it: it’s a classic topping with the dill and all.  Capers would feel totally at home also…  just sayin’….

PancakesReady
You can make these pancakes ahead of time, and I am sure they freeze well too with all the cream cheese in the batter.  I think a salmon mousse would be superb topping these babies, with a sprinkle of fresh dill all over. Come to think of it, I’ve never made salmon mousse. Once, years and years ago, before my blogging life, I made a fish mousseline that shaved a few years off my life.  It was a recipe from a special cookbook I own, one written by Vincent Price. The recipes are amazing, but soooo involved and complicated. That fish mousse tasted wonderful but  hell will have to freeze over three times before I attempted it again.  These pancakes?  A walk at the beach by comparison… try them and you will not be disappointed!

And now it’s time for the quiz… do you know which movie the expression “I’m hip about time” comes from?  It’s as much of a classic as smoked salmon on a horseradish cream with dill and capers….

😉

ONE YEAR AGO: Our Green Trip to Colorado

TWO YEARS AGO: Ditalini Pasta Salad

THREE YEARS AGO: Celebrate Wednesday with a Thai Seafood Curry

FOUR YEARS AGO:  Post-workout Breakfast

FIVE YEARS AGO: Semolina Barbecue Buns

SIX YEARS AGO: Lavash Crackers

RASPBERRY-BITTERSWEET CHOCOLATE CHUNK BROWNIES

Cheesy as it may sound, some matches are made in heaven. Like cheese and wine… that’s cheesy enough, right? Sauternes and foie gras…  Lobster and drawn butter…  Another winning combination: chocolate and raspberries. They work together to awe your palate in a tantalizing way. And that is the match I offer today delivered in the shape of Raspberry & Chocolate Brownies. I found this recipe in a book I bought after Karen from Karen’s Kitchen Stories delicately twisted my arm. Amazing what we do to please a fellow food blogger. Yeap, going against my nature and unshakable will power, I purchased a cookbook. How could I not? Karen said it was her favorite cookie book, and she knows her way around baking. Obviously, I had no choice.  Anyway, the book is called quite simply Simply Sensational Cookies, and I have three words to say about it: you need it.

Raspberry Chocolate Brownies

RASPBERRY– BITTERSWEET CHOCOLATE CHUNK BROWNIES
(reprinted with permission from Nancy Baggett’s Simply Sensational Cookies)

Nancy’s thoughts on the recipe: I tried teaming up raspberries and chocolate in brownie recipes several times in the past, but they weren’t nearly as fruity or fudgy as these beauties. They are dark, as rich as candy, and burst with berry and chocolate flavor.

1⁄2 cup (1 stick) unsalted butter, cut into chunks
2 cups (about 11 ounces) coarsely chopped bittersweet chocolate, divided
1⁄2 cup good-quality unsweetened natural or Dutch-process cocoa powder, sifted after measuring
1 cup granulated sugar
1⁄4 teaspoon salt
3 large eggs, at room temperature
1⁄4 cup very finely chopped freeze-dried raspberries (see comments)
1⁄4 cup seedless raspberry preserves
1⁄2 teaspoon raspberry extract
1 cup unbleached all-purpose white flour

Heat the oven to 350 F and position a rack in the center of it. Line an 8-inch square baking pan with aluminum foil; let the foil slightly overhang on the two opposite sides. Grease the foil or coat with nonstick spray.

In a large microwave-safe bowl with the microwave on medium power, melt the butter and 1 cup chopped chocolate, stopping and stirring every 30 seconds, until the chocolate mostly melts. Stir until completely melted. Vigorously stir the cocoa, sugar, and salt into the chocolate mixture until smoothly incorporated, free of lumps, and cooled to warm. Vigorously stir in the eggs, then the chopped raspberries, raspberry preserves, and raspberry extract. Stir in the flour until the batter is smooth and shiny. Lightly fold in the remaining 1 cup chopped chocolate. Put the batter in the pan, spreading evenly to the edges.

Bake for 20 to 25 minutes or until the edges are just pulling away from the pan sides and a toothpick inserted in the center comes out clean except for the bottom 3⁄4 inch, which should still look moist and gooey. Transfer to a wire rack until cooled to room temperature.  Refrigerate the brownie slab for at least 45 minutes so it will cut more neatly. Using the overhanging foil as handles, lift the slab onto a cutting board. Peel off and discard the foil. Using a large sharp knife, cut the brownie crosswise and lengthwise into quarters to yield 16 bars; or cut as desired. Use a damp paper towel to wipe the blade of buildup between cuts. Let the brownies warm up  to room temperature before serving.

ENJOY!

to print the recipe, click here

COMPOSITE

Comments: Nancy suggests that if you object to the seeds in the freeze-dried raspberries, you can pulverize them in a food processor and sieve out the seeds.  I did not do that, and thought the brownies turned out perfect, with some little chunks of raspberries peeking through them.  If you prefer a smoother texture, you can get rid of the seeds.

I really love this cookbook! It is divided in the following chapters: Extra-Easy Cookies, Drop Cookies, Hand-Shaped Cookies, Rolled Cookies, Brownies and Bars, Slice & Bake Cookies, Biscotti, Semisweet Crisps, Savory Cocktail Cookies, Cookies-in-Jars Mixes, No-Bake Cookies, Semi-Homemade Cookies… and a few more general chapters on techniques and finishing touches.  Each recipe starts with quick general notes. For instance, for the  brownies I shared today she added: Fairly Easy One-Bowl, one-spoon mixing. Gourmet taste with easy technique.  Exactly right. My only modification of the recipe was to omit the raspberry extract, because I did not know if what they had available at the store was good enough quality. I often hear that extracts can ruin a recipe unless you get the very best.  For my taste, the brownies were perfect, they had a distinct raspberry flavor thanks to the use of freeze-dried fruit and the preserves. She suggests a chocolate ganache to top them, but I decided to keep them simple. They were very rich, definitely can stand on their own without gilding the lily.  Fantastic recipe, two thumbs up!

Raspberry Brownies1

Nancy, thank you for giving me permission to publish your recipe!  I gave a Kindle copy of  your book to one of my nieces in Brazil, the one who got all the good baking genes in the family, and she fell in love with it too… And of course, thanks Karen for bringing this cookbook into my radar…

To order your copy of Simply Sensational Cookies, click here.
(No, I am not going to make a single penny out of your purchase, I recommend it because it is a great book).

😉

ONE YEAR AGO: Scary Good Pork Burgers

TWO YEARS AGO: Review of exercise program Focus25

THREE YEARS AGO: Celebrate Wednesday with a Thai Seafood Curry

FOUR YEARS AGO:  Post-workout Breakfast

FIVE YEARS AGO: Semolina Barbecue Buns

SIX YEARS AGO: Lavash Crackers