TLAYUDA, A MEXICAN PIZZA

Every once in a while a photo makes no justice to the dish. Case in point: tlayuda. But this recipe turned out soooo delicious that I must share right now, I don’t want to wait until I make it again.  It is tastier than you would imagine from its simple ingredients put together. Very quick to prepare, perfect to make a weeknight feel special…  The recipe was recently featured by Marcela Valladolid in her show Mexican Made Easy.  It comes from the Oaxaca region in Mexico and her description of the place made me want to buy a ticket and fly there.  Tlayudas are a typical street food, and everybody loves them.   I can tell you, the combination of refried beans with the Oaxaca cheese, the lettuce and Mexican crema is spectacular!  The chorizo adds a lot to it, but if you are vegetarian, simply omit it, the tlayuda can shine on its own without it. Avocados on the side (or sliced on top) would be amazing too…

served1

TLAYUDA
(adapted from Marcela Valladolid)

 for topping:
1 tablespoons vegetable oil
5 ounces raw pork chorizo
One 16-ounce canned refried pinto beans

for tortilla base:
2 cups instant corn masa
1/4 teaspoon salt
1 + ¼ cup water
1 tablespoons vegetable oil

for final assembly:
1/2 cup Oaxaca cheese
Iceberg lettuce, shredded
Salt and freshly ground black pepper
Crumbled queso fresco
Mexican crema

For the chorizo and bean topping: In a large heavy saute pan, heat 1 tablespoons oil on medium-high heat. Add the chorizo and cook until crisp, about 6 minutes. Remove from the heat and reserve. Heat the beans on low heat or in a microwave until very hot and easy to spread.  Reserve, keeping warm.

For the tortillas: Combine the corn masa, 1 cup of water and salt in a large mixing bowl. Mix thoroughly by hand to form a soft dough, about 2 minutes. If the dough feels dry, add more water (one tablespoon at a time).  You may not need to use the full amount of water left.

Heat a 12-inch cast-iron or heavy skillet. Place a piece of parchment paper on a flat surface. Put half of the dough onto the parchment paper and place another piece of parchment paper on top. Using a rolling-pin, roll out the dough until it is 1/4-inch thick and 10 inches in diameter.  Drizzle the oil into the hot skillet and place the rolled out masa dough into the skillet to cook for about 2 minutes. Turn over to cook on the other side.

Spread 1/2 cup of the warm refried beans onto the cooked side of dough. Add 1/4 cup Oaxaca cheese and 1/2 cup cooked chorizo. Continue to cook for until the cheese is melted, another 2 to 3 minutes. Remove the pizza from the pan onto a round serving platter. Top with the iceberg lettuce. Season with salt and pepper.  Sprinkle with crumbled queso fresco and a drizzle of Mexican crema. Cut into wedges and serve immediately. Repeat with the remaining half of dough and toppings.

ENJOY!

to print the recipe, click here

Comments: The recipe makes two 10-inch discs. I did not use the full amount of the dough, and instead  made two 8-inch discs. They were perfect for our dinner, with a little slice leftover.  If you make the full recipe, it could be a wonderful appetizer for a get-together, cutting each tlayuda in squares.  That is exactly the suggestion for serving as published in the FoodTV website, by the way.

The only challenging part of making tlayuda is transferring the rolled out dough to the hot skillet.  My first production reminded me of a book I was quite fond of growing up, Le Petit Prince, by Saint-Exupéry.  Quite a popular book in Brazil at the time. Yes, that was more or less the shape of my first tlayuda.

petitprince

Undeterred, I moved on to the second pizza, and managed to get a round enough shape to justify the name.  Oh, well. Taste is more important than looks, and even the elephant-shaped concoction was devoured with gusto. Plus, cutting the odd-shaped tlayuda in 4 pieces is a nice way to exercise your brains. And knife skills.

The dough is of course quite similar to a tortilla, but thicker and absolutely perfect for a pizza-like base.  I will definitely keep this recipe in mind to improvise with other types of toppings, including options traditionally associated with Italian pizza.

_____________________________________________________________________________________________________________________________________________

“Voici mon secret. Il est très simple: on ne voit bien qu’avec le cœur.

L’essentiel est invisible pour les yeux.”

Antoine de Saint-Exupéry, Le Petit Prince

_____________________________________________________________________________________________________________________________________________

ONE YEAR AGO: Paradise Revisited

TWO YEARS AGO: Feijoada, the Ultimate Brazilian Feast

THREE YEARS AGO: Vegetable Milhojas

FOUR YEARS AGO: Italian Bread

SECRET RECIPE CLUB: APPLE-CINNAMON BREAD

The month of August is coming to an end. The last Monday of this busy month brings with it a special revelation: which blog was I assigned to cook from as a member of The Secret Recipe Club? And who is posting something from my blog?  Which recipe was chosen? So much excitement, so much fun… This month I was paired with a food blog Queen:  Amy, the hostess of “Fearless Homemaker” has even been on TV!   You can read about her first cooking demonstration by clicking here.   And now, here I am, cooking a recipe from her blog.  Too cool for words. If her blog is new to you, I strongly recommend you to stop by.  Not only she has loads of wonderful recipes, but side-stories that are truly special, like her surprise wedding party.  She and her partner invited friends over for a nice get-together, and all of a sudden both disappeared, changed into their wedding outfits, and next thing their guests knew, an orchestra was playing, a priest was arriving , and the party turned into their wedding!  Now the family got bigger, as she and her husband recently welcomed the arrival of   “The Fearless Baby“…  Congratulations, Amy!

I had quite a few recipes on my final list to cook for the Secret Recipe reveal day: her Vegetable and Quinoa Pilaf, her Honey-Chipotle Turkey Meatballs, her Chicken Bolognese, and also her Nutella-Swirl Pound Cake.  But, in the end, I went with an Apple-Cinnamon Bread, with chunks of apple permeating the cake.   Yes, you guessed it, I took it to our department on a sunny Monday morning…    😉

SRCAugust1

APPLE-CINNAMON BREAD
(from Fearless Homemaker)

1 + 1/2 cups all-purpose flour
1 teaspoon baking soda
1/2 teaspoon salt
2 teaspoons cinnamon
1/2 teaspoon allspice
1/4 teaspoon ground cloves
2 large eggs
1/4 cup canola oil
1/4 cup applesauce
pods from 1 vanilla bean
1 cup granulated sugar
2 cups chopped Granny Smith apples, skin removed

for topping:
2 tablespoons brown sugar
1 tablespoon sugar
1 teaspoon cinnamon

 Heat the oven to 350 degrees F.  Spray an 8 by 4 loaf pan with cooking spray and set aside.

In a medium bowl, whisk together flour, baking soda, salt, cinnamon, allspice, and cloves.  Reserve.

In the bowl of a stand mixer fitted with the paddle attachment, add the eggs and beat on medium speed for about 30 seconds. Add in oil, applesauce, vanilla,  mix until smooth.    Add the sugar and mix until well combined.

Slowly add in the flour mixture, incorporating until the flour is barely combined. Gently fold in the apple chunks. pour batter into prepared loaf pan.

Prepare the topping: in a small bowl, mix together brown sugar, sugar, and cinnamon. Sprinkle this topping over the batter in the loaf pan. Bake for 50-55 minutes, or until loaf is golden, and a toothpick inserted into the center comes out clean.

Cool bread in pan for 10 minutes. loosen sides of the loaf with a knife and invert carefully.  Cool the cake completely on a rack before slicing.

.
ENJOY!

.
to print the recipe, click here

.apple

.
Comments:
  As Amy pointed out in her post, this bread smells WONDERFUL while it bakes.  Cinnamon seems to do just that, fill the house with intoxicating aroma of deliciousness to come…    I am not sure why I’ve been picking sweet recipes for the past few Secret Recipe Club adventures, but I’m enjoying the phase.  And I suppose the members of our department don’t mind that either!   😉

___________________________________________________________________________________________________________________________________________________

Amy, it’s been great to spend time on your blog, reading your stories, marveling at your photos.  

I hope you enjoyed this month’s assignment as much as I did!

___________________________________________________________________________________________________________________________________________________

To see what the other members of my group cooked up for today’s Reveal Day, click on the blue amphibian smiling at the bottom of the post.  And if you are wondering who got my blog and the recipe chosen, go visit Karen’s site at Lavender and Lovage!  😉

ONE YEAR AGO: Secret Recipe Club: Blueberry Galette

TWO YEARS AGO: In My Kitchen, August 2011

THREE YEARS AGO: Journey to a New Home

FOUR YEARS AGO: Friday Night Dinner (very tasty pork medallions)

SEMOLINA SOURDOUGH BOULE

Having recently exorcised a few of my sourdough demons, I am happy as a clam baking bread every weekend.  This version is an adaptation of a formula that called for 100% durum semolina flour.  I took a small step back by including some regular flour in the mix, just a tad.  The dough is mixed the day before baking and rises for 12 or more hours in the fridge.   The semolina flour – which must absolutely be the correct type – gives the crumb a yellow hint, and takes the taste of the sourdough into a new direction.   A simple bread, with delicate flavor, but a hearty crust just like expected from a rustic sourdough.

loaf1

SEMOLINA SOURDOUGH BOULE
(adapted from Michele, at  The Fresh Loaf Forum)


to make the levain:
35 g sourdough starter at 100% hydration
140 g water
140 g  Semola  di Grano Duro Rimacinata
(you will use all the starter, make sure to save some of your leftover)

for final dough:
350 + 50 g water
4 g of diastatic malt powder
400 g semolina flour (Semola di grano Duro Rimacinata)
160 g bread flour
13 g salt

 Make the levain 10 hours before preparing the dough.  Mix all ingredients and leave at room temperature for 10 hours.

When the starter is ready, mix 350 g water with the malt and the starter (all of it).   When well combined, add the semolina, and the bread flour, mix until a shaggy dough forms.  Let it rest for 20 to 40 minutes.

Add the salt and the remaining 50 g water.  Mix well (you can use a Kitchen Aid type mixer for 2 to 3 minutes in low-speed if you prefer).

Let the dough ferment at room temperature for 2 hours, folding the dough every 30 minutes.  After the last folding, leave the dough undisturbed for 20 minutes.

Shape the dough as a ball and place in a floured round container.  Leave at room temperature for 20 minutes, then refrigerate for 16 to 20 hours.

Remove the dough from the fridge 1 to 2 hours before baking in a 450F with steam for 20 minutes, then reduce the temperature to 430F and bake for 25 minutes longer, until dark brown.

Cool completely on a rack before slicing.

ENJOY!

to print the recipe, click here

crumb2

Comments:  If you are new to sourdough baking, this bread could be a bit challenging.   The semolina flour makes the dough pretty soft and very moist, it could scare a beginner into adding too much flour during handling.  The original recipe called for only three cycles of folding, but I added one more. The dough asked for it, it had not developed enough “muscle” at the third folding cycle.    I’ve been having trouble with my bread sticking to the banneton in long rises, so this time I took a different path and placed it inside a ceramic bowl heavily coated with rice flour.

composite

It worked really well, the bread expanded a bit during the overnight stay in the fridge, and had a nice shape after baking.  I left it at room temperature for a little over 2 hours before baking.

I wish I knew how to score the bread to get the amazing “flower effect” that Michele obtained, but until I see some type of tutorial for it online, I’ll have to accept a more old-fashioned, rustic type scoring.   Take a look at Michele’s full post about it and marvel at his technique…  I suspect the blade needs to be almost parallel to the surface of the dough instead of slashing deeply into it.

__________________________________________________________________________________________________________________________________

I am submitting this post to Susan’s Yeastspotting

__________________________________________________________________________________________________________________________________

ONE YEAR AGO: Forgive me, for I have sinned

TWO YEARS AGO: Cracked Wheat Sandwich Bread

THREE YEARS AGOAu Revoir, my Bewitching Kitchen

FOUR YEARS AGO:  French Bread

BLACKBERRY-CHERRY SORBET

When your office is next door to that of one of the best (and most generous) gardeners in the state of Kansas, be ready to receive amazing gifts, such as two boxes of freshly picked blackberries! We consumed some in their natural state, and decided to make a nice, refreshing sorbet with the rest. We’ve actually made two batches of this sorbet in the past month. I am sharing the recipe for the second version, which I think turned out to be the best, with the small amount of cherries plus a little unusual ingredient. Although some inspiration was found in Lebovit’s The Perfect Scoop, Phil devised his own recipe. Since we fully share our assets,  I feel entitled to call it “our own”. That’s my story, and I’m sticking to it.

blackberry2

BLACKBERRY-CHERRY SORBET
(from the Bewitching Kitchen)

3 cups blackberries
1 cup pitted cherries
1 ripe banana
2 Tablespoons lemon juice
2/3  cup sugar
1 + 1/2 cup water

Add the blackberries, cherries, and banana to the bowl of a food processor.  Process until smooth, cleaning the sides of the bowl a couple of times. Add the lemon juice, the sugar, and the water, and process everything together until fully smooth.

Keep the base in the fridge overnight or for at least 4 hours to cool completely.

Place the mixture in your ice cream maker and churn it according to the instructions of the manufacturer.

Scoop into a freezer-safe container.

ENJOY!

to print the recipe, click here

composite111

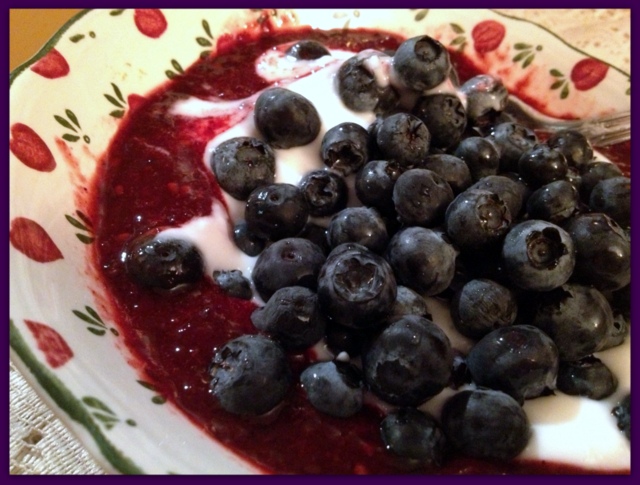
Comments:  The banana adds a nicer texture to the sorbet, which can be a bit grainy once it freezes, because there is no milk fat in it.  You can barely taste it, though. Most recipes for blackberries or raspberries will instruct you to pass the pureed mixture  through a sieve to get rid of the seeds.  We decided to skip this step, and I’m glad to report that we did not mind the seeds at all.  If you are looking for a real smooth texture, go ahead and sieve it away.  If you don’t remove the seeds, the amount of sorbet made could be just a little big for your ice cream maker.  If that’s the case, no need to worry, it’s the type of problem you should welcome with open arms (and a spoon).   Save the excess, and follow these instructions: pour some of the sorbet base in a small bowl, add Greek yogurt and a handful of fresh blueberries on top.    Enjoy late at night, early in the morning, or anytime you feel like it… it’s that good!   😉

photo

ONE YEAR AGO: Asparagus Pesto

TWO YEARS AGO: Chocolate and Chestnut Terrine

THREE YEARS AGO: Under the spell of lemongrass

FOUR YEARS AGO: Greens + Grapefruit + Shrimp = Great Salad!

A BEWITCHING ANNOUNCEMENT: TIGHTEN YOUR SEAT BELTS!

This blog has witnessed quite a few “small revolutions” in our lives. In 2010 we moved briefly from Oklahoma to California, and cooked for almost a full year in a nano-kitchen where there was no real stove, no real oven, no real kitchen sink. No dishwasher either, by the way. Last year, as we joined Kansas State University, we went  through a phase of alternating weeks camping in an almost empty home in OK and living in the new place in KS. I am not quite sure how, but I managed to keep the blog going through it all.   It so happens that we are about to face a new revolution: the renovation of our kitchen!   Tomorrow at 8am plastic sheets will enclose the space, cabinets will be removed, floors ripped off. In other words, “all hell will break loose”.

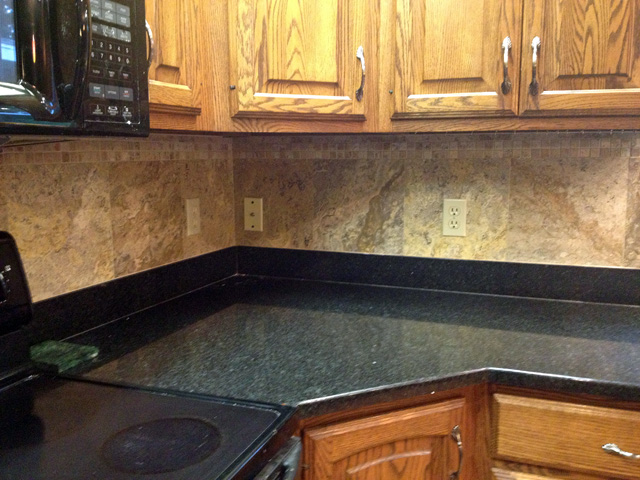
Our main goal is to make the place lighter.  Everything in the kitchen is dark right now. Appliances are black, granite counter tops are black. Cabinets are dark, the floor is dark. But we also want to modernize the appliances. Keep in mind that we nicknamed our range “Poltergeist”.  It gives you an idea of its performance. The fridge makes no ice, but plenty of noises. The dishwasher needs human help to get dishes clean, and whoever designed its racks was a geometry-challenged sadist. So the three appliances are going to be replaced.  Wait until you see the range we ordered!  It will be a gas range, it will be gorgeous, and it will have a real hood on top of it.  Can you imagine the huge smile I have as I type this?  I bet you can… 😉  It won’t arrive for a few weeks still, and because the floor won’t be installed until October, we’ll probably not have the kitchen fully functional until then.

Every weekend I’ve been writing  posts so that the blog can sail as smoothly as possible through the rough waters ahead.  But I thought you should all be aware of the excitement behind the curtains…  Here are a few shots of the “before”.  I can hardly wait to show you the “after”, a couple of months from now.

.

stoveareaPoltergeist plus his partners in crime: the black fridge, the black microwave with a pseudo-hood underneath that pays lip service to fumes.

countertopphoto(6)The black granite will stay all around the kitchen, except the center island.  We’ve got a different plan for that area…

floorThe floor is a bit too rustic for our  taste.  It seems always dirty, and it adds to the overall darkness of the kitchen.  Hardwood floor in our future!

.
Stay tuned for updates as the weeks move along… and keep your fingers crossed for us!  😉

Photo of our kitchen, 12 hours after publication of this post: they do work pretty fast!

composite1