OUR MEXICAN HOLIDAY DINNER

As I mentioned in a previous post, we had an early Christmas celebration with one of my stepsons.  This year all our holiday meals were decided on a whim, serendipity playing a pretty big role. I happened to catch Marcela’s episode “My Favorite Holiday Dishes“, and while watching it with Phil he suggested we make that full menu for our Christmas dinner. Avocado-Cilantro Mousse, Pork Tenderloin, and Mexican Chocolate Souffle.   You know how we felt about the mousse, so now it’s time to share the recipe for the second course, a pork that ended up moist and tender, surrounded by the sweetness of prunes and pearl onions.

served

ROASTED PORK TENDERLOIN WITH PINEAPPLE GLAZE
(from Marcela Valladolid)

for the brine:
1/2 cup kosher salt
1/2 cup packed light brown sugar
1 tablespoon black peppercorns
1 tablespoon coriander seeds
2 cups warm water
6 cups cold water
2 pork tenderloins
.
for the herb rub:
1 clove garlic, minced
2 tablespoons olive oil
1 tablespoon salt
1/2 teaspoon freshly ground pepper
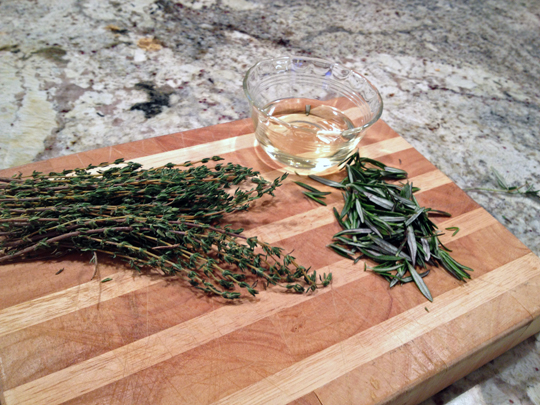
2 teaspoons chopped fresh thyme leaves
2 teaspoons chopped fresh rosemary leaves
.
for the final roasting:
1 tablespoon olive oil
1 cup dried prunes, halved
1 pound pearl onions, peeled
1/3 cup dry white wine
1 cup pineapple juice
Salt and freshly ground black pepper

.

For the brine: Combine the salt, brown sugar, peppercorns, coriander seeds, and 2 cups warm water in a large bowl. Stir until the salt dissolves. Add 6 cups cold water. Add the pork, cover, and refrigerate overnight (the pork should be submerged in the liquid).
.
Heat the oven to 400 degrees F.For the herb rub: Mix the garlic, olive oil, salt, pepper, thyme, and rosemary in a small bowl. Remove the pork from the brine and pat it dry (discard the brine). Spread the herb mixture over the pork loin, making sure you coat all sides of the loin.
.
For the pork: Heat the olive oil in a medium, heavy saute pan over high heat. Add the pork and sear until browned, 4 minutes. Carefully turn the pork over and sear until browned, another 4 minutes. Meanwhile, add the prunes and pearl onions to a baking dish, creating a bed for the loin. Transfer the seared pork loin to the baking dish (making sure the loin fits in the baking dish, leaving a 1-inch border on every side). Add the wine to the same saute pan used to sear the pork and cook, scraping the bottom of the pan to remove the browned bits, until almost evaporated, about 1 minute. Stir in the pineapple juice and remove from the heat. Season with salt and pepper. Pour the mixture over the pork. Season the prunes and onions with salt and pepper.
.
Place the pork in the oven and roast until a thermometer inserted into the center registers 160 degrees F, or to your desired level of roasting. Baste with the pan juices every 20 minutes. Transfer the pork to a cutting board, tent with foil, and let it stand for 10 minutes. Slice the pork into 1/4 to 1/2-inch thick slices and arrange on a platter. Top the pork slices with the pearl onions, prunes, and sauce.
.
ENJOY!
.
to print the recipe, click here
.
herbs
Comments:  I loved making this dish, it is perfect for a day spent at home, relaxing, enjoying the aromas and the anticipation of a more elaborate meal to come.  Brining the meat is the way to go when roasting pork loin (or tenderloin), as the delicate meat, so low in fat these days, can dry out in the oven.  I left the tenderloins in the brine from 8am until around 5pm.
composite

.
Pork and prunes are a classic combination for good reason! This recipe is not too different from a typical meal served in my family in Brazil during the holidays, except that they like to roast a pork shoulder or butt. We call it “pernil assado“, and prunes or pineapple slices are often part of the sauce.

Leftovers were awesome on day 2 and amazing on day 4, the sauce intensified in flavor, the meat retained its moisture and tenderness. I can tell this recipe will become a regular appearance at our table.  Next time I’ll add some fennel to the bed of prunes and onions, I think its flavor would be great here.

Pork with Prunes in Pineapple Glaze

ONE YEAR AGO: The Ultimate Cranberry Sauce

TWO YEARS AGO: Edamame Dip

THREE YEARS AGO: Gougeres

FOUR YEARS AGO: Beef Wellington on a Special Night

THE AVOCADO MOUSSE THAT STOLE THE SHOW

MERRY CHRISTMAS!   FELIZ NATAL!  JOYEUX NOËL!

This year we had a pre-Christmas celebration with one of my stepsons, because he had to fly back to California on the 23rd. The evening before his departure we made a special dinner that featured the whole menu of a recent show from the one and only Marcela Valladolid, entitled “My Favorite Holiday Dishes“.  The main dish was Pork with Prunes and Pineapple Glaze (on the blog soon), and I expected it to be the star of our meal, but truth is that the first course,  a simple, unassuming avocado mousse put up a great fight and according to some, took the Christmas Eve spotlight…  😉

Avocado Cilantro Mousse
AVOCADO AND CILANTRO MOUSSE
(slightly adapted from Marcela Valladolid)

1 to 1 + 1/2 bunches fresh cilantro, washed and dried, leaves picked off and reserved (about 2 cups loosely packed)
1  avocado (I used two small ones)
1 (8-ounce) package cream cheese, at room temperature
1 teaspoon salt
1 tablespoon fresh lime juice, from about 1 lime
1 Serrano chile, stemmed, seeded, deveined, and roughly chopped
1 cup cold water, divided
2 (1/4-ounce) envelopes unflavored gelatin
.
Spray 3 (1 cup) or 6 (1/2 cup) ramekins with vegetable oil cooking spray.

Place the cilantro, cream cheese, avocado, salt, lime juice, and chile in a food processor and puree until smooth.
.
Pour 1/4 cup water in a small bowl. Sprinkle the gelatin over the water and let it sit for a few minutes. Place the remaining 3/4 cup water in a small saucepan and bring to a boil. Pour the boiling water over the softened gelatin and whisk until the gelatin has dissolved.
.
Add the gelatin to the mixture in the food processor, pulsing until pureed and thoroughly blended.
.
Pour the mixture into the prepared ramekins. Cover with plastic wrap and refrigerate until firm, about 2 hours. To unmold, fill a large container with very hot water. Dip the ramekins in the water for 1 minute. Run a small, sharp knife tip around the edge of each mousse. Invert onto a platter. Let stand at room temperature for 20 minutes before serving.
.
ENJOY!

to print the recipe, click here

Comments:  I made my own tortilla strips to serve alongside the mousse, and I must say the work involved is minimal, but the pay-off huge.  They were so much better than store-bought versions, both in texture and flavor.  I just cut some yellow corn tortillas into strips, placed them on a baking sheet, sprayed with olive oil, and coated very lightly with salt and more liberally with Southwest Spice mix from Penzey’s.  Baked at 375F until  they start to crisp up and get brown.

The mousse… WOW!  We started enjoying it quite politely, a little bit spread on a cracker, a little more on a tortilla strip, but by the end of the dinner we were slicing it and adding the cold slice on top of the pork tenderloin and moaning about it…  We decided it will go well with pretty much anything, from grilled salmon to lamb burgers, and in case of emergency, licked from the tip of a finger when no one is looking.   It is THAT good.  Please, make it for your next dinner party, and stop by to thank me later… 😉

ONE YEAR AGO: Sourdough Popovers

TWO YEARS AGO: Merry Christmas!

THREE YEARS AGO:  Sourdough Focaccia, with a twist

FOUR YEARS AGO: Merry Christmas!

BEER-MARINATED GRILLED SKIRT STEAK

When grilling meat, I normally follow the Brazilian rule of using only salt as seasoning.  We are all about the flavor of the beef, preferring not to mask it with spices and rubs. But, I thought that Marcella’s take on skirt steak was too tempting to pass.   She marinates the meat in beer and soy sauce, and also adds orange slices to the party.  I normally reach for lemons or limes, but whenever I use oranges in cooking I am  surprised by how much I enjoy their subtle citric tone, a tad less aggressive.   We both loved the flavor they imparted to the meat… the beer definitely comes through loud and clear.  I marinated the meat from early morning to dinner time.

sliced

BEER-MARINATED GRILLED SKIRT STEAK
(adapted from Mexican Made Easy)

1 orange, thinly sliced
1/2 onion, thinly sliced
1 garlic clove, smashed
2 + 1/2 pounds skirt steak
Kosher salt and fresh ground black pepper
1 cup light-colored beer (preferably lager style)
1/2 cup soy sauce
.
In a wide, shallow glass baking dish, scatter half of the orange slices, half of the onion slices and the garlic on the bottom of the dish. Sprinkle the steak all over with salt and pepper and put in the dish on top of the orange and onion slices. Scatter the remaining orange, onion and garlic over the steak and pour in the beer and soy sauce. Cover with plastic wrap and marinate for 1 hour at room temperature or up to overnight in the refrigerator.
.
Prepare a grill on medium-high heat. Remove the meat from the marinade and discard the marinade. Grill the steak to your taste,  about 4 minutes on the first side and 3 minutes on the second for medium-rare.
.
Let the meat rest, tented with foil, for 10 minutes before slicing it.
.
ENJOY!
.
to print the recipe, click here
.
served
.
Comments:  Skirt-steak is one of the busy cook’s best friend!  Less than 10 minutes on the grill and you are on your way for a tasty dinner.  Now, if not only you are very busy but you also don’t have a functional kitchen, this type of meal will be a life-saver.   I like to wrap the meat in large butter lettuce leaves, top with salsa and/or guacamole, but this time I made it even simpler and only added fresh, juicy tomatoes, salt, pepper, and a sprinkle of grated Cotija cheese, just to keep it on the Mexican environment…    😉 Of course, corn or flour tortillas, fajita-style are the most authentic way to go.
.
The same marinade worked great on chicken thighs, as you may remember from a recent post.  I marinated the chicken the whole day in the beer-soy-oranges, roasted low and slow with the skin side down, then flipped the pieces to have the skin up, and finished them off under the broiler.
.

ONE YEAR AGO:  Secret Recipe Club: Corn Chowda

TWO YEARS AGO: Page-A-Day Calendar (Pits and Chief 5 minutes of fame…)

THREE YEARS AGO: Home Sweet Home (our beloved Pits in one of his last photos)

FOUR YEARS AGO: Marbled Rye

TLAYUDA, A MEXICAN PIZZA

Every once in a while a photo makes no justice to the dish. Case in point: tlayuda. But this recipe turned out soooo delicious that I must share right now, I don’t want to wait until I make it again.  It is tastier than you would imagine from its simple ingredients put together. Very quick to prepare, perfect to make a weeknight feel special…  The recipe was recently featured by Marcela Valladolid in her show Mexican Made Easy.  It comes from the Oaxaca region in Mexico and her description of the place made me want to buy a ticket and fly there.  Tlayudas are a typical street food, and everybody loves them.   I can tell you, the combination of refried beans with the Oaxaca cheese, the lettuce and Mexican crema is spectacular!  The chorizo adds a lot to it, but if you are vegetarian, simply omit it, the tlayuda can shine on its own without it. Avocados on the side (or sliced on top) would be amazing too…

served1

TLAYUDA
(adapted from Marcela Valladolid)

 for topping:
1 tablespoons vegetable oil
5 ounces raw pork chorizo
One 16-ounce canned refried pinto beans

for tortilla base:
2 cups instant corn masa
1/4 teaspoon salt
1 + ¼ cup water
1 tablespoons vegetable oil

for final assembly:
1/2 cup Oaxaca cheese
Iceberg lettuce, shredded
Salt and freshly ground black pepper
Crumbled queso fresco
Mexican crema

For the chorizo and bean topping: In a large heavy saute pan, heat 1 tablespoons oil on medium-high heat. Add the chorizo and cook until crisp, about 6 minutes. Remove from the heat and reserve. Heat the beans on low heat or in a microwave until very hot and easy to spread.  Reserve, keeping warm.

For the tortillas: Combine the corn masa, 1 cup of water and salt in a large mixing bowl. Mix thoroughly by hand to form a soft dough, about 2 minutes. If the dough feels dry, add more water (one tablespoon at a time).  You may not need to use the full amount of water left.

Heat a 12-inch cast-iron or heavy skillet. Place a piece of parchment paper on a flat surface. Put half of the dough onto the parchment paper and place another piece of parchment paper on top. Using a rolling-pin, roll out the dough until it is 1/4-inch thick and 10 inches in diameter.  Drizzle the oil into the hot skillet and place the rolled out masa dough into the skillet to cook for about 2 minutes. Turn over to cook on the other side.

Spread 1/2 cup of the warm refried beans onto the cooked side of dough. Add 1/4 cup Oaxaca cheese and 1/2 cup cooked chorizo. Continue to cook for until the cheese is melted, another 2 to 3 minutes. Remove the pizza from the pan onto a round serving platter. Top with the iceberg lettuce. Season with salt and pepper.  Sprinkle with crumbled queso fresco and a drizzle of Mexican crema. Cut into wedges and serve immediately. Repeat with the remaining half of dough and toppings.

ENJOY!

to print the recipe, click here

Comments: The recipe makes two 10-inch discs. I did not use the full amount of the dough, and instead  made two 8-inch discs. They were perfect for our dinner, with a little slice leftover.  If you make the full recipe, it could be a wonderful appetizer for a get-together, cutting each tlayuda in squares.  That is exactly the suggestion for serving as published in the FoodTV website, by the way.

The only challenging part of making tlayuda is transferring the rolled out dough to the hot skillet.  My first production reminded me of a book I was quite fond of growing up, Le Petit Prince, by Saint-Exupéry.  Quite a popular book in Brazil at the time. Yes, that was more or less the shape of my first tlayuda.

petitprince

Undeterred, I moved on to the second pizza, and managed to get a round enough shape to justify the name.  Oh, well. Taste is more important than looks, and even the elephant-shaped concoction was devoured with gusto. Plus, cutting the odd-shaped tlayuda in 4 pieces is a nice way to exercise your brains. And knife skills.

The dough is of course quite similar to a tortilla, but thicker and absolutely perfect for a pizza-like base.  I will definitely keep this recipe in mind to improvise with other types of toppings, including options traditionally associated with Italian pizza.

_____________________________________________________________________________________________________________________________________________

“Voici mon secret. Il est très simple: on ne voit bien qu’avec le cœur.

L’essentiel est invisible pour les yeux.”

Antoine de Saint-Exupéry, Le Petit Prince

_____________________________________________________________________________________________________________________________________________

ONE YEAR AGO: Paradise Revisited

TWO YEARS AGO: Feijoada, the Ultimate Brazilian Feast

THREE YEARS AGO: Vegetable Milhojas

FOUR YEARS AGO: Italian Bread

ENCHILADAS SUIZAS A LA MARCELA VALLADOLID

Today we are leaving to present our work at a meeting (Gordon Conference on Mechanisms of Membrane Transport, very exciting venue!) and visit former colleagues & collaborators.
I have posts scheduled for publication during our trip, but my ability to reply to comments or leave comments on blogs will be limited until
June 26th.

enchilladas.
Watching an episode of Mexican Made Easy the other day made me crave this dish. Pure comfort food.  As everyone knows, enchiladas are a typical Mexican concoction of corn tortillas rolled around some type of meat (or veggies, or cheese) and baked under a blanket of chile sauce, often tomato-based.  Enchiladas suizas are a variation that resulted from the influence of Swiss immigrants to Mexican cuisine. A real happy marriage!   This was a fun dish to prepare, perfect activity for a Sunday afternoon.  The tomatillo sauce is superb, the recipe makes more than you’ll need, so you can enjoy it in other dishes later.

CHICKEN ENCHILADAS SUIZAS
(slightly adapted from Marcella Valladolid, Mexican Made Easy)
.
9 tomatillos, husked and rinsed
1/2 medium white onion
1 Serrano chile
1 clove garlic
1/2 cup fresh cilantro leaves, loosely packed
Salt and freshly ground black pepper
1/4 cup vegetable oil
6 (6-inch) corn tortillas
1 + 1/2 cup shredded cooked chicken breasts (I used from rotisserie chicken) 
1/2  cup Mexican crema or sour cream (I used a little more than 1/4 cup)
1 cup shredded Monterey Jack cheese
.
Heat the oven to 350 degrees F.  Put the tomatillos, onion, Serrano pepper and 3/4 cup water in a medium, heavy saucepan. Bring to a boil over medium-high heat. Cover and boil until the tomatillos turn olive-green color, about 10 minutes. Let it cool a little, then transfer the tomatillos, onion and pepper to a blender. Add as much water as you need to make a smooth sauce (I added almost all the liquid left in the pan). Add the garlic and cilantro and blend again until smooth. Season with salt and pepper.Heat the oil in a small skillet over medium-high heat. Fry the tortillas until golden but still pliable, about 10 seconds per side. Transfer to paper towels to drain.
.
Put the tortillas on a work surface. Divide the shredded chicken evenly among the tortillas and roll up each like a cigar. Spread 1/3 cup sauce in a 9 by 13-inch glass baking dish. Arrange the enchiladas, seam-side down, in one layer snugly inside the dish. Pour the remaining sauce over the enchiladas.
.
Drizzle with the Mexican crema and sprinkle the cheese all over. Bake until the cheese melts and starts to brown in spots, about 30 minutes. Serve immediately.

ENJOY!
.

                                            to print the recipe, click here

.

composite
When you make this recipe, use good quality corn tortillas,  not flimsy ones that are too thin or too soft.  Those would pretty much disintegrate during baking.  For me, two of these enchiladas make a nice meal.  We had leftovers and they were still delicious on the following day. Not as good as fresh from the oven, but definitely a tasty option for a quick lunch at home.  We warmed them up in the microwave, which is not ideal. If you have time, warm leftovers in a low oven, covered with aluminum foil.

IMG_1988

The tomatillo sauce is absolutely delicious!  The level of heat I like, not too much, but definitely there.  You can add more Serrano peppers or other chiles too, using the basic recipe as a starting point.  I had a moment of unique inspiration to use the leftover sauce, and will blog (brag?  ;-)) about it in the near future… Stay tuned!

ONE YEAR AGO: The Little Apple

TWO YEARS AGO: Majestic Sedona

THREE YEARS AGO: Watermelon-induced Daze