OMG ROASTED SWEET POTATOES

If you’ve read my previous post (In My Kitchen), you will know that I’ve been playing with Korean ingredients. My version of this recipe is not authentic because I decided not to serve it cold. I love a regular roasted potato, piping hot from the oven, and let me tell you, this was one spectacular side dish! I had leftovers two days in a row, gently warmed in the microwave. No loss of flavor, no harm in texture. Please give it a try and I am sure you will fall in love…


KOREAN ROASTED SWEET POTATOES
(from the Bewitching Kitchen, inspired by several sources)

3 large sweet potatoes, peeled and cut in 1 inch pieces
2 tablespoons olive oil
salt to taste
¼ cup rice wine vinegar
1 tablespoon soy sauce
2 teaspoons sesame oil
2 teaspoons gochugaru (or a red pepper flake of your choice)
strands of Korean red pepper for garnish (optional)

Heat the oven to 425F. Coat the potatoes with the olive oil and season with a little bit of salt. Lay them on a baking sheet protected with aluminum foil and roast for 20 to 25 minutes, moving them around halfway through. You want the edges to get nicely brown, so adjust the timing if needed.

Meanwhile, make the finishing sauce by combining the vinegar, sesame oil, gochugaru and soy sauce. Once the potatoes are almost done, pour the sauce all over and mix gently. Roast for additional 5 minutes and serve, sprinkling some strands of Korean pepper (optional).

ENJOY!

to print the recipe, click here


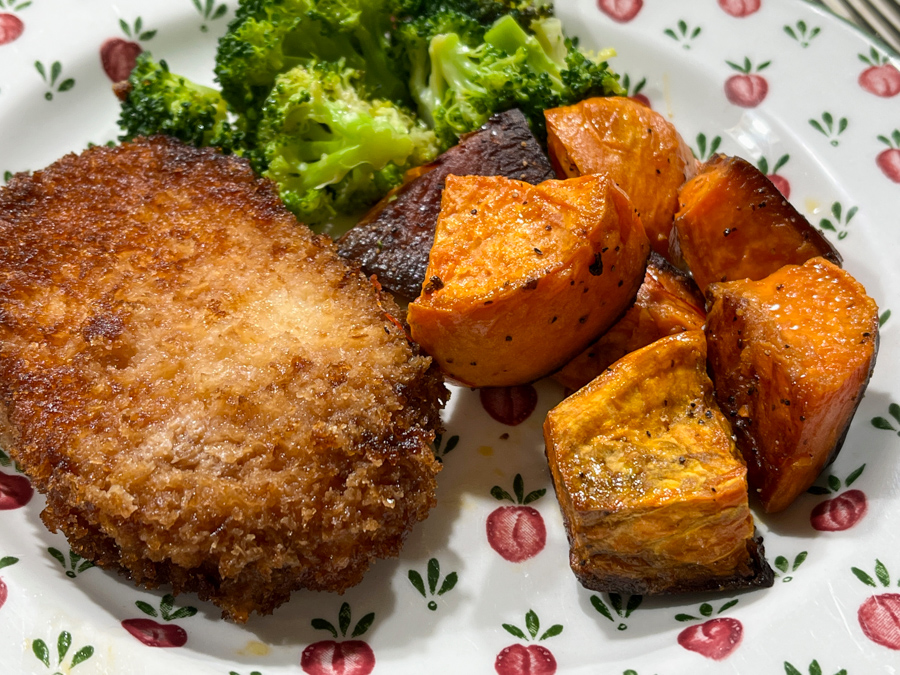
Comments: I am a Sweet Potato Cheerleader, never get tired of them. In my opinion, they don’t need that much to shine, but this preparation takes them to a higher, brighter spot. It gives them, that “fancy restaurant” aura. I think it is the vinegar that changes things around. Please make it, even if you don’t have the specific Korean ingredients. We enjoyed it with breaded center-cut pork loin, and a little broccoli. A perfect midweek dinner.

ONE YEAR AGO: Air-Fried Eggplant Raita

TWO YEARS AGO: Turkey-Pumpkin Roulade with Cider Sauce

THREE YEARS AGO: Strawberry-Vanilla Mini-Cakes

FOUR YEARS AGO: Bourbon-Glazed Pork Tenderloin with Pea Pesto

FIVE YEARS AGO: Chocolate Chip Cookies from Naturally Sweet

SIX YEARS AGO: Little Bites of Paradise

SEVEN YEARS AGO: Maple-Glazed Pumpkin Bread

EIGHT YEARS AGO: In My Kitchen, October 2014

NINE YEARS AGO: Grilled Steelhead Trout

TEN YEARS AGO: Brown Butter Tomato Salad

ELEVEN YEARS AGO:  Spelt and Cornmeal Rolls

TWELVE YEARS AGO: Roasted Potato and Olive Focaccia

THIRTEEN YEARS AGO: Multigrain Bread Extraordinaire

MARINATED CHICKPEAS WITH SLOW-ROASTED RED PEPPERS

I follow a group of food bloggers I completely trust. Kelly from Inspired Edibles is part of this group. When she raves about a recipe, I usually jump on making it. This is the most recent example, and I know if you make it you will rave about it also. Two things: do not be tempted to use canned chickpeas. And go for the slow-roasting of bell peppers. These two small details make the dish shine.

MARINATED CHICKPEAS WITH SLOW-ROASTED RED PEPPERS
(adapted from Inspired Edibles)

for the veggie mixture:
1 + 1/4 cup dried chickpeas (from 1 1/4 cup dry)
2 large red bell peppers, cut into strips
110 g Feta cheese
60 g pitted Kalamata olives, sliced
10 cherry tomatoes, halved
parsley to serve

for the marinade:
⅓ cup olive oil
2 Tbsp fresh lemon juice
1 ½ Tbsp red wine vinegar
1 tsp Herbes de Provence
¾ tsp salt or to taste
black pepper to taste
½ Tbsp honey

Soak the chickpeas overnight in cold water. Next day, drain and rinse, then cook in slightly salted water until tender, but still al dente – about 40 minutes. the chickpeas in a large pot with lots of water until desired consistency is achieved (for this recipe, I prefer the chickpeas to have some texture – not too mushy – so I aim for al dente, it takes over 1 hour). This step can be made in advance.

Heat oven to 300F and prepare the marinade by whisking together all the ingredients. Make sure when you add the honey that it gets fully integrated with the other components.

Place the cooked chickpeas (ideally still warm) in serving platter with tomatoes, olives, and feta cheese. intermingle with tomatoes, onion, olives and half of the feta. Pour the marinade over top, tossing gently to combine.

While the chickpea mixture marinades at room temperature, spread the sliced peppers out on a baking sheet, drizzle with 1.5-2 Tbsp olive oil and add a couple shakes of salt, and roast for about one hour. Add them to the chickpea mixture, and serve, sprinkled with parsley leaves.

ENJOY!

to print the recipe, click here

Comments: This recipe is a winner, all the way. Leftovers were fantastic next day and even better on the second day. I warmed everything in the microwave, just barely, and there was no compromise in the texture, the taste of the marinade just got more intense. Perfect.

Make sure to stop by Kelly’s blog and read her post, as she offers a different way to enjoy it, with cucumbers in tzatziki sauce. The key is to cook the chickpeas from scratch. Totally different from canned, which works fine for other preparations such as hummus. The slow-roasting of the bell peppers is another great twist, they develop a milder flavor and very soft texture.

ONE YEAR AGO: Passionfruit Millionaire’s Shortbread

TWO YEARS AGO: Chai-Mango Rosette Macarons

THREE YEARS AGO: Common Table, Something New in My Life

FOUR YEAR AGO: The Daisy, a Bread with Brioche Alter-Ego

FIVE YEARS AGO: Pork Tenderloin, Braciole Style

SIX YEARS AGO: Raspberry Buckle

SEVEN YEARS AGO: Seafood Gratin for a Special Dinner

EIGHT YEARS AGO: Cooking Sous-Vide: Sweet and Spicy Asian Pork Loin

NINE YEARS AGO:  Farewell to a Bewitching Kitchen

TEN YEARS AGO: In My Kitchen. June 2012

ELEVEN YEARS AGO: Goodbye L.A.

TWELVE YEARS AGO: 7-6-5 Pork Tenderloin

ORIENTAL-STYLE SESAME SLAW

I love cole slaw, but prefer a dressing without mayonnaise. Something fresh, light, and bright. This version couples orange juice with sesame oil. I add just a little squirt of lemon juice at the very end because I crave that extra acidity. Some might try to convince me that incorporating the lemon juice in the dressing would do the same job, but I beg to differ. In fact, when I ate the leftovers, I did a little lemon juice encore, and loved it even more.

ORIENTAL-STYLE SESAME SLAW
(adapted from several sources)

for the dressing:
¼ cup soy sauce
¼ cup fresh orange juice
2 tablespoons extra-virgin olive oil
1 tablespoon toasted sesame oil
2 teaspoons minced fresh ginger
1 teaspoon salt
1/2 teaspoon black pepper
1/2 to 1 teaspoon Sriracha sauce

for the salad:
3 cups shredded napa cabbage
2 cups shredded green cabbage
1 cup shredded red cabbage
1 cup shredded carrots
fresh cilantro leaves, amount to taste
black sesame seeds to serve
fresh lemon juice to serve

Start by making the dressing. Combine all ingredients in a measuring cup or flask with a lid, and whisk or shake to emulsify. Reserve.

In a large serving bowl, add all ingredients for the salad except the black sesame seeds, combine tossing gently, then pour the dressing on top. Toss again and leave in the fridge for 30 minutes before serving. Sprinkle with black sesame seeds, add lemon juice, adjust seasoning if needed, and serve.

ENJOY!

to print the recipe, click here

Comments: f you like cole slaw but mayonnaise is not your thing, this will for sure please you. It gets even better next day, as all components are so sturdy. I made it twice already, the second time I added fresh orange zest together with the black sesame seeds before serving and that was a nice extra touch of flavor. Avocado goes quite well with it, keep that in mind. Not much else is needed to make this a complete meal. We enjoyed ours with a rotisserie chicken, so that was a super easy dinner to put together. The recipe can be easily adapted to a Whole30 system, if you don’t use soy sauce, and replace it with coconut aminos.

ONE YEAR AGO: Revelation Veggie-or-Not Egg-Roll Bowl

TWO YEARS AGO: Covid Update and Stayin’ Alive

THREE YEARS AGO: A Brazilian Hummingbird

FOUR YEARS AGO: A Cookbook Review

FIVE YEARS AGO: Air-Fried Carrots, Two Ways

SIX YEARS AGO: Sweet Potato Crust Quiche

SEVEN YEARS AGO: Chicken Thighs with Artichokes and Capers

EIGHT YEARS AGO: Pea Pancakes with Herbed Yogurt

TEN YEARS AGO: Mushroom Stroganoff

ELEVEN YEARS AGO: Tomato Sourdough

TWELVE YEARS AGO: Gamberetti con rucola e pomodori

THIRTEEN YEARS AGO: Flirting with Orzo

CARROTS AND ZUCCHINI STIR-FRY WITH PEANUT SAUCE

Five days without our faithful goofy companion. I want to thank for all the comments in my previous post. I read each one, but cannot bring myself to answer them. Please consider yourself hugged.

This key to this recipe is slicing the carrots in ribbons, which is a bit of a labor of love, but worth it. Couple that with spiralized zucchini, and you’ll hit a jackpot. If you do not have a spiralizer, slice the zucchini very thinly and that will do. It is surprisingly hearty, and would be a great vegetarian meal if you add perhaps some farro and a slice of bread.

CARROT AND ZUCCHINI STIR-FRY WITH PEANUT SAUCE
(inspired by many sources)

3 carrots, sliced in ribbons (with a large veggie peeler)
2 large zucchini, spiralized fine
1 tablespoon grapeseed oil
grated ginger to taste
1 shallot, minced
salt and pepper

for the sauce:
2 tablespoons smooth peanut butter
2 tablespoons soy sauce
2 tsp sesame oil
1 tsp or more Sriracha sauce
drizzle of agave nectar
juice of 1/2 lemon
water to adjust consistency

Heat the oil in a non-stick large wok. Sautee the ginger and the shallot until fragrant. Add the veggies, stir-fry for a couple of minutes in high heat. Drizzle the sauce, you might not need the full amount, so that the veggies are not drenched. Cook for a couple of minutes more, stirring constantly to distribute the thick sauce well into the veggies.

Add the peanuts, and serve.

ENJOY!

to print the recipe, click here

Comments: If you want to make a bigger amount, you might have to stir-fry the veggies in two batches, then join them and finish with the sauce. As I mentioned, slicing the carrots is not the most enjoyable activity in the world, but it is a game changer. Just incorporate the Zen and go for it. The sauce is pretty delicious and would be awesome added on top of grilled pork tenderloin, which I intend to do soon.

ONE YEAR AGO: Cookie Therapy, Anyone?

TWO YEARS AGO: The Quasi-Vegan Quiche

THREE YEARS AGO: Not Quite Moqueca

FOUR YEARS AGO: Roasted Butternut Squash with Cashew Nuts

FIVE YEARS AGO: Mississippi Roast and the Open Mind

SIX YEARS AGO: Walnut-Raisin Bran Muffins

SEVEN YEARS AGO: A Star is Born!

EIGHT YEARS AGO: Chestnut Flour Sourdough Bread

NINE YEARS AGO: Kinpira Gobo and Japanese Home Cooking

TEN YEARS AGO: Walnut Sourdough

ELEVEN YEARS AGO: Thai Chicken Curry

TWELVE YEARS AGO: Zen and the art of risotto

KAMUT AND BROCCOLI SALAD

If I am going to have a salad, my preference is a salad with substance, and a variety of textures and colors. No need to go all the way into a Chicken Caesar or a Steak Salad, but the addition of grains is more than welcome. I used quick-cooking kamut, but any type will work, just pay attention to the timing. Also, any other will be fine: barley, cracked wheat, or the beautiful farro.

KAMUT & BROCCOLI SALAD
(adapted from many sources)

1 cup cooked kamut, or amount to taste
2 broccoli heads, or amount to taste
1/2 cup roasted, salted cashews
1/4 cup raisins
1/2 apple, cut in pieces (I used Pink Lady)
1/4 cup olive oil
juice and zest of 1 lemon
grated ginger to taste
salt and pepper to taste

The kamut can be prepared a day in advance if you like. Make sure it is cold when you make the salad. If you make it in advance, drizzle just a touch of olive oil to prevent the grains from sticking together. Separate the broccoli into florets and steam them for 3 minutes. Immediately run very cold water to stop the cooking. Cut the steamed broccoli into pieces. Reserve.

Make the dressing by whisking the olive oil with lemon juice, add ginger, salt and pepper.

In a large serving bowl, add all the ingredients for the salad, pour the dressing and mix gently. Adjust seasoning with salt and pepper if needed. Allow the salad to sit for 30 minutes before serving, if possible.

ENJOY!

to print the recipe, click here

Comments: The main inspiration for this recipe came from a cookbook I own, but that version served the broccoli raw and passed by the food processor. The pieces of raw broccoli were very small and lost in the middle of the grain, all acquiring the same green color. The way I chose to make it, was barely steaming the broccoli. This simple step tames its raw sharpness. Next, I cut the pieces with a knife, in small chunks. In my opinion, this makes the final product much more appealing not only visually, but as far as texture goes.

The apples and raisins are a must, and the cashews give that extra crunchiness that will leave you smiling… peanuts, walnuts, or pecans, can be used instead.

The added bonus of this salad: it holds quite well in the fridge. I made such a big portion that in fact it lasted two days, and on the second day I decided to warm it in the microwave for a minute. Perfect! A light lunch that needed absolutely nothing else to go with it.

ONE YEAR AGO: Charcoal Peanut Sourdough

TWO YEARS AGO: Chocolate Cake with Coconut Buttercream

THREE YEARS AGO: Berry Rebellion Tarts 

FOUR YEARS AGO: Bergamot-Cherry Macarons

FIVE YEAR AGO: Roasted Veggies with Queso Cotija Dressing

SIX YEARS AGO: Creamy Broccoli and Mushroom Casserole

SEVEN YEARS AGO: Maple Walnut Biscotti

EIGHT YEARS AGO: Barley Risotto with Peas

NINE YEARS AGO: Oatmeal Fudge Bars

TEN YEARS AGO: Cauliflower Steaks

ELEVEN YEARS AGO: Soft Spot for Chevre

TWELVE YEARS AGO: Quick sun-dried Tomato Crostini