MEXICAN CONCHAS

This recipe has been waiting for a long time in that list of “To Make Soon”. Better late than never, I actually made it twice, because I wasn’t totally happy with my first attempt. This is a classic Mexican sweet bread, with a colorful coating that is sweet and addictive…

for the concha press I used, click here


MEXICAN CONCHAS
(from The Bewitching Kitchen)

makes 8 large conchas

4 cups (550g) all-purpose flour
1/2 cup (100g) sugar
2 tsp ground cinnamon
1 tbsp instant yeast
1/4 tsp salt
6 tbsp (85g) butter at room temperature
3 eggs at room temperature
1 tbsp vanilla extract
3/4 cup warm milk


Topping
1 1/2 cups (185g) all purpose flour
1 1/2 cup (180g) powdered sugar
1 cup butter, softened
1 tbsp vanilla extract
1 tbsp coco powder
1 tsp freeze dried strawberries, ground
Food coloring (optional)

In the bowl of a KitchenAid type mixer, add the flour, sugar, cinnamon, salt, yeast, and butter cut into pieces. Using the hook, mix for a few minutes until the butter is fully incorporated. Add one egg at a time, mixing for a minute after addition. Slowly add the milk, and once the mixture is smooth, knead it for a full 15 minutes, until the dough is super smooth and elastic.

Transfer to a buttered bowl, and let it rise until doubled. About 2 hours.

Make the topping by kneading (by hand is fine) flour, powdered sugar and butter until a dough is formed. Divide it in four pieces, add cocoa powder to one of them fourths, strawberry powder to the second half, vanilla to the remaining pieces. Add food color of your choice, if so desired. You can leave one of the vanilla pieces plain. Place in the fridge to set while the dough rises.

Punch the risen dough down, divide in 8 pieces and form little balls. Place them over parchment paper, four per baking sheet. Divide the colored dough into two, so you have a total of 8 pieces, 2 of each color. Use a tortilla press to roll them out, placing parchment paper squares on top and bottom to make it easy to move the dough around. Place the dough over the little rolls, and cut around to make it neat. Use the concha press to make the design on top. Cover, let them rise for 30 minutes and bake at 350F for about 25 minutes. Add a baking sheet with ice at the bottom of the oven to generate steam. You can also spray some water lightly over the dough after 2 minutes during baking.

Cool on a rack before eating.

ENJOY!

to print the recipe, click here

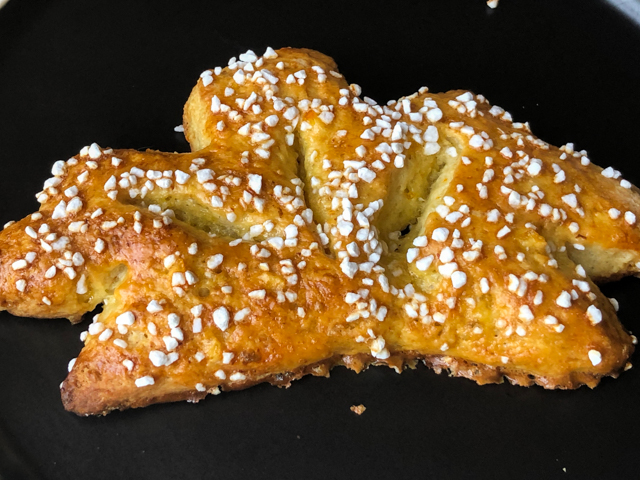
Comments: Talk about a fun baking project, this is definitely it! When I made it the first time, I did not cover the breads fully with the colored dough, and later learned that the traditional way covers them fully. They get a more polished look that way. Below you see my first attempt, I used a heavier hand with the colors also…

When I make them again, I will either make half the recipe and form 6 little breads, or make the full recipe and shape 12 because I think these turned out slightly too big. Also, I think it would be fun to gather the different colors of topping and knead them slightly together to make a fun marbled topping. I just love the look of the bread as it goes through the final proofing.

I donated the whole batch, but of course had to ‘test taste” one. Love the cinnamon flavor, the bread is soft, tender, moist. And the topping, yes, addictive!

ONE YEAR AGO: Red Velvet Sugar Cookies, Three Ways

TWO YEARS AGO: Lemon Macarons

THREE YEARS AGO: Thai Chicken with Peanut Sauce

FOUR YEARS AGO: Baharat Flower Sourdough

FIVE YEARS AGO: Biscoitinhos de Canela

SIX YEARS AGO: Salmon Tacos

SEVEN YEARS AGO: The Chignon

EIGHT YEARS AGO: Rack of Lamb Sous-Vide with Couscous Salad

NINE YEARS AGO: Focaccia with Grapes, Roquefort and Truffled Honey

TEN YEARS AGO: Moroccan Carrot Dip over Cucumber Slices

ELEVEN YEARS AGO: White Chocolate Macadamia Nut Cookies

TWELVE YEARS AGO: Cilantro-Jalapeno “Hummus”

THIRTEEN YEARS AGO:A Moving Odyssey

FOURTEEN YEARS AGO:Hoegaarden Beer Bread

FIFTEEN YEARS AGO:
 
Ancho-Chile Marinade: Pleased to Meat you!


HAWAIIAN BREAD ROLLS

I have always flirted with the idea of baking these from scratch. This type of bread is popular in Brazil, although they don’t go as Hawaiian, they are just called pão doce, which translates as “sweet bread”. The shape, size, and taste is very similar, but the Brazilian concoction originates from Portugal. I adapted a recipe from Molly Yeh, the key component in this dough is pineapple juice, so go get some right away!

HAWAIIAN SWEET ROLLS
(adapted from Molly Yeh’s Girl Meets Farm)

390 grams all-purpose flour (about 3 cups)
2 + 1/4 tsp instant yeast (1 package)
1 + 1/2 teaspoons kosher salt
1/4 teaspoon ground turmeric
160 grams pineapple juice, slightly warmed warmed (about 2/3 cup)
2 tablespoons light brown sugar
1 tablespoons honey
1 large egg plus 2 yolks (egg white saved for egg wash later)
1/2 teaspoon vanilla extract
4 tablespoons (56 grams) unsalted butter, at room temperature, plus more for the pan
Flaky salt, for sprinkling

Add the flour, yeast, kosher salt and turmeric to a mixer fitted with the dough hook and mix on low to combine. Add the pineapple juice, brown sugar, honey, whole egg and yolks and vanilla. Increase the speed to medium and mix to form a somewhat stiff, shaggy dough, about 3 minutes. With the mixer running, add the butter, 1 tablespoon at a time, allowing each to fully incorporate before adding more. Once all of the butter is added, mix on medium-high to make a smooth, glossy, somewhat-wet dough, 10 to 12 minutes. Oil a large bowl and add the dough, turning to coat. Cover and let rise until doubled in size, about 2 hours.

Punch the dough down and divide into 12 equal pieces. Butter a quarter sheet pan. Form each piece into a ball and roll on the counter encased in your palm to tighten up the ball. Lay the balls in a 3-by-4 grid in the buttered pan. Cover loosely and let rise until puffed but not quite doubled, about 1 hour.

Heat the oven to 350F. When the rolls have risen, beat the reserved egg whites with a splash of water and brush over the rolls. Sprinkle with flaky salt. Bake until puffed and a deep golden brown; start checking at 20 minutes. Cool in the pan on a cooling rack for 10 minutes, then remove to cool completely sitting on the rack.

ENJOY!

to print the recipe, click here

Comments: These are not only adorable to look at but dangerously delicious. Soft, not too sweet (I cut the sugar a bit from her original recipe), and the salt on top should not be omitted. They go well with pretty much anything, savory or sweet. What is even more important in our case, is that they freeze well, and defrost quickly. So after enjoying a couple on the day I baked them, I placed them in a bag in the freezer and whenever convenient, in a few minutes we had a delicious Hawaiian roll ready for us…

ONE YEAR AGO: Incredibly Simple Prosciutto-Wrapped Chicken Breasts

TWO YEARS AGO: Cauliflower with Sun-dried Tomatoes and Olives

THREE YEARS AGO: Curry Sourdough with Sesame Seeds

FOUR YEARS AGO: Chocolate-Crusted Passion Fruit Tart

FIVE YEARS AGO: Lemony Shredded Brussels Sprouts with Almonds

SIX YEAR AGO: Savory Oatmeal with Bacon and Cheddar

SEVEN YEARS AGO: Air-Fried Carrots, Two Ways (most popular post on my blog!)

EIGHT YEARS AGO: Five Minutes in L.I.T (a tour of our laboratory!)

NINE YEARS AGO: Chicken Thighs with Artichokes and Capers

TEN YEARS AGO: Pea Pancakes with Herbed Yogurt

ELEVEN YEARS AGO: Mushroom Stroganoff

TWELVE YEARS AGO: Tomato Sourdough

THIRTEEN YEARS AGO: Gamberetti con rucola e pomodori

FOURTEEN YEARS AGO: Flirting with Orzo

HELEN FLETCHER’S PINEAPPLE KOLACHE

I am going to say something quite daring, so here it goes: this might very well be the best thing I’ve baked in a whole year! If you follow my blog, you probably know I am quite fond of Helen’s recipes, because not only they always work, but her explanations are crystal clear, and make you comfortable to try something even if it seems complex or out of your skill level. I had never made kolache, but following the method described in this post, I had no issues. They turned out fantastic! Check her post for all sorts of variations for the filling, or go with the one I chose: pineapple. Tart, bright, fresh, perfect contrast with the slightly sweet bread dough. A winner. I promise you.

PINEAPPLE KOLACHE
(from Helen Fletcher’s Pastries Like a Pro)

for the pineapple filling:
1 cup well drained crushed pineapple
⅓ cup sugar
1 teaspoon potato starch or cornstarch
1 teaspoon lemon juice
1 tablespoon melted butter

Whisk together the sugar and potato starch or cornstarch. Combine all ingredients in a small pan and bring to a boil over medium heat. Boil for 1 minute. Cool completely. Refrigerate until needed.

for the dough:
½ cup butter (1 stick, 114 grams)
½ cup sugar (100 grams)
1 teaspoon salt
1 cup sour cream (225 grams)
2 teaspoons instant yeast
½ cup lukewarm water
2 eggs
4 cups all purpose flour (560 grams)

Cut the butter into pieces and place in a small saucepan along with the sugar and salt. Heat until the butter is melted. Remove from the heat and let it sit until it is lukewarm. Add the sour cream. Whisk it into the butter mixture. Add eggs and yeast, whisk them in. Lastly, add the water. Transfer to the bowl of a mixer. Add the flour and, beat until it comes together.  Knead in the machine for 3 minutes, turning after about 1 ½ minutes as the dough will adhere to the top of the dough hook and not get beaten.  The dough will be very soft and more of a batter.

Place it in a greased bowl or container, cover with plastic wrap and allow it to rise until doubled, about 2 ½ hours. After it has risen, punch it down, re-cover it and refrigerate overnight so the butter can firm up. 

for shaping and baking:
Refrigerated dough
1 egg, well beaten
pineapple filling

Line three baking sheets with parchment.  Set aside. Punch the dough down if risen and divide the dough in half (585 grams each).  Shape each piece into a rectangle.  Wrap each piece in plastic wrap and refrigerate for 10 to 15 minutes. Remove one piece of dough from the refrigerator and roll it out so it is ½ inch thick.  The dough will be very firm. With a 3″ cookie cutter (or whatever size you want) cut out rounds and place them on the parchment about 1 inch apart.  Repeat with the second piece of dough.  Reroll and cut additional rounds. Cover them with tea towels and allow to rise until almost doubled.

Preheat the oven to 375°F. With your fingers, make a deep well in the rounds about ½ inches in from the edge of the dough but do not go through the dough.  Start by making a hole in the center. Expand the well by pressing the dough down. Brush the top edges of the Kolache with the beaten egg. Fill the wells with 1 to 1 ½ tablespoons of filling.  Bake on a double pan for about 20 minutes for the 3″ size until the top of the dough is well browned.  Reduce the time for smaller pastries.

Makes about 20 – 3″ rolls with re-rolling the dough.

ENJOY!

to print the recipe, click here

Comments: I highly recommend you visit Helen’s site to get her step-by-step photos and instructions, especially if you’ve never made enriched bread dough. The dough is very nice to work with, a bit sticky, but I urged the temptation to add more flour and all ended well in the end. I was intrigued by the pineapple filling because I rarely use pineapple in baking, but it was much better than I expected. I made the filling the day before, right after mixing the dough and placing it in the fridge for overnight proofing. Next day the whole thing was a breeze, just rolled the dough, cut circles, filled and baked. I donated them all, but sampled one for “quality control”. It was hard to stop, but I exercised herculean self-control.

Helen, cannot thank you enough for so many great recipes I’ve made from your site!

ONE YEAR AGO: Blood Orange and Cranberry Mini-Cakes

TWO YEARS AGO: Simnel Cupcakes

THREE YEARS AGO: Oat and Sesame Seed Sourdough

FOUR YEARS AGO: Moroccan Turkey Pie with Olive Oil Crust

FIVE YEARS AGO: Another Twisted Sister of the Shepherd’s Pie 

SIX YEARS AGO: Cashew Chicken, My Way

SEVEN YEARS AGO: Two Deliciously Simple Salads

EIGHT YEARS AGO: In My Kitchen, April 2016

NINE YEARS AGO: Spring has Sprung with Suzanne Goin

TEN YEARS AGO: Chai Brownies

ELEVEN YEARS AGO: Pomegranate-Molasses Glazed Carrots

TWELVE YEARS AGO: Braised Brisket with Bourbon-Peach Glaze

THIRTEEN YEARS AGO: The Real Vodka Sauce

FOURTEEN YEARS AGO: Spring Rolls on a Spring Day

GIBASSIER

Those who follow my blog might be aware that I am a huge fan of Helen Fletcher. When she praises a recipe, I just know it will be awesome. Still, this one surpassed all my expectations. Gibassier is a little brioche-like delicacy from Provence, a place that enchanted me when I visited many years ago, right during lavender harvesting season. I will never forget the fields and the intense but delicate lavender aroma present everywhere. Helen’s recipe is a breeze to make  using the food processor, but she also gives detailed instructions to make it in a regular mixer.

GIBASSIER
(from Pastries Like a Pro)

Preferment (Biga):
140 g bread flour
1/2 cup warm milk (about 105°F)
Large pinch of instant yeast

Stir together in a small bowl.  Knead several times to make a smooth ball.  Let sit at room temperature for 12 to 18 hours.

Gibassier Dough:
385 grams bread flour
6 tablespoons unsalted butter, cold (85 grams)
100 grams granulated sugar or 3 1/2 ounces)
2 + 1/2 teaspoons instant yeast
3/4 teaspoon salt
Orange zest from l medium navel orange
All of preferment from above
2 eggs
1/3 cup olive oil
1/4 cup water, divided
1/4 tsp Fiori di Sicilia (optional)
2/3 cup candied orange rind

Place the flour in the processor and pulse several times.  Cut the cold butter into pieces and arrange in a circle over the flour. Process until the butter is no longer distinguishable.

Add the sugar, yeast, salt, zest, and Fiori di Sicilia.  Pulse to incorporate. Tear the preferment into pieces and add it processor.  Process to fully incorporate.

Combine the eggs, olive oil, and half of the water. Pour over the dry ingredients and process to mix completely.  Scrape down and rearrange the dough if necessary.  The dough should be very soft.  Add water a teaspoon at a time if necessary (I did not use additional water).  Add the candied orange rind.  Pulse briefly to mix.  Do not over mix or the  rind will be too small.

Let the dough proof at room temperature for 2 hours, then deflate the dough and transfer to the fridge overnight

Shape the Gibassier.  Line two half-sheet pans with parchment paper. Turn the dough out. Weigh your dough and do the math to find out how many grams you should use to form each little dough. You should have enough for 14 gibassiers. In my case, I used 80 grams per little ball.  Shape all the balls, cover, and refrigerate to make it easier to cut them.  Take two or three out at a time so they don’t soften too much. Take a ball and stretch it out with your fingers to make a rough torpedo shape. Turn it so the best side is up.  With the heel of your hand press the top of the dough upward from the middle. Again from the middle of the dough, with the heel of your hand press the dough downward to form a lemon shape.  Flatten the ends to match the center. It shoud be abut 2 1/2 ” high.

With a single edge razor blade, make a cut in the middle of the dough.Then one to the left. One to the right. Along the right side of the top of the dough cut in toward the center about 3/4” to 1”. Again on the other side. Last cut in the same amount on the right side. And on the left. As you pick it up to put it on the sheet pan, stretch it out to enlarge the holes.  Place 7 on a tray.

Cover them and allow them to rise for 2 to 2 1/2 hours until puffy.

Heat the oven to 350F. While the oven is heating brush 2 or 3 of the rolls with the egg wash and sprinkle heavily with sanding sugar or pearl sugar. Bake one sheet at a time on the middle rung for 18 to 22 minutes until golden brown and baked through.

Serve warm or room temperature.

ENJOY!

to print the recipe, click here

Comments: If you’d like to make Gibassier, I urge you to stop by Helen’s site because her step-by-step photos are perfect to understand what needs to be done. Explaining just with words is a bit tricky. If you make it in the food processor, it will be easy to make just half the recipe, as the processor will handle it without issues. Everything comes together super quickly, and I like the fact that I could use butter straight from the fridge.

Some people suggest using an old credit card to do the cuts on the dough, but Helen’s idea of getting those single edged razor blades is truly spot on. I advise you to allow the final proofing to reach the 2.5 hour mark or even a little big longer as enriched doughs tend to be a bit sluggish. The puffier they get at that stage, the lighter the rolls will be. I had to cut my final proofing a bit short for half of them, and the second batch was better.


This is the type of pastry that will transport you straight to a cafe in France, sitting outside, people-watching, as you sip a little hot chocolate, coffee, or whatever suits your mood…

Helen, thank you once again not only for the inspiration but for your detailed instructions that make it all so much easier to follow.

ONE YEAR AGO: Sundried Tomato Twist Bread

TWO YEAR AGO: And now for something completely different….

THREE YEARS AGO: Parsnip, Coconut, and Lemongrass Soup

FOUR YEARS AGO: In My Kitchen, October 2016

FIVE YEARS AGO: Paleo Moussaka

SIX YEARS AGO: In My Kitchen, October 2014

SEVEN YEARS AGO: In My Kitchen, October 2013

EIGHT YEARS AGO: Crimson and Cream Turkey Chili

NINE YEARS AGO: Taking a break from the nano-kitchen

TEN YEARS AGO: Chocolate Chip Cookies