COOKING SOUS-VIDE: SWEET AND SPICY ASIAN PORK LOIN

I am so excited to publish this post!  My first experiment with the Anova sous-vide gadget, actually if I must be completely honest, it was the second experiment, the first shall remain unblogged.  It involved soft-boiled eggs, and a garbage disposal. Pretty sad combination.  But, I did not let that bring me down, next day I rolled up my sleeves, and went to work on a recipe for pork loin that I found on SVKitchen: Sous-vide Recipes and Techniques for the Home Cook.

served

SWEET AND SPICY ASIAN PORK LOIN
(slightly modified from this recipe)

3 pounds boneless pork loin (not pork tenderloin), trimmed of excess fat, cut into 2-inch pieces
2 stalks lemongrass, 3 outer layers and top third removed and discarded, thinly sliced
½ cup soy sauce
⅔ cup packed brown sugar
1 tablespoon Sriracha sauce
2 tablespoons minced fresh ginger
2 teaspoons Chinese five-spice powder
1 teaspoon kosher salt
1 teaspoon freshly ground black pepper
2 scallions, sliced on a diagonal, for garnish

Heat the water bath to 132°F (56°C).

In a bowl large enough to accommodate the pork, combine the lemongrass, soy sauce, brown sugar, chili-garlic sauce, ginger, five-spice, salt, and pepper. Add the pork and toss everything together to coat evenly. Divide the pork between two large zip lock food bags and seal using the water displacement method.

Cook for 6 hours.

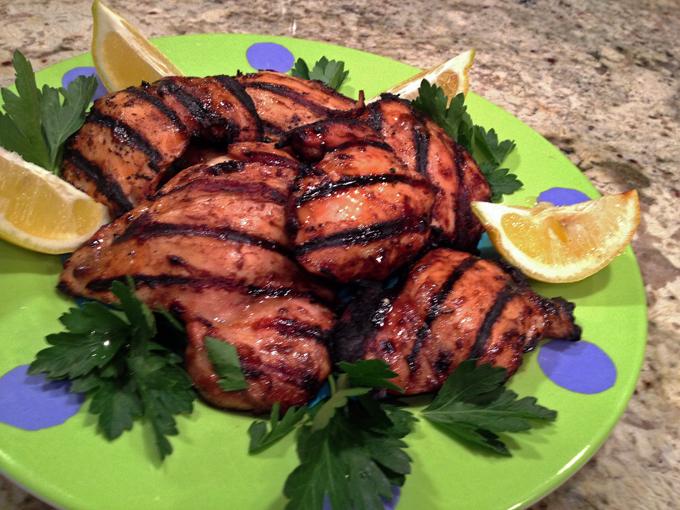
Carefully open the food bags and serve the pork over cooked rice garnished with the sliced scallions.

ENJOY!

to print the recipe, click here

Composite1
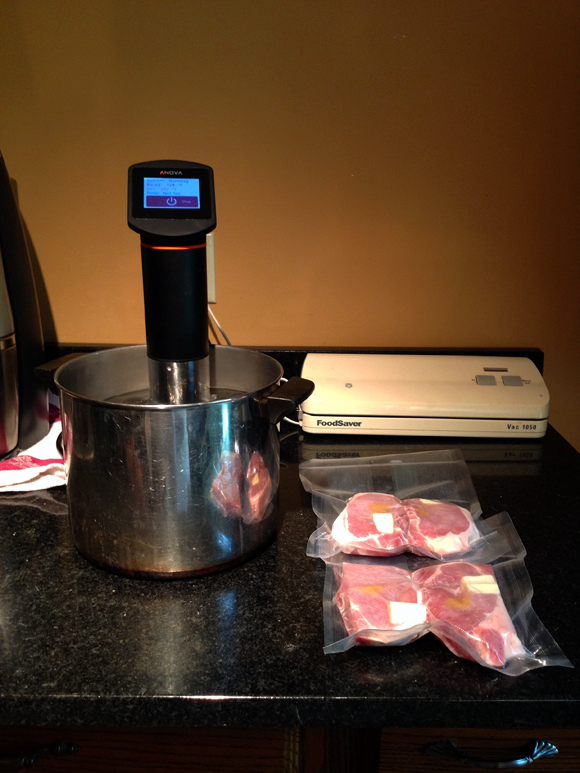
In this photo, you see the Anova gadget attached to the large pan, and the water heating nicely to the correct temperature.  After mixing the pieces of meat with the marinade, two large Ziplock bags are sealed using the water displacement method.  I lowered the bag in a bowl of warm water (that makes the plastic more pliable and facilitates removing all air bubbles). The last photo shows the two bags sealed and ready to dive into the water-bath.  Easy as pie!

composite2
I set the timer for 6 hours, but due to important commitments such as helping Phil mow the front lawn & folding laundry, time was extended to 6 hours and 45 minutes. I hoped it would not be a problem. It wasn’t. In fact, it confirmed one of the advantages of sous–vide cooking: once the temperature is reached and properly equilibrated through the meat, you can take your time. Within limits, of course, there will be a change in texture if you push it too far. But this too far becomes a matter of hours, not minutes. Sweet!

Pork Sous-vide

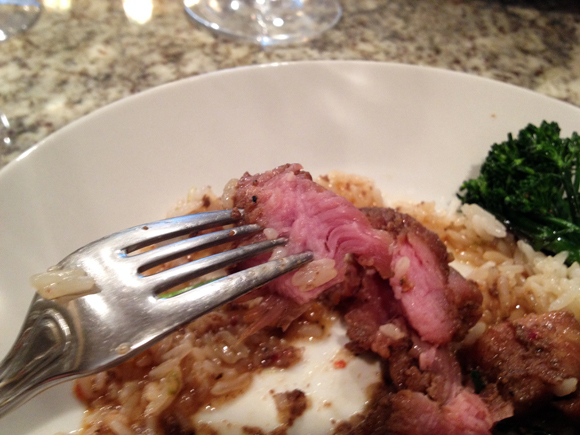
Here is a close up of the meat as you bite into it… moist and tender all the way through!

Meat
Final comments:
 SVKitchen is a fantastic source of recipes and tips for sous-vide cooking, I have several recipes already bookmarked. The site is not getting updates anymore which is kind of sad, but you can still find a ton of stuff and they are also very helpful by email.

One of the things I learned right away from sous-vide cooking is: take notes.  Small variations in temperature will change the result of a recipe, and some can be pretty tricky to nail. Soft-boiled eggs are one classic example. Apparently, once you hit the jackpot with the method that pleases you, it will be quite reproducible.  I am not there yet, but slowly improving.  A very informative and fun article dealing exclusively with soft-boiled eggs can be found here.

Another important point in sous-vide is that for the most part the food will not look appetizing once it’s cooked.  The sous-vide obviously doesn’t brown the food and doesn’t reduce a liquid.  Normally you will need to do a final stove-top, oven, or grill step to bring the dish to completion.  Still, the idea that you can prepare your food in advance and wrap it up in minutes at dinner is quite attractive for those who work full days.  But more important than that is the ability to have perfectly cooked seafood, poultry to work with. Goodbye, tough scallops & shrimp… goodbye dried up chicken breasts & pork loin…

So far, I am really having fun with this new toy.  It is compact, can be stored away in a shelf when not in use, and I found an even better spot to put it in action: the countertop in our laundry room, adjacent to the kitchen.  There Anova enjoys the company of the vacuum sealer,  and on the left of the picture we have a sink, so it’s all quite functional.

AnovaSetting

I hope you enjoyed this first post on sous-vide, stay tuned for new adventures on Anova Land…  

ONE YEAR AGO:  Farewell to a Bewitching Kitchen

TWO YEARS AGO: In My Kitchen. June 2012

THREE YEARS AGO: Goodbye L.A.

FOUR YEARS AGO: 7-6-5 Pork Tenderloin


IN MY KITCHEN: JUNE 2014

It is now time to join Celia’s great blog party, her In My Kitchen series, in which bloggers all over the world offer a little peek into their favorite room in the house.  I like to start with gifts, so here they are.

From our dear friend SL, two bags of paprika brought from Slovakia.  You cannot imagine how strong they smell, they put any of the stuff we can buy here in the US into shame.  He gave me two kinds, one sweet, one hot.  Oh, yeah….

paprikacomposite11


Same friend, another super special gift brought from his recent visit to Saudi Arabia (yes, he got me saffron too).  Vacuum-packed dates, absolutely amazing! He also offered a very nice recipe to put these dates to good use. I’ve been very protective of this bag, so that I don’t find it almost empty when I’m ready to bake.

datescomposite

From friends back in Oklahoma, a nice ceramic bottle to “freeze” vodka.  A gift they brought all the way from Ukraine for us. It lives in the freezer, holding your favorite brand of vodka.  When you feel like having a shot, grab the bottle and bring it to play.  I don’t do the vodka shot thing, but vodka lovers will appreciate how long this bottle keeps it at the proper temperature.

VodkaBottle

From Cindy, who has given me countless cooking-related gifts, one more for the collection: chestnut flour!  She found it at a market in Dallas, and was super kind to grab a bag for me. The order of the universe is now restored. No more shortage of this unique ingredient. Thank you, Cindy!

photo(12)

Finally, from Phil, two bottles of beautiful pearls of sugar, I guess that means he would like to have some cupcakes in the near future?   😉

Pearls

In our kitchen….

A small colander I bought on impulse at the grocery store, in a sale special with each item for a buck or so.  I fell in love with the vibrant coral color, so I brought it home.  Now I cannot live without it, it is perfect to drain cans of beans, chickpeas, rinse berries, that sort of stuff.

Colandercomposite
In our kitchen…

Something I’ve been craving for ages!  I wanted to have salt and ground pepper ready to grab with a teaspoon or my fingers.  Searched left and right for the perfect size, but nothing seemed to fit my dreams, until I found these on Paula’s shop at Etsy (Paulova Ceramics).  You can custom order them in several different colors.  Paula shipped them from Portland quite quickly, by the way.  Just keep in mind that the base doesn’t come with it, mine was a support for some plastic containers. I am still amazed at how well they matched those bowls.   As if they were made for that purpose!

SaltPepperEtsy

In our kitchen…

A spoon rest, found at Bed Bath and Beyond… I think it is a good match for the salt and pepper bowls…  It works double duty as a place to rest a couple of eggs waiting to be scrambled, avoiding the dangers of them falling off the countertop cliff.  Yes, that happened in a distant past. The experience was traumatic, to put it mildly.

CompositeSpoonRest


In our kitchen….

A huge plastic box to finally add some sense of organization to the flours I bring home. It lives in our freezer in the garage.The list of flours go not only on the top of the box, but is also stored in my iPhone.  The goal? To prevent me from buying yet another bag of spelt flour, when two are sitting at home.  (sigh)

FlourBoxcomposite

In our kitchen…

The pantry received some more special attention, it is not easy to see in the photo, but some clear plastic boxes are now holding items that belong together (baking stuff, dried fruits, extracts, etc).

Pantry1

Still on the pantry subject, you win some, you lose some.  I saw a tip on Food Network and jumped on the idea like Buck jumps on a snake (side note: last year he killed 8 snakes in our backyard, this year the first casualty happened a few days ago, he is incredibly fast!).  Anyway, the tip was to buy plastic magazine holders like you see in the photo, and use them to store canned stuff, laying on their sides.  Unable to find them anywhere, I went to amazon.com, but the ones I got were too narrow for that purpose. Bummer!  At least they were very cheap, and are now holding…. cooking magazines!   😉

rack1-side

I was forced to put Plan B in action: soda can containers for the fridge from Bed Bath & Beyond.  More expensive than the magazine holders, but at least they sort of worked.  Not ideal, though. I would like some type of storage in which the cans would be easier to see. Of course, I am vertically challenged, and that adds complexity to this crucial issue.

PantryCans


 In our kitchen….

We love these crackers, from Doctor Kracker.  One of our former graduate students got us hooked on them (thanks, Chuck!).  They are crunchy, with the right amount of seeds and nuts without making you feel like an oversized parrot.  Truly delicious with cheese, with hummus, or naked. The crackers. Don’t be naughty…

crackercomposite

In our kitchen….

Another impulse buy from Bed Bath and Beyond.  In my defense, it was on sale. Again in my defense, it had a photo of Ming Tsai on the box.  He endorsed this knife, saying it never needs sharpening, and no food will stick to it. Perfect for tomatoes and cheese.  Passed my test.  Ming would never lie to one of his most loyal admirers. HA!

MingTsaiKnife

In our kitchen….

Saved the best for last…. drum roll please…. intense drum roll….

A sous-vide gadget from ANOVA!!!!

AnovaBox
This is the new toy in its inaugural use…  All you need is a tall saucepan that can hold the gadget on its side.  Anova will keep the water in constant circulation, at the perfect temperature you set it to.  Of course, the size of your pan limits the amount of stuff you can cook under sous-vide.  But any container that is heat-safe and food-safe will work.  I have a huge plastic bin that can be used for larger cuts of meat.  Stay tuned for my first recipe using Anova… Anova, Supernova, our kitchen is at the cutting edge!

composite2

Because I do my nails on the kitchen island, I feel it’s totally appropriate to talk manicure, and introduce a new kid on the block, a holographic nail polish (you cannot go wrong with that, obviously).  Anyway, the color changes quite dramatically depending on the ambient light, pretty cool.  I might have to investigate other colors, you know, just for the sake of scientific experimentation.

photo(7)

(click to enlarge)

I almost closed this post without canine appearances, but the pups threatened to go on a good-behavior strike.  So I reconsidered my decision, and invited them in…

Chief has been very tired these past weeks…
He says hello from his dreams, his ball keeping him company…

ChiefSleeping


Buck playing his favorite game: You eat, I stare. 
I won’t move. I won’t blink.  

BuckStare


A small dog with a hearty appetite, he shares another one of his many 
food obsessions…

CompositeSushi


Oscar’s ego is a bit inflated since he was featured all by himself in a recent post. Maybe that’s why he took a few liberties and jumped on the sofa as I was trying to take his picture. The superstar is partial to close-ups now.

Osky2


Oscar might think he is a superstar, but “I” am the only one who goes running with Mom & Dad. Whenever she sits down to put those funny looking shoes, I glue to her.
Ready, Mom? Let’s GO!

IMG_4699


I don’ t run. I get pampered. Only special dogs get the Kansas-Summer-Shave.

Are we jealous already?

IMG_4672

Jealous?  You must be kidding me!  You go ahead and stay laying on comfy carpets, I rather go golfing with Mom and Dad.  Who is special now?

BuckGolf2

Ok, let’s admit it. We are both equally spoiled. 

Sunning

Hope to see you soon, folks! Until next time we leave you with Mom’s regular blogging…


ONE YEAR AGO:  Strawberry Frozen Yogurt

TWO YEARS AGO: Baked Coconut and “The Brazilian Kitchen”

THREE YEARS AGO: Honey-Glazed Chicken Legs

FOUR YEARS AGO: French-Style Rolls

GRILLED CHICKEN WITH TAMARIND AND COCONUT GLAZE

For most people, there is such thing as a grilling season, and it’s starting right about now.  For us, the grill is going all year-long, no matter the temperature outside. We never stop. Of course, it is a lot nicer to be out  moving stuff around the grill wearing shorts and a t-shirt instead of a down jacket. Let me rephrase that: it’s a lot nicer to do anything wearing shorts and a t-shirt.

This is the perfect recipe for those busy days.  Boneless chicken thighs stay the whole day in the fridge, marinating in coconut milk, tamarind, and a few selected spices.  When you get home, bring the chicken to room temperature as you heat your grill and get your side dishes going.  The meat will be moist, tender, with the right amount of heat.  You will love this!

ChickenCoconutTamarind2

GRILLED CHICKEN WITH TAMARIND AND COCONUT GLAZE
(slightly modified from One Perfect Bite)

1/2 cup coconut milk (or yogurt)
1 tablespoons tamarind paste
1 clove garlic, minced
1/2 tablespoon kosher salt
1/2 tablespoon garam masala (or ground cumin)
1/8 teaspoon cayenne
6 boneless, skinless chicken thighs
1 lemon, cut in wedges
Sprigs of fresh cilantro for serving (optional)

In a large bowl, combine coconut milk, tamarind paste, garlic, salt, garam masala and cayenne. Add chicken and turn to coat well with marinade. Cover and refrigerate for 4 to 8 hours.

Remove chicken from  marinade, and grill for 8 to 10 minutes per side. You could also brown chicken in a skillet on stove, place on a baking sheet and finish cooking in a 375 degree oven for 20 minutes.

Garnish with lemon wedges and cilantro.

ENJOY!

to print the recipe, click

composite2

The classic substitution suggested for tamarind paste is lime juice, as the main purpose of the tamarind is to bring acidity into the equation. Of course, it’s acceptable, but the paste is one of those ingredients that once you start using, you will get more and more fond of.   Just like miso, it keeps forever.  You can use it in drinks, in desserts, in all sorts of recipes. Not sold yet? Let me share a few delicious options:

Tamarind-Glazed Honey Shrimp, from A_Boleyn

Chickpeas and Chana Dal Cooked Together in a Mint Sauce, from Eats Well with Others

Thai Red Curry with Pork Belly, from Rachel Cooks Thai

Creamy Peanut Chutney, from Love Food Eat

Prawn Sambal, from Sea Salt with Food

Indian-Spiced Pulled Pork with Tamarind Barbecue Sauce, from Angela’s Food Love

Tamarind Date Cake, from Dan Lepard

Tamarind and Fresh Ginger Cake with Lime Glazing, from Anh’s Food Blog

Mozambique Chicken, from The Perfect Pantry

Tamarind Rice (Puli Sadham), from Chitra’s Food Book

Agua de Tamarindo, from A_Boleyn

+++++++++++++++++++++++++++++++++++++++++++++++++++++++

ONE YEAR AGO: Chicken-Apricot Skewers

TWO YEARS AGO:  Asparagus Quiche

THREE YEARS AGO: Two-stage Pea and Prosciutto Risotto

FOUR YEARS AGO: Mellow Bakers: Corn Bread

SECRET RECIPE CLUB: DULCE DE LECHE CHEESECAKE BARS

Where is 2014 going in such a big hurry?  It acts as if it’s desperately searching for 2015 or something, hard to believe we are in the end of May already!  Still, each month closes with the secretive deliciousness of Reveal Day in the Secret Recipe Club. For those who may not know, it is that super fun event in which bloggers pick are assigned a blog in secret, choose a recipe to cook from it, and blog about it on the exact same day (and time!).  This month I went through several cycles of hyperventilation from the moment I got my assignment. Why, you may ask?  Because I received the blog of our group’s moderator!  Can you imagine that?  It’s like having to present a seminar on the research topic of the Head of your department!   Hummmm, come to think of it, I’ve done that a few times in the past couple of years.  No wonder I hyperventilate so much…  (inside joke, laugh if you get it).

Our moderator, Sarah, is the gorgeous hostess of the blog Fantastical Sharing of Recipes. She is the Mom of two kids, 7-year-old Matthew and 6-year-old Cambria, and also has two kittens, Bella and Muffin. That seems busy enough for me, but she talks about getting a dog to join the fun! Let’s hope she will think twice before getting a Jack Russell Terror…  😉  Apart from taking care of two young kids, she also supervises 37 grownup kids in Group D of The Secret Recipe Club. For the most part, I suppose we are well-behaved,  but undoubtedly there’s a lot of responsibilities on her shoulders. I went through her site with desserts and sweets in mind, hoping to bake something to take to our graduate students.  But a lot of savory options tempted me like her Atomic Hashbrowns (with a name like that, they gotta be awesome!), her Tamale BallsPhilly Cheesesteak Egg Rolls (fusion cooking, anyone?), and her Jalapeno Popper Turkey Chili.  After struggling with several options for sweets, I could not decide between her Blueberry Breakfast Braid. and the Dulce de Leche Cheesecake Bars.  I tossed a coin. Yes, I did.  And here is what the coin told me to do:

Bars1


DULCE DE LECHE CHEESECAKE BARS
(from Fantastical Sharing of Recipes)

for the crust:
1 sleeve graham crackers
2 Tbsp. sugar
3 Tbsp. butter, melted

for the filling:
12 oz. dulce de leche
2 (8 oz.) package cream cheese, room temp
1/2 cup sugar
2 eggs
2 tsp. vanilla

for the glaze:
4 oz. bittersweet chocolate, chopped
4 Tbsp. butter
2 tsp. corn syrup
1 Tbsp. heavy cream

Prepare an 8-inch square pan with parchment paper and non-stick spray.

Grind crackers with sugar in a food processor. Stir in butter. Cover the bottom of the pan pressing the crumbs well with your fingers. Bake at 325* for 10 minutes and cool on a wire rack for 5 minutes. Pour dulce de leche on the crust and refrigerate.

Make the filling:  beat cream cheese for 3 minutes. Add sugar and beat another 2 minutes. Add eggs and vanilla; beat just until incorporated. Spread filling on top of dulce de leche layer. Bake for 45 to 55 minutes. Cool for 2 hours.

For glaze: Heat all ingredients in a saucepan or double broiler, stirring until smooth. Cool for 10 minutes and pour over cooled filling. Chill for at least 30 minutes. Let sit at room temp for 10 minutes before cutting.

ENJOY!

to print the recipe, click here

composite

 Comments:  This was my first time making a cheesecake type dessert, so I was excited to try it, but a bit worried about my inexperience. My goal was to take these bars to our lab meeting, which happens early on Thursdays.  I laid out a nice schedule to make everything the evening before, taking in account that I had to meet Phil and a guest speaker for dinner at 8pm.  On my way home I stopped at the store to get the ingredients, arrived home and got busy. Each step was planned to the minute,  I was following along flawlessly. Flawlessly? Not so fast, Silly Sally… not so fast.  When making my list for the grocery store, I did not notice the recipe called for TWO cream cheese packages. TWO. I brought home only one.  Can you imagine the shiver up and down my spine? Can you picture my kitchen at that very moment? Can you, really?  Yeap.  Best laid plans.

Considering all my options and how fast the clock was ticking, I rushed back to the grocery store, faced the same cashier with a sheepish smile, and brought the second package of cream cheese home.  Drove like a maniac to the restaurant, joined the gentlemen for dinner, and…  found myself baking way past bedtime.  Best laid plans. Story of my life.

CheesecakeBars22


But, as usual, it all had a happy ending, although I should have remembered to bring a good knife to the lab to cut the squares.  The knife available at the department was definitely not up to the challenge, and my production did not look nearly as good as that from Sarah. I think the best way to cut a cheesecake is a very sharp knife, dipping it in hot water at each cut, and cleaning the blade with a paper towel as you go. Keep that in mind if you make this decadent dessert.   Decadent is a good way to define it, we are talking major caloric intake, but a little piece should satisfy even those with a very sweet tooth…   I wish I had made my own dulce de leche from scratch like Sarah did,  but that will have to wait for another opportunity.

Sarah, I had a blast with my assignment this month, I know it was not a secret for you, but that is part of the life of a moderator, right?  I also want to take this opportunity to thank you for always sending the assignments very early, giving us more than enough time to stalk, cook, and blog. I know that everyone from our group certainly appreciates that… 😉

If you want to check the labor of love of my fellow Group D members, click on the blue entity smiling at you at the end of the post.


ONE YEAR AGO: Penne with Trapanese Pesto

TWO YEARS AGO: Superman

THREE YEARS AGO: Spring Pasta

FOUR YEARS AGO: Ice Cream Melts for Mango


RASPBERRY BROWN SUGAR CHOCOLATE CHIP ICE CREAM

When I spotted this recipe during last month’s Reveal Day of Secret Recipe Club, I knew it was the perfect excuse to bring our Cuisinart ice cream maker out of its hibernation in the basement.  Raspberries offer their beautiful color and sharp flavor, brown sugar mellows it all down, the chocolate provides exciting contrast in texture, but what really sold me was the use of coconut milk. Wonderful!  So, allow me to share with you the first ice cream of the season!

IMG_4468
RASPBERRY BROWN SUGAR CHOCOLATE CHIP ICE CREAM
(slightly adapted from Nora’s site Natural Noshing)

3 cups coconut milk (full-fat)
3 eggs, lightly beaten
1 tsp pure vanilla extract
1/2 cup packed brown sugar
1 cup fresh raspberries, chopped
3/4 cup chocolate chips (I used 1/4 cup cacao nibs)
1 Tbsp lemon juice
.
In a saucepan, heat coconut milk until it bubbles slightly.  Remove from heat.  Stir coconut milk into beaten eggs. Return to saucepan.  Cook and stir for approximately 2 minutes or until heated. Remove from heat. Let it cool.  Cover and chill for 30 minutes.
.
In a mixing bowl, combine brown sugar with lemon juice.  Mix well.  Stir into chilled ice cream mixture. Cool the mixture for at least a couple of hours (or overnight).
.
Follow ice cream maker’s instructions and towards the end, stir in raspberries and chocolate chips/nibs.  Transfer to a container and place in the freezer.   Scoop some, and…
.
ENJOY!
.
to print the recipe, click here
.
Comments:  Nora modified the original recipe to use coconut milk, and what a great twist that was! The coconut flavor is not too intense, even people with coconut issues might not mind it in this preparation, as there’s a lot going on with the raspberries and the chocolate anyway.   I worried that the nibs could be too harsh in texture, that’s why I reduced the amount quite a bit.  You might want to play with this recipe and see how you like it best.  White chocolate chips could be perfect, although it might be a good idea to use mini-chips, keeping the whole thing more delicate and elegant.
.
I cannot tell you how much I enjoy Spring and with it the promise of Summer…
Sun, shorts, t-shirts, sandals, bright colors, lighter food, it’s all wonderful!
And frozen treats don’t hurt anything either!
.
YEAR2
(modified from a classic cartoon…)
.