SECRET RECIPE CLUB: RUSTIC CIABATTA AND MINI-MEATLOAVES

FOUR YEARS AS A MEMBER OF THE SECRET RECIPE CLUB!

Rustic Ciabbata with Dates.
It’s that fun time of the month again, Reveal Day of The Secret Recipe Club, a virtual event in which food bloggers are assigned a site in secret, then blog about a chosen recipe at midnight of Reveal Day. In two words: incredibly awesome. But what is more awesome than that is the blog I got this month. I almost passed out from excitement, thrill, and joy. Why? Because my assigned site is one of my favorites in the whole food blogosphere: Karen’s Kitchen Stories. Just to make an analogy, if blogging was like acting, my Secret Acting Club assignment would be Meryl Streep. Yeap, that awesome!   I’ve been reading Karen’s blog forever, I consider her as one of my personal gurus in bread baking. She is the type of baker who is not afraid to push the limits, moving easily from tangzhong type breads to bialys, baguettes, all sorts of rustic sourdoughs, Pullman type loaves, really amazing what she can do with flour, water, salt, and yeast, often wild (the yeast, not her).  At my last count, she’s got 247 bread recipes in her blog. Two hundred and forty-seven. You can collect your chin off the floor now. I bookmarked so many recipes that it was not even funny. Just to give you a small sampling of the breads that tempted me: Cheese and Herb Happy Bread,  Cinnamon Swirl Pumpkin Rolls , Corn and Jalapeno Rolls (oh, my!), English Muffin Bread (I really need to make this one!), Tangzhong Whole Wheat Bread (very interesting method), Kesra Moroccan Flatbread, Hawaiian Style Sweet Rolls (reminds me of my childhood in Brazil), Stuffed Pretzel Bites (O.M.G.!). Of course, that doesn’t include the breads from her site I already made like the delicious Ka’Kat. or Forkish’s Warm Spot Sourdough. But of course there’s a lot more than bread in her blog. For instance, if you like stir-fries, she has a section on Wok Wednesdays that is a must-follow, holding so far 57 entries.  The bottom line is, I had no choice but to make two recipes from her site. A rustic ciabatta, because it would be almost rude not to choose a bread from Karen’s blog, and some mini-meatloaves because they looked so incredibly cute, I could not stop dreaming about them…

Ciabatta Dates Flax2

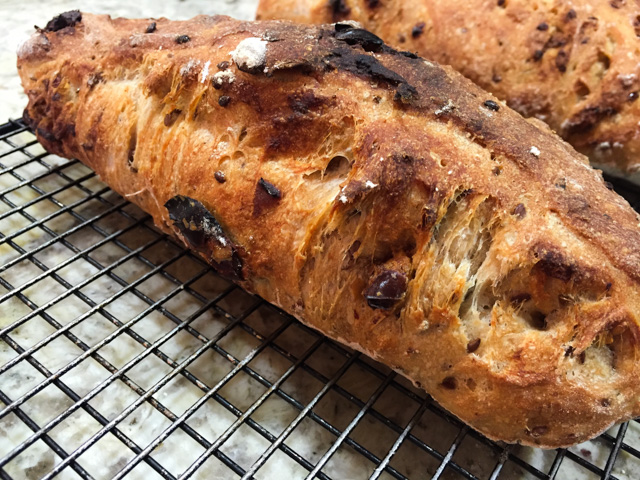
RUSTIC CIABATTA WITH DATES AND FLAX SEEDS
(from Karen’s Kitchen Stories)

for the soaker:
48 grams flaxseeds
72 grams (1/3 C) water
 .
for the poolish:
125 grams unbleached bread flour
125 grams (1/2 C) water
pinch of instant yeast
 .
for the final dough:
278 grams (~1 1/4 C) water
All of the poolish
300 grams unbleached bread flour
50 grams coarsely ground whole wheat flour
25 grams coarsely ground rye flour
10 grams (1 3/4 tsp) salt
2 grams (~ 3/4 tsp) instant yeast
All of the soaker
84 grams dried dates, seeded previously, cut into 1/2 inch pieces
 .
The night before baking day, mix the soaker and poolish in separate bowls. Cover both bowls with plastic wrap. Leave enough room in the poolish bowl for it to double in size.
.
The next day (about 12 to 16 hours later), measure the 278 grams of water into a large bowl or dough rising bucket. Add the poolish, and mix it into the water with your hand to break it apart. Add the flours, salt, and yeast, and mix the dough with your hands, stirring, pinching, and folding the dough to absorb all of the flour and dissolve the salt and yeast. When you pinch the dough, you should not feel any grit.
.
Once all of the ingredients are combined, mix in the soaker with your hand until evenly distributed. Add the dates, and mix to distribute. Cover the bowl with plastic wrap and let rise in a warm spot.
.
After 45 minutes, stretch and fold the dough over itself from all four “sides.” Repeat the 45 minute rest followed by a stretch-and-fold two more times (a total of 3 stretch-and-folds).  Let the dough rest for a final 45 minutes, covered, in a warm spot.
.
Scrape the dough out onto a lightly floured counter, and gently nudge it into a rectangle. Be careful not to deflate the dough. Using an oiled bench knife, cut the dough into three equal pieces. Pick each piece up with floured hands and place it on a floured couche or parchment lined baking sheet. Cover with the rest of the couche or oiled plastic wrap.  Let the dough rest for 20 minutes, while you heat the oven to 475 degrees F, and set it up with a steam pan on the lowest rack and a baking stone directly above it. Fill a spray bottle with water.
 .
When the oven is at the correct temperature, transfer the loaves to the baking stone (see notes above, or place the baking sheet with the loaves on it in the oven). Place a cup of boiling water in the steam pan (cover your oven’s window), and spray the oven walls with water. Quickly close the door.  Bake the loaves for 25 to 30 minutes, rotating halfway through. They are done when the internal temperature reaches 200 to 210 degrees F. Cool on a wire rack.
.

ENJOY!

to print the recipe, click here
.

ciabattacollage
.
Comments:
I made this bread in one of those perfect Saturdays!  Why? Because I woke up before 5am feeling super energetic, could hardly wait to get downstairs and play with my ingredients already measured since the evening before.  During the first 45 minutes rise I did a nice P90X yoga while the house was still dark, peaceful and silent…  As in a perfectly timed symphony, just as I finished my exercises, Phil woke up and made me a fantastic cappuccino…. the dogs immediately joined us in welcoming the weekend…Told ya: perfect Saturday!
.
Back to Karen’s ciabatta: the dough was a pleasure to work with, gaining strength at each folding cycle. In the composite photo above, the dough is shown after the last folding cycle, all plump and shiny.  I used whole flaxseeds, Karen used ground, but I followed the exact same method, including the volume of water to make the soaker. You can use whatever type of flaxseeds you have in your pantry.  Most important thing is not to deflate the dough too much as you coach it into the ciabatta shape. The less you mess with it, the better.  You will be rewarded with a ton of holes, a very airy bread, comme il faut.
.
Crumb shot
.

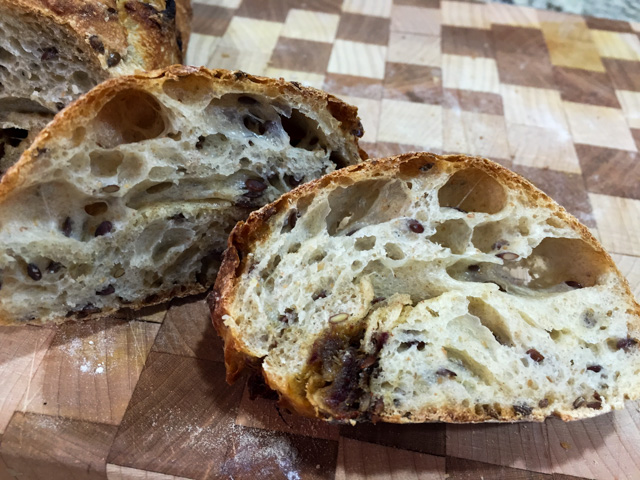
We both loved this bread! The dates offer a burst of sweetness that plays well with the almost sour nature of the dough given by the extended fermentation of the poolish.  Cut a slice, toast it very very lightly, top it with some Gorgonzola and you will have to tie yourself to your seat not to fly away in a magic carpet….   Awesome combo.

 +++++++++++++++++++++++++++++++++++++++++++++++
 .

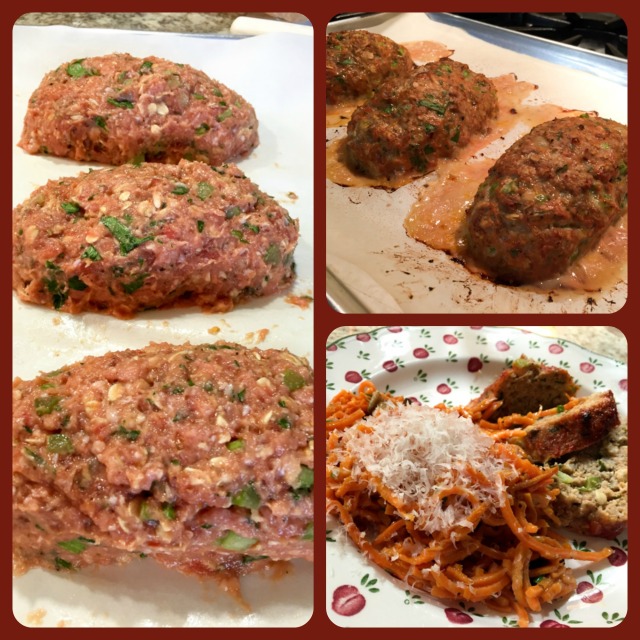
And now, for the bonus recipe from Karen’s site…  Adorable meatloaves in individual servings.  Her recipe used beef, I changed it slightly by using ground turkey.

miniloaves served11
.
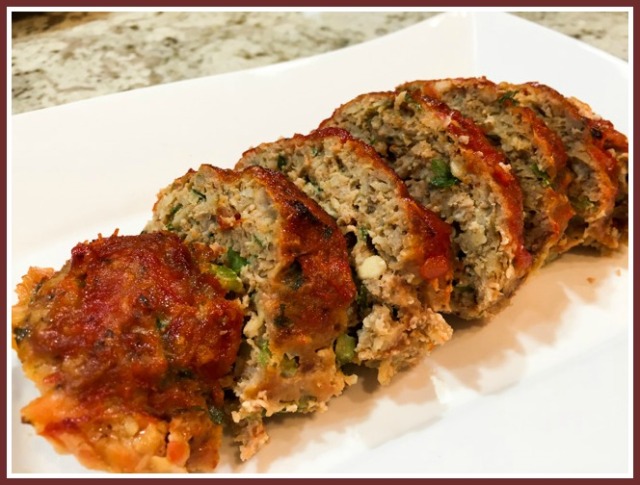
INDIVIDUAL MEATLOAVES WITH CHILI SAUCE

(adapted from Karen’s Kitchen Stories)
.
1 shallot, coarsely chopped
1 rib celery, diced
1/3 cup packed flat leaf parsley leaves
4 slices of bacon, cut into 1/2 inch slices
2/3 cup rolled oats
1/4 cup boiling water
1 pound 85% lean ground turkey
1/4 pound ground pork
2 large eggs
1 1/2 tsp Kosher salt
3/4 tsp freshly ground black pepper
1 cup jarred chili sauce, such as Heinz
 .
Spray a half sheet pan with spray oil and heat the oven to 400 degrees F. In a food processor, pulse the shallot, celery, parsley, and bacon several times until well chopped.  In a large bowl, combine the oats and boiling water and stir. Add the mixture from the food processor and combine.
 .
Break up the ground turkey and pork and add them to the large bowl. Whisk the eggs and add them to the meat and oat mixture. Sprinkle with the salt and pepper. Add 1/4 cup of the chili sauce to the meat mixture. Mix with your hands until everything is well mixed.
 .
Divide the mixture into four equal parts and shape each into a small loaf, placing them onto the baking sheet. Take 1/2 cup of the chili sauce, and brush it over the four loaves.  Bake the loaves on the center rack for about 25 minutes. Remove the pan from the oven and brush the loaves with the rest (1/4 cup) of the chili sauce. Turn on the broiler, and place the pan back on the center rack. Broil for about 5 minutes, until the chili sauce just begins to brown.
.
ENJOY!
.

to print the recipe, click here

 .

PicMonkey Collage11

.
These meatloaves were sooooo good!  The chili sauce is a must, do not skip it. They turned out moist, flavorful, spicy but not overly so. I served them with sweet potato noodles that were recently published in my guest post over at Foodbod. The recipe made 3 loaves and we enjoyed them for dinner, then I had leftovers for my lunch a couple of days in a row. Heaven. Just heaven. If I may make a public confession, I had some slices straight from the fridge. Cold. Yeah, standing up, with a Jack Russell staring at me wondering how long it would take for Newton’s Law of Gravity to work its magic in his favor. HA!  Not a chance!

Karen, I hope you enjoyed your assignment this month. It goes without saying that I spent the past 4  weeks anticipating this Reveal Day, anxious to share the recipes I made from your blog. For my readers, if you don’t yet know Karen’s Kitchen Stories, stop right now and go pay her a visit.  Not only she is a great baker and cook, but a very cool person with great sense of humor and wit.  Plus, she is the Grandma of two beautiful boys, and lucky to live very close to them, so it’s easier for her to spoil them rotten.  I intend to follow her footsteps and do my best to spoil Greenlee at every chance I get…   Maybe one day I can teach Greenlee to bake a chocolate cake for her Dad too. Oops, did I just use “teach” and “bake a cake” in the same sentence?  Excuse me while I go grab a thermometer. I might be running a very high fever… (sigh)

ONE YEAR AGO: Green Rice

TWO YEARS AGO: Potato-Crusted Italian Mini-Quiches

THREE YEARS AGO: Beetroot Sourdough for the Holidays

FOUR YEARS AGO: Cod Filet with Mustard Tarragon Crust

FIVE YEARS AGO: Soba Noodles: Light and Healthy

SIX YEARS AGO: Potato-Rosemary Bread

GREENLEE SWEETNESS

No words are needed…..

Greenlee1composite


greenlee composite2


(comments are shutdown for this post)

SPAGHETTI SQUASH PERFECTION

I considered calling this post Life-Changing Spaghetti Squash, but then decided it would be a bit much, after all many people don’t even care for it and rather have their lives unchanged, leaving the spaghetti squash behind at the grocery store.  However, if you are like me and happen to love the process of making the strands magically appear at the tines of the fork, then enjoy them with a little browned butter, or a hearty Bolognese sauce… you should consider this method.  You’ll need a pressure cooker with a steamer insert, and 8 minutes of your busy day.  Eight short minutes and you will be rewarded with the best ever spaghetti squash, the strands will have such great texture that you will not use another method ever ever again.

Instead of a regular recipe, I will walk you through the process, which starts exactly the same way as any other method… Cut the spaghetti squash in half and remove the seeds (I like to cut them crosswise but you can definitely do it lengthwise).

squash cut

Now, set up your pressure cooker with 1/2 cup water inside, and a steamer….

steamer

Place the spaghetti squash halves inside the steamer, it doesn’t matter if they don’t fit standing up, any placement will work fine….

pressurecooker

Close the pressure cooker, once it reaches proper pressure cook for exactly 8 minutes.  Open the pan right away by equalizing the pressure running the pan under cold water in the sink…. Marvel at the look of the strands, ready to be forked out without a single hard, uncooked spot….

8 minutes

Now, all you have to do is remove the strands to a serving platter, and enjoy the best, most perfect spaghetti squash ever, in record time!

Spaghetti Squash22

Comments: I eat a lot of spaghetti squash and have tried many methods to cook it. Most people like to roast it, but I intensely dislike doing so. More often than not I end up with chunks of the squash that never get tender enough to pull into strands, and then it’s a major pain, sticking it back in the oven or calling it a day and accepting the idea that some of it will be lost. One day I read about microwaving it, and it is an improvement in terms of time and convenience. You can cut it in half, remove the seeds, and microwave it for about 15 minutes.   It cooks a lot more evenly, but the texture suffers a little.  With the pressure cooker, all problems are solved: in 8 minutes you get spaghetti squash that will give you nice strands all the way through the skin. And the texture? Unbeatable!  I know not many people have a pressure cooker, but if you are a spaghetti squash fan, it’s almost worth getting one just for preparing it. Not to mention black beans, artichokes, brown rice….

😉

ONE YEAR AGO: Skinny Eggplant Parmigiana

TWO YEARS AGO: Supernova Meets Wok

THREE YEARS AGO500 Posts and The Best Thing I ever made

FOUR YEARS AGO: Back in Los Angeles

FIVE YEARS AGO: White House Macaroni and Cheese

SIX YEARS AGO: Korean-Style Pork with Asian Slaw

PIMP YOUR VEG, A GUEST POST!

Today I have a very exciting post to share!  Do you know the blog Foodbod hosted by Elaine? Great site for vegetarian recipes with an upscale gourmet flair. I’ve been following her blog for a while, and I can tell you that pretty much everything she blogs about makes me dream about being a guest in her dining room. She lives far away from me, we have half a continent and a huge ocean separating us, but the fun thing of the food blog world is that we can have virtual events that join us. Recently Elaine started a series on her blog entitled “Pimp your veg.” Her goal is to come up with ways to make veggie dishes more interesting and fun, and she does that like nobody’s business! I was thrilled when she invited me to contribute with a post for this series using the spiralizer, which is one of my favorite gadgets these days.  So, if you’d like to see what I came up to pimp my veggies, stop by Foodbod, and…. ENJOY!

This is the spiralizer I love…. Paderno, 4 blades

Cucumber Carrot Salad2

Elaine, I had a lot of fun composing the post for your blog!
Thank you so much for the invitation….


BRIGADEIROS DE MORANGO

Strawberry Brigadeiros

Say it like a native: repeat after me….


I grew up enjoying brigadeiros, probably the most popular food item in Brazilian birthdays and wedding celebrations. They are pretty much mandatory in such occasions. Then, last month we were at my niece Raquel’s home and when it was time for dessert she marched into the dining room with a humongous batch of brigadeiros sent by one of my cousins who could not join us that day. Brigadeiros, home-made with love! Most were the normal, chocolate type, but some were pretty wild, with a bright neon-pink color. “What are these?”  The answer puzzled me: “These are bicho de pé.” A literal translation produces something definitely unappetizing. Bicho de pé is a type of flea-like creature that lives in tropical swamps. Walking barefoot in those places carries a high risk of having those creatures set territory in the delicate flesh between your toes. They happen to look a lot like strawberry seeds, therefore the name. With this explanation, I just proved to you that Brazilians have a twisted sense of humor… At any rate, I rather go with  “strawberry brigadeiros.”  They are addictive. It’s hard for me to decide if they are better than the traditional ones, but… they put up a decent fight for first prize.  Easy to make and even easier to wolf down.  You’ve been warned!

Strawberry Brigadeiros2

STRAWBERRY BRIGADEIROS
(from the Bewitching Kitchen)

makes about 35 brigadeiros

2 cans of sweetened, condensed milk
2 tablespoons butter
1 package of strawberry gelatin
1 tablespoon of strawberry liquor (optional)
pink granulated sugar, or other coating of your choice

Add the condensed milk and butter to a saucepan, preferably non-stick. Cook over medium-low heat until the butter melts. Add the strawberry gelatin and the strawberry liquor, if using.

Cook, stirring constantly, until the mixture thickens and starts to release from the bottom of the pan.  Keep it in low to medium-low heat, and stir often so that it doesn’t burn at the bottom of the pan.  When it is thick, remove from heat and dump it over a half-sheet pan to cool faster. You can also simply transfer to a bowl and stick it in the fridge.

Pour about half a cup of granulated sugar on a small bowl. Reserve. When the brigadeiro mixture is cool, form little balls with a teaspoon, and roll on the palm of  your hand. If you wet your hands with cold water it is easier to roll, and also helps the granulated sugar to adhere.  Roll each ball on granulated sugar, and place in little paper cups.

Set the brigadeiros on a platter, and…

ENJOY!

to print the recipe, click here

PicMonkey Collage

Comments: Wanna try to guess how to say Bicho de Pe’? Hint: the “CH” in Portuguese has a sound of “SH.”  (try it then click on the sound file below to see how well you did)


Bicho de pé
is actually a registered trademark for these adorable candies. They were first made in a patisserie called “Amor aos Pedaços” (Love by the Slice) that opened in São Paulo back in 1982.  The person behind the store, Ivani Calarezi, made beautiful gourmet cakes and pies, and her customers could choose one, grab a slice (or several), and go. It was a huge hit. Today Amor aos Pedaços is a chain with 50 stores all over the country. From what I’m told, the quality is not compromised. Apparently Bicho de Pé was available since its opening, so it’s a bit surprising that I had never seen one until now. Better late than never!  I got the recipe from my cousin Yvone and made it right away after coming back home. A Halloween party was the perfect occasion…  Everyone loved them!

They are a little tangy, a little sweet, plenty delicious… You can use different gelatin flavors, raspberry, blueberry, to have a slightly different color and taste. You can coat with chocolate sprinkles or make a mixed batch with different coatings, whatever you decide to do, I know these will be a huge success. Kids will go crazy for them, adults will try to act with restraint. HA! Wish them luck with that… Everyone turns into a kid around a batch of brigadeiros

😉

tothefreezer

We freeze well too! Make a big batch, stick us in the freezer,
and we’ll be ready to party whenever you are…

ONE YEAR AGO: Pan-charred Veggies from Cooking Light

TWO YEARS AGO: Artichoke-Saffron Souffle

THREE YEARS AGO: Cinnamon-Wreath

FOUR YEARS AGO:  Yeastspotting 11.11.11
.
FIVE YEARS AGO: Oven-baked Risotto
.