Long name for a great side dish that might turn into a full meal if coupled with goodies such as barley, couscous, quinoa, or a nice helping of soft-cooked polenta… Once more the inspiration to make this recipe came from Fer’s site, Chucrute com Salsicha. She always shares interesting recipes that take ingredients through some unusual path. I love it!
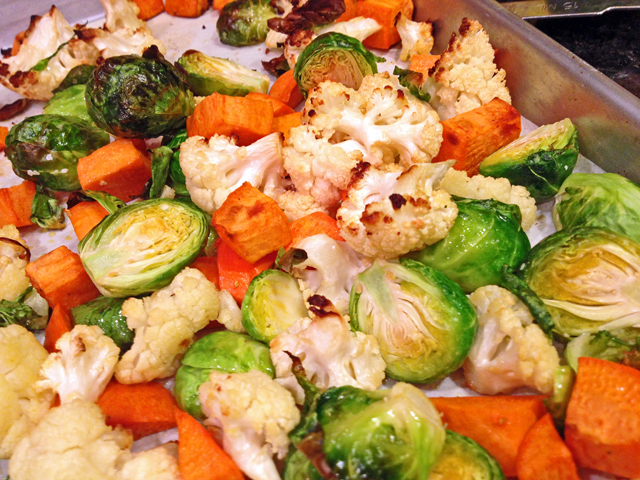
 ROASTED WINTER VEGETABLES WITH MISO-LIME DRESSING
(adapted from Chucrute com Salsicha, originally published in The Kitchn)
8 ounces Brussels sprouts, trimmed and halved lengthwise
1 medium sweet potato, peeled, cut in 1/2-inch cubes
1 medium head of cauliflower, cut into bite-size pieces
1 tablespoon olive oil (I needed to use a little more)
1/4 teaspoon salt
2 tablespoons lime juice
2 teaspoons yellow miso paste
2 tablespoons walnut oil
Black pepper
Preheat oven to 400°F.
Place sweet potato and cauliflower pieces on a large bowl. Place Brussels sprouts in a separate bowl. Drizzle all veggies with olive oil, sprinkle with salt and toss to thoroughly coat. Add the sweet potato and cauliflower to a baking sheet and roast, moving them every once in a while. Total roasting time for sweet potato and cauliflower will be about 25 minutes. After they have been in the oven for 10 minutes, add the Brussels sprouts.
Meanwhile, in a small bowl whisk together the lime juice and miso paste until smooth. Slowly drizzle in the walnut oil, whisking constantly, until thoroughly combined.
Place the roasted vegetables in a large bowl, pour in the dressing and toss to coat. Adjust seasoning. Serve warm or at room temperature.
ENJOY!
to print the recipe, click here
Comments: If you visit TheKitchn for the original recipe, you will notice they recommend using three baking trays, but Fer, in her version, simplified quite a bit, and I did the same. One large baking sheet was more than enough to handle all the veggies, just add them in the order they cook, Brussels sprouts going last. Other than that, the recipe was followed closely enough.
Miso and lime might become my favorite flavor combo for this year, the miso is sweet and funky, the lime is the life of the party, and if you ask me, a mandatory guest when Brussels sprouts are around. Fer served her veggies with barley, I went with Israeli couscous. But being the omnivores we are, this super delicious side dish was paired with (vegetarians, close your eyes now) grilled flank steak. A great dinner! Leftovers were amazing for lunch next day, by the way.

ONE YEAR AGO: 2012 Fitness Report: P90X2
TWO YEARS AGO: Caramelized Bananas
THREE YEARS AGO: Roasted Lemon Vinaigrette
FOUR YEARS AGO: Whole Wheat Bread