11 YEARS, TIME FOR GOODBYE

I guess it was bound to happen, sooner or later. Eleven years of blogging and all of a sudden I am forced to witness crowds and crowds of readers abandoning me. It hurts, but I feared that this post could cause it. Tofu. Has she gone nuts? Yes, now that you mentioned, cashews are also partners in this crime. If you are leaving me, I am sorry to see you go, and beg you to re-consider. I swear to you, this was one of the best things I’ve made in the past few months, and even “I” cannot quite believe how much we enjoyed it.  Soooo, will you stay? There shall be macarons soon…

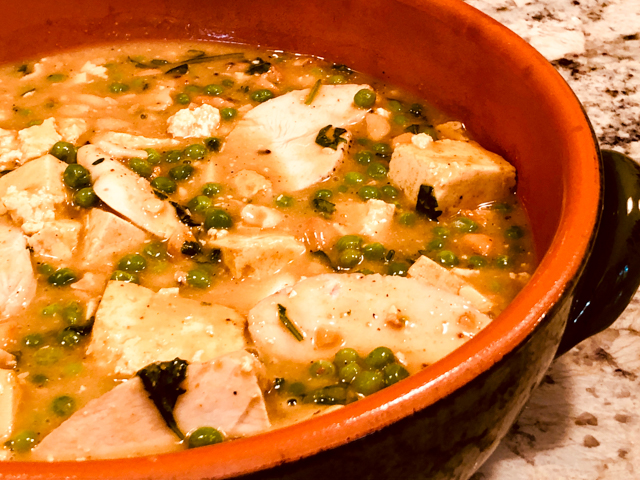
JEN’S CURRIED TOFU WITH PEAS AND CASHEWS
(slightly modified from Jennifer Guerrero’s blog

Heat oven to 350 degrees F.

1 pound extra firm tofu
2 Tablespoons peanut butter
2 Tablespoons soy sauce
1 Tablespoon curry powder
1 teaspoon onion powder
½ teaspoon pepper
2 Tablespoons honey
¼ cup water
2 cups vegetable stock or water
2 tablespoons cornstarch
2 cups peas (frozen is fine)
1/2 cup cashews (lightly toasted)

optional:
poached chicken breasts, sliced thin

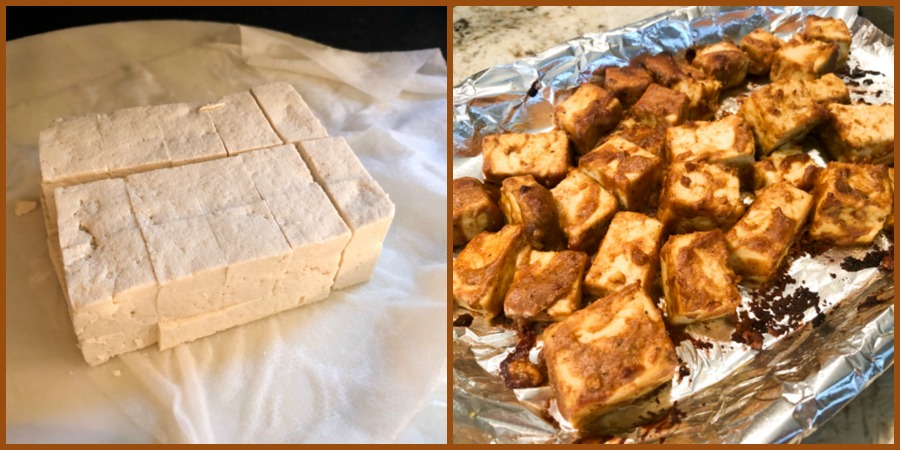
Slice the tofu in a checkerboard pattern and then right across its equator as you see in my composite picture after the recipe. Wrap in plenty of paper towels and put a heavy pan on it to drain while you do the rest of the preparation of the recipe.

In a medium bowl, whisk the peanut butter with the soy sauce, then add the spices, honey and water. Toss with the drained tofu, coating nicely. Spray a baking sheet generously with cooking spray, tip the tofu on in a single layer,  and bake for 30 minutes, flipping them over at halftime.

Whisk together in a saucepan the vegetable broth and the cornstarch. Turn the heat to medium, and when the stock is simmering, add the tofu along with the peas and cashews. If using chicken, add it now.  Stir until it is all lightly thickened, and serve over rice or riced cauliflower.

ENJOY!

to print the recipe, click here

Comments: I hope you stop by Jen’s blog to read her nice write-up about this recipe.  Interestingly, when I read her post about it, I had just bought some extra-firm tofu without any clear ideas of how to put it to use.  Serendipity. Don’t you love when that happens?

Now, I admit that I chickened out and added chicken (very sorry for this phrase, please don’t leave). I was unsure of how we would feel about the texture and taste of tofu, and decided that in case of a complete disaster, at least we could enjoy some animal protein with the peas and cashews. I used chicken breasts that I had previously cooked sous-vide, but you can poach it or saute with a bit of salt and pepper.

This was one amazing meal! It all works together nicely, the tofu gets a nice soaking with the spices and caramelizes a bit with the honey in that marinade. If you are vegetarian, you absolutely must make this. If you are not, you absolutely must make this, and go for the kill: omit the chicken. I guess that means going for the non-kill?  (very sorry for this phrase too, my apologies).

If you are anti-tofu, I hope this post will make you try it, just make sure you get the extra-firm. I know that tofu aficcionados like to use a special press to compact it before cooking, but I felt that the resulting texture was nice enough the way Jen recommended.

Jen, thank you so much for opening my cooking horizons, I love it…

ONE YEAR AGO: Salmon Tacos

TWO YEARS AGO: A Dream that did not come true

THREE YEARS AGO: Kaleidoscopic Macarons

FOUR YEARS AGO: Zucchini Noodles with Sun-dried Tomato Pesto

FIVE YEARS AGO: In My Kitchen, July 2015

SIX YEARS AGO: Sous-vide Pork Chops with Roasted Poblano Butter

SEVEN YEARS AGO: Roasted Strawberry-Buttermilk Sherbet

EIGHT YEARS AGO: Amazing Ribs for the 4th of July!

NINE YEARS AGO: Baby Back Ribs on the 4th of July

TEN YEARS AGO: Blueberry Muffins

ELEVEN YEARS AGO: A Pie for your 4th of July


BULGUR AND CHICKPEA SALAD WITH POMEGRANATE SEEDS

I’ve been on a bulgur kick lately. It is such a nice grain, cooks in less than 10 minutes and you can enjoy it warm or cold. In the version I share today, it showed up as salad, with a very simple lemony dressing with fresh mint from our own garden. Disclaimer: I take zero credit for any fruits, legumes or herbs grown in our backyard. The husband is the gardener in charge, and for that I am forever grateful. I am a certified mint-killer.

BULGUR AND CHICKPEA SALAD WITH POMEGRANATE SEEDS
(from the Bewitching Kitchen)

1 cup bulgur
1/2 tsp salt
1 can chickpeas, drained and rinsed
1/4 tsp paprika
2 Tablespoons olive oil
juice of 1 lemon
fresh mint leaves
fresh pomegranate seeds
1/2 preserved lemon, cut in small pieces (optional)
salt and pepper for final seasoning

Cook the bulgur in a large volume of salted water for 8 to 10 minutes. Drain and rinse briefly with cold water. Reserve.

Place the drained chickpeas in a microwave-safe bowl, sprinkle some paprika and microwave for 15 seconds or so. Let them cool briefly.  Add the chickpeas to the bulgur in a serving bowl. Add mint leaves to taste, drizzle olive oil and lemon juice, mix everything well. Finally add pieces of preserved lemons (if using) and pomegranate seeds. Adjust seasoning, and serve.

ENJOY!

to print the recipe, click here

Comments: The little step of microwaving the chickpeas for just a few seconds with a touch of spice is absolutely worth it. I read about it a long time ago and now I just incorporate in every recipe that calls for canned chickpeas. It brightens up the flavor, and since it is such a short “cooking” time, it does not affect the texture. It exorcises  that “tinned” feel out of them.

I added preserved lemons because I made some from scratch back in April and this salad was a perfect opportunity to bring them to play. You can omit or add orange segments together with the pomegranate seeds. Leftovers keep quite well, in fact I think the salad was better at lunch next day. I added a squeeze of fresh lemon juice, and a touch of additional salt. This will be in our regular rotation, I am sure.

ONE YEAR AGO: Purple Star Macarons

TWO YEAR AGO: Smoked Salmon, Fait Maison

THREE YEARS AGO: Kouign-Amann, Fighting Fire with Fire

FOUR YEARS AGO: In My Kitchen, Yin and Yang

FIVE YEARS AGO: Chocolate Toffee Banana Bread

SIX YEARS AGO: In My Kitchen, June 2014

SEVEN YEARS AGO:  Strawberry Frozen Yogurt

EIGHT YEARS AGO: Baked Coconut and “The Brazilian Kitchen”

NINE YEARS AGO: Honey-Glazed Chicken Legs

TEN YEARS AGO: French-Style Rolls


CAULIFLOWER FOR COMPANY? YES, PLEASE!

Let’s imagine for a moment that dinner parties are still “a thing.”  Those days feel like a lifetime away, but I know they will come back at some point. When? I have no idea. But when they do, allow me to offer a recipe for mashed cauliflower as your side dish. I promise you, this one will please every single one of your guests, even those who twist the nose at anything low-carb. The secret is topping the mash with roasted grape tomatoes (you can use yellow or a mixture).  It turns into a luscious, satisfying, flavorful side dish that will go well with pretty much any protein you are featuring as the star of your show.

MASHED CAULIFLOWER WITH ROASTED GRAPE TOMATOES
(from the Bewitching Kitchen)

1 large head of cauliflower
squirt of lemon juice
salt to taste
1/3 cup yogurt (low-fat is ok)
drizzle of olive oil
1 Tablespoon nutritional yeast (or grated parmigiano-reggiano to taste)
smoked paprika to taste
grape tomatoes (yellow or red)
1 Tablespoon olive oil
drizzle of balsamic vinegar
salt and pepper

Start by roasting the tomatoes. Place them as a single layer on a baking dish covered with aluminum foil. Drizzle the olive oil, balsamic vinegar, and season with salt and pepper. Roast at 400 F until they start to get golden brown and release some juices. Reserve.

Cut the cauliflower in florets and cook in slightly salted boiling water with a bit of lemon juice until fork-tender.  Add to a food processor (ok if a bit of water goes with it), and add the yogurt, nutritional yeast, olive oil, and spices. Process until smooth, taste and adjust seasoning, or even a bit more lemon juice if you like. Transfer to a baking dish. Top with the roasted tomatoes, but don’t add too much of the tomato liquid, just a little bit.

Place in the 400 F oven for about 10 minutes to warm everything together. If the mashed cauliflower is looking more on the dry side, you can warm up covered with foil. If it seems a bit loose, warm it with no foil on top.

Serve right away with the main dish of your choice.

ENJOY!

to print the recipe, click here

Comments: This was one delicious meal! The pork tenderloin is very similar to the one I shared recently, made in our smoker, with a bit less pepper. A little avocado and orange on the side, and we were ready to dig in. Felt like a dinner party…

ONE YEAR AGO: Coconut and Lime Macarons

TWO YEAR AGO: Flank Steak Carnitas

THREE YEARS AGO: Sesame and Poppy Seed Sourdough

FOUR YEARS AGO: Pecan-Crusted Chicken from Southern at Heart

FIVE YEARS AGO: Lamb Shanks en Papillote with Cauliflower-Celeriac Purée

SIX YEARS AGO: Chestnut Brownies and a Blog Award!

SEVEN YEARS AGO: Quinoa with Cider-Glazed Carrots

EIGHT YEARS AGO: Celebrate Wednesday: Heirloom Tomatoes Steal the Show

NINE YEARS AGO: Pain de Provence

TEN YEARS AGO: Golspie Loaf, from the Scottish Highlands


SMOKED PORK TENDERLOIN WITH ROASTED PARSNIPS

You know those dinners you think might turn out pretty tasty and they go on to blow your mind in the deliciousness department? This was it. I had never smoked a pork tenderloin, but it sounded like a simple, new way to enjoy one of our favorite cuts of meat. Parsnips are the classical example of under-rated root veggie, but paired with maple syrup and harissa? Yes, please. Great dinner, and thanks to social isolation quite doable any day of the week.

SMOKED PORK TENDERLOIN
(from the Bewitching Kitchen)

1 pork tenderloin, silverskin removed
olive oil to rub, about 2 Tablespoons
coarsely crushed peppercorns, about 1 Tablespoon
1 Tablespoon turbinado sugar
salt to taste
applewood for smoking

Mix the peppercorns and sugar in a small bowl. Dry the meat well. Rub with olive oil, then coat with a small amount of the spice mixture. Season with salt to taste.

Place in smoker set at 225 F with a small amount of applewood chips. Smoke for 3 hours.

Let it sit for 10 minutes, tented with foil. Slice the meat and serve.

ENJOY!

to print the recipe, click here

ROASTED PARSNIPS WITH MAPLE AND HARISSA
(from the Bewitching Kitchen)

Parsnips, peeled and cut in steak-fries style
4 Tablespoons olive oil
1 Tablespoon maple syrup
1/2 tsp Rosey Harissa (or substitute smoked paprika + harissa or other seasoning of your choice)
Salt to taste
(asparagus are optional)

Heat oven to 425F. Make a spice mixture with the olive oil, maple and Rosey Harissa or another seasoning of your choice.

Coat the pieces of parsnips with the mixture. Add to a roasting pan covered with aluminum foil, season with salt. Add a splash of water to the pan, cover with aluminum foil and roast for 20 minutes. Remove foil, add asparagus (if using), mix well and roast for 20 minutes more, until veggies are nicely browned.

ENJOY!

to print the recipe, click here

Comments: The Rosey Harissa spice has been on my list of things to try for a long time. I don’t even remember where I read about it for the first time, it’s been a while. I finally caved and ordered a bottle (it is a bit pricey), but I’m glad I did. It conveys a similar flavor of my recent passion (Ottolenghi’s Rose Harissa paste), but because it is dry, you can use it in different ways and it can sit in your pantry for a longer time. Smells wonderful.

The meat was tender, juicy, and with a nice hint of smoke. It went perfectly well with the roasted veggies.  I had some leftover asparagus sitting in the fridge, so I roasted with the parsnips, but you can omit that or even add other root veggies, just keep in mind their roasting times. Sweet potatoes, butternut squash, turnips, they would all work great.

I know not everyone has a smoker, so you can do a similar preparation cooking the pork tenderloin in the oven, after searing it on the stove top. Use smoked paprika to season it, and you will be on your way for a delicious meal.

ONE YEAR AGO: Fresh Take on Farro with Roasted Veggies

TWO YEARS AGO: Secret Recipe Club Reunion 2018

THREE YEARS AGO: Parsnip and Tomato Soup

FOUR YEARS AGO: A Retro Dessert

FIVE YEARS AGO: Cauliflower Tortillas: Going low-carb and loving it!

SIX YEARS AGO: Clementines in Cinnamon Syrup

SEVEN YEARS AGO: In My Kitchen, April 2013 

EIGHT YEARS AGO: Thrilling Moments

NINE YEARS AGO: Maple-Oatmeal Sourdough Bread

TEN YEARS AGO: Pork Trinity: coffee, mushrooms, and curry

OMG SPINACH PIES

Staying safe in Corona virus time: read the guest blog post by Phillip Klebba here. A video summarizing important tips can be found here

SPINACH PIES… Please, do not run away from me, I cannot take it. Times are stressful, I need your company. Hate spinach? Hate anything green? Fear not, this was quite likely THE tastiest savory recipe I tried this year. I know, it’s just April, but it’s a year that feels like a lifetime passing by. I will ask you to steam a ton of spinach and you might be a bit annoyed by that step. But once that’s done, you are basically there. Ready to enjoy one amazing side dish or fancy brunch item. Locked inside with no guests? Fancy Brunch for Two. Go with the flow…

SPINACH PIES
(slightly modified from The Washington Post)

(5 to 6 tartlet pans, about 4.5 inches in diameter)

20 ounces fresh baby spinach, rinsed
1 medium shallot, chopped
2 large eggs, beaten
10 ounces small-curd, low-fat cottage cheese
10 ounces grated Parmigiano-Reggiano cheese
1/4 teaspoon freshly ground black pepper
1/4 teaspoon freshly grated nutmeg

Set a steamer basket above simmering water. Place half of the spinach in the steamer. Cover and steam until just wilted, then drain and coarsely chop. Press with paper towels to remove as much moisture from the spinach as possible, then transfer to a large bowl. Repeat with the remaining spinach.

Heat oven to 350 degrees. Use cooking oil spray to grease the tartlet pans, then arrange them on a baking sheet. Add the diced shallot to the spinach, along with the eggs, cottage cheese, Parmigiano-Reggiano, pepper and nutmeg; stir to blend well. Divide evenly among the tartlet pans. Bake for 30 to 35 minutes, until browned on the edges and set in the center.

Wait 5 minutes before removing the little pies from the pans. Serve warm or at room temperature.

ENJOY!

to print the recipe, click here

Comments: Credit should go for the husband who noticed the recipe in The Washington Post and sent me the link. It was part of an article on Irish cooking, published right around St Patrick’s Day.  We were so impressed by these pies, not only tasty the day I made them, but two days later, very gently warmed in a low oven. I normally don’t care for low-fat cottage cheese, but it worked perfectly in this preparation. If using low-fat goes against your principles, by all means grab the regular kind.

I used tartlet pans from Wilton that have a loose bottom, so it’s easy to push them out to serve. The original recipe mentioned you could make 6 tartlets, but using these pans I made only 5. The same type of filling could work well as a real tart, over a crust (like the olive oil crust of my recent past), but this version is as light as it is flavorful.

I hope you make these pies. It is possible that it would work well with frozen spinach, but I much prefer the brighter taste that you get once you steam it yourself and use right away.

ONE YEAR AGO: Avgolemono Soup, My Way

TWO YEARS AGO: Sourdough Chocolate Twist Bread

THREE YEARS AGO: Dan Lepard Times Three

FOUR YEARS AGO: Turkey Portobello Burger

FIVE YEARS AGO: Raspberry Ricotta Cake

SIX YEARS AGO: In My Kitchen, April 2014

SEVEN YEARS AGO: Whole-Wheat Pasta with Lemony Tomatoes and Spinach

EIGHT YEARS AGO: Blood Orange Duck: A work in progress

NINE YEARS AGO: Grilled Mahi-mahi with citrus marinade

TEN YEARS AGO: Memories of Pastéis