CURRIED SWEET POTATO FRITTERS

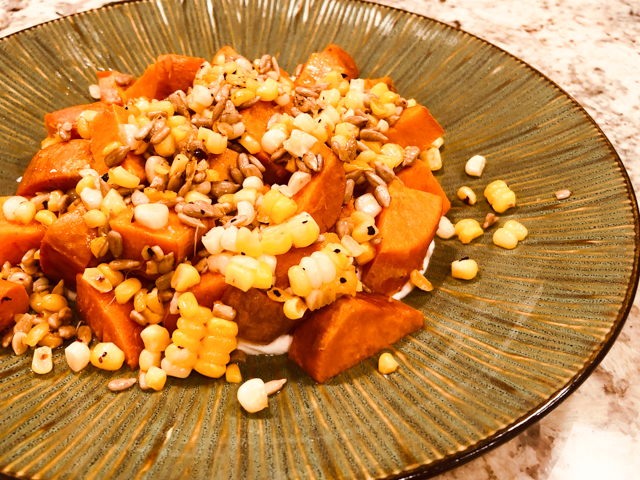
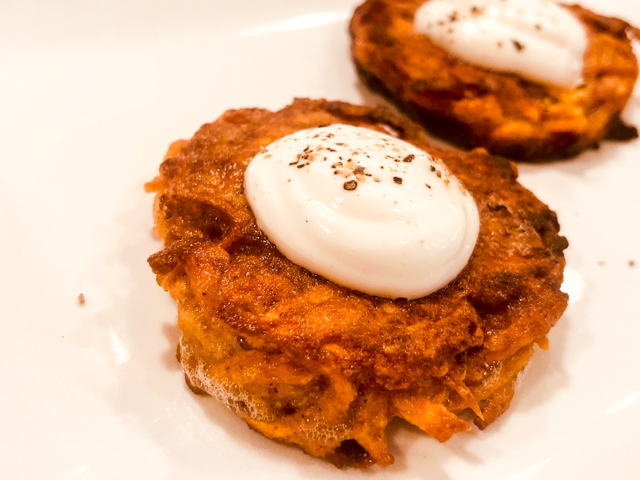
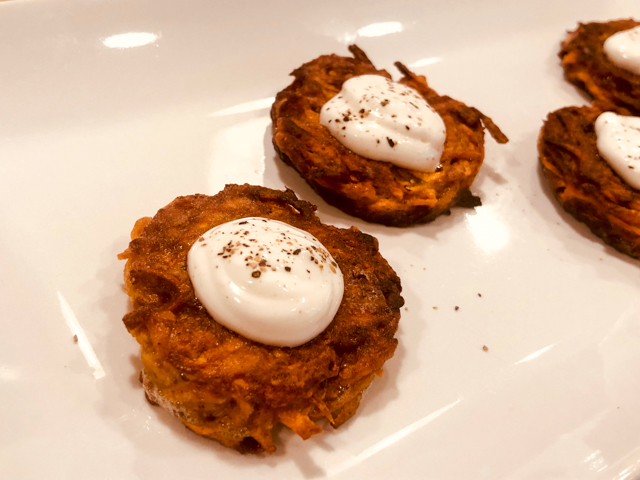
This is a wonderful take on sweet potatoes, that you could conceivably serve as a little appetizer, if you make them slightly smaller and use a lighter hand on the yogurt topping. Using cookie cutters to shape the patties makes the presentation very uniform and appealing, but of course if you don’t want to go through that step, simply add portions to the hot oil. They will be rustic but there’s really nothing wrong with that.

CURRIED SWEET POTATO FRITTERS
(adapted from Tea Time Magazine, November-December 2020)

for yogurt sauce:
1/3 cup yogurt
1 tsp agave nectar
1/8 tsp ground cardamon
1 Tbs lemon juice
pinch of salt

for fritters:
2 cups sweet potato, peeled and grated
1 egg
1/4 cup all-purpose flour
1/2 tsp curry powder
1/2 tsp salt
olive oil for shallow frying

Make the yogurt by mixing all ingredients in a small bowl, and keeping in the fridge until serving time.

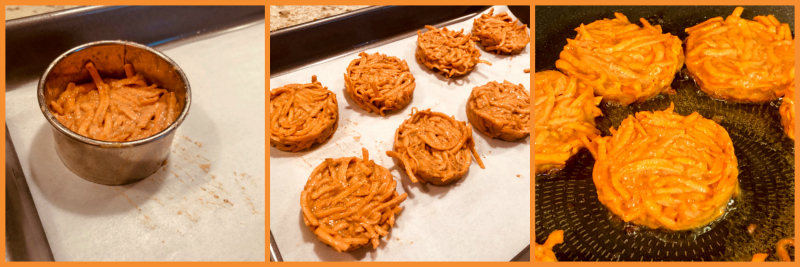
Stir together all ingredients for the fritters (except olive oil)  in a large bowl.  Place a 2-inch cookie cutter over a baking sheet lined with parchment paper. Place a little over 1 tablespoon of the sweet potato mixture inside the cutter, patting it flat. Carefully remove the ring and make a second one. Use all the potato mixture, you should have between 8 and 10 fritters. Refrigerate to firm the mixture up for about 20 minutes.

Heat the olive oil in a large non-stick frying pan and sautee the little cakes on both sides until golden brown. Drain on paper towels, and serve with a dollop of the yogurt sauce on top. You can keep the fritters in a low-oven for a while if needed.

ENJOY!

to print the recipe, click here

Comments: You can make the little patties way in advance and keep them in the fridge. In fact, I recommend you do that because they will keep their shape better as you cook them. I did not want to make them too thin, because they would get too soaked in oil, so after sauteeing both sides, I placed them in a 350F oven for about 10 minutes.

When I make them again, I will go Pollock on the sauce, I think it will look pretty cool that way. And yes, this will undoubtedly be one of those recipes to show up regularly in our kitchen. We both loved it!

ONE YEAR AGO: Miso and Sesame Roast Chicken with Revelation Quinoa

TWO YEAR AGO: Incredibly Simple Times Four

THREE YEARS AGO: Parsnip, Coconut and Lemongrass Soup

FOUR YEARS AGO: In My Kitchen, October 2016

FIVE YEARS AGO: Paleo Moussaka

SIX YEARS AGO: In My Kitchen, October 2014

SEVEN YEARS AGO: In My Kitchen, October 2013

EIGHT YEARS AGO: Bourbon and Molasses Glazed Pork Tenderloin

NINE YEARS AGO: Crimson and Cream Turkey Chili

TEN YEARS AGO: Taking a break from the nano-kitchen

ELEVEN YEARS AGO: Chocolate Chip Cookies

SWEET AND SPICY ROASTED CAULIFLOWER

Cauliflower is quite likely the most versatile vegetable out there. You can turn it into pizza crust. You can turn it into pasta sauce. It roasts well, it fries well, it mimics rice, it disguises as tabbouleh. I’ve seen recipes using it in brownies, but even with my mind open wide, I cannot quite embrace that aspect. In this recipe, it gets a tempura-like treatment, and into the hot oven it goes. I never expected to have to fight the husband for the last bits of cauliflower in the bowl, but that’s what happened.

SWEET AND SPICY ROASTED CAULIFLOWER
(inspired by Cook Eat Share Vegan)

Yogurt sauce:
150g full-fat yogurt
zest and juice of 1 lemon
1 teaspoon cider vinegar
salt to taste

panko breadcrumbs
1 head of cauliflower, broken into florets

for the batter:
70g g rice flour
pinch of sea salt
¼ teaspoon black pepper
¼ teaspoon baking soda
juice of ½ lemon
150ml milk

for the spicy sauce:
2 tablespoons gochujang (Korean red chilli paste)
2 tablespoons soy sauce
1 tablespoon apple cider vinegar
3 tablespoons agave nectar
50ml water

Heat oven to 420F and line a baking tray with foil or baking paper. Make the yogurt sauce by whisking all ingredients in a small bowl, and reserve in the fridge until serving time.

To make the batter, whisk the ingredients together in a bowl until smooth. Place the panko in a shallow baking dish.  Dip cauliflower florets in the batter and shake off any excess before dredging in the panko crumbs and placing on the prepared baking tray. Bake for 25 minutes or until crispy and golden.

As the cauliflower roasts, place the gochujang dressing ingredients in a saucepan, bring to a boil and cook for 5 minutes, or until smooth thick, adding a splash more water if it seems too thick. Transfer the baked cauliflower to a large bowl, pour over the dressing and toss to coat. Serve right away of keep in a low oven while you prepare the rest of your dinner, with the yogurt sauce on the side.

ENJOY!

to print the recipe, click here

Comments: This was the type of preparation that had me a bit nervous until I finally took the first bite. The Gochujang sauce looked like liquid lava as it reduced, and I thought that it could end up as something that would turn my Dad off for being too spicy (Dad used to eat hot peppers as if they were candy… I refer you to this story of my past if you like to be amused).

But both Phil and I loved it!  It definitely had enough heat but it was not overpowering. No need for Kleenex. At any rate, if you don’t like spicy food, this is definitely not for you. But where there’s a will, there’s a way:  use ketchup instead of kochujang and proceed with the recipe as written. I am sure it will be very delicious.

ONE YEAR AGO: Roasted Cauliflower Salad over Hummus

TWO YEARS AGO: Queen of Sheba

THREE YEAR AGO: Brunch Burger

FOUR YEARS AGO: Mango Salsa with Verjus

FIVE YEARS AGO: Raspberry Bittersweet Chocolate Chunk Brownies

SIX YEARS AGO: Scary Good Pork Burgers

SEVEN YEARS AGO: Review of exercise program Focus25

EIGHT YEARS AGO: Celebrate Wednesday with a Thai Seafood Curry

NINE YEARS AGO:  Post-workout Breakfast

TEN YEARS AGO: Semolina Barbecue Buns

ELEVEN YEARS AGO: Lavash Crackers


FROM MY HUSBAND TO YOU: ASPARAGUS STIR-FRY

Some veggies are so delicious that I tend to do as little as possible to prepare them, so they can shine on their own. But the other day the husband pulled an amazing dinner for us and the side dish blew my mind. Asparagus stir-fry that packed a ton of flavor and made us feel as if we were dining in a cool restaurant in Los Angeles. Just like we did during our sabbatical at UCLA years ago (it does feel like a previous life).  I insisted he should write a guest blog post about it, but he is quite busy wrapping up a review article, and food blogging is definitely not a distraction he needs. So, I did the altruistic, sensible thing, and composed the post myself. Because if you also have a soft spot for asparagus, you need this in your life…

ASPARAGUS STIR-FRY
(adapted from The Washington Post)

1 medium jalapeno chile pepper, seeded and thinly sliced
1 tablespoon olive oil
1 pound asparagus, trimmed and thinly sliced on a diagonal
1/4 teaspoon kosher salt
1 tablespoon soy sauce
3 tablespoons lemon juice,  divided
Zest of 1 lemon
1 teaspoon finely grated fresh ginger
1/2 cup fresh cilantro leaves with tender stems
toasted sesame seeds

Heat a large, non-stick skillet over medium-high heat until a drop of water sizzles on the surface. Add the jalapeno and olive oil, saute for a couple of minutes, until fragrant.  Add the asparagus. Sprinkle lightly with salt and cook, tossing occasionally, until the asparagus begins to brown around the edges, a couple of minutes more.

Add the soy sauce and 2 tablespoons of the lemon juice and cook, stirring constantly, until the asparagus is coated in sauce, but still firm, about 1 minute.

Add the lemon zest, the remaining tablespoon of lemon juice and the ginger. Toss to combine and cook, continuing to toss for 1 minute, or until ginger is fragrant. Remove the pan from heat. Transfer the asparagus to a platter and toss with cilantro and sesame seeds. Serve right away, perfect with grilled salmon.

ENJOY!

to print the recipe, click here

Comments: Looking at our served meal, you could conclude we love sesame seeds. And you would be 100% correct. They do go well with salmon and perfect with asparagus. This is a very simple and quick dish to put together, and would complement many main dishes, from beef to poultry.  Serve these asparagus over polenta and you can call it a great, satisfying vegan meal…

I have to say I am pretty lucky to have a partner who cooks dinner for us every other day. I love to cook, but it would get a bit tiring to do it every single evening.  We have different styles, I am always trying new recipes, whereas he tends to stick to his favorites. But every once in a while he finds a recipe and jumps on it. Like this one. It was a fabulous meal…

ONE YEAR AGO: The Best, The Very Best Hummus

TWO YEARS AGO: Chicken Katsu

THREE YEARS AGO: Whole-Lemon Marinade: Long Overdue

FOUR YEARS AGO: Tomato and Cucumber Salad with Almond Vinaigrette

FIVE YEARS AGO: Eggplant Tomato Stacks

SIX YEARS AGO: The Couscous that Wasn’t

SEVEN YEARS AGO: Apple-Cinnamon Bread

EIGHT YEARS AGO: Blueberry Galette

NINE YEARS AGO: In My Kitchen, August 2011

TEN YEARS AGO: Journey to a New Home

ELEVEN YEARS AGO: Friday Night Dinner

PICKLED-ROASTED CHICKPEAS WITH CASHEW CREAM

I share with you today another slightly unusual side dish, or main dish if you add to it a nice helping of couscous. It starts with chickpeas simmered in white vinegar, then roasted with smoked paprika. After pairing them with juicy tomatoes, the whole thing was dressed with the number one choice for vegans when they crave sauces like bechamel: cashew cream.  It has the advantage of being very low in saturated fat, so those who are watching their intake of all things butter and cheese, can indulge without worries.

PICKLED-ROASTED CHICKPEAS WITH CASHEW CREAM
(from the Bewitching Kitchen)

1 (15-ounce) can chickpeas, drained and rinsed
2 cups white vinegar
drizzle of olive oil
1/2 tsp salt or to taste
1/2 tsp smoked paprika or to taste
fresh tomatoes, cut into slices or small pieces
cilantro leaves (optional)

for the cashew cream:
1 cup cashews, soaked for 4 hours to overnight in a large volume of cold water
2 tablespoons lemon juice
salt to taste
1 cup water

Heat oven to 420F.

Bring the vinegar with a pinch of salt to a boil in a sauce pan. Immediately add the chickpeas, boil for 30 seconds, close the pan and remove from heat. Leave the chickpeas in the hot vinegar for 20 minutes. Drain.

Place the drained chickpeas in a roasting pan covered with aluminum foil. Drizzle the olive oil, season with salt and smoked paprika, rubbing them gently to coat well. Roast for about 25 minutes, until dark golden.  Remove them to a paper towel lined plate to cool.

Make the cashew cream. Place the drained cashews with lemon juice and salt into a Vitamix type blender, blend until almost smooth (it won’t turn completely smooth until you add water). Add the water slowly with the motor running. Add as much water as you like to achieve a smooth, creamy consistency.

Assemble the dish: place tomatoes on a serving platter, season lightly with salt, pepper, and a drizzle of olive oil. Spoon the roasted, cold chickpeas on top, and drizzle with the cashew cream. Decorate with cilantro leaves if desired.

ENJOY!

to print the recipe, click here

Comments: If you love pickled things, you will enjoy this take on chickpeas. If you are not too fond of the sharp taste of vinegar, simply skip that step and roast the chickpeas without simmering first. They will still be delicious, and complement the tomatoes well.

The cashew cream. This is a simpler version of one I made a few years ago.  I actually made a double batch and enjoyed it over smoked chicken fajitas, drizzled over roasted butternut squash, and replacing cheese on eggplant Parmigiana. The secret is to soak the cashews for several hours. You can speed up the process by using boiling water and letting them sit for 30 minutes or so, but I find that the taste is brighter and the texture better if you take the longer route. Next on my list is to use cashews as a base for “buttercream” in macaron filling. Perhaps with matcha flavor. Stay tuned.

ONE YEAR AGO: Twice-Baked Goat Cheese Souffle

TWO YEARS AGO: A Star from England in the Bewitching Kitchen

THREE YEARS AGO: Hommage to the Sun


ROASTED SWEET POTATO WITH CORN AND SUNFLOWER SEEDS

A few things make this recipe a bit unusual. First, the sweet potato is roasted at a low temperature, 300F. Second, it is served either barely warm or at room temperature over fridge-cold lemony yogurt. And finally, it gets crowned with a hot and spicy mixture of sauteed sunflower seeds and corn. I know it all sounds a bit crazy, but when the husband praised this side dish more than he did the bison chili that went with it, I knew I had hit gold.

ROASTED SWEET POTATO WITH CORN AND SUNFLOWER SEEDS
(adapted from Start Simple)

3 medium sweet potatoes
olive oil and salt to season potatoes
1/2 cup yogurt
1 tablespoon lemon juice
1 tsp harissa paste
Urfa pepper (or another ground chile pepper you like)
salt to taste
2 tablespoons grape seed oil
kernels of 1 ear of corn (raw or cooked)
1/4 cup sunflowers seeds, raw
drizzle of toasted sesame oil

Turn the oven to 300F. Rub the sweet potatoes with a little olive oil, season with salt. Roast for 60 to 75 minutes, until soft (it depends on the size of the potatoes). Let the potatoes cool to room temperature, the flesh will sink and the skin will peel off super easily.  Cube the flesh in the size you like. Reserve.

Mix the yogurt with lemon juice and harissa, season lightly with salt. Place in the dish you will use to serve the potatoes.  Add the cubed potatoes on top. Just before your meal, add grape seed oil to a non-stick skillet, when it gets nice and hot add the corn kernels, season with Urfa pepper and salt. Sautee until fragrant, add the sunflower seeds and cook until they start to get golden.  Immediately add the hot mixture over the sweet potatoes, and take to the table.

ENJOY!

to print the recipe, click here

Comments: There are two ways to make sweet potatoes truly special, sous-vide and low-temperature roasting. The latter is the easiest, and if you’ve never tried them prepared this way, you are in for a treat. It is really a lot better than the more common method of blasting it at higher temperatures, either whole or cut in pieces. Roasted, they can sit in the fridge waiting for you, perfect texture, to be used in all sorts of preparations.

We enjoyed it over bison chili (made with this recipe, but using ground bison instead of ground turkey). The yogurt tames that heat from the chili, acts as a refreshing breeze on a warm summer night. A delicious dinner, that will be on our menu for sure in the near future.  The husband already requested it…

ONE YEAR AGO: Five-Stranded Braided Bread

TWO YEARS AGO: Ptichye Moloko, a Russian Dessert

THREE YEARS AGO: Cheesy Low-Carb Zucchini Tarts

FOUR YEARS AGO: Blogging Hiatus

FIVE YEARS AGO: Apricots, Three Ways

SIX YEARS AGO: Up Close and Personal with Kale

SEVEN YEARS AGOBlack Berry Cherry Sorbet

EIGHT YEARS AGO: Asparagus Pesto

NINE YEARS AGO: Chocolate and Chestnut Terrine

TEN YEARS AGO: Under the spell of lemongrass

ELEVEN YEARS AGO: Greens + Grapefruit + Shrimp = Great Salad!