RUTABAGAS ANNA

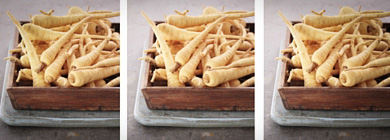
Talk about life not being fair. This poor veggie falls quite short on looks, no way to sugar coat that pill. But to add insult to injury, someone decided to name it rutabaga. I mean, c’mon!  “Go to sleep now, or the rutabaga will come and get you!” No wonder most people don’t even look at them at the grocery store. My friend Denise tells me that in England they are called swedes, a much more poetic name. I was intrigued, so a quick stroll through Wikipedia-Land brought the light at the end of the tunnel: the name has its roots in old Swedish. Rotabagge from rot (root) + bagge (short, stumpy object). so swede would be a natural choice to name these ugly ducklings.  Call it swede, rutabaga, white turnip, or snadger (yeah, that too), this recipe is absolute perfection.  I still cannot believe that two ingredients (sliced swedes and butter) plus a little seasoning could result in such a perfect side-dish. Pretty easy on the eyes too. So, get over their funky looks and unfortunate name. Bring them home, get slicing and cooking… Did I mention it is reasonably low-carb?
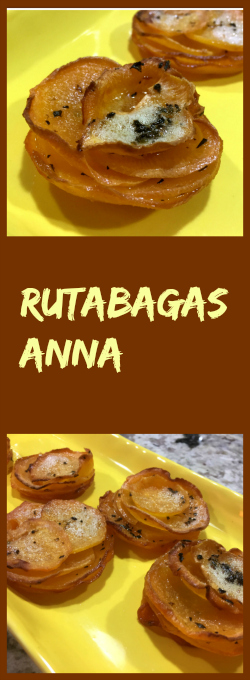
Rutabagas Anna1a
RUTABAGAS ANNA
(slightly modified from Ketogasm)

2 small rutabagas, thinly sliced
½ stick of butter
1 teaspoon dried thyme
2 teaspoons salt

Heat oven to 350 degrees. Slice rutabaga thinly using a mandolin or knife. Reserve the sliced rutabaga in a bowl. Melt the butter in a small saucepan over medium heat. Add thyme to melted butter and let it gently simmer for a couple of minutes.
.
Pour the melted butter herb mixture over the sliced rutabaga. Ensure the slices are evenly coated by rubbing them all with the butter using your hands. Gloves work wonders here…

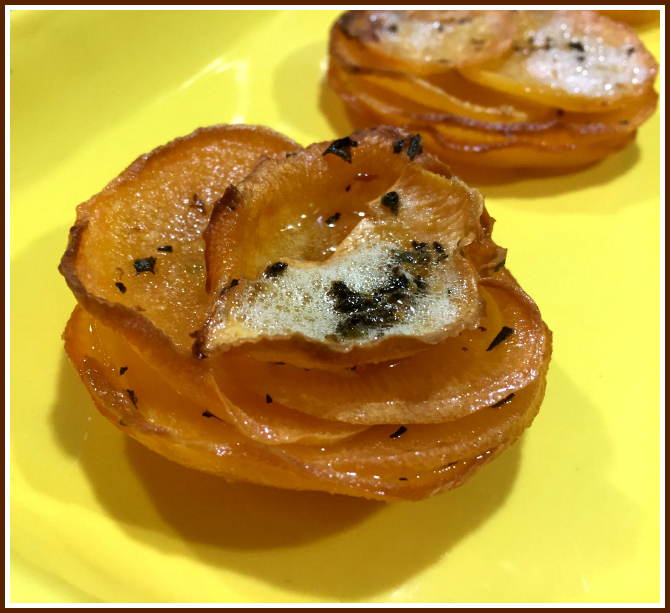
Arrange and layer the rutabaga slices, dividing among the muffin tins, larger slices at the bottom, overlapping smaller slices on top.   Drizzle any remaining butter over your rutabaga little towers. Cover the muffin tin with foil.

Bake for 35 minutes. Remove foil. Continue baking uncovered for an additional 25-30 minutes, or until the edges are golden and crispy.

ENJOY!

to print the recipe, click here

rutabagacomposite
Comments: I found this recipe over at Ketogasm, a blog that is new to me. Being a huge fan of Potatoes Anna, but rarely indulging in it, I thought that this version with a lower-carb root veggie could be worth trying. We both loved it. The rutabaga gets very creamy, with the crusty edges offering a nice contrast, very similar to the authentic Anna. I don’t usually like to mess with classics, but there’s really nothing  bad to say about this version.  My only recommendation is to add more slices to the muffin tin than you think you’ll need. The little towers collapse a lot during baking.  Next time I’ll start with three rutabagas and make 6 individual portions. We love our leftovers, and I am not finicky about warming up in the microwave for my lunch next day.  If you’d like to serve these for company, do the first step of baking, covered, and reserve. Twenty minutes before serving, finish them uncovered.  They keep warm for quite some time.  You can add different spices, perhaps. Smoked paprika sounds great, maybe a little cumin for a Southwest flair. Great side dish, satisfying without being too heavy.

Note to self:  Try alternating slices of rutabaga and sweet potatoes,
I bet it could look and taste wonderful too!


Rutabagas Anna, from Bewitching Kitchen

.
ONE YEAR AGO: The Ultimate Raspberry Sorbet

TWO YEARS AGO: Crispy Cornmeal Sweet Potato Fries

THREE YEARS AGO: Pan-grilled Tilapia with Smoked Paprika & Avocado Cream

FOUR YEARS AGO: Golden Saffron and Fennel Loaf

FIVE YEARS AGO: In My Kitchen, July 2011

SIX YEARS AGO: Heavenly Homemade Fromage Blanc

SEVEN YEARS AGOA Perfect Sunday Dinner


ZUCCHINI NOODLES WITH SUNDRIED TOMATO PESTO

One of the best acquisitions for our kitchen was the spiralizer. It is the type of gadget that requires a little bit of getting used to. When I first got it, the idea of dragging it out of the cabinet, setting it on the countertop, and getting my technique right so that the strands would be uniformly gorgeous… seemed a bit much. But trust me, the more you use it, the better you’ll be and the more you’ll fall in love with it. Now I don’t even blink, grab it, and try it on all sorts of veggies, broccoli stalks being the most recent. Stay tuned for that one… Should I call them “broodles?” Yeah, broodles. Mind. Blown. But anyway, zucchini is probably the number one veggie that everyone uses. They have the perfect shape and give super long and beautiful strands. Plus, they marry well with so many sauces: Oriental style like soy with peanuts plus a little fish sauce to hip-it-up, tomato based sauces, cashew cream, real cream, pesto, browned butter… Today I am sharing a recipe from a favorite food blog of mine. I’ve cooked many dishes from  The Iron You. Mike raved about the combination of sun-dried tomato pesto and zoodles. He is one smart cookie. It is superb! You must try it.

ZoodlesSundried11

ZUCCHINI NOODLES WITH SUN-DRIED TOMATO PESTO
(adapted from The Iron You)

for the sun-dried tomato pesto:
½ cup  oil-packed sun-dried tomatoes, drained
⅓ cup roasted almonds
4 tablespoons grated Parmesan cheese
4 tablespoons grated Pecorino Romano cheese
small bunch of fresh basil leaves
salt to taste
4 tablespoons olive oil

for the noodles:
6 medium-large zucchini

In a food processor (or blender) add roasted almonds and basil and pulse until roughly chopped. Add sun-dried tomatoes, Parmesan cheese, and Pecorino Romano cheese and process until a uniform paste has formed. Season with a little salt. With the food processor (or blender) running, stream in the olive oil and continue blending until the olive oil is emulsified into the pesto and the sauce looks uniform. Pesto can be stored in the refrigerator with a thin film of olive oil on top.

Using a spiralizer create zucchini noodles using your favorite blade, thin or thick, whatever you prefer.

Boil the zoodles in salted boiling water for 2 minutes, drain and mix with the pesto sauce while still very hot.  Sprinkle with additional Parmigiano cheese before serving.

ENJOY!

to print the recipe, click here

comp1


Comments:
Talk about a tasty pesto!  The texture of mine was not as smooth as the one Mike made, at least from the photos, but I don’t think that matters that much. If you prefer a smoother texture, process further and maybe add a little more olive oil.  I used roasted unsalted almonds, so I adjusted the seasoning with salt. Mike used salted almonds and he also used garlic, which I am sure most of my readers will enjoy too.  I fully agree that it was a match made in heaven with the zoodles.  We enjoyed it as a side dish with grilled pork tenderloin, but of course you could make it into a fully vegetarian meal if you add a few more goodies on the plate, like roasted asparagus, a big salad, or a crostini with a smear of goat cheese run under the broiler. Yeah, that sounds about right!

served11

Dinner is served!


Zoodles with Sundried Tomato Pesto


ONE YEAR AGO: Caprese Salad with Toasted Walnuts

TWO YEARS AGO: Oh, my God! I think I saw something!

THREE YEARS AGO: Celebrate Wednesday with Hoisin-Grilled Chicken and Soba Noodles

FOUR YEARS AGO: The Manhattan Project

FIVE YEARS AGO: Carrot “Nib” Orzo

SIX YEARS AGO:  A Sticky Situation

SEVEN YEARS AGO:  The Garden

WHEN THREE IS BETTER THAN TWO

Am I talking about the dogs again?
No, this time it’s a veggie thing…

triple

As far as vegetable purees are concerned I tend to be very conservative to allow the main ingredient to shine in all its glory. Yes, I’ve been known to mix two veggies together, for instance Broccoli & Spinach,  Carrot & Sweet Potato , or Cauliflower and Celeriac, but those are exceptions rather than the rule. However, the other day I was staring at the bag of parsnips I got with the intention of roasting them and faced a disappointing state of affairs. You’d think that those bagged creatures would all be more or less similar in size and shape? Don’t get your hopes high! They place one or two gorgeous specimens with a bunch of pencil-thin cousins. Pathetic.  I learned a lesson, of course, will never buy bagged parsnips again. I’ll pick them myself, thank you very much, and they will be all chubby.  But, I digress. I was staring at the parsnips and decided that they could work better in a puree of sorts. Since I did not have enough for a side dish, I also grabbed some carrots. And then, the tiny orange cauliflower winked at me.  So there you have it, not one, not two, but three veggies cooked together in harmony. I must tell you, this turned out much better than I expected, especially considering I kept it very simple. No exotic spices, no garlic confit, not even chicken stock… I let the veggies sing, and the music was gorgeous!

ParsnipCarrotMash

PARSNIP, CARROT AND CAULIFLOWER MASH
(from the Bewitching Kitchen)

1 tablespoon butter + smear of olive oil
3 celery stalks, diced
1 small head of orange cauliflower, florets only
5 parsnips, cut in chunks
4 carrots, cut in chunks
salt and pepper (go heavy on the pepper)
2 cups water

Heat the butter and oil in a large pan, add the diced celery, season lightly with salt and pepper and cook until translucent and fragrant. Add all the other veggies and cook in medium-high heat stirring occasionally for a few minutes. If necessary, add a tiny amount of olive oil to prevent the veggies from scorching.

Add the two cups of water, season with salt and pepper again, and cover the pan. Simmer for 25 minutes in low-heat. When veggies are tender, remove them to a food processor, leaving most of the water behind. Process and add more water if too thick.  Adjust seasoning, and serve right away.

ENJOY!

to print the recipe, click here

ingredients
Comments:
We were both quite impressed by how complex this puree tasted.  I think parsnips adds a lot with their distinctive taste: spicy, peppery, a bit citric almost. They change completely the flavor of the carrots and cauliflower. This mash has great texture and just the right amount of sweetness. Plus, the color is not too shabby either… When processing, don’t go overboard, I think having some chunks here and there add a lot to the dish. You might even skip the processing and mash it all by hand, whatever rocks your boat…

served

Dinner is served!  Simple grille chicken breasts, mashed veggies, and a salad.
Very delicious way to end a busy Monday.


ONE  YEAR AGO: Mini-quiches with Duxelles and Baby Broccoli

TWO YEARS AGO: Quinoa and Sweet Potato Cakes

THREE YEARS AGO: Pumpkin Bolo de Fuba’ Cremoso

FOUR YEARS AGO: Citrus-crusted Tilapia Filets

FIVE YEARS AGO: Bran Muffins, not just for Hippies

SIX YEARS AGO: Flourless Chocolate Cake


KADOO BORANEE: BUTTERNUT SQUASH PERFECTION

My first cooking post in 2016 needs to be special, and special it will be. Maybe you don’t like butternut squash, maybe you are anti-pumpkin in general, but even if you are, please bear with me.  I fell in love with this recipe from the moment I tried the first bite, not sure what to expect. Kelly blogged about it a while ago, a great post crowned with the sweetest photo of her and her husband on the evening they got engaged just a few months ago (wink, wink, wink). I can understand how this humble butternut squash preparation could leave such a strong impression. It is warm, it is creamy, it is luscious, at the same time refreshing due to the acidity of the yogurt. You must, absolutely must make it. Even if you live with a crowd of picky eaters who are afraid of squash. Dare them to try a little bite. They won’t be able to stop there.

Kadoo
KADOO BORANEE
(very slightly modified from Inspired Edibles)

for the butternut squash:
1 large yellow onion, coarsely chopped
3 Tbsp olive oil
1 pound butternut squash, cubed
1 Tbsp fresh ginger, thinly sliced
1 tsp ground turmeric
1 tsp ground cumin
1/2 tsp chili powder
1/2 tsp ground coriander
1/4 tsp ground ginger
1 Tbsp tomato paste
2 Tbsp coconut sugar
1/2 tsp sea salt
1 cup liquid (mixture of veggie stock + water)

for the yogurt sauce:
3/4 cup plain Greek yogurt
1/4 cup sour cream
good pinch of salt
1 clove garlic, smashed

for topping: 
toasted slivered almonds and dried mint

Make the yogurt sauce by whisking together: yogurt, sour cream, salt and garlic in a bowl – cover and place in fridge while prepping the remaining ingredients.

Purée onion in a small blender/food processor. In a separate small dish, combine the dry spices: turmeric, cumin, chili, coriander & ginger.

Meanwhile, heat oil in a large skillet over low-medium heat and sautée onion until golden. Add fresh ginger, and the ground dry spices: turmeric, cumin, chili, coriander and ground ginger, stirring until the seasonings are well combined and fragrant. Add tomato paste, broth, water, sugar and salt, mixing well to combine. Bring the mixture to a boil and add the cubed butternut squash.

Reduce heat and simmer covered for 10 minutes (lifting the lid to stir the squash once or twice during this time). Remove the lid for the remaining cooking time until the squash is tender but still holding its shape. Continue to stir the squash on occasion and use more water or stock while cooking, if needed. The goal is to have about 80% of the seasoned liquid absorbed into the squash while retaining the remaining liquid as a golden sauce.

Remove yogurt sauce from the fridge, reserve about 2 tablespoons, and spread the rest on plates to make a base for the squash. Top each yogurt base with some of the warm butternut squash, then add a bit more yogurt sauce on top, sprinkling the toasted almonds and dried mint right before serving.

ENJOY!

to print the recipe, click here

Kadoo2

Comments: This preparation goes to my personal Hall of Fame of Veggies. I cannot think of a better way to enjoy butternut squash, in fact it would work for all kinds of pumpkin, I am sure, as long as you respect their optimal cooking time.  As Kelly says in her post, you could omit the sour cream if you prefer to keep it lighter, but it does add a lot to the dish in terms of texture and also taste.  Try it exactly this way, you won’t be disappointed. I added toasted slivered almonds, my main modification to the recipe. I like the added crunch and feel that almonds go very well with squash and all the spices in the sauce.

Kelly, thanks for yet another great recipe!

Looking forward to more deliciousness coming from your blog…

 .holidays


ONE YEAR AGO: Creamy Broccoli Soup with Toasted Almonds

TWO YEARS AGO:
Fennel and Cheddar Cheese Crackers

THREE YEARS AGO: A Festive Pomegranate Dessert

FOUR YEARS AGO: My First Award!

FIVE YEARS AGO: A Message from WordPress

SIX YEARS AGO: Turkish Chicken Kebabs


HAVE A CRAN-MERRY CHRISTMAS!

For those who celebrate, Merry Christmas!  

For those who don’t, Happy Holidays!  

When I first arrived in the US  for my post-doc (bringing with me a pretty broken English), I thought that a straight translation from Portuguese (Feliz Natal) would work quite well to greet my friends. I had no idea that Merry Christmas is the greeting of choice. There is a very interesting story behind it, if you are fond of this type of trivia click here.  At any rate, if you happen to know a foreigner who is new to the US of A, do him or her a favor and make this point clear. My American colleagues were very sweet and graciously accepted my Happy Christmas,  until a good soul pushed me to the side and explained that even though there was nothing fundamentally wrong with happy, merry was the way to go. Now, would it be too bad to wish you a Cran-Merry Christmas? I hope not.  Cranberries are everywhere these days, they are appropriately red, cute, plump, go well in sweet and savory dishes, they are festive, and… I love them. Since it is the season of giving, I share not one but two recipes. Let’s start by sweetening up this festive day, shall we?

CranberryChristmasCake

CRANBERRY CHRISTMAS CAKE
(from Barefeet in the Kitchen)

3 eggs at room temperature
2 cups sugar
3/4 cup butter, softened
1 teaspoon vanilla
2 cups all-purpose flour
12 oz fresh cranberries

Heat oven to 350 degrees. With a mixer, beat the eggs with the sugar until slightly thickened and light in color, about 7 minutes. The mixture should almost double in size. The mixture should form a ribbon when you lift the beaters out of the bowl. Add the butter and vanilla; mix two more minutes. Stir in the flour until just combined. Add the cranberries and stir to mix throughout.

Spread in a buttered 9×13 pan. Bake for 45 to 50 minutes, or until lightly browned and a toothpick inserted near the center of the cake comes out clean. Let cool completely before cutting into squares.

ENJOY!

to print the recipe, click here 

baked
Comments: This cake is a must-make. Period. First there will be a bit of a surprise from the sharp tartness, but then everything mellows down into the perfect amount of sweetness. Quickly you’ll realize that behind its adorable face lies danger. One piece will very likely lead to a second one. Maybe a third… I baked it around 6pm for a small reception we were hosting a couple of hours later, so I could not quite let the cake cool completely before slicing it. No harm was done, though.  Next day it was even better, I think the flavor of the cranberries permeated the crumb a little more. It was perfect to start the day with a cup of coffee.  So there you have it, a very simple cake to prepare, huge pay-off in taste. You are very welcome….

divider

And now that we got the sweetness taken care of, let’s take cranberries on another culinary adventure: Cranberry Sauce, a mandatory side dish at Thanksgiving.  So tasty that it should never be limited to one day of your year. When it comes to cranberry sauce, you will find countless versions, often using ingredients like Port wine, dried figs, pomegranate molasses, all sorts of exotic additions that promise to make it truly memorable. Not that theres’s anything wrong with it, I even have one such version in the blog.  However, when I saw Dorothy’s recipe and read her comments about it, I knew I had to try it myself. She went through many recipes, always coming back to this one. Simplicity, few ingredients, 15 minutes of your time.

Cranberry Sauce-2
BEST EVER CRANBERRY SAUCE
(from Shockingly Delicious)

1 1/4 cups granulated sugar
3/4 cup water
1/4 teaspoon ground cloves
1/4 teaspoon ground allspice
1/2 teaspoon ground cinnamon
1 (12-ounce) bag fresh cranberries
Zest of 1 orange (orange part only)

In a large, heavy saucepan, add sugar, water and spices and cook, stirring often, until sugar dissolves, syrup is clear and comes to a rolling boil, about 3 minutes. In a colander, rinse and pick over the cranberries to remove any mushy ones. Add cranberries to boiling syrup and continue cooking, uncovered, just until they begin to pop, about 2-3 minutes (set the timer). Be careful not to cook them too long or they will get mushy.

Remove from heat, stir in orange zest and cool to room temperature, uncovered. Ladle into clean jars or plastic containers, label and refrigerate until serving time.

Makes about 2 1/2 cups sauce, enough to serve 6-8.

ENJOY!

to print the recipe, click here

Comments: I had no intention to blog on this recipe until I tried the sauce. It was everything Dorothy promised it to be. The spices are just right, and the texture of the cranberries spot on. I think I’ve always over-cooked my cranberries thinking that was the way to do it. Trust Dorothy’s directions, set the timer, stop the cooking even though you think it’s not nearly enough. We had one vegetarian guest at our  home for Thanksgiving who arrived from India just a few months ago, so it was his first Thanksgiving and first contact with cranberry sauce. He absolutely loved it, in fact I almost wanted to take a picture of his plate, he had a bit of mashed potatoes and this humongous amount of cranberry sauce all around it… Made my day!

divider

ONE YEAR AGO: Merry Christmas!

TWO YEARS AGO: The Avocado Mousse that Stole the Show

THREE YEARS AGO: Sourdough Popovers

FOUR YEARS AGO: Merry Christmas!

FIVE YEARS AGO:  Sourdough Focaccia, with a twist

SIX YEARS AGO: Merry Christmas!