PEARLED FARRO WITH ASPARAGUS COINS

A few years ago I posted a pasta recipe using tiny little asparagus coins as a component of the sauce. The other day I decided to roast them and ended up with a side dish that won me over. Added bonus: it is super fast to prepare. Pearled farro cooks a lot faster than the regular grain, and I did not detect any loss in flavor or texture. If you find it in your grocery store, stock on a few bags.

PEARLED FARRO WITH ROASTED ASPARAGUS COINS
(from the Bewitching Kitchen)

3/4 cup pearled farro
asparagus stalks, cut in very small rounds
2 Tablespoons olive oil
salt and freshly ground black pepper to taste
Herbes de Provence
squirt of lemon juice

Heat oven to 420F.

Bring a large pot of salted water to boil. Add the farro, cook for 15 to 20 minutes. If you like it with a bit more bite, check at 15 minutes and if it’s done to your liking, drain and reserve.

Meanwhile coat the asparagus coins with olive oil, season with salt, pepper, and Herbes de Provence, amounts are flexible, just go with your intuition. For a regular size asparagus bundle I used 1/4 tsp Herbes de Provence.

Place the asparagus in a single layer in a baking dish covered with aluminum foil to facilitate clean-up. Roast for about 15 minutes moving it around the baking sheet.  When they are done, squirt some lemon juice, adjust seasoning and mix with the warm farro.  Serve right away. Leftovers are great also. Even cold as a salad.

ENJOY!

to print the recipe, click here

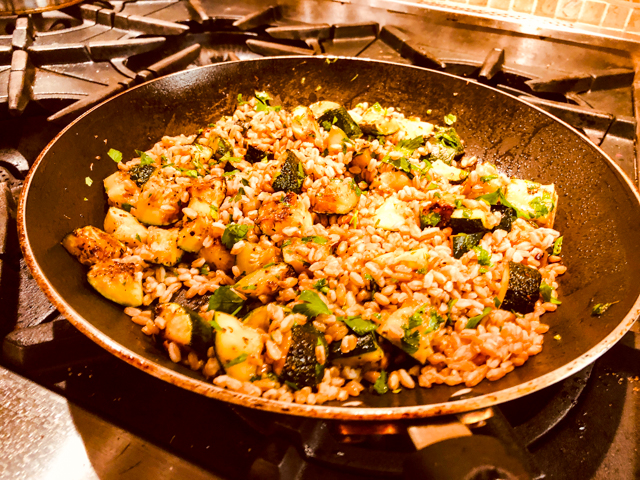
Comments: Many variations are possible here. If you don’t want to roast the asparagus coins, simply sautee them quickly in olive oil plus all the spices. Because the coins are so tiny, they cook very fast, so doing the top of the stove method, they can be ready in 5 minutes for sure. The roasted version has slightly more intense flavor. The second picture shows a similar approach (top of the stove), but using zucchini. Also very delicious.

I use farro a lot, but was a bit unsure about trying the pearled version, thinking it would not be nearly as good. I was wrong. It is a way to make farro a suitable option for a fast side dish after a busy day in the lab.

I hope you’ll give this simple recipe a try.

ONE YEAR AGO: Pistachio Caramel and Apple Mousse Cake

TWO YEARS AGO: Someone turns 70 today!

THREE YEARS AGO: Carioca Cake, the Final Chapter

FOUR YEARS AGO: Duck Confit for a Special Occasion

FIVE YEARS AGO: Ken Forkish’s Warm Spot Sourdough 

SIX YEARS AGO: Bran Muffins, Rainbows, and a wonderful surprise!

SEVEN YEARS AGO: Salmon Wellington

EIGHT YEARS AGO: The Green Chip Alternative

NINE YEARS AGO: Weekend Pita Project

TEN YEARS AGO: Let it snow, let it snow, eggs in snow


CHICKPEAS AND ZUCCHINI WITH TAHINI SAUCE

This side dish was the marriage of two regular appearances in our kitchen: quickly sauteed zucchini and air-fried chickpeas. The union was celebrated with a nice amount of tahini sauce.  I tell you, this worked very very well. If you don’t have an air-fryer, roast the chickpeas in a 400-420F oven. It takes longer and the texture won’t be quite as crunchy, but it will work just fine.  I intended to sprinkle pomegranate seeds right before serving for a little extra bling, but of course that day the grocery store had ran out of them. Best laid plans.

LEMONY ZUCCHINI AND CHICKPEAS WITH TAHINI-SAUCE
(from the Bewitching Kitchen)

for the tahini-sauce:
1/3 cup plain full-fat yogurt
1/8 cup tahini paste
juice and zest of 1 lemon
2 tsp honey
salt to taste
water if needed
for the veggies:

3 small zucchini, sliced in half lengthwise, then thinly sliced
1 tablespoon olive oil
salt and pepper
juice of 1 lemon
1 can chickpeas, well drained and dried
olive oil to coat chickpeas
1 tsp smoked paprika
1/2 tsp cumin
salt to taste
fresh parsley
(pomegranate seeds if you have them)

Make the tahini sauce: whisk all ingredients in a small bowl. Reserve.

Make the air-fried chickpeas.  Coat them lightly with olive oil, add the spices and place them in the air-frier set at the highest temperature (usually 390F) for about 12 minutes. They should be crunchy and golden brown.  Reserve.

Heat the olive oil in a 12-inch non-stick skillet, add the zucchini covering the whole surface, season with salt and pepper. Let the slices cook undisturbed until the side in contact with the pan is well seared. Move the slices around and cook until done. Sprinkle lemon juice all over, cover the pan for a minute, remove the lid, add the chickpeas and parsley.  Serve immediately with the tahini sauce on top.

ENJOY!

to print the recipe, click here

Comments: When I was a child, teenager or even young adult, you could not bribe me to eat chickpeas, which in Portuguese have the non-appealing name of “grão-de-bico”. It translates – loosely – as “the grain of the beak”. They can also be called “ervilha-de-galinha”, which ends up as “chicken’s green peas”. Yeah, very sexy. How could anyone consider that a delicacy? Anyway, now I crave it. Go figure.

Leftovers were delicious a couple of days later. In fact, I found out that air-fried chickpeas, when microwaved just enough to make them warm, get a nice texture, a bit more creamy inside. My lunch coupled this tasty concoction with a fried egg on top.  I was smiling the whole afternoon.

ONE YEAR AGO: Mokonut’s Rye Cranberry Chocolate Chip Cookies

TWO YEARS AGO: Incredibly Simple Times Four

THREE YEARS AGO: Going naked, and my husband loved it

FOUR YEARS AGO: Cream Cheese Mini-Pancakes with Smoked Salmon

FIVE YEARS AGO:  Star-Shaped Chocolate Brioche Bread

SIX YEARS AGO: Blueberry-Banana Bread 

SEVEN YEARS AGO: Into the Light Again

EIGHT YEARS AGO: Five Grain Sourdough Bread

NINE YEARS AGO: The Nano-Kitchen

TEN YEARS AGO: Kaiser Rolls


ROASTED CAULIFLOWER SALAD OVER HUMMUS

We are back from a month-long trip to England, where I had the pleasure of eating twice at Ottolenghi and once at Dishoom.  Both restaurants focus on Middle Eastern food, and both serve dishes absolutely packed with flavor. No matter what you order, it will feel like an explosion of flavors: hot, bright, lemony, spicy, with contrasting textures to make it all even more appealing. I came back home with the goals of being a bit less timid with how I season our food, and also of expanding my horizons as far as veggie side dishes are concerned. It’s not a secret that I have a weak spot for hummus and all things chickpeas. Hummus is great as a dip, but it is quite amazing when coupled with roasted veggies such as cauliflower. This recipe will prove it to you…

ROASTED CAULIFLOWER SALAD OVER HUMMUS
(from the Bewitching Kitchen, inspired by Simple)

for the salad component:
florets from 1 large cauliflower
1 teaspoon smoked paprika
1 teaspoon cumin seeds
olive oil to coat cauliflower
salt and pepper
⅓ cup walnuts, toasted
½ cup chopped green olives
parsley leaves to taste, chopped
juice and zest of on large lemon

for the hummus:
14oz can of chickpeas, drained and rinsed
2 tablespoons tahini
1 teaspoon ground cumin
1/2 teaspoon cayenne pepper
salt and pepper to taste
olive oil  to taste (less than 1/2 cup)
lemon juice to taste
water if needed to adjust consistency

Heat oven to 400°F.  Coat the cauliflower florets with olive oil, add all spices and mix well. Place in a single layer in a roasting pan and roast for 35 to 40 minutes, until golden brown and cooked through. Toast the walnuts on a dry, non-stick frying pan over medium heat until fragrant. Reserve.

Make the hummus by processing the chickpeas with the tahini, cumin and cayenne pepper. Season with salt and pepper, and with the processor running add the olive oil until it gets a creamy consistency. Add lemon juice, taste and adjust seasoning. If needed, add cold water to thin the hummus. Reserve.

Assemble the dish: in a large bowl, mix the roasted cauliflower florets with the walnuts, green olives, parsley and lemon juice.  Drizzle a bit of olive oil right before serving over hummus.

ENJOY!

to print the recipe, click here

Comments: This was absolutely scrumptious! You could conceivably omit the hummus, but it adds a lot to the dish. It would stand as a full vegetarian meal if coupled with items such as farro, couscous, or bulgur wheat. We enjoyed it with boneless chicken thighs marinated in yogurt & smoked paprika, with a bit of plain rice. It was our first dinner after coming back home, jet-lagged, tired, but looking forward to sleeping in our own bed, with three very happy pups nearby. I missed them so much…


Dinner is served!

ONE YEAR AGO: Sous-vide Egg Bites

TWO YEARS AGO: Paul Hollywood, The Weekend Baker

THREE YEARS AGO: Texas Sheet Cake

FOUR YEARS AGO: In My Kitchen, September 2015

FIVE YEARS AGO: Sour Cherry Sorbet: A Labor of Love

SIX YEARS AGO: In My Kitchen – September 2013

SEVEN YEARS AGO: Raspberry Sorbet at Summer’s End

EIGHT YEARS AGO: When three is better than two  (four years with Buck!)

NINE YEARS AGO: Grating Tomatoes (and loving it!)

TEN YEARS AGO: A Peachy Salad for a Sunny Day

FRESH TAKE ON FARRO WITH ROASTED VEGGIES

Grains and roasted veggies are a classic combination, one that I like a lot and shows up at our table on a regular basis. But lately I’ve incorporated a small extra step into it, and it is a game changer.  Interesting expression, by the way. From my “foreign perspective”, it is not necessarily a good thing.  After all, if the game is going well, a game changer would ruin it.  But the term, adopted by the Oxford dictionary very recently (2012), always has a positive connotation. Which makes it perfect to describe the addition of fresh veggies right before serving this dish. Game-changing. I promise.

FARRO WITH ROASTED VEGGIES
(from the Bewitching Kitchen)

1 cup farro
5 carrots, peeled and cut in sticks
bunch of asparagus
drizzle of olive oil
1/2 tsp smoked paprika
salt and pepper to taste
yellow grape tomatoes, cut in half
fresh lemon juice to taste

Fill a large pot with salted water and bring to a boil.  Add the farro and cook (as if cooking pasta) until al dente. Cooking time will depend on many factors, start checking at 25 minutes, it might take 40 minutes or a tad longer. When cooked to your liking, drain and reserve.

Coat the carrots with a bit of olive oil, season with paprika, salt and pepper. Roast uncovered in a 420F oven for about 30 minutes. Meanwhile, prepare the asparagus. Lay they on a microwave-safe dish, season very lightly with salt and sprinkle with lemon juice. Add a paper towel on top to cover them lightly. Microwave for 2 to 3 minutes. Reserve.

When the carrots are almost done roasting, add the asparagus and gently mix them. If necessary, add a touch more of olive oil. Roast the two veggies together for a final 5 minutes. Immediately add the fresh tomatoes, toss all veggies together, and place in a serving dish together with the farro. Adjust seasoning and serve.

ENJOY!

to print the recipe, click here

Comments: First, let me say that cooking farro as if it’s pasta (freely swimming in a huge pool of water), is another game changer. The problem with farro is that if you go by a specific ratio of water to grain, sometimes you hit the jackpot (that is the grain is perfectly cooked when the water is absorbed), but sometimes it is either too hard or mushy.  This method takes all the guessing out of it, you cook, you test it as the cooking goes along, and when it reaches the level you like, it’s over. Drain it, and incorporate in any recipe you like.

As to the veggies, I realize this is a little more involved than roasting a bunch of them together and calling it a day. The thing is, I am not too fond of the woody texture that the asparagus gets when simply roasted. With braces, the situation gets even worse. So I use my favorite method of preparing them, a very brief encounter with the microwave, and then finalizing in the oven. It gets the best of both worlds.

Finally, the fresh component. The real game-changing bit. Amazing what that does to a roasted veggie concoction. It brightens up the flavors, and makes the whole thing taste quite a bit lighter. You can use tomatoes of any color, diced cucumber, radishes, kalamata olives, and guess what? Grapes! Seedless grapes, cut in half. You will be surprised how well they pair with roasted veggies. I intend to try strawberries next. Why not, right? With a little rose harissa just to take it truly over the top…

ONE YEAR AGO: Secret Recipe Club Reunion 2018

TWO YEARS AGO: Parsnip and Tomato Soup

THREE YEARS AGO: A Retro Dessert

FOUR YEARS AGO: Cauliflower Tortillas: Going low-carb and loving it!

FIVE YEARS AGO: Clementines in Cinnamon Syrup

SIX YEARS AGO: In My Kitchen, April 2013 

SEVEN YEARS AGO: Thrilling Moments

EIGHT YEARS AGO: Maple-Oatmeal Sourdough Bread

NINE YEARS AGO: Pork Trinity: coffee, mushrooms, and curry

RAINBOW CARROTS WITH ROSE HARISSA

Giving credit where credit is due, I saw this recipe over at Eats Well with Others, and made it that same evening. I did not have pomegranate seeds at the time, so I used diced mango as a sweet component. We loved it so much I made it again a few days later, this time pomegranate seeds were involved, and I can tell they are a must here. Because I used rainbow carrots, there was not that much contrast of color, but their tiny bursts of sharpness and fresh flavor contribute a lot to the sweetness of the carrots. This will certainly be a regular appearance in our meals, at least for as long as I can get my hands on the amazing ingredient that is rose harissa. Thank you, Joanne!

RAINBOW CARROTS WITH ROSE HARISSA
(inspired by Eats Well with Others)

1 pound carrots of several colors
2 tbsp olive oil
2 tbsp rose harissa
1 tbsp pomegranate molasses
1 tsp cumin seeds
1 tsp salt
lemon juice to taste
½ cup pomegranate seeds
fresh cilantro to decorate (optional)

Heat oven to 450F.
.
Peel the carrots and cut into batons. In a large bowl, mix together the olive oil, harissa, cumin, pomegranate molasses, and salt.  Add the carrots to the bowl and toss well to combine. Spread on a parchment-lined baking sheet and roast for 20 minutes, or until starting to caramelize and become tender.

Remove from the oven, add some lemon juice and  sprinkle with pomegranate seeds. Decorate with cilantro leaves, if so desired.

ENJOY!

to print the recipe, click here

Comments: I am absolutely in love with this dish. I had to wait a long time to get rose harissa, since it was shipped all the way from England, so I get very protective of my bottle and always wonder if I should really use it in this or that preparation. Well, this one is definitely worth getting that couple of tablespoons from My Precioussssss.  My love for this sauce should be quite clear from the composite photo above… It is not really hot, it’s intense and complex, with a very subtle floral component from the rose. The more I use it, the more I love it. Which means soon it might be time to cave and place another order for it. Either that or emigrate to UK.

ONE YEAR AGO: Deviled Eggs go Green

TWO YEARS AGO: Tiramisu

THREE YEARS AGO: Pulled Pork, Slow-Cooker version

FOUR YEARS AGO: The Pie of the Century

FIVE YEARS AGO: Bon Bon Chicken

SIX YEARS AGO: Leaving on a Jet Plane

SEVEN YEARS AGO: A Pearfect Drink

EIGHT YEARS AGO: Ming Tsai Under Pressure

NINE YEARS AGO: Paris, je t’aime!