CHICKPEAS AND ZUCCHINI WITH TAHINI SAUCE

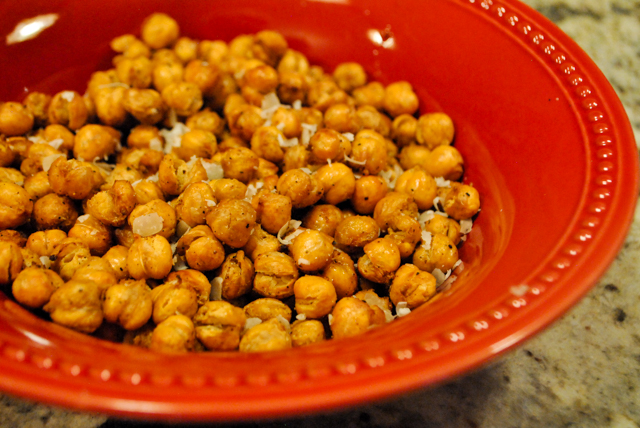
This side dish was the marriage of two regular appearances in our kitchen: quickly sauteed zucchini and air-fried chickpeas. The union was celebrated with a nice amount of tahini sauce.  I tell you, this worked very very well. If you don’t have an air-fryer, roast the chickpeas in a 400-420F oven. It takes longer and the texture won’t be quite as crunchy, but it will work just fine.  I intended to sprinkle pomegranate seeds right before serving for a little extra bling, but of course that day the grocery store had ran out of them. Best laid plans.

LEMONY ZUCCHINI AND CHICKPEAS WITH TAHINI-SAUCE
(from the Bewitching Kitchen)

for the tahini-sauce:
1/3 cup plain full-fat yogurt
1/8 cup tahini paste
juice and zest of 1 lemon
2 tsp honey
salt to taste
water if needed
for the veggies:

3 small zucchini, sliced in half lengthwise, then thinly sliced
1 tablespoon olive oil
salt and pepper
juice of 1 lemon
1 can chickpeas, well drained and dried
olive oil to coat chickpeas
1 tsp smoked paprika
1/2 tsp cumin
salt to taste
fresh parsley
(pomegranate seeds if you have them)

Make the tahini sauce: whisk all ingredients in a small bowl. Reserve.

Make the air-fried chickpeas.  Coat them lightly with olive oil, add the spices and place them in the air-frier set at the highest temperature (usually 390F) for about 12 minutes. They should be crunchy and golden brown.  Reserve.

Heat the olive oil in a 12-inch non-stick skillet, add the zucchini covering the whole surface, season with salt and pepper. Let the slices cook undisturbed until the side in contact with the pan is well seared. Move the slices around and cook until done. Sprinkle lemon juice all over, cover the pan for a minute, remove the lid, add the chickpeas and parsley.  Serve immediately with the tahini sauce on top.

ENJOY!

to print the recipe, click here

Comments: When I was a child, teenager or even young adult, you could not bribe me to eat chickpeas, which in Portuguese have the non-appealing name of “grão-de-bico”. It translates – loosely – as “the grain of the beak”. They can also be called “ervilha-de-galinha”, which ends up as “chicken’s green peas”. Yeah, very sexy. How could anyone consider that a delicacy? Anyway, now I crave it. Go figure.

Leftovers were delicious a couple of days later. In fact, I found out that air-fried chickpeas, when microwaved just enough to make them warm, get a nice texture, a bit more creamy inside. My lunch coupled this tasty concoction with a fried egg on top.  I was smiling the whole afternoon.

ONE YEAR AGO: Mokonut’s Rye Cranberry Chocolate Chip Cookies

TWO YEARS AGO: Incredibly Simple Times Four

THREE YEARS AGO: Going naked, and my husband loved it

FOUR YEARS AGO: Cream Cheese Mini-Pancakes with Smoked Salmon

FIVE YEARS AGO:  Star-Shaped Chocolate Brioche Bread

SIX YEARS AGO: Blueberry-Banana Bread 

SEVEN YEARS AGO: Into the Light Again

EIGHT YEARS AGO: Five Grain Sourdough Bread

NINE YEARS AGO: The Nano-Kitchen

TEN YEARS AGO: Kaiser Rolls


INCREDIBLY SIMPLE TIMES FOUR: OCTOBER 2018

Time to feature recipes that are so simple they hardly qualify as such.

INCREDIBLY SIMPLE #1

AIR-FRIED CHICKPEAS
(also work in a regular oven)

AIR-FRIED CHICKPEAS

1 can chickpeas
a little olive oil
spices of your choice (I used Southwest mix from Penzey’s)
salt
grated Parmigiano cheese

Drain the chickpeas and dry them on paper towels. You need to prevent them from steaming, as much as possible. Place them in a bowl, coat lightly with olive oil, and add the spices of your choice, just a little sprinkle will do. Season with salt.

Spray the basket of your air-fryer with olive oil. Set it to 360 F. Add the chickpeas and roast them for 12 to 15 minutes, shaking the basket every five minutes or so.  Transfer them to a serving bowl, and sprinkle Parmigiano while they are hot. Enjoy right away, or store them for many hours at room temperature, uncovered. They are still excellent next day.

If using a regular oven, set it to 400F, and roast the chickpeas for 25 to 30 minutes.

to print the recipe, click here

I’ve made them both ways, oven and air-fryer. The air-fryer gives a little more crunch, so it is my favorite method. The fact that it is so fast does not hurt it either!  Beware, they are addictive. Perfect to nibble as appetizer but also quite good sprinkled over salads, spinach in particular goes well with crunchy chickpeas. Curry is a great spice to add to them before air-frying/roasting. Make sure to save them in an open bowl, they keep their crunchy nature better that way. Not that they will last that long.

INCREDIBLY SIMPLE #2

LEMONY SAUTEED ZUCCHINI

LEMONY ZUCCHINI

Prepare enough zucchini pieces to almost cover a 12-inch non-stick frying pan, like shown below:


Add 1 tablespoon olive oil to the pan and allow it to heat until almost smoking. Add the pieces of zucchini, season with salt and pepper, and do not touch them. Let them develop a dark golden color on the side touching the pan, like shown below:

Only when they get to this point, move them to get some color on another side. Again, move them as little as possible, and wait for a deep color to develop. When the zucchini is tender (but not mushy), squeeze lemon juice all over, and shake the pan to move the slices around and gently coat them with the lemony glaze that forms.  Serve immediately, adjust seasoning if necessary.

INCREDIBLY SIMPLE #3

SMOKED RICE

Smoked rice, you ask? I first read about it in a blog I follow, Love and Olive Oil. Lindsay bought some smoked Basmati rice and raved about it. I was intrigued, and decided to take the smoke into my own hands. If you don’t have a smoker, you can follow the method described hereIf you have an electric smoker, it’s quite straightforward…

Add hickory wooden chips (or any wood you like) to the smoker

and set it to 175 F.

Place 2 cups of rice on a quarter-sheet baking pan.

Smoke it for one hour.

Allow it to cool completely, and cook the rice as you normally would.


I cooked one cup and saved another smoked cup for later. I was afraid that the rice would be all clumped up, because I did not want to rinse it after smoking. To my surprise, it was super fluffy, all grains well separated. The hour of heating at 175 F did not hurt anything, quite the contrary.  The rice had just the right amount of smokiness, and was excellent as a side dish for some sausages cooked sous-vide. We are smoking rice quite often these days…

INCREDIBLY SIMPLE #4

SOUS-VIDE ITALIAN SAUSAGES

SOUS-VIDE ITALIAN SAUSAGES

5 Italian sausages
1/2 cup Lager beer
salt and pepper

Heat the sous-vide to 170 F.

Place the sausages inside a food-safe plastic bag. Add the beer, season with a little salt and pepper.  Use the water displacement method to close the bag.

Submerge the bag and cook the sausages for 1  to 3 hours.

Remove the sausages from the bag, discard the cooking liquid. Dry the sausages very well, and crisp them up on a non-stick pan with a light coating of oil, or on a hot grill.

The sausages cooked sous-vide can also be kept in the fridge for a couple of days. When you want to serve them, place them in hot water for 5 minutes, then proceed to saute them as described.

to print the recipe, click here

Sous-vide sausages, smoked rice, and a little butternut squash on the side…

When we cook sausages on the grill, we go through a pretty elaborate method of switching them from the grill to a pan with simmering beer on top of the stove. They go back and forth, back and forth, from simmering to the grill, to make sure they end up moist and flavorful. The sous-vide delivers the same quality in terms of texture, without any hassle at all. I doubt I will cook this type of sausage any other way. Even warmed up in the microwave two days later, they were excellent.  If you have a sous-vide gadget, give it a try.

I realize that this series of Incredibly Easy recipes used an air-fryer, electric smoker, and a sous-vide, but except for the Italian sausages, all others can be prepared without any special cooking equipment.

ONE YEAR AGO: Parsnip, Coconut and Lemongrass Soup

TWO YEARS AGO: In My Kitchen, October 2016

THREE YEARS AGO: Paleo Moussaka

FOUR YEARS AGO: In My Kitchen, October 2014

FIVE YEARS AGO: In My Kitchen, October 2013

SIX YEARS AGO: Bourbon and Molasses Glazed Pork Tenderloin

SEVEN YEARS AGO: Crimson and Cream Turkey Chili

EIGHT YEARS AGO: Taking a break from the nano-kitchen

NINE YEARS AGO: Chocolate Chip Cookies