INDIAN SPICED CHICKEN WITH CHICKPEAS AND SPINACH

Another great recipe using my beloved pressure cooker, but no need to run away if you don’t own one, the original method (found here)  uses a regular pan.  We’ve been so busy lately (by lately I guess I mean a few years in a row…)  that shortcuts to get dinner at the table faster are more than welcome. As long as they don’t compromise flavor. No need to worry about it in this recipe, flavorful is one adjective that comes to mind to describe it.

Chicken Curry Spinach


INDIAN SPICED CHICKEN WITH CHICKPEAS AND SPINACH
(adapted from Bon Appetit)

1 tablespoon vegetable oil (I used grape seed oil)
6 boneless, skinless chicken thighs
Kosher salt
1 tablespoon unsalted butter
1 large shallot, thinly sliced
1 + 1/2 tablespoons grated ginger
2 teaspoons ground coriander
1 teaspoon ground cumin
1 teaspoon ground turmeric
1/4 teaspoon cayenne pepper
1 15-ounce can chickpeas, rinsed
1 cups chicken broth
5 ounces baby spinach
1/4 cup Greek yogurt
1/4 cup cilantro leaves, coarsely chopped (optional)

Heat oil in a large heavy pot over medium-high heat or in your pressure cooker. Season chicken with salt. Working in batches, cook chicken, reducing heat as needed to prevent over-browning, until golden brown on all side.Transfer to a plate.

Add butter and shallot to drippings in pot; season with salt. Cook, stirring often, until soft and fragrant. Stir in ginger, coriander, cumin, turmeric, and cayenne. Cook, stirring constantly, until spices are fragrant, about 1 minute. Stir in chickpeas and chicken broth. Return chicken and any accumulated juices to pot. Bring to a simmer. Cover pot and either braise it in a 325 F oven for about 50 minutes, or cook under pressure for 15 minutes.

Quickly release the steam (or place the closed pan under running cold water in the sink), and when the pressure equalizes open the pan. Return the pan to the stove, add the spinach and simmer for a couple of minutes until wilted. Stir yogurt into cooking liquid, mix gently and serve right away, sprinkled with fresh cilantro, if you like.

ENJOY!

to print the recipe, click here

served

Comments:  I absolutely love the way pressure cooking intensifies the flavors of a sauce, and this one with all the warm spices and the chickpeas turned out quite spectacular indeed. The recipe made so much sauce that even after leftovers were enjoyed at lunch, a little sauce remained. I went at it with a spoon on day 3. Yeah, that good.  And, of course the time-saving aspect is hard to be neglected…

Screen Shot 2016-02-28 at 1.02.19 PM

This recipe could be served quite simply with a slice of naan bread, but I opted for cauli-rice and some snow peas sautéed in olive oil and a little mint. We ate like the King and the Queen… except for the fact that we did the dishes afterwards. I doubt royalty deals with such mundane issues. Their loss. Doing dishes can be a lot of fun. All you need is the right music in the background…

😉


ONE YEAR AGO: Curry Cardamon Cookies

TWO YEARS AGO: In My Kitchen, March 2014

THREE YEARS AGO: Boeuf Bourguignon for a Snowy Evening

FOUR YEARS AGO: Chickpea Salad

FIVE YEARS AGO: Soft Spot for Chevre

SIX YEARS AGO: Roasted Onion and Asiago Cheese Miche

DUCK CONFIT FOR A SPECIAL OCCASION

It is hard to beat duck confit when you want to have a memorable meal. I will never forget the first time I had it, actually. I was all alone in Paris (my first trip to Europe!), having flown from Brazil to take part of a scientific workshop sponsored by The World Health Organization. The 2-week workshop launched the sequencing of the whole genome of Mycobacterium leprae. In those days, sequencing DNA was a cumbersome, slow, and painful process, nothing to do with what it is today. I was one of the lucky people invited to participate of that initial workshop. I knew very little about automated DNA sequencing, but even less about duck confit. On my first evening, very tired and a bit insecure to walk around town, I crossed the street and bravely entered a restaurant near Institut Pasteur (Le Pot au Feu). The special of the day was duck confit, so that’s what I ordered. I thought I had died and gone straight to heaven, arriving at dinner time. Unforgettable experience, even if all alone sitting at my table, staring at couples in love all around me. Or so it seemed…  Paris and romance go always hand in hand.

I made duck confit twice in the past, before my blogging years. Even though both meals turned out great, the process was not very pleasant: a lot of fat to deal with, and a pretty intense smell lingering in the house for way too long.  This time, I used sous-vide to cook the duck legs and I have one word to describe it: WOW! I go as far as saying that buying the Anova circulator is worthy it just to make duck confit.  Easy, very little fat needed, no lingering smell, and once the duck legs are cooked, they can go still in the bags to the fridge and stay there for 2 to 3 days until showtime.  Cannot get much better than that…

Duck Confit1


DUCK CONFIT
(from the Bewitching Kitchen)

3 tablespoons salt
2 cloves garlic, smashed (optional)
1 shallot, peeled and sliced
6 sprigs thyme (I used dried thyme)
4 sage leaves
Coarsely ground black pepper
4 duck legs with thighs
4 tablespoons duck fat

Sprinkle 1 tablespoon of salt in the bottom of a dish or plastic container large enough to hold the duck pieces in a single layer. Evenly scatter half the garlic, shallots, and thyme in the container. Arrange the duck, skin-side up, over the salt mixture, placing one sage leaf underneath each piece of duck. Sprinkle with the remaining salt, garlic, shallots, and thyme and a little pepper. Cover and refrigerate for 24 to 48 hours.

Rinse the duck pieces well, to remove the coarse salt. Dry the meat with paper towels. Place each piece in a plastic bag, adding 1 tablespoon of very cold duck fat inside, vacuum-seal the bags.  Submerge the sealed bags in a water-bath set at 82 C (180 F) for 10 hours.  When the time is up, chill the pieces in an ice bath and place in the fridge, still sealed.

About 45 minutes before dinner time, remove the duck from the fridge, open the bag and scrape off most of the congealed fat. Place in a roasting pan, skin side up, cover with aluminum foil and warm up in a 375 F oven for about 30 minutes. Before serving, place the pan under the broiler to crisp up the skin. Alternatively, you can warm up the pieces and then sear the skin on a blazing hot skillet.

ENJOY!

to print the recipe, click here


DuckConfitcomposite

Comments: I made this recipe for a very special dinner. First, it was my beloved’s Birthday, and since it falls very close to Christmas, it’s tricky to have a party for him.  Most people are away visiting family, or too busy with the holidays. But, it turns out that two VERY special friends made a trip all the way from Brazil to be here with us on that special day!  And they are amazing cooks, so the pressure was high on me to deliver a nice meal. Needless to say, I did a lot of research on duck confit sous-vide before settling on the method I shared here.

Several things are important. The duck itself. The best kind to get is Moulard duck, so I special ordered it from d’Artagnan (remember my latest IMK post?). Then, the salting to cure the meat before cooking. Some sous-vide methods advise you to do that step in vacuum-sealed bags, but the meat can turn out overly salty. I decided to salt the pieces in a baking dish in the fridge for 36 hours, then rinse the meat well before cooking it. The sous-vide step is another major consideration. I visited a discussion forum (eGullet), and read everything I could find on duck confit before settling on my choice of 10 hours at 82 C (180 F).  As to the amount of fat to use, one tablespoon is enough, but you could even omit adding any extra fat. If you look at the last photo on the composite picture above, you’ll notice that there was a lot more than one tablespoon of fat in each bag. The fat rendered from the leg itself will be more than enough to properly coat it during cooking. So, if you rather  not render duck fat or buy pre-rendered fat, simply go from the salting step to vacuum-sealing. It will work like a charm. Of course, you could get by with olive oil too. The main goal is to cook the meat submerged in some type of fat, duck fat being the best one for flavor.

I feel that I hit the jackpot with that combination of time and temperature, would not change it in the future.  Finally, the last consideration is how to warm up the meat before serving.  I did not want to deal with a hot skillet and searing the skin, making a huge mess right before our meal, so I went with a regular oven. First 375 F for about 30 minutes, then running the pieces under the broiler to crisp up the skin.  Would not do it any other way, it was spectacular!  The meat had the exact texture I remember from my first duck confit enjoyed in Paris! Not too salty, not too greasy, simply perfect!

plated2

Dinner is served!  Duck confit and gratin of potatoes…
Life is good!

bday

ONE YEAR AGO: Ken Forkish’s Warm Spot Sourdough 

TWO YEARS AGO: Bran Muffins, Rainbows, and a wonderful surprise!

THREE YEARS AGO: Salmon Wellington

FOUR YEARS AGO: The Green Chip Alternative

FIVE YEARS AGO: Weekend Pita Project

SIX YEARS AGO: Let it snow, let it snow, eggs in snow

SECRET RECIPE CLUB: RUSTIC CIABATTA AND MINI-MEATLOAVES

FOUR YEARS AS A MEMBER OF THE SECRET RECIPE CLUB!

Rustic Ciabbata with Dates.
It’s that fun time of the month again, Reveal Day of The Secret Recipe Club, a virtual event in which food bloggers are assigned a site in secret, then blog about a chosen recipe at midnight of Reveal Day. In two words: incredibly awesome. But what is more awesome than that is the blog I got this month. I almost passed out from excitement, thrill, and joy. Why? Because my assigned site is one of my favorites in the whole food blogosphere: Karen’s Kitchen Stories. Just to make an analogy, if blogging was like acting, my Secret Acting Club assignment would be Meryl Streep. Yeap, that awesome!   I’ve been reading Karen’s blog forever, I consider her as one of my personal gurus in bread baking. She is the type of baker who is not afraid to push the limits, moving easily from tangzhong type breads to bialys, baguettes, all sorts of rustic sourdoughs, Pullman type loaves, really amazing what she can do with flour, water, salt, and yeast, often wild (the yeast, not her).  At my last count, she’s got 247 bread recipes in her blog. Two hundred and forty-seven. You can collect your chin off the floor now. I bookmarked so many recipes that it was not even funny. Just to give you a small sampling of the breads that tempted me: Cheese and Herb Happy Bread,  Cinnamon Swirl Pumpkin Rolls , Corn and Jalapeno Rolls (oh, my!), English Muffin Bread (I really need to make this one!), Tangzhong Whole Wheat Bread (very interesting method), Kesra Moroccan Flatbread, Hawaiian Style Sweet Rolls (reminds me of my childhood in Brazil), Stuffed Pretzel Bites (O.M.G.!). Of course, that doesn’t include the breads from her site I already made like the delicious Ka’Kat. or Forkish’s Warm Spot Sourdough. But of course there’s a lot more than bread in her blog. For instance, if you like stir-fries, she has a section on Wok Wednesdays that is a must-follow, holding so far 57 entries.  The bottom line is, I had no choice but to make two recipes from her site. A rustic ciabatta, because it would be almost rude not to choose a bread from Karen’s blog, and some mini-meatloaves because they looked so incredibly cute, I could not stop dreaming about them…

Ciabatta Dates Flax2

RUSTIC CIABATTA WITH DATES AND FLAX SEEDS
(from Karen’s Kitchen Stories)

for the soaker:
48 grams flaxseeds
72 grams (1/3 C) water
 .
for the poolish:
125 grams unbleached bread flour
125 grams (1/2 C) water
pinch of instant yeast
 .
for the final dough:
278 grams (~1 1/4 C) water
All of the poolish
300 grams unbleached bread flour
50 grams coarsely ground whole wheat flour
25 grams coarsely ground rye flour
10 grams (1 3/4 tsp) salt
2 grams (~ 3/4 tsp) instant yeast
All of the soaker
84 grams dried dates, seeded previously, cut into 1/2 inch pieces
 .
The night before baking day, mix the soaker and poolish in separate bowls. Cover both bowls with plastic wrap. Leave enough room in the poolish bowl for it to double in size.
.
The next day (about 12 to 16 hours later), measure the 278 grams of water into a large bowl or dough rising bucket. Add the poolish, and mix it into the water with your hand to break it apart. Add the flours, salt, and yeast, and mix the dough with your hands, stirring, pinching, and folding the dough to absorb all of the flour and dissolve the salt and yeast. When you pinch the dough, you should not feel any grit.
.
Once all of the ingredients are combined, mix in the soaker with your hand until evenly distributed. Add the dates, and mix to distribute. Cover the bowl with plastic wrap and let rise in a warm spot.
.
After 45 minutes, stretch and fold the dough over itself from all four “sides.” Repeat the 45 minute rest followed by a stretch-and-fold two more times (a total of 3 stretch-and-folds).  Let the dough rest for a final 45 minutes, covered, in a warm spot.
.
Scrape the dough out onto a lightly floured counter, and gently nudge it into a rectangle. Be careful not to deflate the dough. Using an oiled bench knife, cut the dough into three equal pieces. Pick each piece up with floured hands and place it on a floured couche or parchment lined baking sheet. Cover with the rest of the couche or oiled plastic wrap.  Let the dough rest for 20 minutes, while you heat the oven to 475 degrees F, and set it up with a steam pan on the lowest rack and a baking stone directly above it. Fill a spray bottle with water.
 .
When the oven is at the correct temperature, transfer the loaves to the baking stone (see notes above, or place the baking sheet with the loaves on it in the oven). Place a cup of boiling water in the steam pan (cover your oven’s window), and spray the oven walls with water. Quickly close the door.  Bake the loaves for 25 to 30 minutes, rotating halfway through. They are done when the internal temperature reaches 200 to 210 degrees F. Cool on a wire rack.
.

ENJOY!

to print the recipe, click here
.

ciabattacollage
.
Comments:
I made this bread in one of those perfect Saturdays!  Why? Because I woke up before 5am feeling super energetic, could hardly wait to get downstairs and play with my ingredients already measured since the evening before.  During the first 45 minutes rise I did a nice P90X yoga while the house was still dark, peaceful and silent…  As in a perfectly timed symphony, just as I finished my exercises, Phil woke up and made me a fantastic cappuccino…. the dogs immediately joined us in welcoming the weekend…Told ya: perfect Saturday!
.
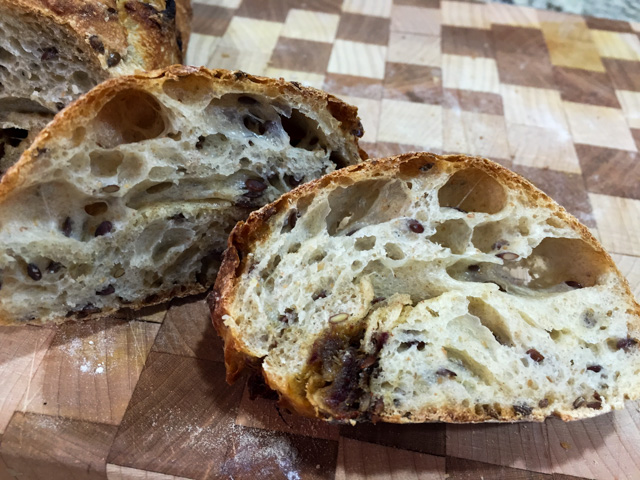
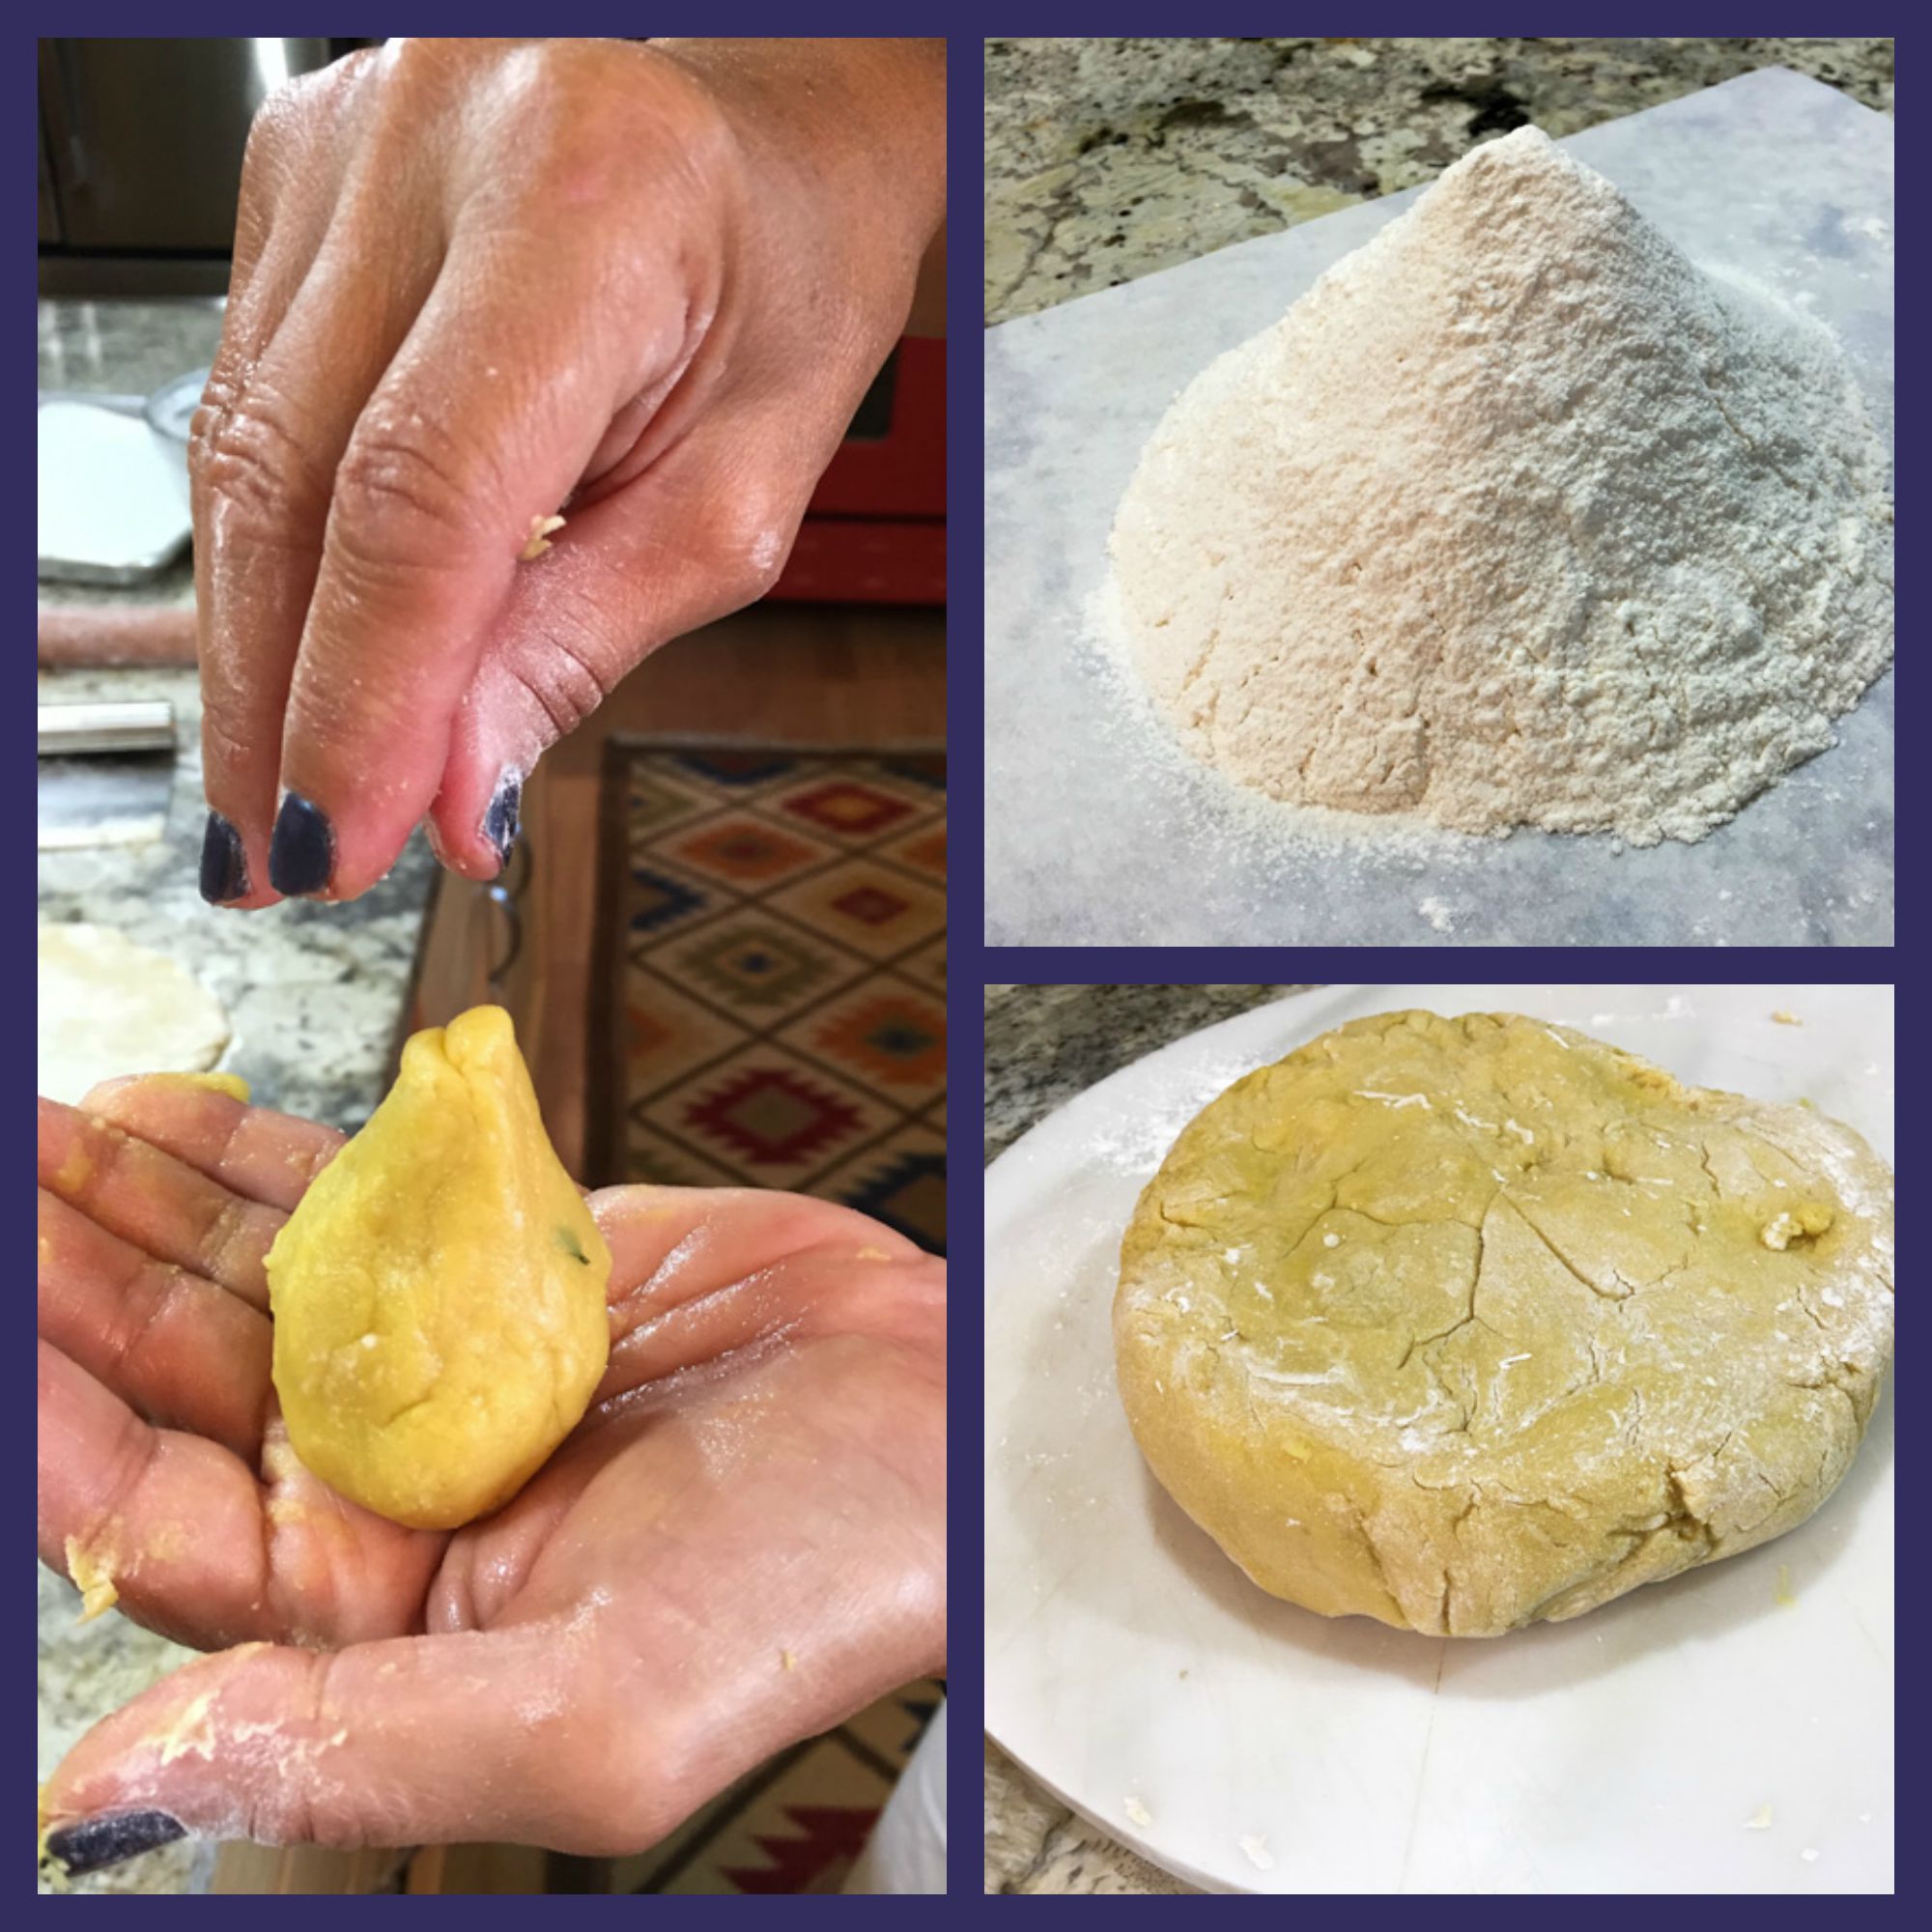
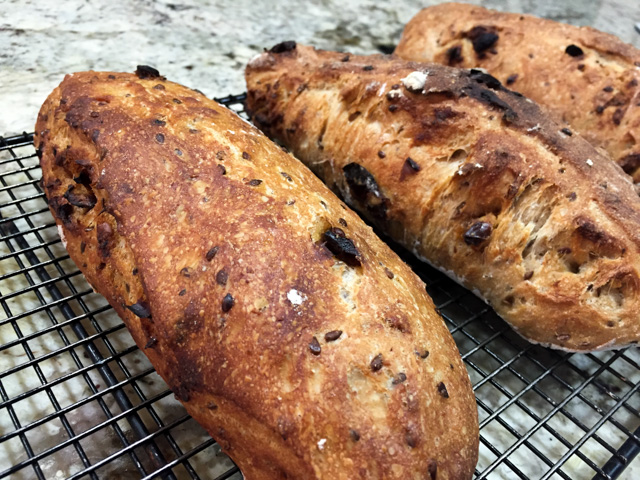
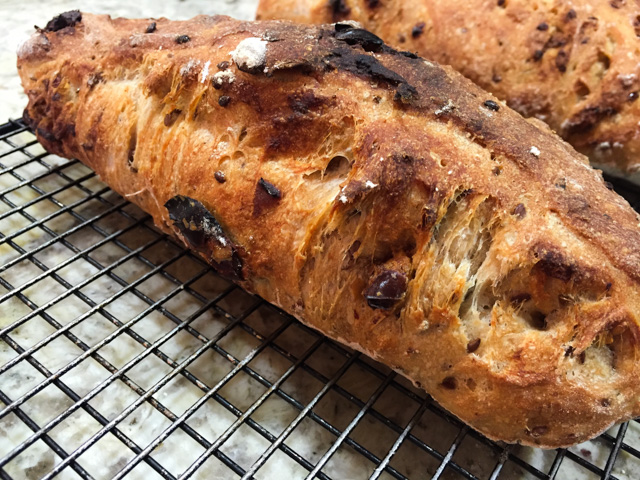
Back to Karen’s ciabatta: the dough was a pleasure to work with, gaining strength at each folding cycle. In the composite photo above, the dough is shown after the last folding cycle, all plump and shiny.  I used whole flaxseeds, Karen used ground, but I followed the exact same method, including the volume of water to make the soaker. You can use whatever type of flaxseeds you have in your pantry.  Most important thing is not to deflate the dough too much as you coach it into the ciabatta shape. The less you mess with it, the better.  You will be rewarded with a ton of holes, a very airy bread, comme il faut.
.
Crumb shot
.

We both loved this bread! The dates offer a burst of sweetness that plays well with the almost sour nature of the dough given by the extended fermentation of the poolish.  Cut a slice, toast it very very lightly, top it with some Gorgonzola and you will have to tie yourself to your seat not to fly away in a magic carpet….   Awesome combo.

 +++++++++++++++++++++++++++++++++++++++++++++++
 .

And now, for the bonus recipe from Karen’s site…  Adorable meatloaves in individual servings.  Her recipe used beef, I changed it slightly by using ground turkey.

miniloaves served11
.
INDIVIDUAL MEATLOAVES WITH CHILI SAUCE

(adapted from Karen’s Kitchen Stories)
.
1 shallot, coarsely chopped
1 rib celery, diced
1/3 cup packed flat leaf parsley leaves
4 slices of bacon, cut into 1/2 inch slices
2/3 cup rolled oats
1/4 cup boiling water
1 pound 85% lean ground turkey
1/4 pound ground pork
2 large eggs
1 1/2 tsp Kosher salt
3/4 tsp freshly ground black pepper
1 cup jarred chili sauce, such as Heinz
 .
Spray a half sheet pan with spray oil and heat the oven to 400 degrees F. In a food processor, pulse the shallot, celery, parsley, and bacon several times until well chopped.  In a large bowl, combine the oats and boiling water and stir. Add the mixture from the food processor and combine.
 .
Break up the ground turkey and pork and add them to the large bowl. Whisk the eggs and add them to the meat and oat mixture. Sprinkle with the salt and pepper. Add 1/4 cup of the chili sauce to the meat mixture. Mix with your hands until everything is well mixed.
 .
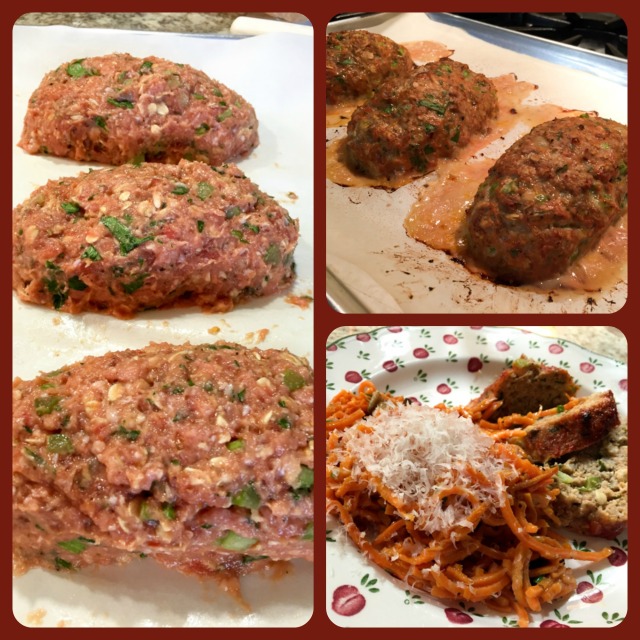
Divide the mixture into four equal parts and shape each into a small loaf, placing them onto the baking sheet. Take 1/2 cup of the chili sauce, and brush it over the four loaves.  Bake the loaves on the center rack for about 25 minutes. Remove the pan from the oven and brush the loaves with the rest (1/4 cup) of the chili sauce. Turn on the broiler, and place the pan back on the center rack. Broil for about 5 minutes, until the chili sauce just begins to brown.
.
ENJOY!
.

to print the recipe, click here

 .

PicMonkey Collage11

.
These meatloaves were sooooo good!  The chili sauce is a must, do not skip it. They turned out moist, flavorful, spicy but not overly so. I served them with sweet potato noodles that were recently published in my guest post over at Foodbod. The recipe made 3 loaves and we enjoyed them for dinner, then I had leftovers for my lunch a couple of days in a row. Heaven. Just heaven. If I may make a public confession, I had some slices straight from the fridge. Cold. Yeah, standing up, with a Jack Russell staring at me wondering how long it would take for Newton’s Law of Gravity to work its magic in his favor. HA!  Not a chance!

Karen, I hope you enjoyed your assignment this month. It goes without saying that I spent the past 4  weeks anticipating this Reveal Day, anxious to share the recipes I made from your blog. For my readers, if you don’t yet know Karen’s Kitchen Stories, stop right now and go pay her a visit.  Not only she is a great baker and cook, but a very cool person with great sense of humor and wit.  Plus, she is the Grandma of two beautiful boys, and lucky to live very close to them, so it’s easier for her to spoil them rotten.  I intend to follow her footsteps and do my best to spoil Greenlee at every chance I get…   Maybe one day I can teach Greenlee to bake a chocolate cake for her Dad too. Oops, did I just use “teach” and “bake a cake” in the same sentence?  Excuse me while I go grab a thermometer. I might be running a very high fever… (sigh)

ONE YEAR AGO: Green Rice

TWO YEARS AGO: Potato-Crusted Italian Mini-Quiches

THREE YEARS AGO: Beetroot Sourdough for the Holidays

FOUR YEARS AGO: Cod Filet with Mustard Tarragon Crust

FIVE YEARS AGO: Soba Noodles: Light and Healthy

SIX YEARS AGO: Potato-Rosemary Bread

BLACK PEPPER CHICKEN CURRY

This recipe was published in Food and Wine magazine back in February 1999. Yes, you read that right, over 16 years ago, when I was only a teenager (in my heart, that is). But someone recently raved so much about it in a cooking forum that other members decided to make it, and next thing I knew, they were raving about it too. I had to join the party and try the recipe myself. However, I modified it a bit, incorporating some tips from our graduate student Aritri (born and raised in India so she knows a thing or two about curries). I also opted by making it in a pressure cooker. No need to run away screaming. If you don’t have one, I’ll share instructions to make it in a regular pan. I am nothing if not accommodating. You are very welcome.

Black Pepper Chicken Curry1
BLACK PEPPER CHICKEN CURRY
(adapted from Food and Wine magazine)

2 teaspoons ground coriander
2 teaspoons ground cumin
1 1/2 teaspoons coarsely crushed black peppercorns
1/2 teaspoon turmeric
1 teaspoon salt
1 3/4 pounds skinless, boneless chicken thighs
1/4 cup plus 2 tablespoons vegetable oil
1 shallot, diced
1 1/2 teaspoons minced fresh ginger
1 teaspoon minced Serrano chile
1/2 cup canned unsweetened coconut milk
1/4 cup water
1/2 cup raw cashews, divided
juice from 1/2 lemon
fresh parsley, minced

In a bowl, combine the coriander with the cumin, peppercorns, turmeric and 1/4 teaspoon of the salt. Add the chicken and rub with the spices to coat. Cover with plastic wrap and let stand at room temperature for 20 to 30 minutes. Meanwhile, place 1/4 cup of cashews in a small food processor and process, not too fine. Reserve.

In a large deep nonstick skillet, heat 1/4 cup of the oil. Add the shallots and saute’ for a few minutes until translucent.  Add the chicken, ginger, Serrano chile and the remaining 3/4 teaspoon of salt and cook, stirring occasionally, until the chicken is golden, about 8 minutes. No need to cook through.

Stir in 1/4 cup of the coconut milk, the water, and the processed cashews, then transfer to a pressure cooker and cook under pressure for 15 minutes. Quickly release the steam (or place the closed pan under running cold water in the sink), and when the pressure equalizes open the pan.  If using a normal pan, simply cover the pan and simmer until cooked to your liking (at least 30 minutes).

Meanwhile, in a small skillet, heat the remaining 2 tablespoons of oil. Add the remaining 1/4 cup of cashews and cook over moderate heat, stirring constantly, until golden brown. Drain on paper towels. Add the remaining 1/4 cup of coconut milk, the lemon juice and the fresh parsley to the chicken and simmer, stirring. Transfer to a bowl, sprinkle with the cashews; serve immediately. 

ENJOY!

to print the recipe, click here

ingredients

Seems familiar? The same photo was in my previous post…  

Comments: After so many years of blogging, it’s hard not to repeat statements from previous posts. For those who follow my blog for a while it will be old news that I like to cook chicken thighs longer than most recipes specify. Super tender is what I shoot for. Exactly the same goes for pork ribs. Some people prefer to have a firmer texture in both types of meat, so if you are part of that team, reduce the cooking time.  For instance, in a pressure cooker, you could get by with 10 minutes, in a regular pan, 20 minutes (which is what Food and Wine magazine recommends in the original recipe).

Pressure cooking is fantastic for recipes such as curries, stews, soups, and chili (made one recently in 20 minutes that was absolutely spectacular). Until a couple of  months ago I made the mistake of keeping my pressure cooker in the basement, bringing it to the kitchen only when I needed to make a batch of black beans, or maybe cook some artichokes in a hurry (pressure cooker works wonders on artichokes).  Out of sight, out of mind. Not anymore. It is now sitting in our appliance rack and I am always finding ways to use it. It makes life so much easier, many recipes that are not feasible on a weeknight because they would take too long become a breeze to prepare.

Served2

This curry turned out wonderful! It is interesting how the humble black pepper offers a heat different from any other type.  Aritri also suggested that we add ground chili to the curry, but I was afraid it would be too hot for our taste, so I went without it. Keep her suggestion in mind if you make it, I think a little extra heat would not hurt the outcome. I hope you try this recipe, make sure to have some rice to fully enjoy the delicious sauce, or if you prefer to keep the carb content low, a cauli-rice  or a cauli-mash will work just fine…

ONE YEAR AGO: Feta-Stuffed Turkey Meatloaf

TWO YEARS AGO: Thai-Style Pesto with Brown Rice Pasta

THREE YEARS AGO: Shrimp with Spicy Orange Sauce

FOUR YEARS AGO:  A Simple Appetizer (Baked Ricotta)

FIVE YEARS AGO: Sour Cream Sandwich Bread

SIX YEARS AGO: Pasta with Zucchini Strands and Shrimp

COXINHA DE GALINHA: A SAVORY BRAZILIAN DELICACY

You know how some recipes adapt ingredients to make an overly heavy dish lighter and “healthier?”  Maybe  using cauliflower instead of potatoes, baking instead of frying? Well, this recipe is not it. This is authentic Brazilian cooking the way it was meant to be: substantial, loaded in carbs, and to make matters worse, breaded AND deep-fried. My advice? Enjoy it with a tropical smile, then go for a Spartan life-style for a couple of days. Totally worth it.  This is the type of finger food that Brazilians grow up enjoying at parties and street markets.  It originated in São Paulo, in the 19th century.  It turns out that Imperial Princess Isabel had a son who loved to eat chicken, but he would only eat the thigh meat.  One day, the cook ran out of chicken thighs and decided to shred the meat of chicken breasts, and hide it in a dough shaped as a drumstick.  The boy loved it, and from then on coxinhas were a regular item in the Imperial kitchen. Imagine the thrill of that cook if he knew that 200 years later his creative recipe would be featured in a Bewitching Kitchen 6 thousand miles away!

Coxinhas de galinha

Before getting in the gastronomic aspect of this delicacy,  I must give you a little lesson on Brazilian Portuguese. I promise it won’t be too painful. Ready? Ok, in Portuguese you can turn almost any word into a diminutive form by adding the suffix “inho” or “inha” depending on the gender of the word. Masculine words get “inho“, feminine gets “inha“.  A few examples:

Casa (house) –> Casinha (little house)

Gato (cat) –> Gatinho (kitten)

Chuva (rain) –> Chuvinha (very light rain)

Linda (beautiful) –> Lindinha (more appropriate to describe a young girl or baby)

So, that brings me to the title of this post, “coxinha de galinha.”   Sounds like two diminutives put together, right?  Not so fast, dear students!  The first part is indeed a diminutive. It derives from “coxa” (thigh), so coxinha is a small thigh. Now, moving to the second part: galinha… that is not a diminutive per se, it is a real word that means chicken. The word for rooster is “galo.”  So, in Portuguese a male rooster gets a beautiful word, but the female is defined by its diminutive form. How sexist is that?

All jokes aside, let’s make sure you can pronounce the words correctly. The “inha” component might be a bit tricky, be patient, listen carefully and repeat after me…

Sheila

Sheila, a Brazilian graduate student from our department…

COXINHA DE GALINHA
(adapted from From Brazil to You)

For the filling:
2 Tablespoons olive oil
2 shallots, finely minced
1 celery rib, finely minced
3 cups cooked (or rotisserie) chicken, finely shredded
Salt and ground black pepper to taste
A pinch of red pepper flakes
¼ cup cream cheese, softened
3 Tablespoons minced green onions
minced cilantro leaves to taste

For the dough:
3-1/3 cup chicken stock
A pinch of salt (enough to taste)
¼ teaspoon annatto or turmeric
2 teaspoons olive oil
3 cups sifted all-purpose flour

For dredging and frying:
2 cups all-purpose flour
4 eggs, whisked with a tablespoon of water
2-3 cups breadcrumbs
enough vegetable oil to fully immerse the coxinhas

Prepare the filling: In a large skillet, heat the olive oil over medium heat. Add the shallots and celery and cook, stirring occasionally, until soft and translucent. In a large bowl, place the finely shredded chicken and stir in the cooked onion and celery mixture, salt, pepper, red pepper flakes , the cream cheese, green onions, and cilantro. Set aside. It can be made a couple of days in advance, keep refrigerated.

Prepare the coxinha dough: In a large, non-stick saucepan, place the chicken stock, salt, annatto or turmeric, and olive oil, and bring to a simmer over medium-low heat. When the stock is hot, add the sifted flour all at once while stirring very well. It will get more and more difficult to stir but continue to stir vigorously for about 1 minute or so until obtaining a uniformly lumpy dough.

Remove from heat and transfer the coxinha dough to an electric mixer fitted with a hook attachment. Knead dough at low-speed for about 5 minutes or until it becomes soft and smooth. Scrape dough from mixing bowl onto a well-floured surface with a dough scraper or spatula, and knead a little bit more by hand. Shape the coxinha dough into a flat disk and let rest for 10 minutes at room temperature.

Using a rolling-pin, roll out the dough onto a well-floured surface until it is about ¼ to ⅛-inch thick. Using a 3-1/4-inch round cookie cutter, cut out disks of dough and place them on a baking sheet lined with parchment paper (a metal spatula can be useful to help pry the disks from the rolling surface). Aggregate the dough leftovers, re-roll, and cut out more disks. You should have between 30 and 35 disks.

Form the coxinhas: Scoop about 1 tablespoon of the chicken filling onto the center of each disk. Lightly oil your hands and shape the filled disks into drumsticks by folding the dough up and around the filling into a beggar’s purse shape, forming the neck of the coxinha between your encircled index finger and thumb, and gently press the filling down into the center as you close. Pinch and seal the edges. Pull the dough at the top out slightly so that it resembles a drumstick. Use a moist towel to clean your fingers off each time they touch the filling. Make sure the dough has no cracks; if it does crack, wet your fingers in water and pinch the dough together. Flatten the rounded bottom of the coxinhas very minimally with the palm of your hand (just enough that they will be able to rest upright), and placed shaped coxinhas on a baking sheet lined with parchment paper.

Dredge and fry the coxinhas: Prepare three separate bowls for the all-purpose flour, eggs, and breadcrumbs. Pass the fritters through each bowl (flour, egg whites, and then breadcrumbs), shaking off any excess.  Pour enough vegetable oil into a frying machine or heavy-bottomed pot. Heat to 350 degrees F. Fry the fritters in batches. Please, do not place too many coxinhas or chicken fritters in at the same time because this will lower the temperature, making the fritters oily. Make sure to turn all sides while frying the fritters so that they will brown evenly. Transfer coxinhas or fritters to a baking sheet lined with a double sheet of paper towels to absorb any excess oil. To serve coxinhas warm, keep the finished batches in a warm oven until serving.

ENJOY!

to print the recipe, click here

compositecoxinha

Comments: I won’t sugar coat the pill,  this is a pretty involved culinary project.  If you have a couple of friends to join in the fun it will be a lot easier. In that particular Sunday I had two friends over, Cindy, who has been a regular in our kitchen since the days we lived in Oklahoma, and Sheila who wanted to introduce Brazilian cuisine to her friends  on campus. We made the full recipe, ending up with 33 coxinhas, more than enough for us to enjoy and share. Perfect!

Shaping takes some practice, but even if you don’t hit it perfectly it will taste great, it’s all about the crunchy outside, the soft dough, and the flavorful meat inside.

composite2

Nothing better than biting into one of these babies….. The turmeric gives the dough a characteristic yellow color, but you can definitely omit it. The same dough could be used to enclose all sorts of goodies, you can even opt for a vegetarian filling, but if you do, please don’t call them ‘veggie coxinhas,” and don’t worry about the shaping, go for a simple round or oblong fritter. I am so glad Sheila asked me to dive into this culinary adventure!  I hope you enjoyed this post on a super traditional Brazilian delicacy. It was a great weekend, actually, because the day before Cindy and I made French macarons for the second time together. You will read all about it soon…

ONE YEAR AGO: Prosciutto-Wrapped Shrimp Skewers

TWO YEARS AGO: Linguine with Cauliflower Pesto

THREE  YEARS AGO: Secret Recipe Club: A Tribute to Daniel

FOUR YEARS AGO: Nutella Drop Cookies

FIVE YEARS AGO:  Dreaming of butternut squash

SIX YEARS AGO: Simply Elegant: Salmon Curry (one of my very favorite dishes!)