CAULIFLOWER TORTILLAS: GOING LOW CARB AND LOVING IT!

You’ve got to admit I did a pretty good job on my promise to stop posting so many cauliflower recipes. It’s been more than 2 months since I brought up Brassica oleracea to your screen. I cannot hold myself back anymore, not when I made these A-M-A-Z-I-N-G “caulitillas” that even the husband professed to be delicious. That is saying a lot, as he is adamant about corn tortillas, preferably the yellow kind. But, ever since Iron Man Mike blogged on these babies I’ve been meaning to try them.  They are everything he told them to be.  Make these.  It is a little involved, but in a fun way. And the pay off is huge.

Caulitillas

CAULIFLOWER CRUST TORTILLAS
(from The Iron You)

olive oil for greasing baking sheets
1 head of cauliflower, riced and packed (3 cups needed)
3 eggs
½ teaspoon fine grain sea salt
¼ teaspoon ground black pepper

Heat oven to 375°F (190°C), line two baking sheets with parchment paper and grease them with olive oil.

In a food processor rice the cauliflower, until you get a texture finer than rice. Measure to make sure you have 3 cups of the riced veggie.  Place cauliflower rice in a bowl and microwave on high for 2 minutes, give it a stir and microwave for another 2 minutes. Place the cauliflower rice in a tea towel and twist it to squeeze as much moisture as you can. Do not skip this step, because the cauliflower must be dry to behave properly in the subsequent stages of cooking.

Place drained cauliflower rice back in the bowl and add eggs, salt and pepper and mix until combined. Spread the mixture onto the lined baking sheets into 8 fairly flat circles. A small offset spatula works wonders here.

Place in the oven for 10 minutes, then peel them off the parchment paper, flip them and bake for further 6 to 7 minutes. Heat a nonstick medium-sized pan over medium heat and place the tortillas into the pan pressing down slightly and brown them (1 minute per side).

ENJOY!

to print the recipe, click here

composite

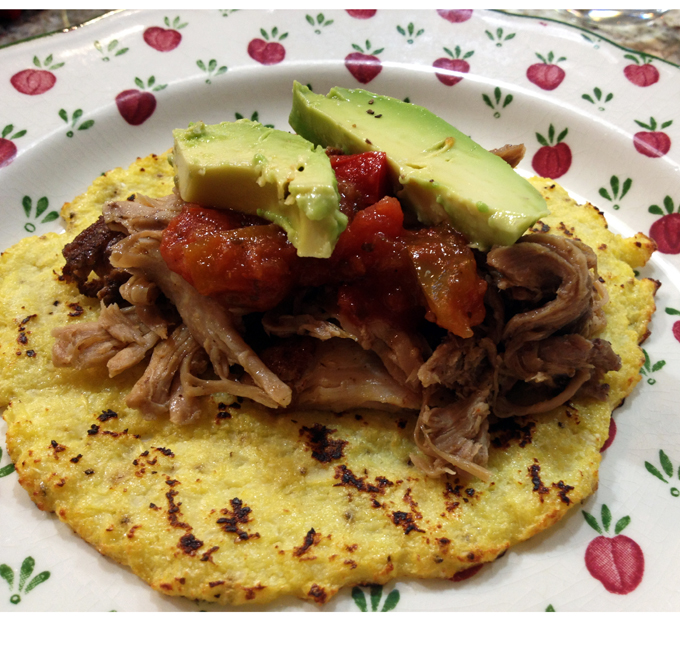
Hard to find someone who loves a Mexican meal more than I do. Tacos, tostadas, enchiladas, I love them all!  But, as the years go by, it gets easier for carbs to turn into fat, so I love it when I find a lighter way to indulge in one of my favorite cuisines. The Paleo world offers quite a few lower-carb options for tortillas using tapioca and/or coconut flour mixed with eggs, and cooked on a non-stick skillet.  They can be quite tasty, but their texture is closer to that of a crepe. If you are searching for a wrap that will be closer to the real thing, look no further. They even look like corn tortillas, don’t you think?   We had some tortillas leftover and I enjoyed them two days in a row, without any detectable loss in flavor or texture. I advise you to bake the full batch, and then do the final browning on top of the stove only for those you intend to consume right away.  Store the rest in the fridge, well wrapped.

The “caulitillas“, paired with pulled pork and a few selected toppings made for a fantastic midweek dinner! Next time I intend to use them in chicken enchiladas, like those from Mike’s original post. Scrumptious!
PulledPorkTortillas

And, don’t forget that if your cauliflower produced more than the three cups of riced veggie needed for this recipe, put the additional amount to good use: make a batch of roasted riced cauliflower with coconut oil, and save it as a tasty side dish for later.

leftovers

ONE YEAR AGO: Majestic Sedona, Take Two

TWO  YEARS AGO: Secret Ingredient Turkey Meatballs

THREE YEARS AGO: Swedish Meatballs and Egg Noodles

FOUR YEARS AGO: Italian Easter Pie

FIVE YEARS AGO: Black Olive Bialy

FOCACCIA WITH CHILE AND COTIJA CHEESE

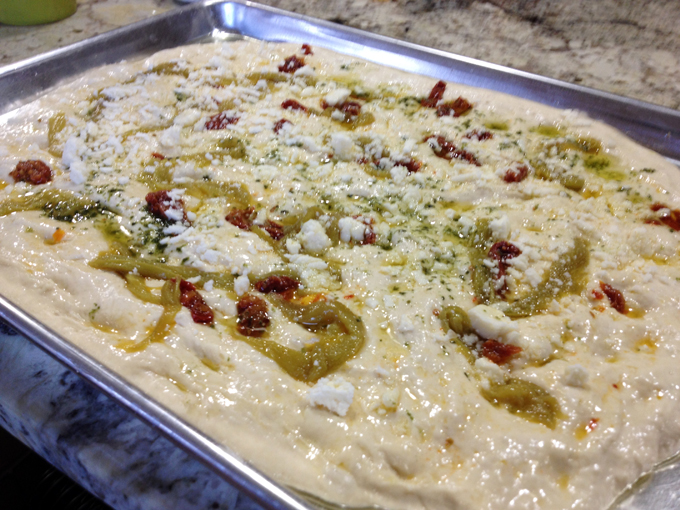
A while ago – June 2013, to be precise – I made a type of Italy-meets-Mexico-focaccia using a sauce with tomatillos. It turned out so tasty that I wanted to re-visit the same type of fusion cuisine again. It took me a while, but here is my second take on the subject.  I used my default recipe for the dough, topped with a mixture of olive oil, avocado oil, New Mexico chiles, and Cotija cheese. Some sun-dried tomatoes for a bit of concentrated sweetness, and voilà…

IMG_6521FOCACCIA WITH CHILE AND COTIJA CHEESE
(from the Bewitching Kitchen)

1 recipe of focaccia dough
Green New Mexico chiles, thinly sliced
Cotija cheese, crumbled (you can use feta, or even Mozzarella)
sun-dried tomatoes
olive oil
avocado oil
salt & pepper

Open the dough on a well-oiled baking dish, stretching with your hands, and making plenty of dimples all over its surface.

Add a good coating of olive and avocado oil, mixed about 50:50. Distribute the slices of chile, cheese, and sun-dried tomatoes all over the dough.  Season with salt and pepper.

Bake as directed in the original foccacia post.

Cut in slices and serve.

ENJOY!

I am not offering a printable version, since the main recipe for the dough is from a previous post. The toppings don’t really need any type of precise measurement, so add as much or as little of each component you feel like. Black olives could be wonderful too, by the way…

prebaked
For the chiles, I used the brand featured in this post, a gift from our friends V & K. They have amazing flavor, and of course go very well with Cotija cheese, one of those matches made in heaven.  Like V & K.

♥♥♥♥♥♥♥♥♥♥♥♥♥♥

The focaccia squares freeze well, I like to wrap 3 to 4 squares in small packages and enjoy them for weeks. Simply remove from the freezer 30 minutes before your meal, and heat them in a low oven until warm and fragrant.

I am submitting this post to Susan’s Yeastspotting event…

ONE YEAR AGO: Crispy Chickpea and Caper Spaghetti 

TWO YEARS AGO: Leaving on a jet plane

THREE YEARS AGO: Crispy Herb-Crusted Halibut

FOUR YEARS AGO: Almond Butter Cake

FIVE YEARS AGO: Bonjour!

PUMPKIN-CHIPOTLE & KALE PIZZA

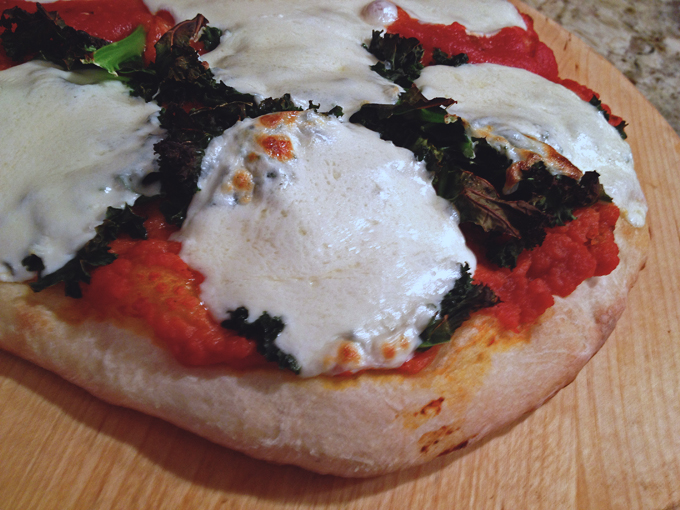
For the past 8 years I’ve been using the same recipe for our pizza dough, one that I blogged about in the very early days of the Bewitching Kitchen.  But every once in a while, I get tempted by a recipe described as “the best you’ll ever taste“, “a crust that will change your life“, or some other irresistible statement. Case in point: a recipe from Roberta’s, a restaurant in Brooklyn, NYC.  According to the description in the New York Times,  “it provides a delicate, extraordinarily flavorful dough that will last in the refrigerator for up to a week”.  Lots of rave reviews online by many people who tried it.  So, I got the required flour (Italian type 00) to be combined with regular all-purpose, and went to work.  I chose a very unusual topping for this experiment, combining kale and pumpkin, after reading this post by Joanne from Eats Well with Others, one of the food blogs I follow very closely.  She cooks strictly vegetarian dishes, but trust me, with her cooking no one would miss the meat. For her version, she used burrata, but I had to settle for mozzarella. No major harm done, it turned out delicious!

PumpkinKalePizza2

ROBERTA’S PIZZA DOUGH
(published by The New York Times)

** I doubled this recipe and made three pizzas **

153 grams 00 flour (1 cup + 1 tablespoon)
153 grams all-purpose flour (1 cup + 1 tablespoon + 2 teaspoons)
8 grams fine sea salt (1 teaspoon)
2 grams active dry yeast (3/4 teaspoon)
4 grams extra-virgin olive oil (1 teaspoon)

In a large mixing bowl, combine flours and salt.

In a small mixing bowl, stir together 200g lukewarm water (about 1 cup), the yeast and the olive oil, then pour this mixture into the flour.  Knead with your hands a few minutes until well combined, then let the dough rest for 15 minutes.

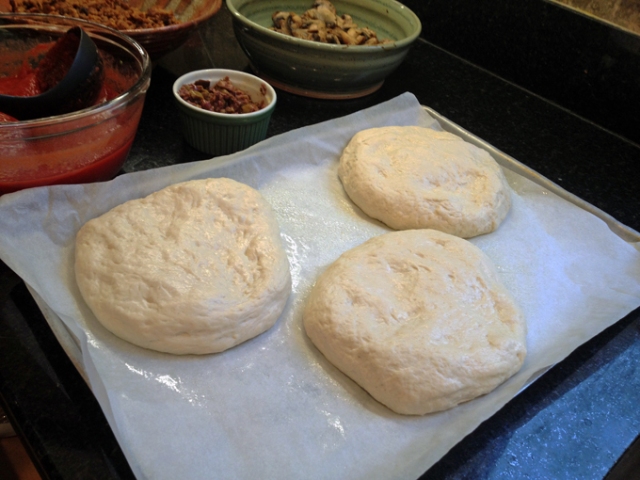
Knead the dough by hand for 3 minutes. Cut into two equal pieces and shape each into a ball. Place on a floured surface,  cover with a cloth slightly moist with water, and let rise for 3 to 4 hours at room temperature. You can also refrigerate it for 8 to 24 hours (or even several days).  If you work from cold dough, let it sit at room temperature for 45 minutes before shaping it.

Place each dough on a floured board and use your fingers to stretch it.  Top and bake on a very hot oven.

to print the dough recipe, click here
.
Dough


PUMPKIN-CHIPOTLE & KALE PIZZA
(slightly adapted from Eats Well with Others)

1 (15 oz) canned pumpkin puree
28 oz fire-roasted diced tomatoes
2 tsp chipotle chili powder
salt and black pepper, to taste
8 oz mozzarella cheese
1 bunch lacinato kale, destemmed and coarsely chopped
1/4 cup Parmigiano cheese

Heat oven to 500 (or higher). Alternatively, you can use your grill covering the rack with quarry tiles.

In a food processor, process together the pumpkin, fire-roasted tomatoes, chipotle chili powder, and salt and black pepper until pureed. Set aside.

Steam the kale in the microwave until wilted.

Spread enough pumpkin tomato sauce over the dough so that it covers it. You will have plenty of sauce leftover, use it for pasta or new fun experiments with pizza toppings. Sprinkle the kale over the sauce. Top with slices of the mozzarella and a sprinkling of parmesan cheese. Bake for 10 minutes or until done to your liking.

ENJOY!

to print the recipe, click here

composite

Comments: As far as dough goes, I think my default recipe still wins…  This was a nice enough recipe, good texture and crunch, but after making Fine Cooking version countless times, I am so used to it I don’t even have to look at the recipe. Plus, all the variations I make incorporating a little spelt flour here, a little whole wheat there, never disappointed me.  Still, it was fun to try something different.

As to the kale and pumpkin topping: winner!  Incorporating pumpkin in the tomato sauce mellows the natural acidity of the tomato, and of course the chipotle flavor doesn’t hurt either…  Great pizza, too bad we did not find burrata, but any nice melting cheese will work, of course.

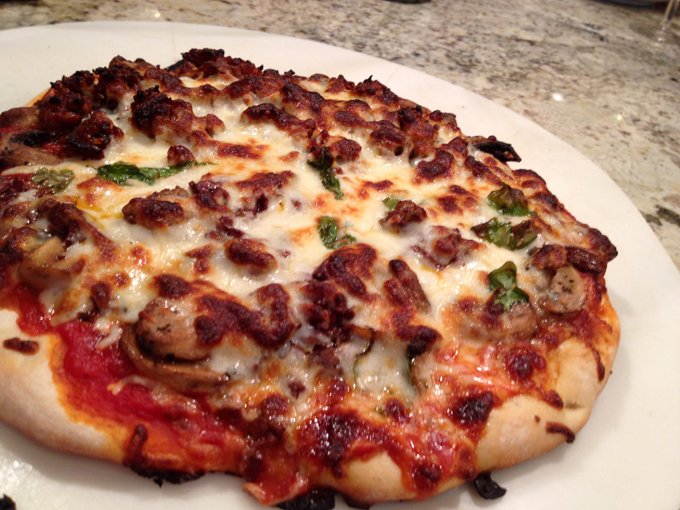
We also combined the kale in one pizza with players such as crumbled chorizo & sautéed mushrooms. Super tasty too.  Pizza dinners are always fun and make any evening feel special. Plus, what’s better than leftover pizza next day?

ChorizoKale

 Joanne, thanks for the constant inspiration, whenever I am in the mood for some spectacular take on a vegetarian meal, I know which blog to turn to…  And your macarons have not left my mind, I am still gathering my strength to attempt those…  😉

ONE YEAR AGO: Enchiladas Suizas a la Marcela Valladolid

TWO YEARS AGO: The Little Apple

THREE YEARS AGO: Majestic Sedona

FOUR YEARS AGO: Watermelon-induced Daze

A SIMPLE TACO TO REMEMBER

December 14th will be forever tainted as one of the saddest days for the United States. Unspeakable tragedy, unbearable pain for all those involved in the shooting at Newtown. One full year has passed.  Very little improvement in gun laws has been made. This is not a politically oriented blog, so I’ll leave it at that.  But, it is up to each of us to never forget what happened and put pressure on Congress to act.

I would like to recommend a fantastic article from the Nicholas Kristof, “The Killer Who Supports Gun Control“.  Thank you, Farine, for bringing it to my attention.

One of the boys whose life was cut short was so fond of tacos that he hoped to one day work in a “taco factory”.  To celebrate his memory,  I am sharing a recipe for a simple, but tasty taco today.  This one is for you, Noah.

tweaked111

HOUSTON-STYLE CARNITAS
(adapted from Homesick Texan)

3 pounds of pork butt, with plenty of fat
1 cup of orange juice
juice of 1 lime
3 cups of water
2 teaspoons of salt

Cut pork into strips (three inches by one inch), add to a large pot with the liquids and salt. Bring to a boil and then simmer uncovered on low for 2 hours. Do not touch the meat.

After two hours, turn heat up to medium high, and continue to cook until all the liquid has evaporated and the pork fat has rendered (about 45 minutes). Stir a few times, to keep pork from sticking to bottom of pan.

When pork has browned on both sides, it’s ready (there will be liquid fat in the pan). Serve either cubed or shredded (pork will be tender enough that just touching it will cause it to fall apart).

Serve it over rice or use it as a filling for tacos with your favorite toppings.
.
Share it with someone you love…
.

composite.

If you want to learn more about the lives of the children and adults who lost their life in December 14th, 2012, visit “My Sandy Hook Family”.
.
The grown-up world has failed you horribly and still does. 
(from Farine, in her letter to Noah, June 2013)

(comments are shutdown for this post)

TLAYUDA, A MEXICAN PIZZA

Every once in a while a photo makes no justice to the dish. Case in point: tlayuda. But this recipe turned out soooo delicious that I must share right now, I don’t want to wait until I make it again.  It is tastier than you would imagine from its simple ingredients put together. Very quick to prepare, perfect to make a weeknight feel special…  The recipe was recently featured by Marcela Valladolid in her show Mexican Made Easy.  It comes from the Oaxaca region in Mexico and her description of the place made me want to buy a ticket and fly there.  Tlayudas are a typical street food, and everybody loves them.   I can tell you, the combination of refried beans with the Oaxaca cheese, the lettuce and Mexican crema is spectacular!  The chorizo adds a lot to it, but if you are vegetarian, simply omit it, the tlayuda can shine on its own without it. Avocados on the side (or sliced on top) would be amazing too…

served1

TLAYUDA
(adapted from Marcela Valladolid)

 for topping:
1 tablespoons vegetable oil
5 ounces raw pork chorizo
One 16-ounce canned refried pinto beans

for tortilla base:
2 cups instant corn masa
1/4 teaspoon salt
1 + ¼ cup water
1 tablespoons vegetable oil

for final assembly:
1/2 cup Oaxaca cheese
Iceberg lettuce, shredded
Salt and freshly ground black pepper
Crumbled queso fresco
Mexican crema

For the chorizo and bean topping: In a large heavy saute pan, heat 1 tablespoons oil on medium-high heat. Add the chorizo and cook until crisp, about 6 minutes. Remove from the heat and reserve. Heat the beans on low heat or in a microwave until very hot and easy to spread.  Reserve, keeping warm.

For the tortillas: Combine the corn masa, 1 cup of water and salt in a large mixing bowl. Mix thoroughly by hand to form a soft dough, about 2 minutes. If the dough feels dry, add more water (one tablespoon at a time).  You may not need to use the full amount of water left.

Heat a 12-inch cast-iron or heavy skillet. Place a piece of parchment paper on a flat surface. Put half of the dough onto the parchment paper and place another piece of parchment paper on top. Using a rolling-pin, roll out the dough until it is 1/4-inch thick and 10 inches in diameter.  Drizzle the oil into the hot skillet and place the rolled out masa dough into the skillet to cook for about 2 minutes. Turn over to cook on the other side.

Spread 1/2 cup of the warm refried beans onto the cooked side of dough. Add 1/4 cup Oaxaca cheese and 1/2 cup cooked chorizo. Continue to cook for until the cheese is melted, another 2 to 3 minutes. Remove the pizza from the pan onto a round serving platter. Top with the iceberg lettuce. Season with salt and pepper.  Sprinkle with crumbled queso fresco and a drizzle of Mexican crema. Cut into wedges and serve immediately. Repeat with the remaining half of dough and toppings.

ENJOY!

to print the recipe, click here

Comments: The recipe makes two 10-inch discs. I did not use the full amount of the dough, and instead  made two 8-inch discs. They were perfect for our dinner, with a little slice leftover.  If you make the full recipe, it could be a wonderful appetizer for a get-together, cutting each tlayuda in squares.  That is exactly the suggestion for serving as published in the FoodTV website, by the way.

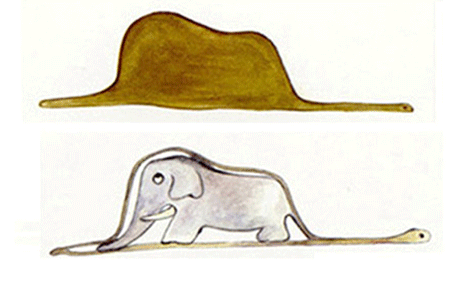
The only challenging part of making tlayuda is transferring the rolled out dough to the hot skillet.  My first production reminded me of a book I was quite fond of growing up, Le Petit Prince, by Saint-Exupéry.  Quite a popular book in Brazil at the time. Yes, that was more or less the shape of my first tlayuda.

petitprince

Undeterred, I moved on to the second pizza, and managed to get a round enough shape to justify the name.  Oh, well. Taste is more important than looks, and even the elephant-shaped concoction was devoured with gusto. Plus, cutting the odd-shaped tlayuda in 4 pieces is a nice way to exercise your brains. And knife skills.

The dough is of course quite similar to a tortilla, but thicker and absolutely perfect for a pizza-like base.  I will definitely keep this recipe in mind to improvise with other types of toppings, including options traditionally associated with Italian pizza.

_____________________________________________________________________________________________________________________________________________

“Voici mon secret. Il est très simple: on ne voit bien qu’avec le cœur.

L’essentiel est invisible pour les yeux.”

Antoine de Saint-Exupéry, Le Petit Prince

_____________________________________________________________________________________________________________________________________________

ONE YEAR AGO: Paradise Revisited

TWO YEARS AGO: Feijoada, the Ultimate Brazilian Feast

THREE YEARS AGO: Vegetable Milhojas

FOUR YEARS AGO: Italian Bread