STRAWBERRY FROZEN YOGURT

A note to subscribers: Google Reader will shutdown on July 1st, 2013. If you have a subscription to this blog through Google Reader, please sign up for email notifications, or switch to another reader. I recommend Feedly or Bloglovin. They will automatically retrieve all your Google reader subscriptions.

IMG_2047-001
We like to have a small bowl of fruit before we go to bed, often while watching a re-run of Law and Order. Actually, I should say Phil loves to have a bowl of fruit, he always offers to make one for me, I decline.  Then we end up sharing.  😉 Sometimes we have apples & diced walnuts, sometimes sliced bananas, or blueberries & yogurt, but these days strawberries are the best choice. With ice-cream season starting, I showed my gratitude for countless evenings of hitting his bowl of fruit by making a batch of frozen strawberry yogurt.  Very little sugar added, non-fat yogurt, this is as light as a dessert can be.  If you have a sweet tooth, this may not be for you. Although you can always cover it with  some chocolate sauce…  it won’t hurt our feelings!

IMG_2019

STRAWBERRY FROZEN YOGURT
(from Kitchen Daily)

4 cup strawberry
⅓ cup sugar
2 Tbsp orange juice
½ cup non-fat yogurt

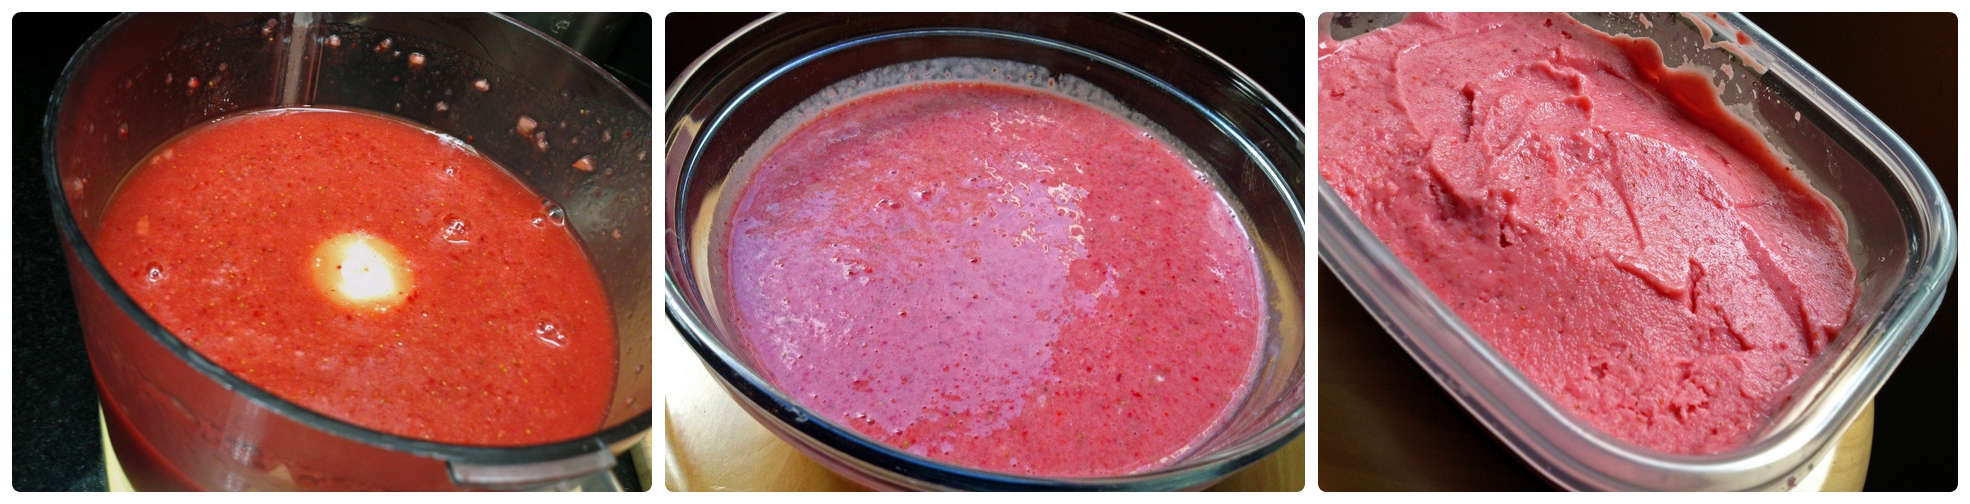
Place berries in a food processor and process until smooth, scraping down the sides as necessary. Add sugar and orange juice; process for a few seconds. Add yogurt and pulse several times until blended. Transfer to a bowl. Cover and refrigerate until chilled, about 1 hour or overnight.

Pour the strawberry mixture into an ice cream maker and freeze according to manufacturer’s directions. Serve immediately or transfer to a storage container and let harden in the freezer for 1 to 1 1/2 hours.

ENJOY!

to print the recipe, click here

composite

Comments:  The frozen yogurt will be harder than ice-cream when kept in the freezer for several hours.  We put the container in the microwave for 20 seconds and that makes it easy to scoop out our evening portion.   Contrary to our normal routine, I’ve been enjoying my own bowl.  😉

A word about Kitchen Daily:  I discovered this site by one of those fortunate accidents while net-surfing. Just like Everyday Food from Martha Stewart, this site offers a daily recipe arriving in your mailbox. For the most part, everything quite compatible with our style of cooking.  If you want to check their website, and maybe join their daily feed, jump here.

ONE YEAR AGO: Baked Coconut and “The Brazilian Kitchen”

TWO YEARS AGO: Honey-Glazed Chicken Legs

THREE YEARS AGO: French-Style Rolls

CHOCOLATE MOUSSE “LEGERE COMME UNE PLUMME”

mousse3
Paris will always be a home away from home for Phil and I.  If we could, we’d fly back there more often, but unfortunately we go through several years of (switching briefly to Portuguese) “saudades de Paris”.  Saudade is a word from my native language that has no exact match is English. From Wikipedia: “Saudade describes a deep emotional state of nostalgic or deeply melancholic longing for an absent something or someone who one loves”.  The word originated in Portugal to describe the feelings of family members of sailors who would see them leave shore on the glorious days of Portuguese expeditions, uncertain of their return.  And the exact same feeling hit the sailors themselves, as the distance between them and their beloved country would get bigger and bigger.  It’s been 3 years since we’ve last been to Paris, so the “saudade” is intensifying quite a bit.  How do I deal with it? I indulge in reading some wonderful French food blogs, like Du Miel et Du Sel, where I found this post about a chocolate mousse. It was described as  “légère comme une plumme“, or “light as a feather”.  It delivered exactly what it promised, a mousse without the cloying nature that often sends it over the top for my taste. The secret? No egg yolks and no butter!  Just pure chocolate deliciousness

mousse2

MOUSSE AU CHOCOLAT
(from Marie Claire,  Du Miel et du Sel)

* 8 servings*

200 g dark chocolate (I used 72% cocoa)
200 g heavy cream
200 g egg whites (6 egg whites)
pinch of salt
60 g sugar

Cut the chocolate in small pieces and place inside a large bowl. Bring the heavy cream to a gentle boil, then pour it over the chocolate, one-third of the volume at a time, mixing well after each addition.  After all the cream is added, the chocolate emulsion should be very smooth, without any lumps.

Beat the egg whites with a pinch of salt for a few minutes until they start to get some body.  At this point, add the sugar slowly, a little at a time, always whipping the eggs.  Beat until they form firm peaks.

Mix 1/3 of the beaten egg whites to the chocolate, no need to be gentle at this point, just mix it all well to lighten up the chocolate mixture.  Add the rest of the egg whites very gently, folding with a spatula, making sure not to deflate the egg whites too much.  Divide the mousse into 8 serving cups, refrigerate for at least 4 hours before serving.

ENJOY!

to print the recipe, click here

We make desserts exclusively when we have guests over for dinner.  For this particular occasion, we had three very special guests at home, a Brazilian scientists who came over to give a talk, and two friends from KSU.   Our Brazilian guest not only is a great scientist and a dear friend, but once suffered through a tricky situation in our home in Oklahoma.  He came to give a talk in our former department (just like he did now at KSU), and on that evening we hosted a lab party that ended with a strawberry genoise cake.  By far the worst concoction I’ve ever made, one that my guests ate in silence, but not the “good” type of silence.  The bottom layer of my “masterpiece” had somehow turned into a solid rock, hard to cut even with a serrated knife!  I know, I know, how could anyone achieve that?  It was very embarrassing. I wanted to disappear from the face of the planet. Of course, once the initial shock was over,  we laughed about it, and everyone salvaged the top layer of the cake and left the concrete part untouched.   I’ve never attempted a genoise again, although my friend Gary, patissier extraordinaire, keeps telling me to go for it.  I will, once I get over that trauma (sigh). Anyway, I wanted to exorcise the demons of my past, and make a dessert that our guests would enjoy. A chocolate mousse light as a feather could not possibly turn into a rock, right?  Right.  This was the happy ending I was hoping for our pizza party.  You can make them big, you can make them small, you can top with strawberries, you can add shaved chocolate, or go for the kill and top with some whipped cream.  Whatever route you choose, Marie Claire said it all in her post:

Vous allez vous lécher les doigts.  (It’s finger-licking good!)

mousse4
ONE YEAR AGO:
Black Olive Sourdough Bread

TWO YEARS AGO: Buttermilk Cluster

THREE YEARS AGO: Farfalle, Farfalle

RIDICULOUSLY GOOD COCONUT BRIGADEIROS

A note to subscribers: Google Reader will shutdown on July 1st, 2013. If you have a subscription to this blog through Google Reader, please sign up for email notifications, or switch to another reader. I recommend Feedly or Bloglovin. They will automatically retrieve all your Google reader subscriptions.

platter1Originally, this post would have a simple and straightforward title:  “Coconut Brigadeiros”.  I made them late on a Sunday evening to take to our department next day.  Phil tried one, and was silent for a while. Then, he said “Sally, these are ridiculously good”.  And that, my friends, is how a new title for my post was born.  I could not let that one pass… 😉

Those of you who do not know what is a “brigadeiro” are invited to jump here and read a post I made a couple of years ago.  It explains everything you need to know about the most traditional sweet served at Brazilians parties and kids’  birthdays (particularly kids younger than 91 years old).   Coconut brigadeiros are simply a variation on a classic, but wow… they ARE ridiculously good.   Make a batch. And you will be hooked.

closeup

COCONUT BRIGADEIROS
(adapted from Fine Cooking magazine, original recipe from Leticia Moreinos Schwartz)

1 can sweetened condensed milk (14 oz)
1/2 cup coconut milk
2 tablespoons unsalted butter
2 teaspoons light corn syrup
2 cups shredded unsweetened coconut (divided)

Add the condensed milk, coconut milk, unsalted butter, corn syrup, and 1/2 cup of shredded coconut to a heavy saucepan and bring to a boil over medium heat. Turn the heat down to medium low and cook, stirring constantly with a wooden spoon, until the mixture thickens.  Depending on your stove, it should take 15 minutes or a little more.  If the mixture boils too furiously, lower the heat.   Keep stirring at all times or you might end up with brigadeiros that are not totally smooth. The mixture is ready when you can see the bottom of the saucepan as you stir.   Slide the mixture out into a bowl, avoid scraping the stuff that glued to the pan. Let the mixture cool completely or until it is cool enough to handle.

Spread the remaining 1 + 1/2 cups of the shredded coconut out onto a rimmed baking sheet and toast in a 350 degree oven for 10-15 minutes, stirring every 5 minutes to ensure even browning. Remove from the oven when most of the coconut is golden brown. Place into a bowl and let cool.

Scoop the coconut mixture with a small spoon (it helps to wet the palm of your hand with cold water) and roll into 3/4″ diameter balls. Drop each ball into the shredded coconut and toss gently to coat.  Serve right away at room temperature, or chill until ready to serve.

This recipe will make 26 to 36 brigadeiros. I tend to like them a little bigger, so I normally end with less than 30.  The recipe can be doubled.   For a different take, roll the coconut brigadeiros in chocolate sprinkles.

ENJOY!

to print the recipe, click here

toasted

Comments:  A friend of mine from Brazil goes to the extent of sautéing the shredded coconut in butter for the coating.  I think toasting in the oven is good enough.  Sometimes you can find shredded coconut in smaller pieces than the ones I used. It will work fine too.

Brigadeiros can be served at room temperature, or straight from the fridge. They will have a different texture, some people (me included) prefer the soft, room temperature version.  While we were in Brazil a couple of months ago, my niece Raquel  served us a variation on brigadeiros that might very well be my favorite: brigadeiros de cupuaçú.

Now, I don’t expect too many Americans (or Europeans for the matter) to know what I’m talking about.  Cupuaçú is a fruit native of the North of Brazil, the same region where açaí grows and where my Dad was born back in 1920.  He absolutely loved both fruits! It has a very unique taste, sweet and sour at the same time. In São Paulo you can easily find cupuaçú pulp  in frozen form, which is what Raquel used for her  brigadeiros.  One of the best things I’ve ever had!  Here in the US I settle for coconut, so you can make it too…   😉

Love Brazilian cooking?  Consider getting Leticia Schwartz book, The Brazilian Kitchen.  For my review of her book, click here.

ONE YEAR AGO:  A bewitching move ahead… (from OK to KS!)

TWO YEARS AGO: Double-hydration focaccia

THREE YEARS AGO: Pierre Nury’s Rustic Light Rye: Bougnat

CLEMENTINE CAKE

cake

Clementines will always remind me of my stepson Alex, as he and his Dad would sit together devouring a few of them after dinner or mid-afternoon on weekends. We made sure to keep a backup bag stored away, just in case.  In our neck of the woods, they are sold as cuties, a well-chosen name. This cake – made in the food processor – is supposed to be very easy.  Of course,  Sally + Cake = Drama.  But it  ended reasonably well, except for a burn on my right hand. Actually, two burns.  A sticky kitchen floor. And a major spill of orange extract.

served2

CLEMENTINE CAKE
(From Razzle Dazzle Recipes)

Cake:
3 clementines
1 1/2 cups granulated sugar
3/4 cup softened butter
3 eggs
2 cups all-purpose flour
2 teaspoons baking powder
pinch of salt

Icing:
1 clementine
2 tablespoons softened butter
1 1/3 cups confectioners’ sugar
1 tablespoon orange liqueur (I used orange extract, about 1/4 tsp)

Grease an 8-cup bundt pan. Peel clementines; cut into quarters. If there are seeds, remove them (they are normally seedless).  Process with sugar in food processor until smooth. Add butter, then eggs; processing after each addition until smooth.  Add flour, baking powder, and pinch of salt; process until combined. Spoon into prepared pan. Bake in 350-degree oven for 40 to 50 minutes or until golden.  Cool on rack for 10 minutes. Remove cake from pan.

For icing: Grate and squeeze juice from clementine. In food processor, measure 1 teaspoon rind and 2 tablespoons juice; add butter, confectioners’ sugar and liqueur. Process until smooth. Drizzle over cake.

ENJOY!

to print the recipe, click here

composite

At some point I would like to be able to bake a cake smoothly. No bumps, no boo-boos.  In this particular case, the cake part went fine, except for the fact that since our oven is a perverse piece of equipment, I had to keep moving the pan around to try to cook it evenly.  Burned my hand twice in the process, touching the grids. I thought I was off the hook, and proceeded to make the icing.  Knowing how powdered sugar has a tendency to make a mess, I was extra careful measuring the first cup, and then, all confident in my flawless technique, grabbed the 1/3 measuring cup but the bag literally Poltergeisted on me!  Powdered sugar everywhere, counter, floor, rug, my shoes…   Truth be told, not the first time it happened, and I suspect it won’t be the last.  (sigh)  No time to clean then, just chased the dogs away, failing to  notice I had the bottle of orange extract already open next to the food processor.  I bumped it. Double mess to clean up, a sticky mixture of powdered sugar and orange extract.  Its smell lingered for a looong while…

Although I greased the pan well, some parts of the cake stuck while unmolding.  I went Zen, and carefully lifted the stuck parts, patching them nicely back on top of the cake.  I expected the icing to hide my poor baking skills.   That takes me to the icing part. Since I did not have orange liqueur and the orange extract seemed quite strong, I reduced the amount to 1/4 teaspoon.  Eyeballed a little water to compensate. It seemed too thick, so I added more water.  That was a mistake in judgment.  The icing ended up too thin and failed to cover the cut and paste job on the surface of the cake. It explains why you only see a close-up photo of my production… I may not know how to bake a perfect cake, but I can point the camera like a pro!  😉 Anyway, I took the cake to the department already sliced, so the boo-boos were less evident.

The cake has a very intense clementine flavor, if you like cakes that are not too sweet, this is a great option.  Of course, it does have a lot of sugar in it, but the clementine juice and zest comes through loud and clear.   A perfect cake to make graduate students happy.  And lots of staff and faculty members too…

served1

ONE YEAR AGO: Springtime Spinach Risotto

TWO YEARS AGO: The end of green bean cruelty

THREE YEARS AGO: Torta di Limone e Mandorle

SECRET RECIPE CLUB: OATMEAL FUDGE BARS

platter2

Mondays keep coming, rushing over me, but the toughest day in the week is made brighter when it’s…. Reveal Day of The Secret Recipe Club!  This club is getting more and more interesting, as new food bloggers join in. I heard the waiting list is huge, so if you have any interest in this type of group event, get yourself in line!    This month I was paired with the blog Everyday Insanity. The name describes my days quite closely… 😉  I also love her tag line: Tackling life, one brownie recipe at a time!  Everyday Insanity is hosted by Cindy, and her choice of name for the blog might be due to her having 6 kids and 14 grandchildren!  My life all of a sudden feels like a walk at the park. Seriously.  Her blog is full of tasty recipes, not only sweets.  I was very tempted to make her Thai Coconut Chicken soup, but these bars won me over. Plus, the timing was perfect: I brought them to our department on Valentine’s Day!

OATMEAL FUDGE BARS
(from Everyday Insanity)

1 cup quick-cooking oats
1+1/4 cup light brown sugar, divided
1 cup all-purpose flour, divided
1/4 tsp baking powder
1/4 tsp baking soda
1/4 tsp salt + 1 pinch, divided
10 tbsp unsalted butter, divided
1 + 1/2 cups chocolate chips
1 egg

Heat your oven to 325 degrees. Line an 8 inch square baker with aluminum foil, allowing excess to hang over the edges of the pan.  Grease foil; set pan aside.

Combine the oats, 1 cup of brown sugar, ¾ cup of flour, baking powder, baking soda, and a pinch of salt.  Stir together in a bowl to combine.  Melt 8 Tbsp butter and stir into the oat mixture until combined.  Reserve ¾ cup of the mixture for the topping.  Sprinkle the remaining oat mixture over the bottom of the prepared pan and press into an even layer.  Bake until light golden brown, about 12 minutes.  Cool completely, about 1 hour.

Combine the remaining ¼ cup flour, the remaining ¼ cup brown sugar, and the remaining  ¼ tsp salt in a bowl.  Set aside.

Melt the chocolate chips and the remaining 2 Tbsp butter in a large bowl, microwaving at 50% power in 30 second intervals, stirring after each.  Let cool slightly.  Add the egg and whisk until combined.  Use a rubber spatula to fold in the flour mixture, stirring until just combined.

Pour the chocolate filling over the cooled crust and sprinkle with the remaining oatmeal mixture.  Bake until a toothpick inserted into the center comes out with a few moist crumbs attached, 25-30 minutes. Cool completely on a wire rack.  Using the foil overhang, lift the bars from the pan and cut into squares.  Store leftovers in an airtight container at room temperature.

ENJOY!

to print the recipe, click here

cutting
Comments:  Valentine’s Day this year fell on a Thursday, so I bravely decided to tackle this recipe the evening before. After work. After dinner. Not a smart move.  I completely overlooked the instruction to “reserve part of the mixture for the topping”, and of course got into full-blast panic mode when I noticed my mistake.  By then the base of the bar was already in the oven.   I rushed to make a little more topping, calculating proportions of all ingredients quickly in my mind, hoping for the best.  Probably due to my level of stress, the chocolate seized in the microwave, prompting me to throw one of those fits that brings Phil back into the kitchen, already holding a box of Kleenex.  To make a long story short, without him, there would be no bars.  Unbearable thought.

So, when you make these absolutely delicious bars, do yourself a favor and follow the recipe as written.  That way the base of your bar will the thinner, and the crumb topping will be lighter, as intended.

Cindy, it was wonderful to get to “meet” you through this baking adventure!  Thanks to you (and also to the imperturbable man I married), I could take a platter full of sweetness to work on the sweetest day of the year!

department

To see what others in my group prepared for Reveal Day, click on the funky little frog smiling at the end of the post. Do you want to know who got my blog and what she cook from it?   Jane, from The Healthy Beehive picked a favorite recipe of mine, check it out by clicking here

ONE  YEAR AGO: Cauliflower Steaks

TWO YEARS AGO: Soft Spot for Chevre

THREE YEARS AGO: Quick sun-dried Tomato Crostini