OWN YOUR KITCHEN with CAPPUCCINO PANNA COTTA

HAPPY THANKSGIVING TO ALL MY AMERICAN READERS! 

You will definitely find plenty of T-day recipes (plus leftover ideas) in the food blogosphere, so I will dance to a slightly different tune, and offer you a cookbook review instead…  

_________________________________________________________

Anne Burrell strikes again with a new cookbook, “Own Your Kitchen: Recipes to Inspire and Empower.”   Knowing that on January 1st my annual New Year’s Resolution of  “No more cookbooks!”  will be in place, I ordered it on the first week of November.  I am obviously quite astute.  😉 However, after browsing “Own Your Kitchen,” I concluded that it would be worth breaking any New Year’s Resolution, no matter what the resulting karma may be.   I couldn’t wait to cook something from it, and with a dinner party approaching this dessert selection was winking at me:  a batch of  her Cappuccino Panna Cotta, that Anne describes in her delightful way:

“My version tastes like a coffee milkshake…YUM!  It’s super cinchy to make but very impressive and a perfect do-ahead… Dress it up with a little chocolate sauce and voilà, it’s fancy!”

Cappuccino Panna Cotta

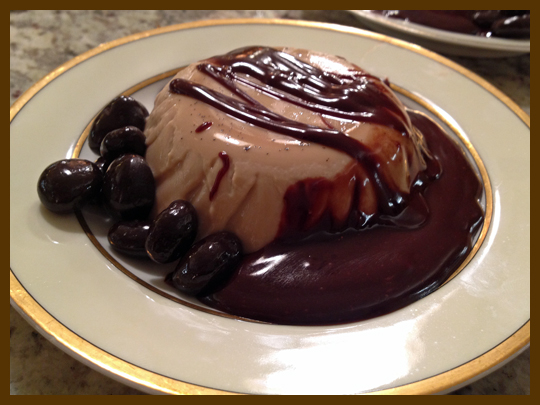
CAPPUCCINO PANNA COTTA WITH CHOCOLATE SAUCE
(from Own Your Kitchen, re-printed with permission from Anne Burrell & Random House LLC)

for the panna cotta:
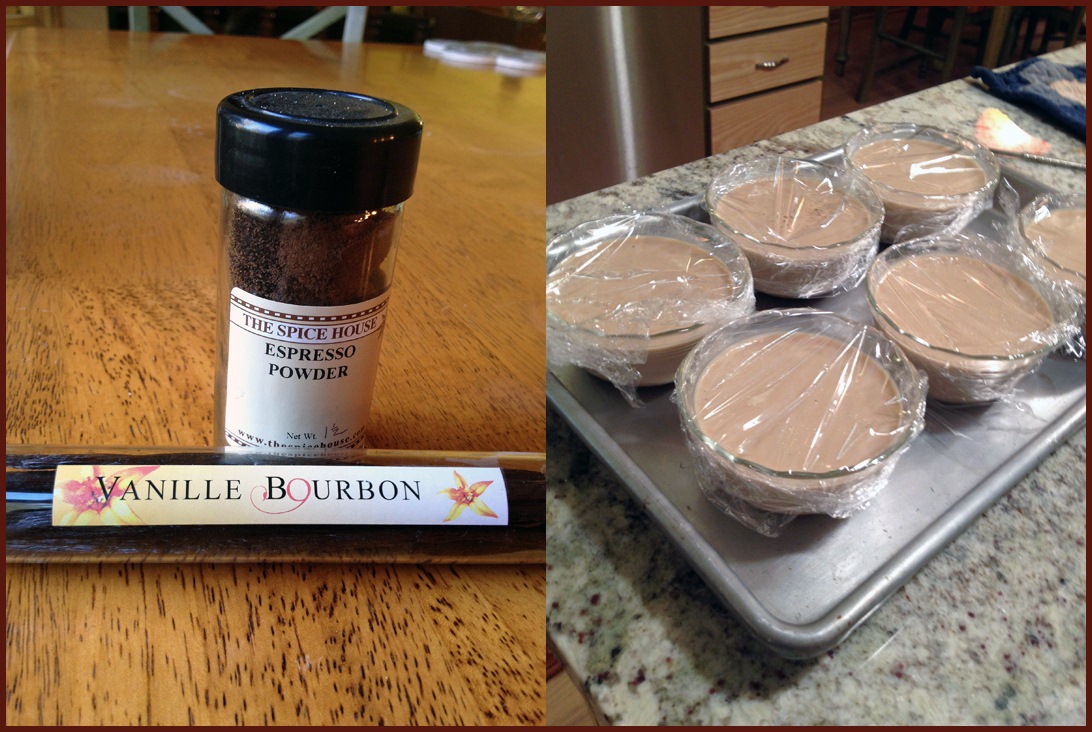
4 sheets of gelatin (*)
3 cups heavy cream
¾ cup sugar
2 tablespoons instant espresso powder
½ vanilla bean
½ cup chocolate-covered coffee beans, for garnish (I opted for chocolate-covered cranberries)
.
for the chocolate sauce:
4 ounces semisweet chocolate chips
¼ cup heavy cream
2 tablespoons unsalted butter
2 tablespoons light corn syrup

.
Make the panna cotta: In a small bowl of cool water, submerge the gelatin sheets to soften. They will go from stiff to soft.
.
In a small saucepan, combine the cream, sugar, and espresso powder. Split the vanilla bean lengthwise down one side, open it up, and scrape out the seeds with a paring knife. Add the seeds and the hull to the pan. Whisk to combine everything.  Bring the cream mixture to a boil and then immediately turn off the heat.
.
Remove the softened gelatin sheets from the water and squeeze out the excess water. Add the gelatin sheets to the pan and whisk to combine. Immediately ladle the cream mixture into four 6-ounce ramekins and refrigerate for 2 to 3 hours or overnight.
.
Make the chocolate sauce: Fill a small saucepan with 1 inch of water and bring it to a boil.  In a medium heatproof bowl, combine the chocolate chips, heavy cream, butter and corn syrup. place the bowl on top of the pan of water. Reduce the heat to a simmer. Stir until the chocolate has melted and all the ingredients are combined. Remove and use immediately or store in a warm place until ready to use.
.
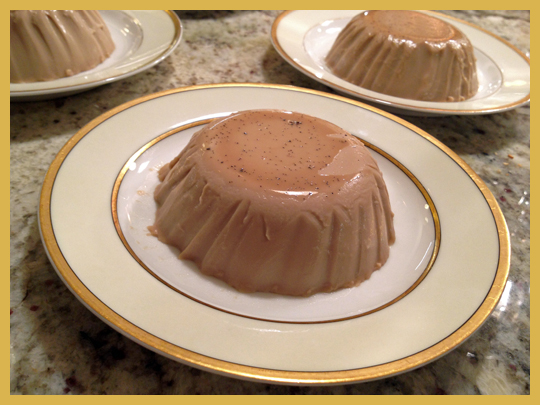
Unmold the panna cotta:  Fill a small saucepan with 1 inch of water and bring to a boil, then turn off the heat. Run a paring knife around the outside edge of the panna cotta to loosen it. Set each ramekin in the saucepan for 10 seconds. Place a small serving plate on top of each ramekin and flip it over to unmold the panna cotta. If it doesn’t release, put the ramekin in the water for a few seconds more and try again.
.
To serve, ladle a couple of tablespoons of the chocolate sauce around the panna cotta and sprinkle with a few chocolate-covered espresso beans.
.
(*) If you can’t find gelatin sheets, you can substitute powdered gelatin. To use powdered gelatin in this recipe, first bloom one ¼ ounce envelope in 2 tablespoons water, then add it to the mix. ENJOY!

to print the recipe, click here

composite1

My comments on the panna cotta…   Our desserts tend toward simple rather than extravagant, and  Panna Cotta is the essence of simplicity.  It’s a recipe that you can take in countless directions by changing the flavors in the steeping cream.   The espresso powder in this version performs pure magic with the vanilla, and when the chocolate sauce joins it, the party reaches perfection.   And, because chocolate-covered cranberries never hurt anyone, I invited them too.  😉   The fact that you can prepare the panna cotta the day beforehand makes it great for entertaining.  I measured and placed all the chocolate sauce ingredients in a double-boiler, except the butter and cream that I kept in a small bowl in the fridge.  When the dinner wound down I cooked up the chocolate sauce, unmolded the cold panna cotta, and assembled each individual serving.  The softness of the cool panna cotta against the warm sauce, and the little crunch of the cranberries was out of this world!  A perfect end for any special meal, and as Anne pointed out, simple to prepare.

panacotta1

OWN YOUR KITCHEN, my review…

ABCover

If you were hooked on Anne’s FoodTV show  (and can’t quite understand why they don’t bring her back for new episodes….) you’ll love her new book.    If you’ve never watched her show, the outcome will be exactly the same!. 😉 “Own Your Kitchen” is an extension of her personality,  highlighting the fun aspects of cooking, but also loaded with culinary knowledge from her many years as a successful chef.   My favorite cookbooks not only feature nice recipes, but also share a little background about each one.   Is it a family recipe?  Is it something that the author recreated from a vacation, or maybe from a restaurant meal?  What makes it so special that I’d want to hurry to the kitchen and prepare it?   On the other hand, I don’t  need a philosophical treatise tagged to a Bolognese sauce.  Anne Burrell achieves just the right the balance between food and entertainment.

Like many cookbooks, the overall organization of  “Own Your Kitchen”  is divided into courses, but in a flexible, amusing way:  Firsts, Seconds, Brunch, Sandwiches, Sides, and Desserts.  She precedes each recipe with what I’d call a  “teaser paragraph,” that reveals interesting info about it.  In the recipe itself she highlights (with a “HINT!”) steps to prepare ahead of time, or even the day before, that will help those who are not seasoned cooks.   Lastly, after the recipe you’ll often find remarks called Anne-notations, in which she suggests possible changes, how to make that recipe your own. It’s the “inspire and empower” aspect of the book.

Now, for a brief virtual tour of “Own Your Kitchen,”  I’ll describe my two favorite recipes from each chapter.

FIRSTS
Tomato Salad with Shrimp and Black Volcanic Salt.  
Simple has never looked so decadent and luscious.  With just a few ingredients,  she re-created a recipe  enjoyed on a trip to Hawaii, a place so dear to my heart!  Of course, I had to place an order for Black salt, and this salad will be on our table whenever great tomatoes are back in season…

Ricotta Flan with Bacon, Corn, Cherry Tomatoes and Arugula Pesto.    In Anne’s words:  “…this lovely little flan says, “Hi, ricotta, you shy girl, come out and be the superstar!”  😉  You can make your own ricotta (she shows you how), or use store-bought, but this recipe would be amazing to start a dinner party, or to enjoy as a light meal.

SECONDS
Cornish Game Hens with Pancetta-Rosemary Crust. 
She developed this recipe years ago, while working in a restaurant in New York where “her paycheck kept bouncing and she was frustrated and broke.”   She left that place, but took this gem of a recipe with her.  Wise girl! I wonder if the place still exists (I bet it doesn’t) and how they feel about losing Anne as a chef.  Ha! Their loss! Come to think of it, that’s the type of recipe that has her trademark all over, using an ingredient (pancetta) in a completely unexpected way. I love it!

Balsamic-braised Brisket with Bacon and Mushrooms.   I almost picked this recipe as my first to cook from the book, because I remember it from her show on TV.   She actually wrote that the filming crew attacked the meat once the show was over.   I can imagine the scene…  Her personal endorsement:  “one of my favorites of all the recipes I’ve ever written.”  You can bet I’ll be making it during the cold months ahead of us.

BRUNCH
Farro Granola.  
To deal with the harsh texture so common in granola,  Anne uses a clever twist on the grains of farro before adding them to the other ingredients.  Fascinating, Mr. Spock, fascinating…

Homemade Ricotta.   Making ricotta from scratch has been on my list of things to do for years!  Shame on me!  Maybe this cookbook will finally push me in the right direction.

SANDWICHES
Killer Turkey Burger.  
I remember this burger from her TV show too.   She was so tired of bad turkey burgers that she took matters into her own hands, and made a great version.  In typical Anne Burrell fashion, you will find an ingredient you would not expect in the mix.  😉

Tallegio Grilled Cheese with Bacon and Honey Crisp Apples.   Her upscale version of a classic, adding crisp apples to a strong cheese and smoky bacon.  Comfort food, in sandwich form…

SIDES
Shaved Raw Cauliflower with Caper-Raisin Vinaigrette.  
  I just know this will be a winner!   She shaves the cauliflower, then takes it in the direction of ceviche.  Yeah, baby… Much to my beloved husband’s consternation, I can’t have enough recipes for cauliflower…

Yukon Gold Potato Pancakes.    These are NOT your regular potato pancakes.  Trust me, Anne adds her usual twist to the recipe, and these pancakes will top any other version.

DESSERTS
Cappuccino Panna Cotta.  
Today’s post, a winner all the way…

Sticky Toffee Pudding.     I’ve been meaning to make this dessert forever,  as I’ve never had it but it sounds incredibly tasty.   Anne’s description of her own experience in a London restaurant will convince you  to bake a batch right on the spot.

_______________________________________________________________________________________________________________________

My job is to empower you to become the best cook you can be and learn to own your kitchen. Why? Because cooking is fun and delicious.
(Anne Burrell, Own Your Kitchen)

_______________________________________________________________________________________________________________________

She definitely succeeds in doing that. First, there is no doubt she brings the fun aspect of cooking to the forefront. Diluting a sheet of gelatin in water and feeling its textural change? Fun! Making and cooking dough? Fun (and satisfying)…  Cracking the salt crust on a whole fish at the table?  Fun! Mixing bread and sausage with your hands to make a stuffing?  Fun, of course!  But, she is also a natural teacher who is able to stress what really matters in a technique. With her trademark phrase “Brown food tastes good!“, she makes sure that cooks take their time to do that first step so common in stews, braises and even roasts: BROWN your food, do it nicely, do it well. That step alone will make a huge difference in the quality of your dishes. But that’s just one example, there’s a lot more to learn from her.

The holidays are coming up, so if you want to give someone a great cookbook, order a copy of “Own Your Kitchen“. Now, if you are like me and insist on making New Year Resolutions that involve a self-inflicted moratorium on cookbooks, hurry up and get a copy for yourself: 2014 is just about to say hello…

Disclaimer: I do not accept requests or any type of compensation to review cookbooks or products. I am not affiliated with amazon.com or any other company. Not that there’s anything wrong with it, but I like to make this point clear.

ONE YEAR AGO: Chicken Parmigiana, the Thriller

TWO YEARS AGO: Wild Mushroom Risotto

THREE YEARS AGO: Tartine Bread:  Basic Country Loaf

FOUR YEARS AGO:  Pugliese Bread

APRICOT-RASPBERRY SORBET: A FAREWELL TO SUMMER

Every year I must prepare myself mentally for a cruel fate ahead: the end of the summer. Goodbye shorts and t-shirts, goodbye laying in the sun, goodbye golf (well, that could be a good thing for my fellow players). This year summer took too long to arrive and never got hot enough for my taste. I can only hope that winter will be equally wimpy. But, back to what matters, a recipe to put our ice cream maker to good use before storing it away.  Another production of my beloved husband, this sorbet was quite likely my favorite.

served

APRICOT-RASPBERRY SORBET
(from the Bewitching Kitchen)

1 lb. fresh apricots
1 lb. fresh raspberries
1 cup water
3/4 cups sugar
1 ripe banana, cut in pieces

.
Split the apricots in half, remove the pits, and cut each half into chunks. Combine the apricot and water in a saucepan and cook, covered, over medium heat, stirring occasionally. Heat until cooked through, about 10 minutes. Remove from the heat and stir in the sugar. Let the mixture cool to room temperature.
.
Place the cooked apricots to the bowl of a food processor, add the raspberries and the banana, then puree the mixture until completely smooth. Taste and adjust the amount of sugar if necessary.  Cover and chill thoroughly in the refrigerator.
.
Freeze the mixture in your ice cream maker.
.
ENJOY!
.

to print the recipe, click here

.
Comments:  I shall hereby nominate my beloved husband the Master Sorbet Maker in our home.  He comes up with one great recipe after another, never afraid to improvise.

You’d think that a kitchen renovation could prevent him from coming up with this type of concoction, but far from that. If you paid attention to my last In My Kitchen post, you may have noticed the ice cream machine sitting at the counter during our chaotic hellnovation.   😉

A final note:  this is a very special blog post for me, as tomorrow we will be flying back home to our new kitchen!  Looking back,  I  can hardly believe I kept the Bewitching Kitchen going through it all…  It was a bit of a challenge, but here I am, almost crossing the finish line.


ONE YEAR AGO: Marcela’s Salpicon

TWO YEARS AGO: Pork Kebabs

THREE YEARS AGO: Fondant au Chocolat

FOUR YEARS AGO: Got Spinach? Have a salad!

BLUEBERRY-BANANA BREAD

Back when my site was a young baby, I blogged about one of the greatest classics in American cooking, the banana bread. I had no idea that a few months down the line, that recipe would be part of a fun quest to find the world’s best banana bread, and what’s even more amazing, it tied for first place! To me, that matter was solved. No need to even bother trying another recipe. Then, on a quiet Saturday morning, while checking FoodTV episodes taped during the previous week, I saw Giada cheerfully making a blueberry banana loaf. Blueberries and bananas, baked together until the blueberries get all soft and intensely sweet… I decided that my blog can handle a second take on a classic, especially one with a purple twist! 😉

readyBLUEBERRY-BANANA BREAD
(from Giada de Laurentiis)
.
Butter, for greasing the loaf pan
1 + 1/2 cups all-purpose flour, plus extra for dusting the loaf pan
1 teaspoon baking soda
1 teaspoon salt
1/2 teaspoon baking powder
1/2 teaspoon ground cinnamon
1/2 teaspoon ground nutmeg
1 cup sugar
1/2 cup vegetable oil
2 large eggs, beaten
2 teaspoons vanilla extract
2 ripe bananas, mashed (about 3/4 cup of mashed banana)
1 cup (about 4 ounces) fresh blueberries
.

Heat the oven to 350 degrees F. Butter and flour a 9- by 5- by 3-inch loaf pan. Set aside. In a bowl, whisk together the flour, baking soda, salt, baking powder, cinnamon and nutmeg. In a large bowl, beat the sugar, oil, eggs and vanilla until blended. Stir in the bananas and blueberries. Add the dry ingredients and stir just until blended.
.
Pour the batter into the prepared loaf pan. Bake until a cake tester inserted in the center of the loaf comes out clean, about 1 hour. Cool for 15 minutes. Remove the loaf from the pan and cool completely on a wire rack, about 2 hours.
.
ENJOY!
.
to print the recipe, click here
.

slicerow2.
Comments
:  I decided to make this loaf around 9pm on a Monday night.  It was a dark and stormy night… ooops, no, that’s the beginning of a bad novel…   It was actually a nice and warm summer night, but one in which I had to be in the lab at midnight to get some bacteria growing for an experiment early next day.   I wanted to make sure I would  not fall asleep in the middle of a Law and Order episode, and baking definitely gets my adrenaline going.  Side benefit?  Taking banana bread to the department, to make the life of the early birds a little sweeter…    😉
.

closeup2
This banana bread (or cake, or loaf, whatever you want to call it) is a breeze to make! I followed Giada’s advice and did not even use the electric mixer, was left with only a whisk plus two bowls to clean.  Awesome!

ONE YEAR AGO: Busy Times (one year since we moved our lab to KSU!)

TWO YEARS AGO: Oriental-Style Turkey Patties

THREE YEARS AGO: Sourdough English Muffins

FOUR YEARS AGO: Kaiser Rolls

SECRET RECIPE CLUB: APPLE-CINNAMON BREAD

The month of August is coming to an end. The last Monday of this busy month brings with it a special revelation: which blog was I assigned to cook from as a member of The Secret Recipe Club? And who is posting something from my blog?  Which recipe was chosen? So much excitement, so much fun… This month I was paired with a food blog Queen:  Amy, the hostess of “Fearless Homemaker” has even been on TV!   You can read about her first cooking demonstration by clicking here.   And now, here I am, cooking a recipe from her blog.  Too cool for words. If her blog is new to you, I strongly recommend you to stop by.  Not only she has loads of wonderful recipes, but side-stories that are truly special, like her surprise wedding party.  She and her partner invited friends over for a nice get-together, and all of a sudden both disappeared, changed into their wedding outfits, and next thing their guests knew, an orchestra was playing, a priest was arriving , and the party turned into their wedding!  Now the family got bigger, as she and her husband recently welcomed the arrival of   “The Fearless Baby“…  Congratulations, Amy!

I had quite a few recipes on my final list to cook for the Secret Recipe reveal day: her Vegetable and Quinoa Pilaf, her Honey-Chipotle Turkey Meatballs, her Chicken Bolognese, and also her Nutella-Swirl Pound Cake.  But, in the end, I went with an Apple-Cinnamon Bread, with chunks of apple permeating the cake.   Yes, you guessed it, I took it to our department on a sunny Monday morning…    😉

SRCAugust1

APPLE-CINNAMON BREAD
(from Fearless Homemaker)

1 + 1/2 cups all-purpose flour
1 teaspoon baking soda
1/2 teaspoon salt
2 teaspoons cinnamon
1/2 teaspoon allspice
1/4 teaspoon ground cloves
2 large eggs
1/4 cup canola oil
1/4 cup applesauce
pods from 1 vanilla bean
1 cup granulated sugar
2 cups chopped Granny Smith apples, skin removed

for topping:
2 tablespoons brown sugar
1 tablespoon sugar
1 teaspoon cinnamon

 Heat the oven to 350 degrees F.  Spray an 8 by 4 loaf pan with cooking spray and set aside.

In a medium bowl, whisk together flour, baking soda, salt, cinnamon, allspice, and cloves.  Reserve.

In the bowl of a stand mixer fitted with the paddle attachment, add the eggs and beat on medium speed for about 30 seconds. Add in oil, applesauce, vanilla,  mix until smooth.    Add the sugar and mix until well combined.

Slowly add in the flour mixture, incorporating until the flour is barely combined. Gently fold in the apple chunks. pour batter into prepared loaf pan.

Prepare the topping: in a small bowl, mix together brown sugar, sugar, and cinnamon. Sprinkle this topping over the batter in the loaf pan. Bake for 50-55 minutes, or until loaf is golden, and a toothpick inserted into the center comes out clean.

Cool bread in pan for 10 minutes. loosen sides of the loaf with a knife and invert carefully.  Cool the cake completely on a rack before slicing.

.
ENJOY!

.
to print the recipe, click here

.apple

.
Comments:
  As Amy pointed out in her post, this bread smells WONDERFUL while it bakes.  Cinnamon seems to do just that, fill the house with intoxicating aroma of deliciousness to come…    I am not sure why I’ve been picking sweet recipes for the past few Secret Recipe Club adventures, but I’m enjoying the phase.  And I suppose the members of our department don’t mind that either!   😉

___________________________________________________________________________________________________________________________________________________

Amy, it’s been great to spend time on your blog, reading your stories, marveling at your photos.  

I hope you enjoyed this month’s assignment as much as I did!

___________________________________________________________________________________________________________________________________________________

To see what the other members of my group cooked up for today’s Reveal Day, click on the blue amphibian smiling at the bottom of the post.  And if you are wondering who got my blog and the recipe chosen, go visit Karen’s site at Lavender and Lovage!  😉

ONE YEAR AGO: Secret Recipe Club: Blueberry Galette

TWO YEARS AGO: In My Kitchen, August 2011

THREE YEARS AGO: Journey to a New Home

FOUR YEARS AGO: Friday Night Dinner (very tasty pork medallions)

BLACKBERRY-CHERRY SORBET

When your office is next door to that of one of the best (and most generous) gardeners in the state of Kansas, be ready to receive amazing gifts, such as two boxes of freshly picked blackberries! We consumed some in their natural state, and decided to make a nice, refreshing sorbet with the rest. We’ve actually made two batches of this sorbet in the past month. I am sharing the recipe for the second version, which I think turned out to be the best, with the small amount of cherries plus a little unusual ingredient. Although some inspiration was found in Lebovit’s The Perfect Scoop, Phil devised his own recipe. Since we fully share our assets,  I feel entitled to call it “our own”. That’s my story, and I’m sticking to it.

blackberry2

BLACKBERRY-CHERRY SORBET
(from the Bewitching Kitchen)

3 cups blackberries
1 cup pitted cherries
1 ripe banana
2 Tablespoons lemon juice
2/3  cup sugar
1 + 1/2 cup water

Add the blackberries, cherries, and banana to the bowl of a food processor.  Process until smooth, cleaning the sides of the bowl a couple of times. Add the lemon juice, the sugar, and the water, and process everything together until fully smooth.

Keep the base in the fridge overnight or for at least 4 hours to cool completely.

Place the mixture in your ice cream maker and churn it according to the instructions of the manufacturer.

Scoop into a freezer-safe container.

ENJOY!

to print the recipe, click here

composite111

Comments:  The banana adds a nicer texture to the sorbet, which can be a bit grainy once it freezes, because there is no milk fat in it.  You can barely taste it, though. Most recipes for blackberries or raspberries will instruct you to pass the pureed mixture  through a sieve to get rid of the seeds.  We decided to skip this step, and I’m glad to report that we did not mind the seeds at all.  If you are looking for a real smooth texture, go ahead and sieve it away.  If you don’t remove the seeds, the amount of sorbet made could be just a little big for your ice cream maker.  If that’s the case, no need to worry, it’s the type of problem you should welcome with open arms (and a spoon).   Save the excess, and follow these instructions: pour some of the sorbet base in a small bowl, add Greek yogurt and a handful of fresh blueberries on top.    Enjoy late at night, early in the morning, or anytime you feel like it… it’s that good!   😉

photo

ONE YEAR AGO: Asparagus Pesto

TWO YEARS AGO: Chocolate and Chestnut Terrine

THREE YEARS AGO: Under the spell of lemongrass

FOUR YEARS AGO: Greens + Grapefruit + Shrimp = Great Salad!