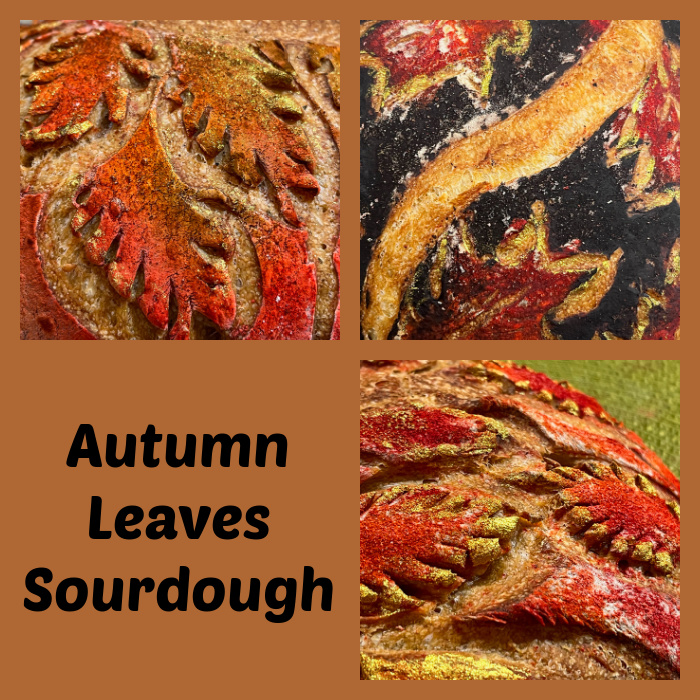
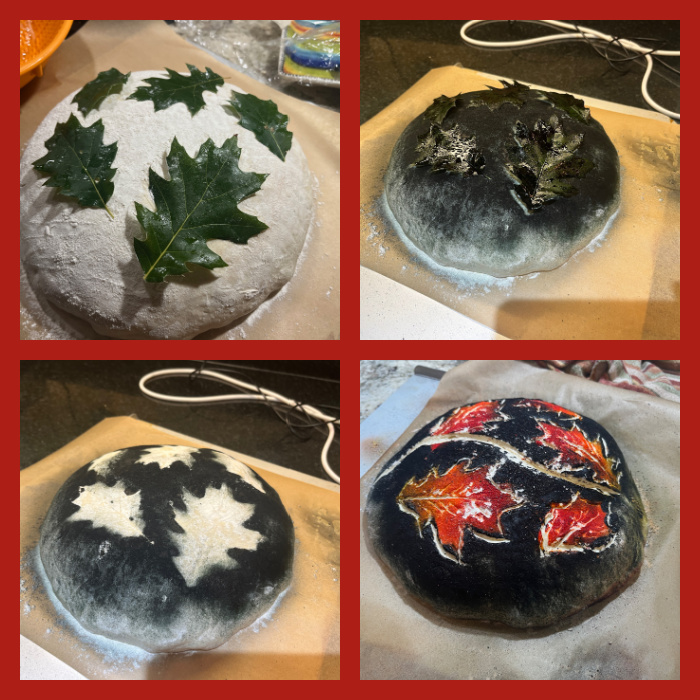
Fall is here, and to celebrate one beautiful season with sourdough bread, I tried a new technique, coupling air-brushing with leaf shapes. You can use any recipe you like, these were flavored with either Za’atar, Smoked Paprika, or Herbes de Provence.
AUTUMN LEAVES SOURDOUGH VERSION #1
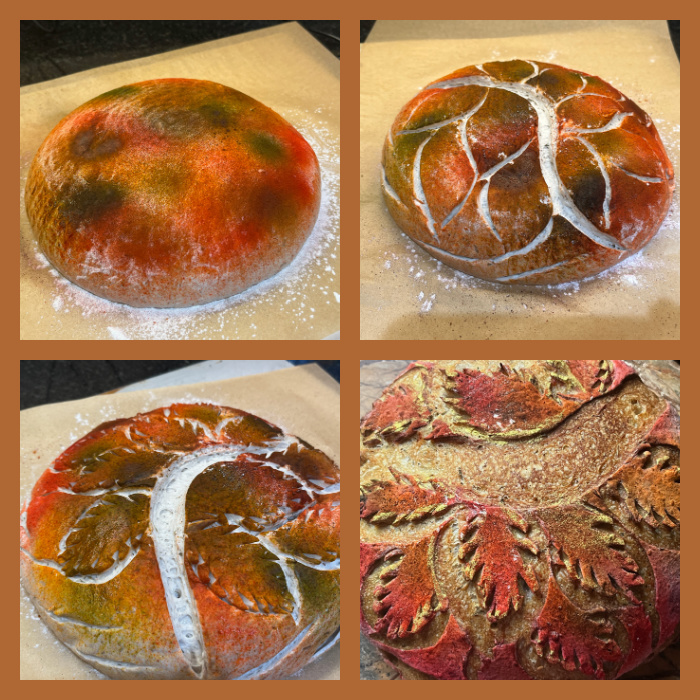
I started air-brushing a mixture of three colors, red, orange and green…
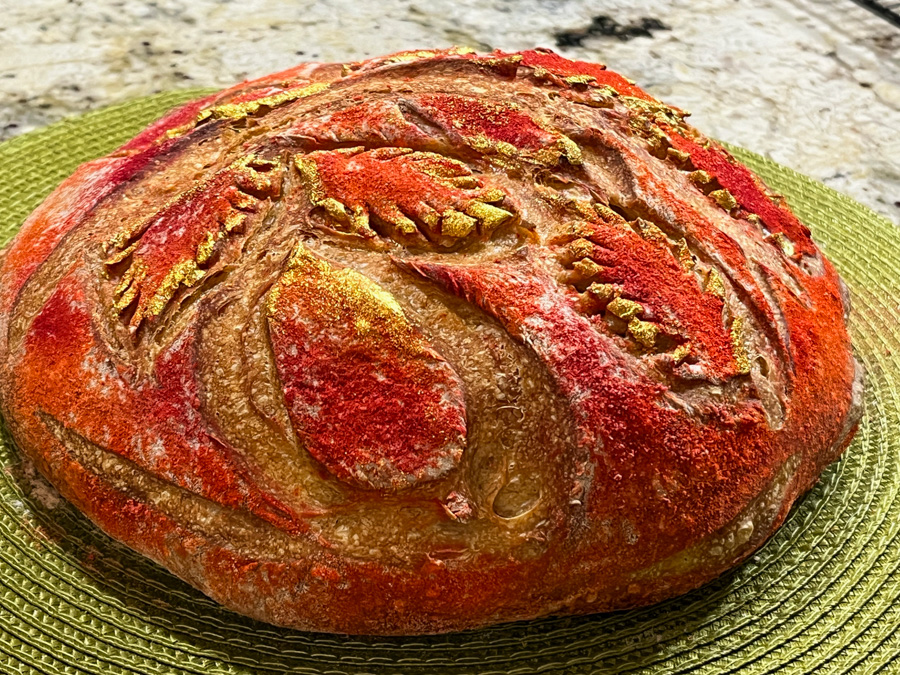
However, the green was totally lost during baking, so in my second attempt I skipped that color and went with red, orange and yellow instead….
AUTUMN LEAVES SOURDOUGH VERSION #2
I also got a little more assertive with the gold painting of the edges, which happens after baking.
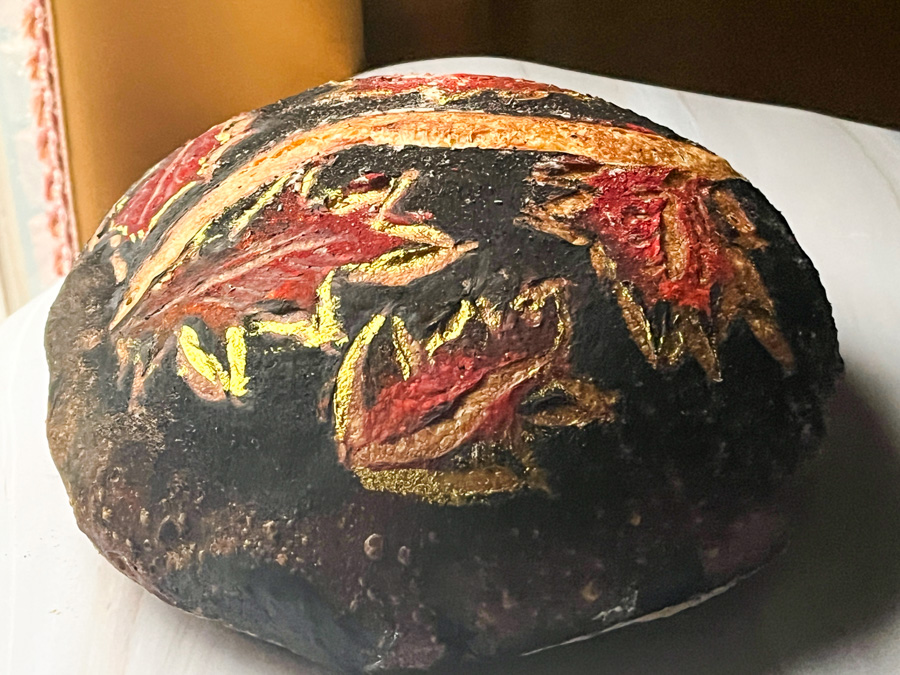
For my last version, I changed things around and used real leaves to mask parts of the dough. Spray-painted black all over, then came back with the air-brush to highlight the leaves with red and yellow.
AUTUMN LEAVES SOURDOUGH VERSION #3
It is by far the most dramatic, and what I like about air-brushing is that contrary to charcoal or cocoa powder, the black color won’t run on your fingers as you touch the bread to slice it.
Stay tuned for more adventures with air-brushing and bread, so many possibilities! A lot of inspiration available on Instagram and Pinterest, it is hard to decide what to try next…
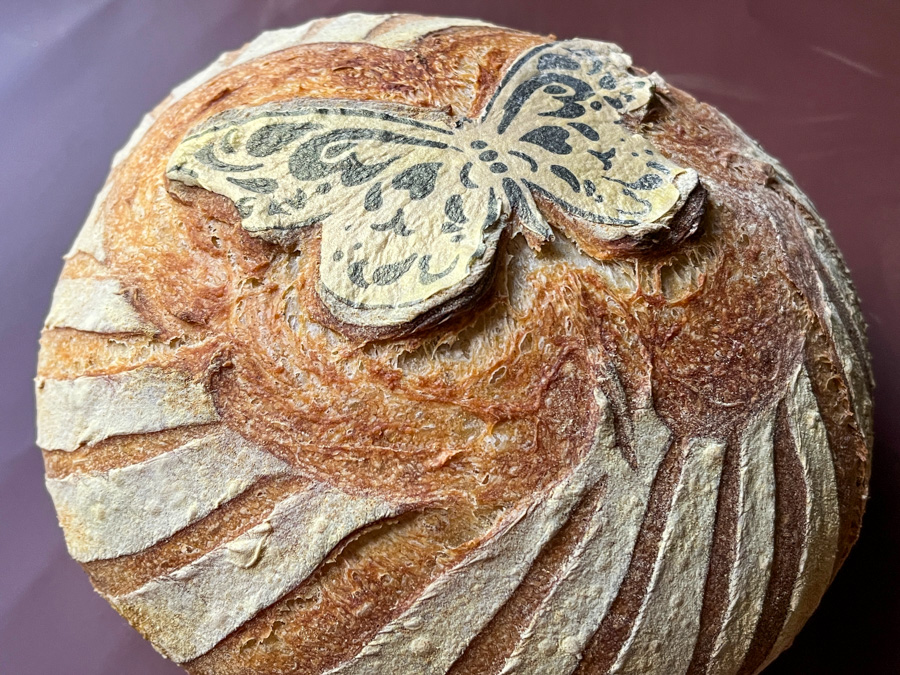
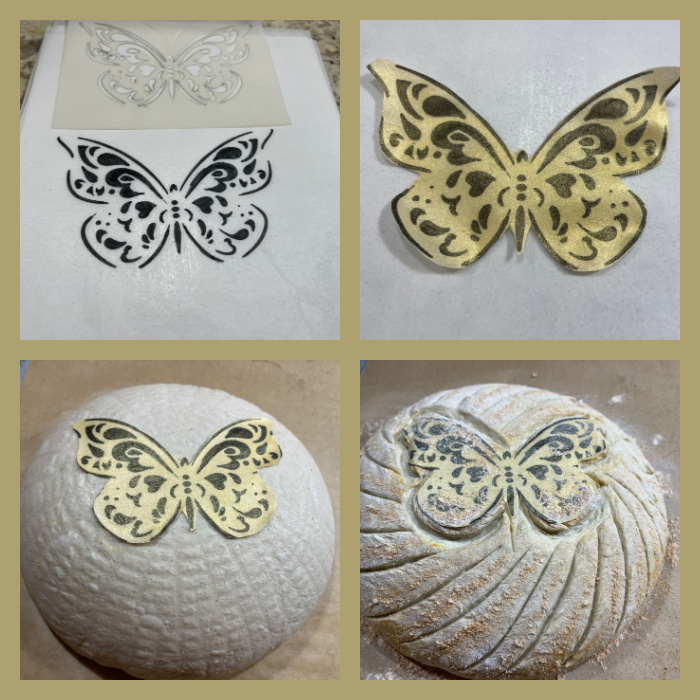
This post is dedicated to Eha, a lover of butterflies…
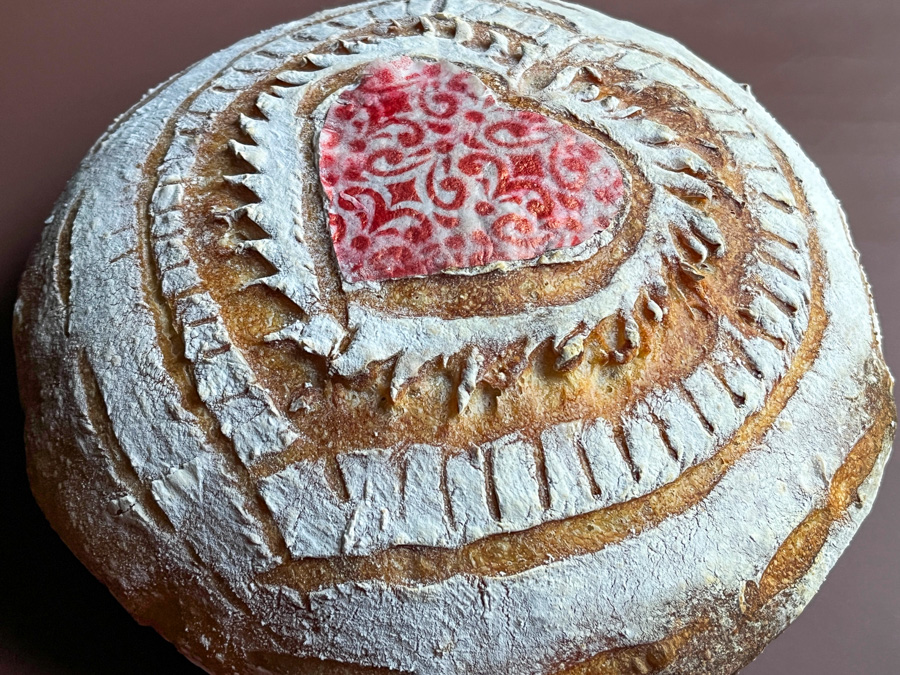
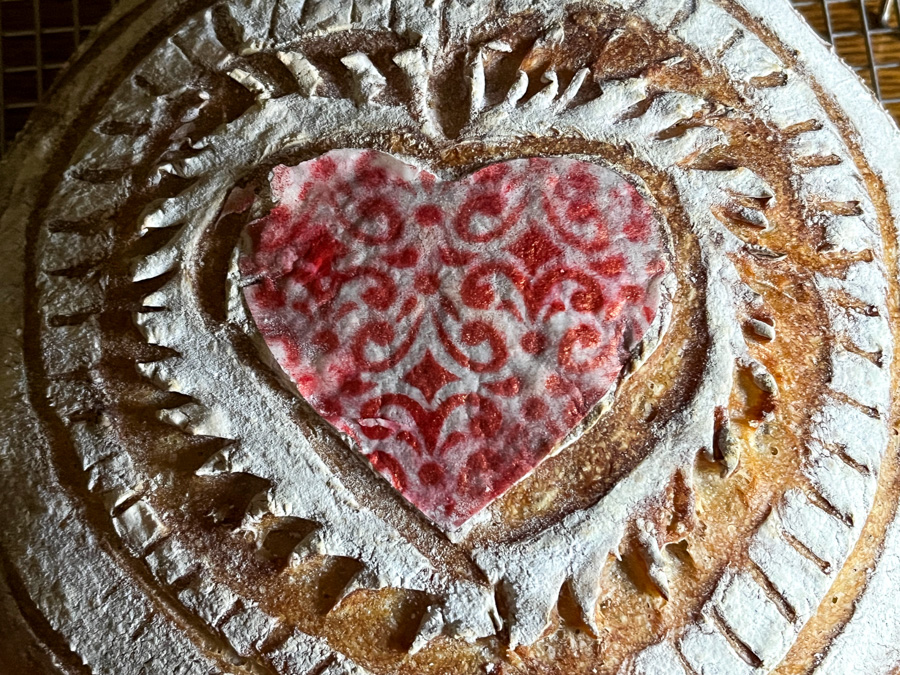
I am so excited to share this new technique with you today! I first saw it on Instagram (check this page) and decided to give it a try. The possibilities are simply endless, of course. Basically, you make a design using wafer paper painted by hand or with a stencil, add that to the shaped, fully proofed dough right before baking, score around it with a razor blade. Isn’t that the coolest thing since….. sliced bread?
You can use any sourdough formula you want, in this particular loaf I re-visited the Ras-El-Hanout of my past, because I love that combination of flavors. Below you see the preparation of the wafer paper and the way I scored it (using my Sonic blade).
I used a stencil and painted the black portion with a food safe pen. Then I sprayed the whole surface with air-brush gold. That has to dry completely, so I advise you to make the wafer paper decoration the day before you intend to bake the bread. Or even several days in advance, it stays perfect, no issues.
My dough had enough moisture for the paper to stick to the surface without problem, if your dough is too dry, spray it lightly with water. VERY lightly. After the paper is on the surface, dust the surface of the loaf lightly with tapioca or all-purpose flour. In my case, I mixed tapioca flour with a little turmeric to re-inforce the golden color and the taste of the bread. Slash around the paper and all over the bread with the pattern of your choice.
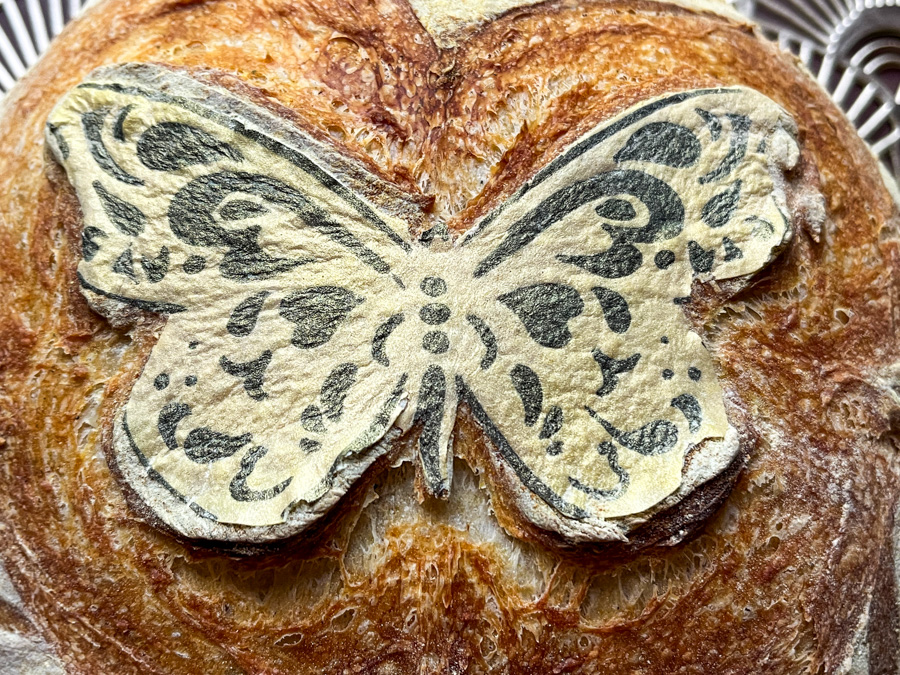
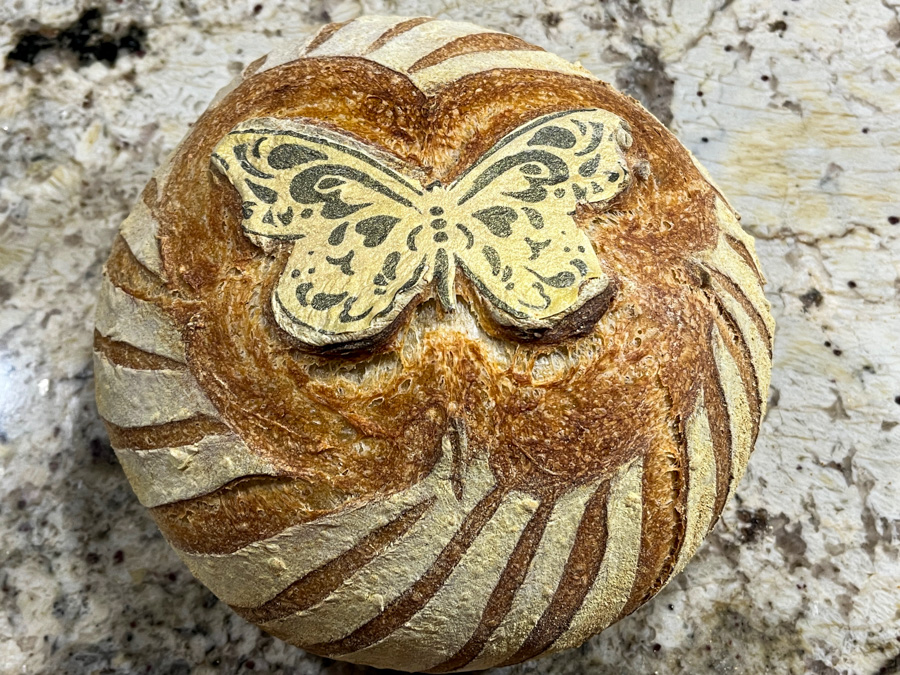
Another important point – do not forget this – after the bread has been in the oven for 5 to 7 minutes, go back and slash AGAIN only around the design. That will make it lift and look much better. Try not to forget this step.
My first attempt making this type of decoration did not work as well for two reasons: I was too focused on the paper and did not plan carefully the scoring, so it did not turn out very good. Second, I forgot to go back and slash the design again after 5 minutes into the bake. That made the paper stay glued to the bread and the design did not have the right impact. Anyway, it is the type of thing that you learn the more you do it.
I know I will be playing with this quite often in the future, and I hope you consider this fun technique also. The paper does not darken in the oven, which surprised me a bit, and the air-brush colors also seem to hold up well. If you are the artistic type, you can paint flowers, landscapes, whatever your imagination desires!
I am so excited to share this new method with you! Perhaps you’ve noticed that I talked about a little mysterious gadget in my previous post, and today I explain what it does. It is an adaptor for a razor blade to be used with a Sonic type toothbrush, You need to have the right model, in which the head is pushed into the toothbrush, not screwed in. I’ve had a Phillips Sonic toothbrush for many many years and was quite intrigued about using it to slash sourdough. Works like a dream. As one user described, “it is like having one of those lightsabers from Star Wars”. It does feel very smooth and efficiently goes through the surface without ripping the dough. You can read all about it here. Nicola, the person behind the invention is super nice and responsive, plus she is amazing at making all sorts of designs on her bread, available on youtube or IG. The website I linked has all the info to her social media.
Here is a little video of one of my recent adventures with Sonic scoring… It is 8X faster than real time. I followed one of the designs by Nicola to make this particular one.
As to the breads, I will share just one recipe because I used olive oil infused with fresh oregano to flavor it, and a little bit of dry oregano in the dough. It turned out absolutely delicious.
FRESH OREGANO SOURDOUGH (from The Bewitching Kitchen)
1/3 cup olive oil fresh oregano leaves, a big bunch 475 g bread flour 25 g spelt flour 60-70 g sourdough starter at 100% hydration 340 g water 10 g salt 1 tsp dried oregano
Make the infused olive oil by heating the oil in a small saucepan, adding the fresh oregano and simmering for a minute or so. Turn off the heat, cover the pan and let the oil sit for half an hour. Pass through a sieve to remove the leaves, pressing them well. Reserve the oil, allowing it to cool to room temperature or barely warm.
Mix all the ingredients and 2 to 3 tablespoons of the infused oil in a KitchenAid type mixer fitted with the dough hook.
Turn the mixer on with the hook attachment and knead the dough for 4 and a half minutes at low-speed all the time. If the dough is too sticky, add a little flour, you want the dough to start clearing the sides of the bowl, but still be sticky at the bottom.
Remove from the machine, and transfer to a container lightly coated with oil. Cover lightly with plastic wrap and allow it to ferment for 4 hours, folding every 45 minutes or so. After four hours bulk fermentation, shape the dough as a ball, and place, seam side up, in a lightly floured banetton. Leave at room temperature one hour, and then place in the fridge overnight, from 8 to 12 hours.
Next morning, heat the oven to 450F. Invert the dough over parchment paper, rub gently tapioca flour on the surface. Score with the pattern of your choice and bake at 450F for 45 minutes, preferably covered for the first 30 minutes to retain steam. Cool completely over a rack before slicing.
It is quite amazing to use that blade, you just need to be careful when placing it in the adaptor, for obvious reasons, it is sharp, very sharp. I like to add the adaptor to the toothbrush first, and then screw the bade in, because I find it safer to do it this way.
I love the clean cuts the blade does, and will be using it often in future breads, so stay tuned!
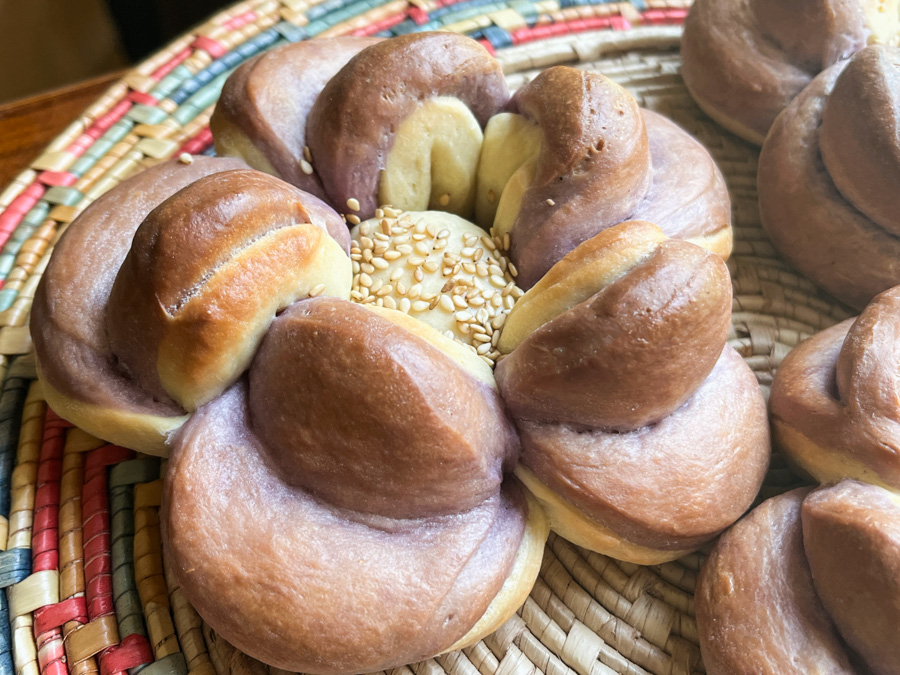
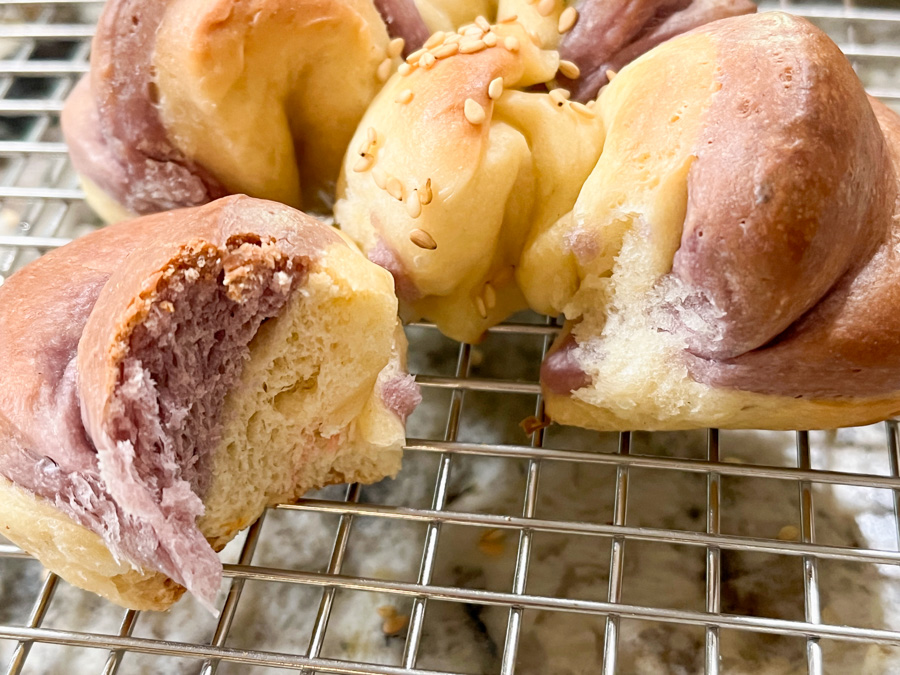
These adorable rolls popped on my Instagram feed, and I fell in love with them so hard that I mixed the dough right away. To be precise, 20 minutes after watching the reel (click here for it). I consider it a work in progress, for reasons I will discuss in the comments…
325g flour 150mL slightly warm milk 1 egg 50g butter, softened 1 tsp instant yeast 30g sugar 1 tsp salt purple carrot powder or any other natural food coloring, about 1 tsp
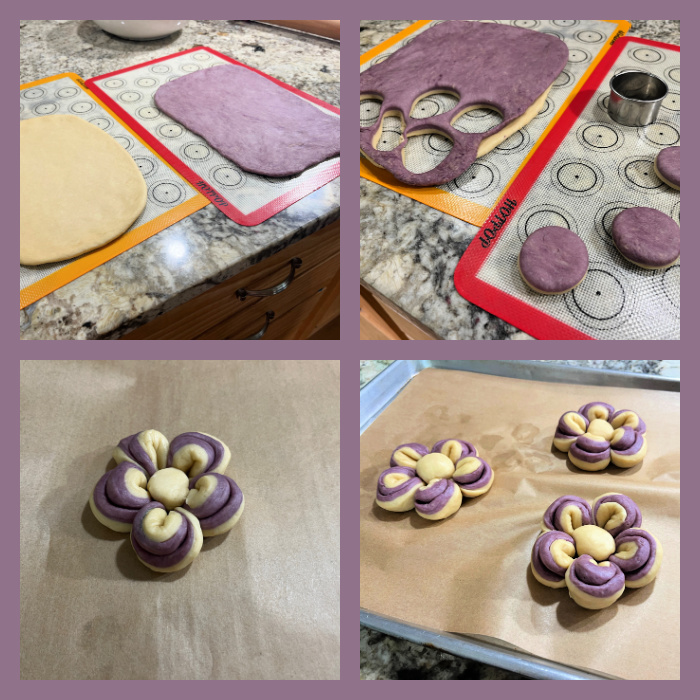
In a KitchenAid type bowl, add milk, sugar, yeast, egg, salt, and flour. Mix them together until they form a shaggy mass of dough. With the machine running (dough hook), add the butter in small pieces and knead until smooth. Split the dough in half. Color one half with your choice of natural dye.
Place both dough portions in a warm spot and let them rise for approximately 2hours, or until doubled in size. Once the dough has risen, punch it down. Roll and flatten both dough portions into squares, layering the purple dough over the white dough.
Use a cookie cutter to cut small circles from the layered dough. Take each circle and fold it three-quarters, then fold it in half again, pinching the ends to form petals. When you make five petals add a small ball of dough in the middle. Repeat the folding and shaping process until all the dough is used.
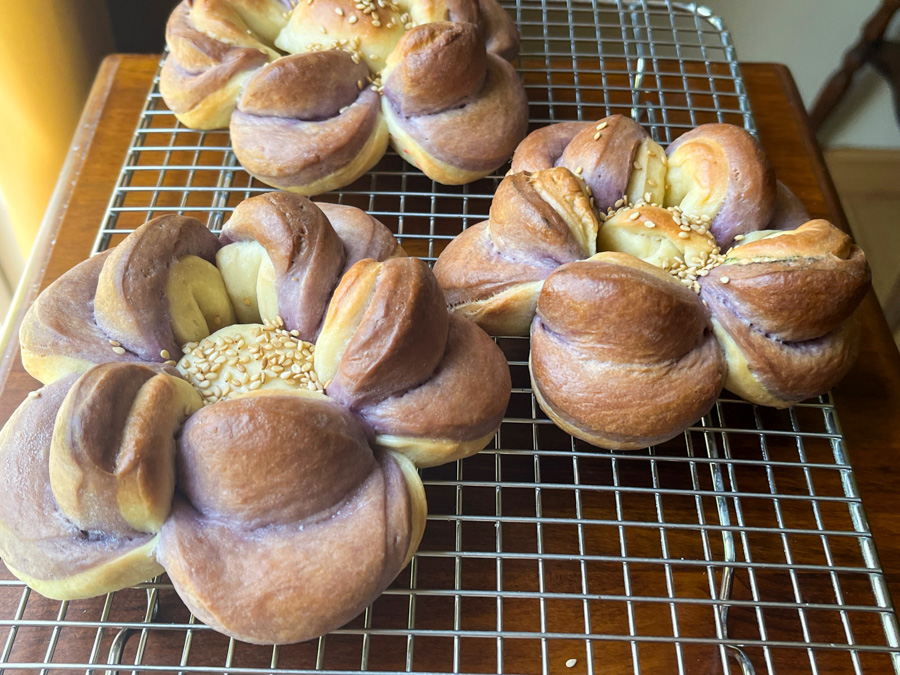
Cover the flower-shaped dinner rolls and let them rise again until doubled in size, about 1 hour. Brush the rolls with milk. Bake them in a 375F oven for 15-20 minutes, or until they turn golden brown. Once the rolls are baked, brush them with melted butter and sprinkle sesame seeds in the middle of each roll for decoration.
Comments: I used ebony carrot powder which was very beautiful in the raw dough, but baked to a much less appealing color. I will use something different next time. Also, I believe the rolls will be better if made with a smaller cookie cutter, so that the petals are more delicate and the rolls smaller. The whole recipe gave me just three rose-shaped rolls, so smaller circles are going to work better for this.
The rolls work almost like a pull-apart bread, pretty cool! Not at all complicated to make, and you can always use a single dough for the shaping effect, which will still be nice.