AVOCADO “HUMMUS”

IMG_2053Sometimes (quite often, I’m afraid) I have a recipe on my list of things to do ASAP and there it sits for a year or five. But every once in a while the exact opposite happens: I see a recipe, fall in love, and make it right away.  This avocado hummus showed up on my screen during the last Secret Recipe Reveal Day, which fell exactly on Memorial Day.  Maybe having the day off helped, but the truth is that I saw the recipe mid-morning, and made it at 3pm.  How about that for efficiency?

AVOCADO HUMMUS
(slightly modified from Chocolate and Chillies)

1 19 oz can of chickpeas, drained and rinsed
2 avocados, pitted and diced
1 garlic clove, minced or pressed (I omitted)
handful of cilantro, roughly chopped
4 tbsp freshly squeezed lemon juice
2 tbsp extra-virgin olive oil
1/2 tsp ground cumin
1/4 cup water
salt and freshly ground pepper to taste

In a food processor add all the ingredients and process.  Add more water if you would like it thinner.

ENJOY!

to print the recipe, click here

We love hummus!  It is one of the items we always have in the fridge, in fact. I know homemade is best, but we love it so much that we always have one or two of those little packages of Athenos plain hummus.  I often add a little bit of freshly squeezed lemon juice, a touch of smoked paprika, and we enjoy it with crackers or veggie sticks.   But this version with avocado instead of tahini is shockingly delicious…  BTW, do you know that blog, Shockingly Delicious?  Great site, check it out…

This hummus recipe makes quite a large amount, so I could save some for a later, happy day!

IMG_2054

ONE YEAR AGO: Moving is not for sissies!

TWO YEARS AGO: Awesome Broccolini

THREE YEARS AGO: Pizza! Pizza!

FOUR YEARS AGO:  From Backyard to Kitchen

SECRET RECIPE CLUB: PORTOBELLO CAPS STUFFED WITH GOAT CHEESE AND PROSCIUTTO

servedThe month of March brought a little too much snow and cold to The Little Apple, but we escaped to warmer weather for a week, arriving from Brazil right before the last Monday of the month.  Why is the last Monday of the month so important in the food blogging world?  Well, by now you should  know it’s The Secret Recipe Club Reveal Day!  This month, with all our activities and travel, it was a bit of a stretch to participate, but I’m very glad I did.  I was paired with a blog I had not visited before, The Saturday Evening Pot.   The host is a trained chef, and that immediately got the adrenaline pumping in my system as I browsed his site in search of recipes.  He cooks for a family of four: himself, his wife, and two kids, but to make things a lot more interesting they have food sensitivities that need to be taken in account. Not an easy task.  He does so beautifully, though, and in his site you will find extensive nutritional information for all recipes and plenty of advice for adapting recipes in case you face similar issues.  I highly recommend a visit to The Saturday Evening Pot.   It did not take me very long to choose a recipe, because I’ve been thinking of trying stuffed Portobello mushrooms for quite some time.  Great opportunity to go for it, wouldn’t you say?

served2
PORTOBELLO MUSHROOM CAPS STUFFED WITH GOAT CHEESE AND PROSCIUTTO
(from The Saturday Evening Pot)

3-4 large Portobello mushroom caps
olive oil
balsamic vinegar
4-6 ounces crumbled goat cheese
3-4 slices prosciutto

Heat oven to 350 degrees. Using a small dinner spoon, remove stems from mushroom caps and scrape out brown ribbing on underside of mushroom caps. Lay mushroom caps, stem side up, on sheet pan.  Brush each lightly with olive oil. Bake approximately 10 minutes or until mushroom browns lightly.

While mushrooms are baking, take each slice of prosciutto and cut using a chiffonade pattern.  Set aside.

Remove mushrooms from oven and turn oven setting to broil. Drizzle each mushroom cap with a small amount (approximately 1/4 teaspoon) of balsamic vinegar.  Spread vinegar evenly with the back of a spoon over inside of mushroom cap. Place one slice shredded prosciutto in each mushroom cap and sprinkle goat cheese on top of prosciutto. Place sheet pan under broiler and melt cheese until lightly browned.  Remove and serve immediately.

ENJOY!

to print the recipe, click here

cleanprepared

Delicious recipe, we will definitely be making this over and over and over, adding all kinds of goodies on the Portobello base.  My only modification was to use fig balsamic vinegar, but other than that, I followed his recipe to a T. Three mushrooms were more than enough for Phil and I, we even had half of the small one leftover.  We enjoyed them as our main dish, next to a little spaghetti with olive oil and lemon zest.  You may notice there is no salt in the recipe. Both goat cheese and prosciutto can be very salty, particularly when you roast them, so make it as written and see how you like it.  I love salt, but did not miss it.  For a full vegetarian version, sun-dried tomatoes could replace the prosciutto, or a mixture of black olives, roasted red bell peppers…  this is a nice basic method to improvise according to your mood.

If you want to see the other recipes made by friends in my group, click on the blue frog that is smiling at you at the bottom of the post.

ONE YEAR AGO:  Orange and Rosemary Pork Tenderloin

TWO YEARS AGO: Pistachio-Walnut Sourdough Bread

THREE YEARS AGO: Cottage Loaf and Yeasty Dogs


BRINED-ROASTED PUMPKIN SEEDS, AND A BLOG AWARD!

As I mentioned on my last post, we love to make our own pumpkin puree.  The pulp stores well in the freezer and we can use it for pies, soups, sauces or anything else that calls for the canned product.  Once that pumpkin is cut open, don’t even consider discarding the seeds.  Roasted pumpkin seeds, home-made, are a special delicacy.  Until now, we’ve followed traditional recipes that simply lay the seeds on a baking sheet, lightly coated with oil and a little seasoning.  This time, I took a slightly different route: I brined the seeds before roasting, and what a difference that made!  All credit goes to Sawsan, the wonderful blogger and ultra-talented photographer from Jordan.  Check her post about it here.

seedsserved
GINGER-PAPRIKA TOASTED PUMPKIN SEEDS
(from Chef in Disguise)

1/2 cup pumpkin seeds
2 cups water
1 tablespoon salt
about 1 tablespoon olive oil
powdered ginger to taste
paprika to taste
     

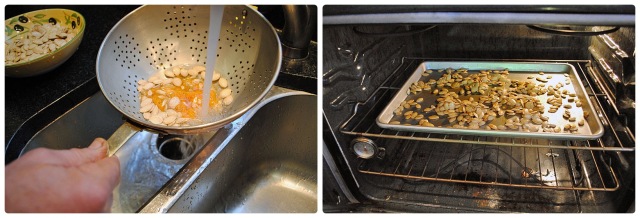
Scoop out the insides of your pumpkin. Separate the seeds from the stringy core and then rinse them.

In a small saucepan, add the water, seeds and 1 tablespoon of salt
Bring to a boil. Let simmer for 10 minutes. Remove from heat and drain.
Spread your seeds on a baking sheet and allow to dry completely.

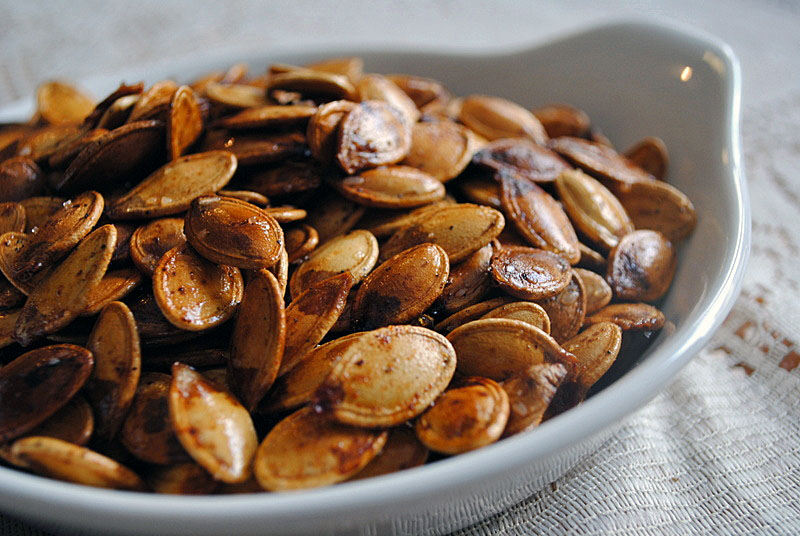
Drizzle the seeds once they get dry with olive oil, sprinkle with the powdered ginger and paprika, or any seasonings you like, and mix to coat them as evenly as possible.  Spread the seeds out over the roasting pan, all in one layer.

Bake in a preheated oven at 390-400 F (200 Celsius) until they become golden brown or are roasted the way you like (10-20 minutes).  Allow to cool, and….

ENJOY!

to print the recipe, click here

composite22
Comments:
  Three great advantages in this brining approach: first, the salt gets into the seed instead of outside only, so you won’t get excess salt in one bite and not enough in another, which is quite common in the “old” method.  Second, the roasting time is reduced quite a bit, as the seeds will have a chance to start mellowing down in the brining step.  Third, a more pleasant texture in the final roasted seeds.  Try it with different seasonings, Southwest spices, chili, I bet even a little curry could be pretty interesting.

Sawsan, thanks for teaching me about brining seeds, loved it!

And now, time to show off the blog award I received…

sisterhood-of-the-world-bloggers-award

I was nominated by Alison, from Happy Domesticity, and of course, it made my day when I got her note about it!  The winner of such an award must answer 10 questions. Alison added one more. I don’t mind at all, as 11 is a prime number, therefore a lot cooler than 10.  Let’s get down to business:

  1. What is your favorite color? Maybe yellow, but I do love all colors.
  2. Your favorite animal? I am a dog person as far as pets go, but my favorite animal is the elephant.
  3. Your favorite non-alcoholic drinks? Home-made carbonated water (Penguin). Twist of lemon is optional.
  4. Facebook or Twitter? I use Facebook because my blog posts are publicized there and I get messages from readers.  I don’t like Twitter, and that is a good thing because I wouldn’t have time for it anyway.
  5. Your favourite pattern? I love horizontal stripes, just the other day I noticed that a lot of my clothes have stripes.
  6. Do you prefer getting or giving presents? Giving.
  7. Your favourite number?  4
  8. Your favorite day of the week? Friday.
  9. Your favorite flower? Christmas-cactus in full bloom.
  10. What is your passion? My work. But fitness comes a close second. Cookbooks get the bronze medal.
  11. Why did you start to write your blog? I love to write and I love to cook. Blogging seems like a good way to join both… 😉 

Alison, thank you once again for the award!
Makes blogging even more fun!

ONE YEAR AGO: A Sourdough Experiment

TWO YEARS AGO: Shrimp and Fennel Casserole

THREE YEARS AGO: Tuscan Bread

THE SECRET RECIPE CLUB: CASHEW CHICKEN LETTUCE WRAPS

Drum roll please…..     This is my first anniversary as a member of The Secret Recipe Club!   One year!  Obviously, I was counting the days for this Reveal Day, and jumped on my assigned blog the very minute I got the email notification.  This month I am cooking from Loving Life, a fun blog hosted by Kirstin, the super busy Mom of two teenage daughters, who also home schools them.  I get tired just thinking about it.  The mystery is how does she find the time to cook and blog?   Superpowers?  Probably. I chose a recipe from her blog quite quickly, because it is one of the favorite dishes we used to order at a place called BJ’s in Oklahoma.  Light, refreshing, flavorful,  Phil and I would share that as an appetizer almost every single time, but I had never made it at home.  Great opportunity, which I grabbed right away!  😉

CASHEW CHICKEN LETTUCE WRAPS
(adapted from Loving Life)

for teriyaki sauce:
2 Tbs. soy sauce
1 Tbs. rice vinegar
1 Tbs. brown sugar
1 tsp fresh grated ginger
1/8 tsp. cayenne pepper
1 tsp. Sesame oil

for chicken:
3/4 lb. chicken breast or tenders, diced in small pieces
6 green onions, finely chopped
1/2 cup diced baby-bella mushrooms
3/4 cup chopped cashews
1 tsp. soy sauce
canola oil
6-8 butter lettuce leaves

for topping:
2 carrots, peeled & julienned
1/2 Tbs. Sesame Seeds

Mix all sauce ingredients, making sure the brown sugar dissolves.

Place some canola oil in a non-stick pan and cook chicken till cooked through and lightly browned. Add green onions, mushrooms, cashews and 1 tsp. soy sauce. Cook until mushrooms soften. Add teriyaki sauce. Cook stirring often on medim-high heat until sauce began to caramelize a bit on the chicken. Lower heat to “low” and continue to cook a bit longer or until your desired consistency is reached.
.
Serve on lettuce cups, adding julienned carrots and sesame seeds on top.
.
ENJOY!

to print the recipe, click here

We absolutely loved this recipe!  Next time I might just up the amount of sauce a little bit, but other than that, no changes…    This post gives me the opportunity to share with you a very special gift we received from our friend Cindy.  She probably got tired of me complaining about the electric stove in our new home, and one day I got this box delivered with an induction-type single burner cooktop!  Not only it works great, but it is a life-saver for me, due to another small problem in our kitchen: no ventilation. I had pretty much given up on frying or sauteing fish or meat.   With this cooktop, I was able to install a cooking area on our patio, and voila’: no more offensive odors!  Plus, it’s is such a nice setting, don’t you agree?

Cindy, thanks so much for such a thoughtful gift!

For the full round-up on the Secret Recipe Club, click on the cute blue frog. To see which recipe was chosen from my blog this month click here to visit Lindsay’s blog…

Kirstin, nice to “meet” your blog!  Have fun with today’s reveal day!

ONE YEAR AGO: Clay-pot Pork Roast

TWO YEARS AGO: Panmarino

THREE YEARS AGO: A Classic Roast Chicken


INSPIRED BY MARCELA

The FoodTV Network: Like a broken record, I might normally go on and on complaining about how great it was but no longer is…  I must say, though, that the more I watch “Mexican Made Easy”, the more I enjoy the show. Marcela Valladolid is knowledgeable, cooks great food, and is fun to watch.  Plus, she’s fit, which is not an easy task when you’re cooking and working with food 24 hours/day. Or close to that.  😉  Apparently she owes her great shape to yoga. On one segment about healthy Mexican recipes, they showed her serene composure during a tough variation of Warrior III, and in an advanced Twisted Pigeon pose.   Impressive, to say the least. ANYWAY,  back to cooking.  In another recent episode she shared a tempting recipe for Chicken Tostadas.  I didn’t make it yet, but I prepared one of its components, the tomatillo-avocado salsa.  It couldn’t be easier, and it couldn’t be tastier.   You absolutely HAVE to make and serve this alongside anything!  Ok, maybe not with that slice of chocolate cake… 😉

FRESH TOMATILLO-AVOCADO SALSA
(adapted from Marcela Villadolin)

6 ounces tomatillos, husked, rinsed and coarsely chopped
2 large yellow tomatoes, cored and seeded, coarsely chopped
1 avocado, halved, pitted and peeled
1/2 cup packed fresh cilantro leaves
1/2 Serrano chile, seeded, minced
1 tablespoon fresh lemon juice
salt and  black pepper

Combine the tomatillos, yellow tomatoes, avocado, cilantro, chile, and lemon juice in a blender and puree until smooth. Season the salsa with salt and pepper, to taste. Transfer to a serving bowl, cover and refrigerate for up to 2 hours or until ready to use.

ENJOY!

to print the recipe, click here

I intend to make her chicken tostadas soon, my problem is the tostada part, as we still don’t have a gas cooktop. But I might improvise and come up with an alternative.  Tomatillos are usually cooked before incorporation into salsas and sauces, but in this fresh preparation  the  trick is to mellow their sharpness down by adding the avocado and using lemon juice instead of lime juice, as most salsas would call for.  Simple. Brilliant.

My adaptation was adding some yellow tomatoes because they were looking at me and begging to be consumed. So I did.  Next time I might either process a little less, or save a few pieces of diced yellow tomatoes to add at the end and make it a bit more chunky.  We served it with grilled steel head trout and steamed rice.  Phil thought that a great idea for an appetizer would be a small piece of grilled salmon or trout over a blue tortilla chip, and a dab of tomatillo salsa on top.  No doubt in my mind I married a guy with great taste.  😉

On a slight tangent: as I was preparing this post, I got the feed notification of a new article by Kelly, over at Inspired Edibles.  She wrote a nice tribute to her yoga instructor, and I invite you to jump over there and read it, very inspring! As a bonus, you’ll also get a recipe for homemade energy bars…
I am all for energy bars these days! 😉

ONE YEAR AGO: Chocolate Intensity

TWO YEARS AGO: Shrimp in Moroccan-Style Tomato Sauce 

THREE YEARS AGO: Golden Zucchini: A Taste of Yellow