DRESSING UP THE ROLL CAKES

I’ve been on a roll for the past month or so. After a long time – maybe a couple of years – not making this type of cake, I flirted with a few different methods, including some by very reputable sources, but they did not please me for one reason or another. In this post, I share a very simple recipe. Simple in the sense that you don’t have to separate egg whites and yolks, it rolls very well thanks to the addition of a very small amount of melted butter, and the texture is not dry like most versions, again kudos to butter. Plus, you won’t need a special size of baking pan, it works well in a half-sheet, which most people have in their kitchen. You can of course, skip the patterned decoration, but, why would you not go for it?
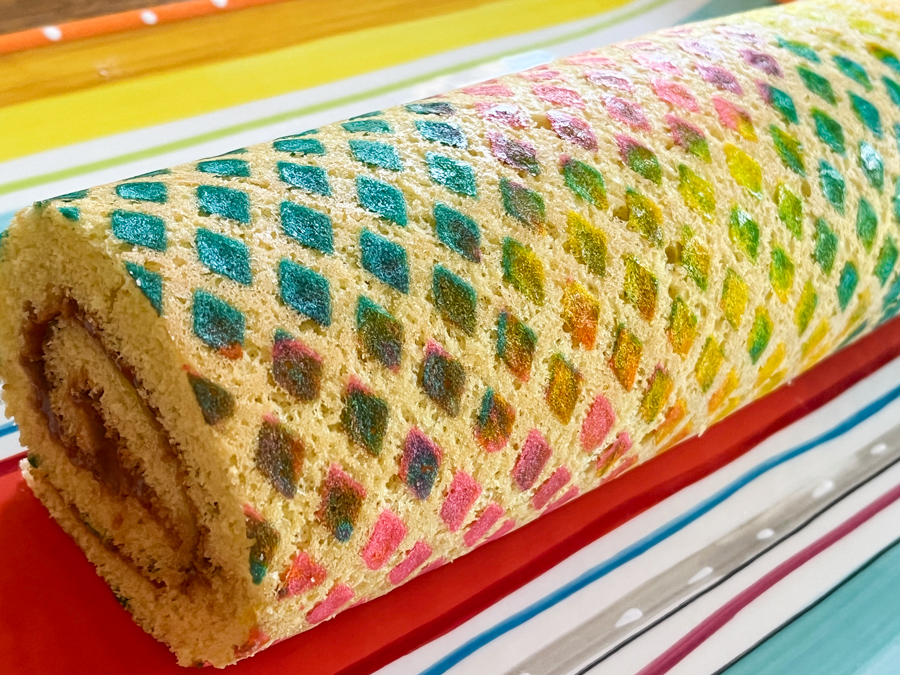
FESTIVE DIAMOND ROLL CAKE WITH NUTELLA FILLING
(from the Bewitching Kitchen)

for the decoration:
50g butter, softened
50g powdered sugar
50g egg whites
50g all-purpose flour
pink, yellow and teal gel colors

for the cake:
130g cake flour
1 teaspoon baking powder
5 large eggs, at room temperature
200 g granulated sugar
Zest of 1 lemon
1/2 teaspoon lemon extract
1/2 teaspoon vanilla extract
¼ teaspoon kosher salt
2 tablespoons butter, melted and cooled

For the filling:
170g (6 ounces) cream cheese, softened to room temperature
¼ cup heavy whipping cream
½ cup powdered sugar
½ cup Nutella
1 tablespoon cocoa powder

Make the piping decoration by beating the butter with powdered sugar in a small bowl until fully combined. I used a hand-held electric mixer. Add the egg whites and beat for a couple of minutes. Add the flour and mix by hand with a spoon, divide in three portions. Color them pink, yellow and teal.

Place a diamond stencil over a sheet of parchment paper and add small amounts of each color as shown in the composite picture included in my post. Spread the colors in one direction, trying not to move them back, but making sure to cover all the little diamonds. Carefully remove the stencil frame and freeze the parchment for 30 minutes or so.

Heat oven to 375°F. Sift the flour and baking powder into a small bowl. Reserve. Place the eggs and sugar in the bowl of a standing mixer fitted with the paddle attachment. Beat until the mixture form ribbons, about 12 minutes. Add the lemon zest, lemon extract and vanilla. Beat until combined. Sift the flour mixture over the beaten eggs, fold gently. When the flour is mostly incorporated, add a little bit of the mixture to the melted butter, whisk well. Pour that into the cake batter, whisk gently to disperse. Pour over the frozen parchment paper placed in a half baking sheet, and smooth the surface.

Bake the cake until it begins to pull away from the sides, about 12 minutes.

Transfer the pan to a cooling rack, cover the cake with a towel and let it cool fr 10 minutes. Remove the towel, sift a little powdered sugar over the surface and flip it over parchment paper. Gently peel off the paper with the design, flip the cake again over a clean towel. Starting with a short side of the cake, roll the cake gently, using the towel to support the cake as you go. Let the cake cool all rolled up in the towel, seam side down.

While cake cools make filling by using a handheld mixer or standing mixer to beat cream cheese and heavy cream on high until light and fluffy, 3 to 4 minutes. Add ½ cup powdered sugar, Nutella, and cocoa powder. Start the mixer on low and slowly increase speed, beating until the filling is light and fluffy. The filling should be thick and spreadable. Refrigerate for 30 minutes, so that it sets a little.

Carefully unroll the completely cool cake, spread the filling, then roll it again. Wrap the cake in plastic and refrigerate for at least 3 hours, overnight is best. When ready to serve, slice a small piece of each of the ends, so that it looks more polished.

ENJOY!

to print the recipe, click here
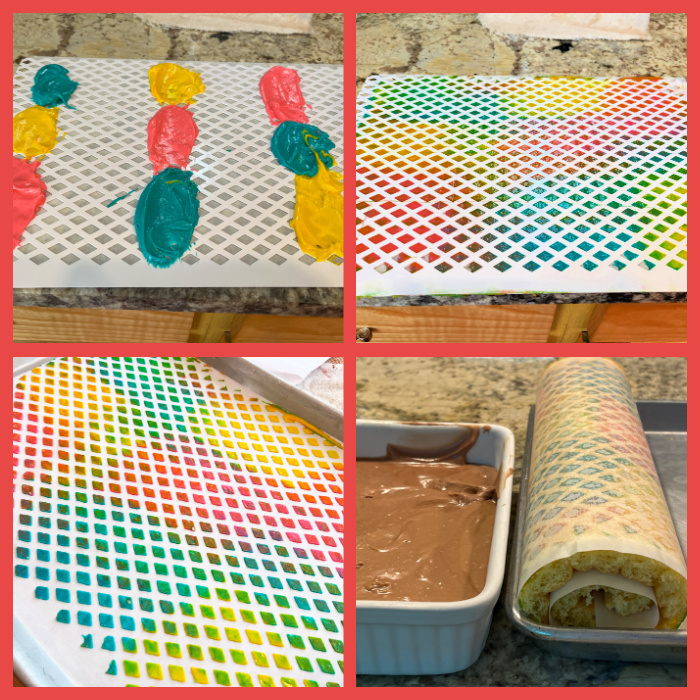
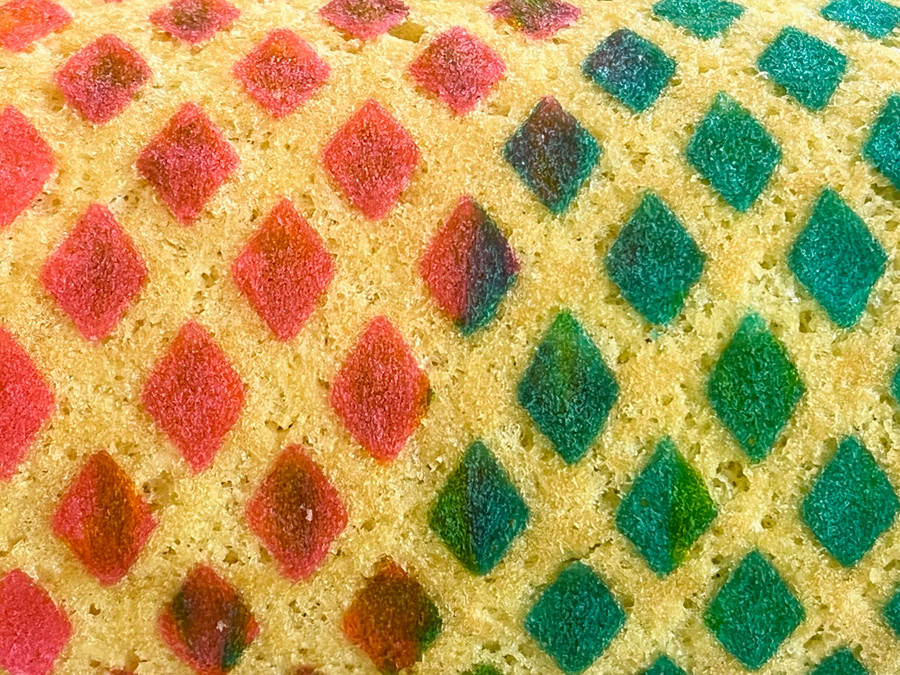
Comments: For this pattern, I used three colors of the paste, and placed them in alternating spots over the large stencil, that covers the whole surface of the half-sheet. The thickness of the stencil determines the amount of paste that gets into the paper. The design transfers very well to the surface of the cake, and does not interfere with rolling it.

I’ve had this stencil frame for many years, bought it on eBay, but could not find it anymore.
This one is very similar, in case you are interested.
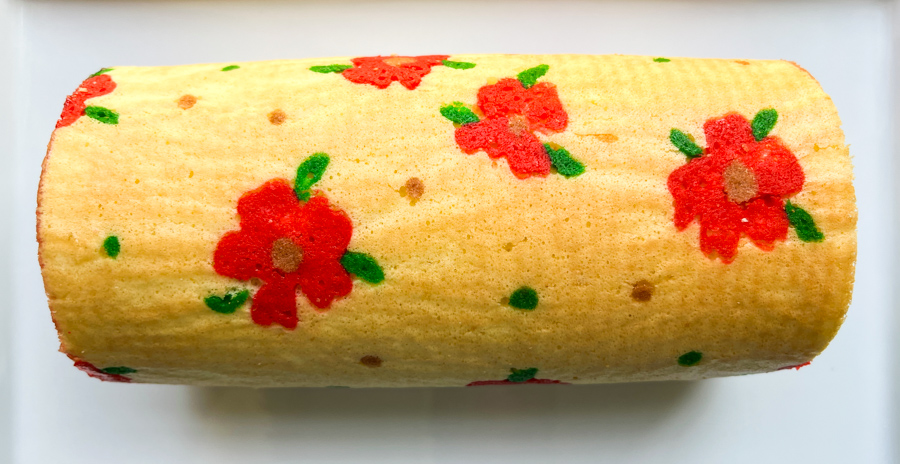
If you don’t have a stencil frame, there are plenty of alternatives to decorate, one of them drawing little flowers on the paper, and pouring the batter on top. Two things are important to remember: first, the design cannot be too large, or it will pull the cake during baking, and might even make a crack in those spots. Second, the layer of the design should be as thin as possible, because it you make it too thick, it might not incorporate well into the cake batter, and pull away during baking. Make sure to use white parchment paper, because it helps keeping the cake layer lighter, giving better contrast with whatever pattern you go for.

The Nutella filling is excellent! I’ve used it to fill macarons a couple of days later. The cream cheese does a little magic to cut the sweetness of Nutella. It has a wonderful spreadable consistency, but the macarons stored in the fridge held up pretty well, once moved to room temperature for 20 minutes or so. I hope you give it a try, either to fill a regular cake, make sandwich cookies, or…. a patterned roll cake!

ONE YEAR AGO: Roasted Carrot and Barley Salad

TWO YEARS AGO: Ode to Halva

THREE YEARS AGO: Brazilian Pao de Queijo (re-blogged)

FOUR YEARS AGO: Apricot Linzer Torte

FIVE YEAR AGO: A Trio of Air-Fried Goodies

SIX YEARS AGO: Focaccia with Grapes, Roquefort and Truffled Honey

SEVEN YEARS AGO: Moroccan Carrot Dip Over Cucumber Slices 

EIGHT YEARS AGO: White Chocolate Macadamia Nut Cookies

NINE YEARS AGO: Cilantro-Jalapeno “Hummus”

TEN YEARS AGO:A Moving Odyssey

ELEVEN YEARS AGO:
Hoegaarden Beer Bread

TWELVE YEARS AGO:
 Ancho-Chile Marinade: Pleased to Meat you!


THIRTEEN YEARS AGO:
 Shrimp Moqueca

THAI CHICKEN WITH PEANUT SAUCE

A recipe that led to a marriage proposal gotta be pretty awesome, don’t you think? You can check out the details on this blog post. I modified slightly the recipe, which is delicious, but could not possibly end in engagement, as I am – as you know – very happily married already. The flavors are complex and the whole meal super satisfying. It would work on any type of weather, cold evenings, or warm nights. So even if you are in Brazil or Australia, grab the ingredients and go for it.


THAI CHICKEN WITH PEANUT SAUCE
(adapted from Well-Plated blog)

for the sauce:
1/3 cup creamy peanut butter
1/4 cup tablespoons water (or more if needed)
2 tablespoons honey
3 tablespoons soy sauce
2 tablespoons Thai red curry paste
2 tablespoons rice vinegar
1 tablespoon minced fresh ginger
1 teaspoon red pepper flakes

for the stir-fry:
2 tablespoons extra virgin olive oil
1/2 tsp salt
1 medium shallot, thinly sliced
3 boneless, skinless chicken breasts, cut into ½-inch pieces
1 medium size head of broccoli, florets only, chopped
½ cup dry-roasted, unsalted peanuts
fresh cilantro leaves, amount to taste

In a medium bowl, whisk together the sauce ingredients until smooth: the peanut butter, water, honey, soy sauce, red curry paste, vinegar, ginger, and red pepper flakes. Set aside.

Make the stir-fry: In a deep, large nonstick skillet or wok, heat 1 tablespoon of the oil over medium-high heat. Once the oil is hot but not yet smoking, add the shallot and cook until fragrant and beginning to soften, about 3 minutes. Add the chicken and salt, and sauté, stirring occasionally, until fully cooked through, about 4 minutes. Transfer everything to a plate.

Add the remaining 1 tablespoon oil, then the mixed vegetables. Sauté until the vegetables are crisp-tender. You can close the pan with a lid and reduce the heat for a couple of minutes to promote even cooking by steaming, then remove the lid, increase the heat until they are done to your liking.

Return the chicken and shallot to the skillet. Add the peanut sauce. Toss to coat evenly, and cook until heated through, about 2 minutes. Stir in the peanuts and cilantro. Taste and add additional soy sauce or red pepper flakes, adjust salt if needed.

ENJOY!

to print the recipe, click here

Comments: Peanut butter is obviously super thick and dense. I found it better to reduce the amount and dilute it a bit further with water, compared to her original recipe. If you don’t do that, it will be a bit too thick once you add it to the pan and heat it with all other ingredients. Feel free to add garlic if you like, if you’ve been around my blog you might remember we have issues with it, and never use it. Other veggies can be used instead of broccoli, but I would keep the bell pepper – orange, red or yellow – avoiding the green like a plague as it creates hell in my digestive system.

Leftovers were enjoyed by yours truly over shirataki noodles, for a low carb lunch that was exactly what I needed to keep me going…

ONE YEAR AGO: Baharat Flower Sourdough

TWO YEARS AGO: Biscoitinhos de Canela

THREE YEARS AGO: Salmon Tacos

FOUR YEARS AGO: The Chignon

FIVE YEARS AGO: Rack of Lamb Sous-Vide with Couscous Salad

SIX YEARS AGO: Focaccia with Grapes, Roquefort and Truffled Honey

SEVEN YEARS AGO: Moroccan Carrot Dip over Cucumber Slices

EIGHT YEARS AGO: White Chocolate Macadamia Nut Cookies

NINE YEARS AGO: Cilantro-Jalapeno “Hummus”

TEN YEARS AGO:A Moving Odyssey

ELEVEN YEARS AGO:Hoegaarden Beer Bread

TWELVE YEARS AGO:
 
Ancho-Chile Marinade: Pleased to Meat you!

STEAMED CHICKEN WITH BLACK BEAN SAUCE

Sometimes a recipe intrigues me. I am not sure I will like it, or might have issues with the method of preparation, but something tells me I must give it a try. I saw this one at chinasichuanfood, placed an order for the fermented black beans (featured in my latest In My Kitchen post), took a deep breath and went to work. We simply loved it! Plus, it gave me a totally new use for the pressure cooker, exploring the steam setting. Do you need a pressure cooker to make it? No, you don’t. But it gave a delicious, velvet texture to the meat. We ate like kings. Or maybe I should say emperors.


STEAMED CHICKEN IN BLACK BEAN SAUCE
(adapted from chinasichuanfood)

6 boneless, skinless chicken thighs, cut in small pieces
1 Tablespoon sherry wine (or Chinese cooking wine)
1 Tablespoon soy sauce
1 Tablespoon hoisin sauce sauce
¼ teaspoon ground black pepper
¼ teaspoon salt
2 spring onions
5 slices of ginger
1 Tablespoon cornstarch
2 Tablespoons fermented black beans, finely minced
2 Tablespoons peanut oil
shiitake mushrooms, amount to taste, or a mixture of mushrooms
sesame oil and soy sauce to finish

Make a marinade with the sherry, soy sauce, hoisin, salt and black pepper. Add the chicken pieces, mix well, add the spring onions and ginger pieces. Place in the fridge for several hours.

Discard the spring onion and pieces of ginger. Add the cornstarch to the meat and gently mix. Place the mushrooms in the bottom of a steamer, then add the chicken on top. Spread the fermented black beans all over the chicken pieces. Heat the oil until it is starting to smoke. Pour immediately over the fermented beans, it will sizzle.

Steam the whole mixture of mushroom and meat for 15 minutes. If using a pressure cooker, add enough water (a little over 1 cup) in the pan to make sure it will have enough to steam for the required time.

Remove the meat from the steamer and serve, drizzling a bit of sesame oil and soy sauce.

ENJOY!

to print the recipe, click here


Comments: I used 6 pieces of chicken and that was the maximum amount my steamer would hold. It was enough for our dinner and we had leftovers that I claimed for my lunch next day. The texture of the meat is perfect for my taste. I normally prefer to stir-fry breast meat, saving the thighs for the grill, but steaming is a real game-changer. Once again, not the type of recipe that will win beauty contests, but the flavor was fantastic. It will definitely go into our regular rotation. You can go into the original website and watch a nice video of the whole preparation.


ONE YEAR AGO: Ginger-Dill Salmon

TWO YEARS AGO: Eleven Years, Time for Goodbye

THREE YEARS AGO: Salmon Tacos

FOUR YEARS AGO: A Dream that did not come true 

FIVE YEARS AGO: Kaleidoscopic Macarons

SIX YEARS AGO: Zucchini Noodles with Sun-dried Tomato Pesto

SEVEN YEARS AGO: In My Kitchen, July 2015

EIGHT YEARS AGO: Sous-vide Pork Chops with Roasted Poblano Butter

NINE YEARS AGO: Roasted Strawberry-Buttermilk Sherbet

TEN YEARS AGO: Amazing Ribs for the 4th of July!

ELEVEN YEARS AGO: Baby Back Ribs on the 4th of July

TWELVE YEARS AGO: Blueberry Muffins

THIRTEEN YEARS AGO: A Pie for your 4th of July

HAPPY 4TH OF JULY!

For those in the USA, have a nice celebration… please do your part to minimize the fireworks, as it is so difficult for pets and for many human beings, for all sorts of reasons.

To learn more about this set of cookies, stop by my cookie blog with a click here…

IN MY KITCHEN, SUMMER 2022

2 months, 11 days since our beloved friend left us…


In My Kitchen posts are hosted by Sherry, from  Sherry’s Pickings. Please visit her site to see whateverybody else is sharing this month. I join four times each year, on the first day of January, April, July and October. If you are a food blogger, considering taking part of this fun event. It is chance to share those little things you bought or received as gifts and that make your life in the kitchen easier. 

In our kitchen…


The most delicious lettuce leaves known to mankind, or so we think… thanks to the work of my beloved husband who years ago built a planter and keeps it going every Spring…


The picture above is a couple of weeks old, the planter looks like a little jungle now…

In our kitchen…


A very simple gadget to slice butter (available here). Normally people would buy it to serve pats of butter to guests, but I use it to slice a stick and use in baking. It comes to room temperature a lot faster and it’s so much easier than slicing with a knife.


In our kitchen…


Another simple gadget, this one works magic to get kernels off corn cobs (available here). Super efficient and again, easier than any other method I’ve used.


In our kitchen…


A silicone mold that is used for fondant, but as you can read about in my cookie blog, it also works for baking cookies.


In our kitchen…


Fermented black beans (douchi), small bombs of flavor used in traditional Chinese cooking. I am learning my ways with it. They will be featured in a great recipe very soon. In a food blog near you!


In our kitchen…


Two little platters found at Marshall’s. When you bake the right cookies, they can be little matches made in heaven…


In our kitchen….


Dried kaffir lime leaves… I investigated quite extensively before getting this product. Normally nothing beats fresh leaves, but they are hard to find where we live. These got excellent reviews by consumers, so I caved. And they are indeed great. Stay tuned for future adventures…


In our kitchen…


Tomato powder, a new product from Spice House. I saw it advertised by the company and could not resist it. So far I’ve used it to add flavor to rice, and it works wonders for that. I just add 1/2 tsp to the amount of rice I normally cook (1 cup of Basmati).

In our kitchen…

Another great product I got recently, this one after my friend Karen blogged about it. Stay tuned for my “experiments” with it…

In our kitchen…


A small plastic knife that does wonders to cut cakes with a lot of moisture such as a brownie. Available here. Used to cut a batch of banana bread brownies, works like a dream!

So that wraps up what I had to share as far as new gadgets and goodies for you… Moving on, it’s time to let the pups bark a little bit… Starting with very important news…


It is Buck’s Birthday today, my little Bucky Boy… Last year, when he turned 14, my heart was already getting a bit heavy, wondering how long would we have together. One year later, he is still around, dealing with his almost total deafness as best as he can. His hearing is gone as far as voice commands go, but he hears clapping and that’s how we communicate.

For his Birthday he’s got a toy…

He’s got a ball…

But, truth is, his favorite “gift” is the one he stole from the trash can (sigh)…

And that seems to be totally fine with this brother…


The rivalry is real, but not too serious. Buck and Bogey were great buddies, and we worried about Buck without him. He seems fine, adjusted well, and now explores the backyard with Oscar, following his lead, for the most part.

This time of the year, we are back having our evening tea outside, watching the sunset, admiring the fireflies, listening to the birds, the owls, the distant coyotes. Like before. But the difference is the huge absence of our Black Spotted Capeless Hero… The emptiness he left is impossible to put into words.

Saudade

ONE YEAR AGO: In My Kitchen, July 2021

TWO YEARS AGO: In My Kitchen, July 2020

THREE YEARS AGO: In My Kitchen, June 2019

FOUR YEARS AGO: In My Kitchen – July 2018

FIVE YEARS AGO: In My Kitchen, July 2017

SIX YEARS AGO: Secret Recipe Club: Falafel and a Bonus Recipe

SEVEN YEARS AGO: Chocolate Toffee Banana Bread

EIGHT YEARS AGO: In My Kitchen, June 2014

NINE YEARS AGO:  Strawberry Frozen Yogurt

TEN YEARS AGO: Baked Coconut and “The Brazilian Kitchen”

ELEVEN YEARS AGO: Honey-Glazed Chicken Legs

TWELVE YEARS AGO: French-Style Rolls

THIRTEEN YEARS AGO: Chicken Breasts, Coffee, and Serendipity