RASPBERRY ALMOND BRUNCH CAKE FOR A SWEET MONDAY

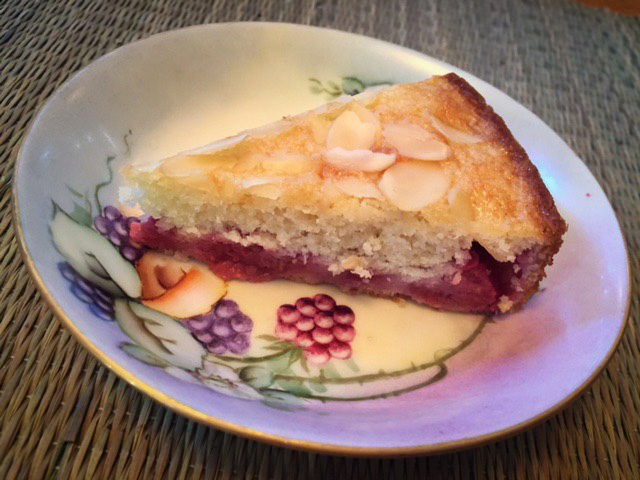
Almost exactly three years ago I reviewed The Global Pastry Cookbook, a cookbook that is very dear to my heart, as I’d been following Gayle’s blog for a very long time. Today I share with you one more recipe from the book, which Gayle gave me permission to publish in full. It is a delicious cake, easy to prepare, with a soft crumb, intense raspberry flavor, and the perfect textural topping given by sliced almonds. Perfect. Just perfect. As it’s often the case, this cake was a Sunday baking project to be shared with our departmental colleagues next day. My goal? To turn the least appreciated day of the week into… something sweet…

RASPBERRY ALMOND BRUNCH CAKE
(from Gayle Gonzales’ Global Pastry Table)

6 oz fresh raspberries
2 tablespoons (26 grams) sugar
1 teaspoon lemon juice
1 cup (5 oz) flour
1/ 2 teaspoon baking powder
1/ 4 teaspoon baking soda
1/ 4 teaspoon salt
1 egg at room temperature
1/ 2 cup + 2 tablespoons (4 1/ 2 oz) sugar
1/ 2 cup (4 oz) buttermilk at room temperature
3 oz (6 tablespoons) butter, melted
1 teaspoon vanilla
1/ 4 cup (3/ 4 oz) sliced almonds

Heat oven to 350ºF. Lightly grease an 8” x 2 1/ 2” cake pan and line the bottom with parchment.

Combine raspberries, sugar and lemon juice and set aside to macerate. In a separate bowl, whisk together the flour, baking powder, baking soda and salt. In another bowl, whisk the egg, sugar, buttermilk, melted butter and vanilla. Use a fork to stir in the flour mixture and mix until moistened and there are no streaks of flour.

Spoon a little over half of the batter into the prepared pan, making sure to cover the entire bottom surface. Top with the raspberry mixture. Dollop the remaining batter over the raspberries and spread out in an even layer. There will be some raspberries exposed and that’s fine. Sprinkle with sliced almonds.

Bake until a tester comes out clean, about 30 minutes. Cool on a wire rack for 10 minutes. Run a thin knife around the edges and gently turn out the cake. Invert again and cool.

ENJOY!

to print the recipe, click here

It’s hard to find a more beautiful color than that of fresh raspberries…  I always catch myself smiling at the bowl, feeling it’s almost rude to cook them or hide them in a cake batter. But it’s for a great cause. They melt down into a single layer, topped by the moist cake and crowned with the almonds and their delicate crunch. Almonds and raspberries, at the risk of repeating myself, it is one of those perfect matches. This is a cake you can make with kids, very easy and it will be a hit with anyone who tries a slice. Or three…
Before I leave you, let me invite you to re-visit my old post and get a tour of Gayle’s book. Hard to believe it’s been three years. When I wrote her to ask permission to publish this recipe, I though the review was maybe a year old, 18 months tops. Almost fell off my chair when I realized it was written in November 2014.  This type of time-shock happens to me quite often these days. I wonder why… (sigh)

ONE YEAR AGO: Paalak Paneer, a Farewell Post

TWO YEARS AGO: In My Kitchen, November 2015

THREE YEARS AGO: Helen Fletcher’s Oatmeal Cookies

FOUR YEARS AGO: Thai-Style Pesto with Brown Rice Pasta

FIVE YEARS AGO: Shrimp with Spicy Orange Sauce

SIX YEARS AGO:  A Simple Appetizer (Baked Ricotta)

SEVEN YEARS AGO: Sour Cream Sandwich Bread

EIGHT YEARS AGO: Pasta with Zucchini Strands and Shrimp

SaveSave

SaveSave

SaveSave

SaveSave

SaveSave

SaveSave

SaveSave

SaveSave

SaveSave

SaveSave

SaveSave

FIRST MONDAY FAVORITE: OCTOBER 2017

First Monday of the month, it’s time to choose my favorite blog post of October.

I cannot pick another post, as “In My Kitchen” is so dear to my heart, as far as types of posts go.  

So my virtual tour of our kitchen last month gets to be highlighted again today. 

To read the full post, click here.


Thank you Sid, for organizing the First Monday Favorite!

If you are a food blogger and would like to participate, drop Sid a line.

To see the contributions from my virtual friends, click on the link below

(comments are shutdown for this post)

https://static.inlinkz.com/cs2.js

SaveSave

SaveSave

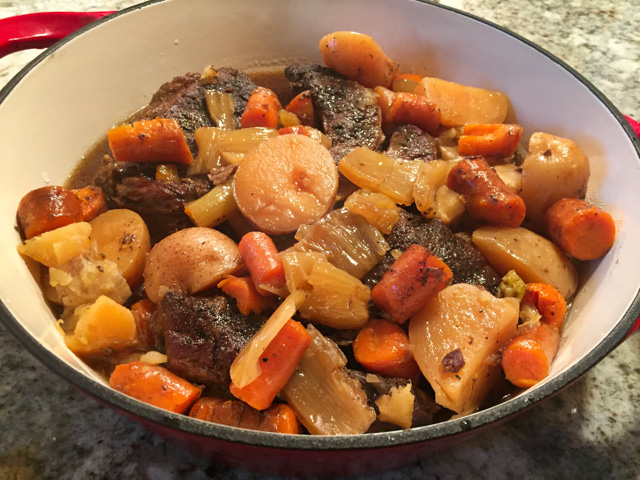
SLOW-COOKER POT ROAST WITH POTATOES, CARROTS AND FENNEL

The Instant Pot is the most recent obsession of cooks everywhere. As a lover of all gadget things, I’ve been seriously tempted to get one, but decided against it. My rationale for swimming against this current is that a regular pressure cooker does the exact same job, with the advantage of heating up faster and achieving higher final pressure (at least my model does).  I always use a skillet if I need to brown meat before cooking under pressure, so the saute feature of the Instant Pot doesn’t appeal to me. Its surface is smaller, I much rather stick with my 12 inch skillet for that. Then there is the slow-cooking capability. From what I heard, it does not compare to a regular slow-cooker and more often than not your tried and true recipe for the trusty old crock pot needs to be tweaked. I also think the size and shape of the classic slow-cooker are more appropriate for the type of stuff I cook in it. Think large pieces of pork shoulder, baby back ribs, or several little pots of custard things for crème brûlée. The only feature of the instant pot that cannot quite be matched by other gadgets is the yogurt making. But, do I ever make yogurt at home? Not really. So there you have it, the Bewitching Kitchen will go on Instant Pot-less. And today I share with you a pot roast made in our crock pot, melt-in-your-mouth tender, with the delicious addition of fennel, that absolutely makes this dish. Don’t omit it. By all means, if you own the Instant Pot, put it to use. My feelings won’t be hurt…

SLOW-COOKER POT ROAST WITH POTATOES, CARROTS AND FENNEL
(from the Bewitching Kitchen, inspired by many sources)

2 tablespoons grapeseed oil (or oil of your choice)
1 bone-in chuck roast, 4 to 5 pounds
2 tsp Herbes de Provence
2 tsp fennel seeds
1 tsp salt
1/2 tsp ground black pepper
6 yellow potatoes (such as Yukon Gold), halved
2 fennel bulbs, cut in large pieces
6 carrots, peeled, and cut in large pieces
1 shallot, diced
1 stick celery, diced
1/2 cup beef broth
1/2 cup water
fresh parsley, to serve (optional)

Mix the spices in a small bowl, crushing the fennel seeds lightly. Rub the dry rub all around the beef.  In a large skillet, heat the oil and brow the meat on all sides. As the meat browns, place the potatoes, carrots, fennel, shallots and celery inside your slow-cooker. Season them lightly with salt.

When the meat is golden brown, transfer it to the slow cooker, placing it on top of the veggies. Deglaze the skillet with a little water, and transfer the juices to the slow-cooker. Add the beef broth and water. Set it on low for 10 hours, you can also cook on high for 5 to 6 hours, but I really prefer the texture of the meat when cooked low and slow.

Shred or cut the beef in serving pieces, and enjoy with all the veggies. It is even better when prepared one day in advance.

ENJOY!

to print the recipe, click here

This was very good served over mashed cauliflower, my to-go veggie of choice for a low-carb side dish. I made the pot roast the day before our dinner, and re-warmed it gently on the stove top, adding fresh parsley right before indulging in it. The exact same recipe could be made in the pressure cooker, probably taking around 30 minutes in high pressure. Still, there’s something to be said about coming home to a house that smells like dinner is waiting for you with open arms. Even if you will place it in the fridge for a day…  Leftovers are as amazing as one would expect!

ONE YEAR AGO: The Best, the Very Best Hummus

TWO YEARS AGO: Cheddar Cheese Crackers

THREE YEARS AGO: A New Take on Cauliflower Puree
.
FOUR YEARS AGO:
 In My (NEW!) Kitchen
.
FIVE YEARS AGO:
 
The Lab Move and New Beginnings
.
SIX YEARS AGO:
 Honey-Oat Pain de Mie
.
SEVEN YEARS AGO:
 Carrot and Leek Soup
.
EIGHT YEARS AGO:
 Chicken Parmigiana 101


SaveSave

SaveSave

SaveSave

SaveSave

SaveSave

SaveSave

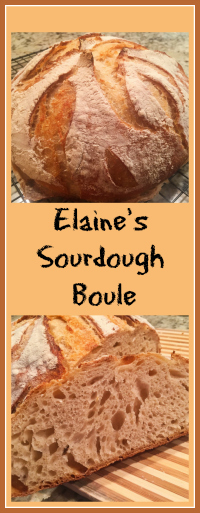
ELAINE’S SOURDOUGH BOULE


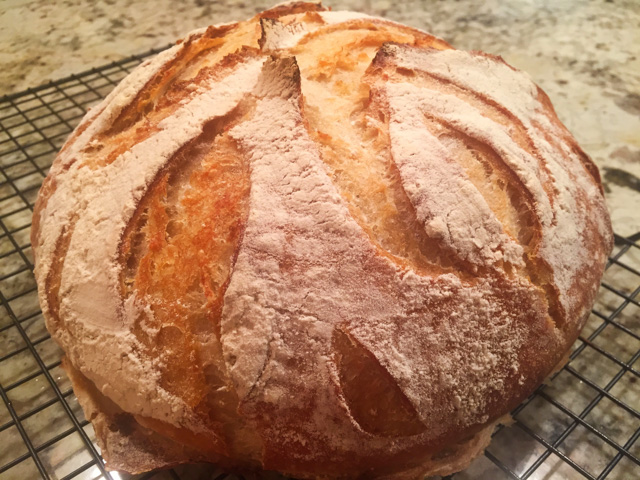
The recipe for this bread, also known as 500 g overnight sourdough,  is beyond tried and true. My dear friend Elaine has been baking this very recipe for years, probably at least twice every week, if not more often. Her very detailed blog post about it can be found here. You can also marvel at her slashing skills, which inspired me to become more adventurous. Remember?

When you bake bread on a regular basis, it is nice to have a formula that is not overly complicated, one you can do it almost without effort. This is it. Of all sourdough breads I’ve baked, this is the one that I will go back to when I want a great loaf of bread, pure with regular bread flour, just that delicious sourdough tang, and a crumb that has the type of texture I enjoy. Some holes, but not a bread sieve. And add to that great crust too. All bases are covered.

Here is a simplified overview of the recipe. First, you need a bubbly sourdough starter, at 100% hydration, that is 50:50 flour to water ratio.

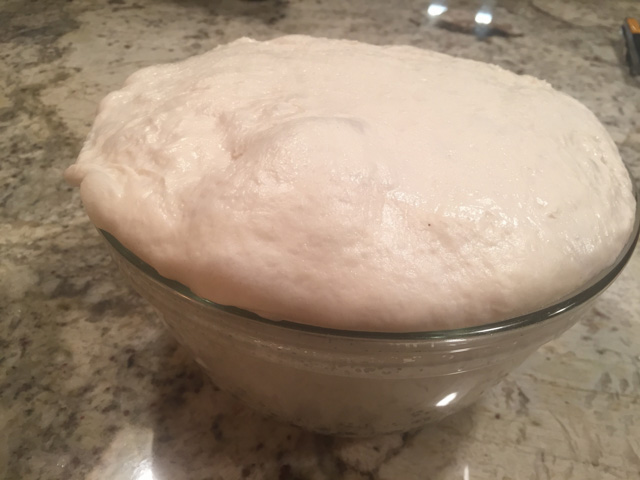
You’ll use 150 g of your bubbly sourdough and mix it with 285 g water, 500 g bread flour, and 9 g of salt. Incorporate it all with your hands, no need to work very hard.  Leave it for 30 minutes at room temperature, then knead it by folding a few times.  Let the dough proof at room temperature overnight. Mine was ready to walk outside and greet the world…

Pour the dough gently out on a floured surface, shape it.
Let it sit for 30 minutes, while you heat the oven to 450 F.
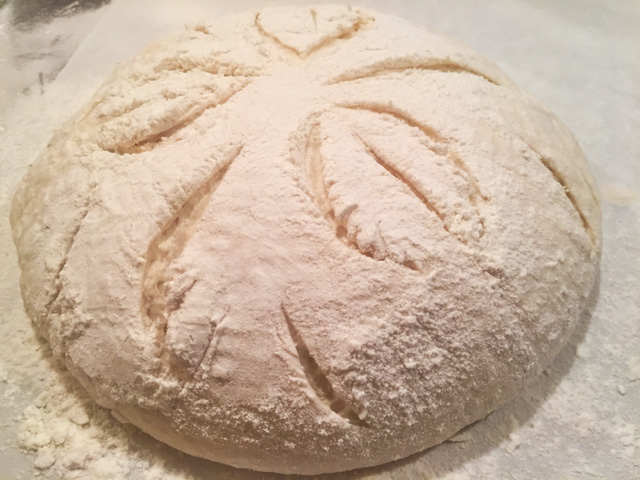
Slash it with enthusiasm…

Bake for 45 minutes, leaving the bread covered for the first 30 minutes, generating steam whichever way you like.
I use the moistened lid of a Dutch oven.

To view the detailed recipe, visit Elaine’s site.

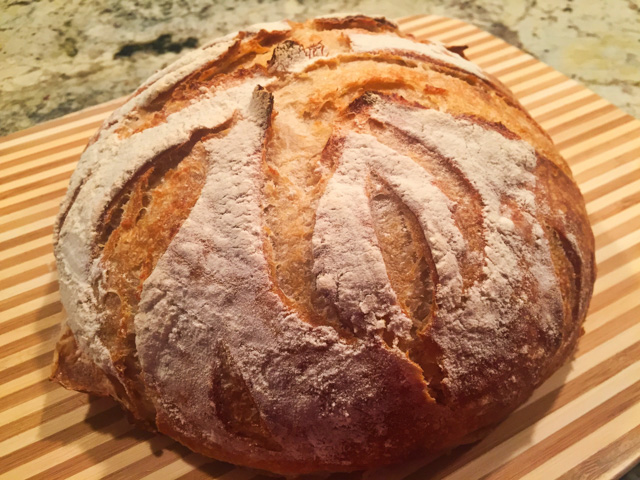
I loved this recipe so much, that I baked it twice in the same week, so that we had enough bread for a bunch of golfing buddies that visited us.  On my second time around, I went for a wheat-stalk design, but the bread had a mind of its own…
Still, it’s fun to try different patterns.

The goal… a few wheat stalks decorating the bread….

The outcome…  not exactly a wheat stalk, but it’s always nice to see a strong oven spring in action!

I can hardly wait to bake again, and try new slashing patterns on the bread.  For the wheat stalk, I think the key is to either omit the central slash of the stalk, or make it very delicate and shallow. Must practice…

Elaine, thanks for bringing sourdough baking back to my routine,
you are a constant source of inspiration!

ONE YEAR AGO: Zucchini, Lemon and Walnut Cake

TWO YEARS AGO: Paleo Energy Bars

THREE YEARS AGO: Pecan-Crusted Chicken with Honey Mustard Dressing

FOUR YEARS AGO: Mozzarella Stuffed Turkey Burgers

FIVE YEARS AGO:  Cashew Chicken Lettuce Wraps

SIX YEARS AGO: Clay-pot Pork Roast

SEVEN YEARS AGO: Panmarino

EIGHT YEARS AGO: A Classic Roast Chicken

SaveSave

SaveSave

SaveSave

SaveSave

SaveSave

SaveSave

PUMPKIN MACARONS

To Halloween or Not to Halloween, that is the question… 

 That’s up to you to decide. They can be very elegant served without any special decoration…

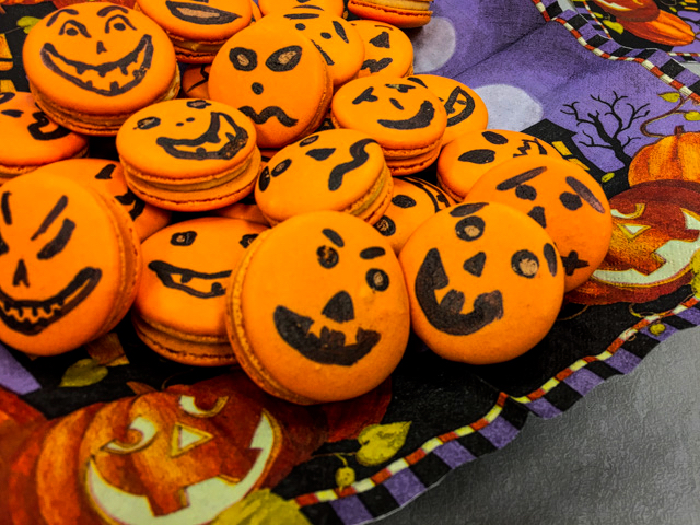
Or you can let your creative juices flow free…

PUMPKIN MACARONS
(adapted from several sources, including Craftsy.com)

for the shells:
198 g powdered sugar
113 g almond meal
113 g egg whites at room temperature
a pinch of cream of tartar
100 g granulated sugar
Orange Gel color from AmeriColor
¼ teaspoon pumpkin spice bakery emulsion (if unavailable, use  2 drops of vanilla extract)

for the filling:
3 tablespoons (40 g) unsalted butter, softened
1 cup (130 g) powdered sugar
1 tablespoon pure pumpkin puree
1 teaspoon milk
1/8 teaspoon ground cinnamon
pinch of salt

for decoration (optional):
luster dust in black and gold
1/8 teaspoon gin for each color

Line 2 or 3 heavy baking sheets with parchment paper or Silpat mats. Layer the powdered sugar and almond meal   in a food processor. Pulse until the mixture looks like fine meal, about 15 seconds. Pass through a sieve and transfer to a small bowl. Set aside.

Place the egg whites and pinch of cream of tartar in the bowl of a stand mixer fitted with the whisk attachment. Make sure that the bowl and the whisk are impeccably clean. Starting on medium speed, whip the whites with the cream of tartar until they look like light foam. The whites should not appear liquid. The foam will be light and should not have any structure.

Slowly rain in the granulated sugar, trying to aim the stream between the whisk and the side of the bowl. Turn the speed up to medium-high. Continue to whip the meringue until it is soft and shiny. It should look like marshmallow creme. Add the gel color and the pumpkin spice emulsion (or vanilla). Staying at medium-high speed, whip the egg whites until the mixture begins to dull and the lines of the whisk are visible on the surface of the meringue. Check the peak. It should be firm. Transfer the whites to a medium bowl.

Fold in the almond meal mixture in three increments. Paint the mixture halfway up the side of the bowl, using the flat side of a spatula. Scrape the mixture down to the center of the bowl. Repeat two or three times, then check to see if the mixture slides slowly down the side of the bowl. Put the mixture in a piping bag fitted with one of the tips listed above. Pipe on the prepared baking sheets.

Slam each sheet hard four to six times on the counter. Then fist bump each end of the sheet’s underside twice. Let the unbaked macarons dry until they look dull but not overly dry. Drying time depends on humidity. Ina dry climate, the macarons can dry in 15 to 20 minutes; in a humid climate, it can take 35 to 40 minutes.

While the macarons are drying, heat the oven to 330 F (170 C/gas mark 3). Bake one sheet at a time on the middle rack. Check in 11 minutes. If the tops slide, then bake for 2 to 3 more minutes. The macarons should release without sticking. Check one or two. If they stick, put them back in the oven for 1 to 2 more minutes. Let the macaroons cool for 10 minutes before removing from the pan.

Make the filling:  Cream the butter with the powdered sugar with a hand mixer, until incorporated and creamy. Add the other ingredients, continue beating until smooth. You should have the exact amount to fill this batch of macarons.

Assemble the macarons: find two macarons similar in size and add a good amount of filling to the bottom of one of them. Place the other on top and squeeze gently to take the filling all the way to the edge.  Paint decorations with luster dust dissolved in gin, if so desired. Let it dry and store the macarons in the fridge for 24 hours for perfect texture.

ENJOY!

to print the recipe, click here

Comments: These turned out so delicious! The pumpkin extract used in the shells gave them a subtle flavor that complemented the filling quite well. I found mine at Marshalls but included a link in the recipe for you to get it at amazon.com, if interested. These macarons scream Fall loud and clear. Once again I used my trustworthy recipe from Colette Christian over at Craftsy. I cannot praise her classes enough. During a recent sale event, I bought her Éclairs lesson, and it is simply outstanding. Plus, if you have any questions, she usually answers quite quickly. Very helpful, and very knowledgable. Yes, you read me correctly: éclairs are on my list of goodies to attempt in the very near future. Wish me luck…


I must thank Phil for saving the day with these Halloween-styled macarons. I had a different idea for decorating them, but let’s say it was a disaster. As I walked in circles around the kitchen, feeling miserable and hopeless, he suggested painting crazy faces on the shells, and we had a blast doing it together. Great project to do with kids, by the way. I used luster dust (available in amazon.com) in black and gold, mixed with a touch of gin. No worries, it evaporates, so these are kid-friendly. And approved by graduate students too…

ONE YEAR AGO: Slow-Cooked Whole Chicken

TWO YEARS AGO: Chocolate Zucchini Cake with Chocolate Frosting

THREE YEARS AGO: Pecan-Crusted Chicken with Honey-Mustard Dressing

FOUR YEARS AGO: Bewitching Kitchen on Fire!

FIVE YEARS AGO: Cashew Chicken Lettuce Wraps

SIX YEARS AGO: Chiarello’s Chicken Cacciatore

SEVEN YEARS AGO: Donna Hay’s Thai-Inspired Dinner

EIGHT YEARS AGO: Panettone


SaveSave

SaveSave

SaveSave

SaveSave

SaveSave

SaveSave

SaveSave

SaveSave

SaveSave

SaveSave

SaveSave

SaveSave

SaveSave

SaveSave

SaveSave