SMOKED SALMON FAIT MAISON

I love this French expression that makes “home-made” sound a lot more special…  In Paris, they often print it in restaurant menus to indicate that some item – say,  their country paté – is “fait maison.”  In other words, unique. Special. Cannot get anywhere else. And that’s pretty much how I feel about smoked salmon made in our very own electric smoker. If you like the stuff available at the grocery store, you will flip for this. It is so much better, it doesn’t even seem like the same food item. I go as far as saying that buying an electric smoker is worth it just for smoking salmon. And steelhead trout.

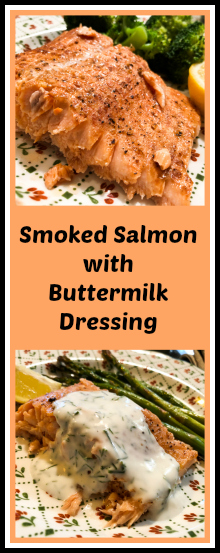
SMOKED SALMON WITH BUTTERMILK DRESSING
(from the Bewitching Kitchen, inspired by many sources)

1 salmon fillet (about 4 pounds)
½ cup seafood dry rub
1 lemon, sliced
½ cup buttermilk dressing

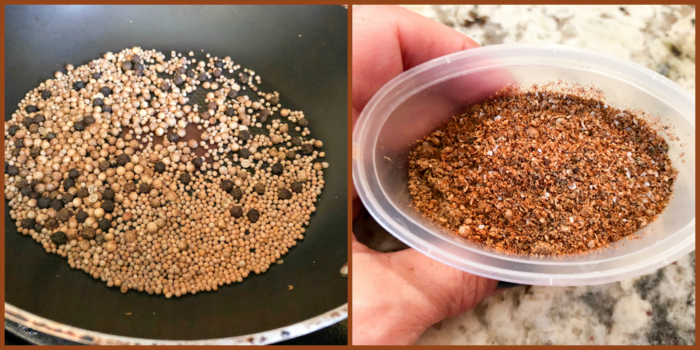
for dry rub (makes more than you need):
1 tablespoon coriander seeds
1 tablespoon yellow mustard seeds
2 teaspoons black peppercorns
1/2 teaspoon whole cloves
1 tablespoon  paprika
1 teaspoon dried oregano
1 teaspoon red pepper flakes
2 teaspoons brown sugar
2 teaspoons kosher salt

for buttermilk dressing:
½ cup buttermilk
1/4 cup full-fat yogurt
Juice of half lemon
1 teaspoon kosher salt
1 tablespoon finely chopped fresh dill

Make the dry rub:  In a small sauté pan over medium heat, toast the coriander seeds, black peppercorns and cloves for 1 to 2 minutes.  Let the mixture cool slightly, then process it thoroughly in a spice grinder and transfer it to a small bowl. Add the paprika, oregano, red pepper flakes, sugar, and salt. Mix thoroughly.  Keep leftovers in a dark, dry place.

Soak 2 cups of wood chips in water for 15 to 30 minutes.  Heat the smoker to 200F.

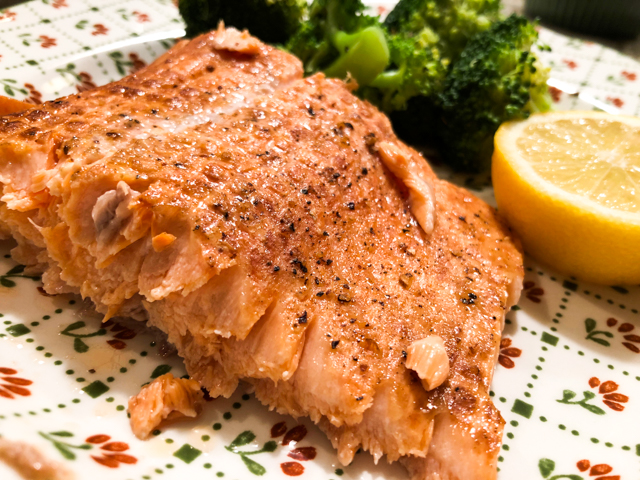
Pat the salmon dry and let it come to room temperature.  Coat the salmon thoroughly in the dry rub and place it skin-side down on the grates. Scatter the lemon slices over the flesh. Smoke for about 1 hour, or until the flesh flakes easily with a fork.  While the salmon smokes, prepare the buttermilk dressing.

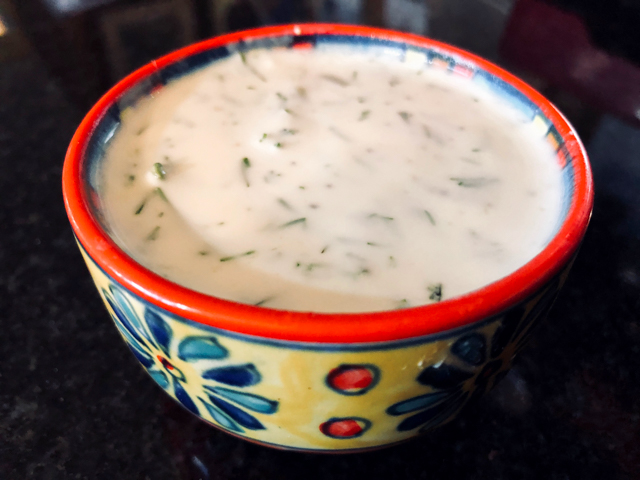
Whisk together the yogurt, buttermilk, lemon juice, salt, and dill. Taste and adjust seasoning if needed. 

Serve the salmon with the buttermilk on the side, or drizzled all over. It’s your call…

ENJOY!

to print the recipe, click here

Comments: Since we acquired the smoker back in December last year, we’ve made this recipe (with or without the buttermilk dressing) countless times.  We simply do not get tired of it. Often we will smoke two pieces, one we remove after 1 hour, and enjoy for dinner. The second piece we allow to smoke for one additional hour or even a little longer. That will be perfect to have over crackers with a bit of sour cream or cream cheese and capers. Or to make salmon rillettes. Or a smoked salmon quiche. Certain dogs love it too…

What makes the smoked salmon ‘fait maison’ so amazing is the texture. Simply cannot beat the texture. It melts in the mouth, and the smoky flavor is just perfect. Subtle. Delicious.

If you do not have a smoker, the closest approximation to this would be a method used by Jacques Pepin, in which you place the salmon on the dish it will be served and stick it in a very low-oven, 200F. You can check it out here. I would then make the same dry rub, but use smoked paprika instead.


Save a pin for later!

ONE YEAR AGO: Kouign-Amann, Fighting Fire with Fire

TWO YEARS AGO: In My Kitchen, Yin and Yang

THREE YEARS AGO: Chocolate Toffee Banana Bread

FOUR YEARS AGO: In My Kitchen, June 2014

FIVE YEARS AGO:  Strawberry Frozen Yogurt

SIX YEARS AGO: Baked Coconut and “The Brazilian Kitchen”

SEVEN YEARS AGO: Honey-Glazed Chicken Legs

EIGHT YEARS AGO: French-Style Rolls


SaveSave

SaveSave

SaveSave

SaveSave

SaveSave

SaveSave

SaveSave

SaveSave

SaveSave

SaveSave

SaveSave

MACARONS WITH GANACHE NOISETTE

The filling for these French macs started with a pâte noisette concoction, which was suggested to me by my friend Jennifer, Pâtissière Extraordinaire. You can see a detailed description (in French) with a jump here.  I used part of this amazing paste in a cake (stay tuned) and what was left metamorphosed into macaron filling. The mixture of pâte noisette with ganache is the most gastronomically sensual thing in the known universe. Too superlative for you? Try it. If you disagree, we can discuss the matter further, sharing a few macarons while we are at it…

MACARONS WITH GANACHE NOISETTE
(from Bewitching Kitchen, inspired by this site)

for the pâte noisette (it makes more than you’ll need):
125 g hazelnuts, peeled
125 g almonds
160 g sugar
5 g water

for the ganache noisette:
100 g milk chocolate
160 g pâte noisette
140 g heavy cream

for the shells:
198 g powdered sugar
113 g almond meal
113 g egg whites at room temperature
a pinch of cream of tartar
100 g granulated sugar
3:1:1 brown, green and yellow food coloring
1/8 teaspoon vanilla paste

Make the pâte noisette. Start by placing water and sugar in a large saucepan. Heat up to 245 F.   Then add the hazelnuts and almonds. Gradually, they will be covered with a white film.  Cook until the sugar dissolves and caramelizes, stirring constantly. Be patient, it is going to take a little time. Pour the mixture on a sheet of parchment paper and let cool completely.  Coarsely chop and add to a blender, the more powerful the better.  In a Vitamix blender, in less than 5 minutes you should have a very smooth paste, which is what you want.

Make the ganache. Heat the heavy cream almost to boiling point. Add to the chocolate, cut in pieces. Wait a couple of minutes and stir to completely dissolve the chocolate. Let it cool for half an hour, add the pâte praline made as described. Keep in the fridge for at least a couple of hours to get into spreadable consistency.  Reserve to fill macarons.

Make the shells. Place the egg whites and pinch of cream of tartar in the bowl of a stand mixer fitted with the whisk attachment. Make sure that the bowl and the whisk are impeccably clean. Starting on medium speed, whip the whites with the cream of tartar until they look like light foam. The whites should not appear liquid. The foam will be light and should not have any structure.

Slowly rain in the granulated sugar, trying to aim the stream between the whisk and the side of the bowl. Turn the speed up to medium-high. Continue to whip the meringue until it is soft and shiny. It should look like marshmallow creme. Add the gel color and the vanilla. Staying at medium-high speed, whip the egg whites until the mixture begins to dull and the lines of the whisk are visible on the surface of the meringue. Check the peak. It should be firm. Transfer the whites to a medium bowl.

Fold in the almond meal mixture in three increments. Paint the mixture halfway up the side of the bowl, using the flat side of a spatula. Scrape the mixture down to the center of the bowl. Repeat two or three times, then check to see if the mixture slides slowly down the side of the bowl. Put the mixture in a piping bag fitted with your tip of choice. Pipe on the prepared baking sheets.

Slam each sheet hard four to six times on the counter. Then fist bump each end of the sheet’s underside twice. Let the unbaked macarons dry until they look dull but not overly dry. Drying time depends on humidity. Ina dry climate, the macarons can dry in 15 to 20 minutes; in a humid climate, it can take 35 to 40 minutes.

While the macarons are drying, heat the oven to 300 F. Bake one sheet at a time on the middle rack. Check in 12 minutes. If the tops slide, then bake for 2 to 3 more minutes. The macarons should release without sticking. Check one or two. If they stick, put them back in the oven for 1 to 2 more minutes. Let the macaroons cool for 10 minutes before removing from the pan.

Use the air-brush and a stencil to decorate each shell. Pair them according to size and fill.

Filled macarons should stay overnight in the fridge before consumed. The texture is much better on the following day.

ENJOY!

to print the recipe, click here

Comments: The air-brusher. I got it with a special discount from Groupon, after a tip from macaron-obsessed folks from a Facebook group. I am in love. First, it is pretty small and very easy to use. They advise you to practice on a piece of parchment paper, I did so, but realized it was pretty much a no-brainer. It has three speeds of spraying, I used the lowest, it gave good coverage without getting out of control. I mean, who wants to have a dalmatian with the ears sprayed gold? Second, it is super easy to clean. For me, that matters. Something that takes a lot of work to clean makes me think twice before using. This was a breeze. Warm water gets poured through the opening, sprayed inside a bowl with more warm water, done! You need special food color for the air-brusher, but I know it’s possible to improvise with normal dyes diluted in vodka or some other type of alcohol.  I used Chefmaster.

The filling. I suppose you can make a similar preparation using Nutella. But I tell you, making the pâte noisette from scratch and incorporating it in the ganache is a game-changer. It is nutty, almost smoky (it’s the caramel speaking), sweet but with a sharp twist to it. For my taste, it is close to perfection.  I had a little bit of ganache noisette left. It was enjoyed one tiny teaspoon at a time, standing up by the fridge, while telling myself: make this again, roll as truffles, coat in chocolate sprinkles, give to all the special human beings in your life.

Make your life sweeter, grab a pin!


ONE YEAR AGO: Quiche with Asparagus and Fennel

TWO YEARS AGO: Fakebouleh

THREE YEARS AGO: Yellow Squash Soup

FOUR YEARS AGO: Grilled Chicken with Tamarind and Coconut Glaze

FIVE YEARS AGO: Chicken-Apricot Skewers

SIX YEARS AGO:  Asparagus Quiche

SEVEN YEARS AGO: Two-stage Pea and Prosciutto Risotto

EIGHT YEARS AGO: Mellow Bakers: Corn Bread


SaveSave

SaveSave

SaveSave

SaveSave

INCREDIBLY SIMPLE TIMES FOUR: MAY 2018

Time to showcase recipes that are so simple they hardly qualify as such.

INCREDIBLY SIMPLE #1

CACIO E PEPE

Hard to believe I had never made this dish until now. It is such a classic, but for one reason or another I only had it in restaurants and not even that often. Guess what? After inaugurating it, I enjoyed it three more times over the following month. It is so simple and so delicious!  You must make it. I tried it with zoodles a couple of times, works wonders too. I was inspired by Geoffrey Zakarian in a recent Kitchen episode.

CACIO E PEPE

pasta of your choice
Kosher salt
2 tsp freshly ground (coarse) pepper (or to taste)
grated Pecorino-Romano cheese to taste
drizzle of extra-virgin olive oil

Two genius touches: first, you will cook the pasta in a pan just large enough to hold it, with about 1 inch water from the bottom. Add a little salt to the water. Cook without closing the pan until al dente.

Second: toast the pepper in a small skillet until fragrant, just a minute or so.

The pasta will be cooked with just a little water left, a water full of starch from the pasta.  Turn off the heat, add the pepper and cheese. Stir well, adjust seasoning with salt.

Serve and enjoy!

to print the recipe, click here 

INCREDIBLY SIMPLE #2

SCRAMBLED EGGS WITH RICOTTA, TURMERIC & ZA’TAR

Another non-recipe for you. This simple concoction was my lunch more often than I care to admit. I tend to have these “phases” in which I might enjoy the exact same recipe over and over and over, not getting tired of it. Amazing what a little ricotta does to add creaminess to a simple scrambled egg. Add a couple of crackers, and I am a happy camper. For those who eat breakfast, this is a must-try. In a way, it’s my breakfast too, I just happen to “break-my-fast” a lot later than most people…

Heat some oil or butter in a non-stick pan. Don’t let it heat too much, add 2 eggs, slightly beaten, immediately drop in the center about 1/4 cup ricotta cheese, season with salt, pepper, and 1/4 tsp of turmeric. Cook, stirring gently over low-heat to your liking. Sprinkle za’tar when it’s almost ready to serve. Enjoy with bread or crackers.

INCREDIBLY SIMPLE #3

AIR-FRIED NEW POTATOES

Cut new potatoes in half. Add to a pan with a little cold, salted water. Bring to a boil, cook for about 8 minutes. Drain. Drizzle a little olive oil, salt, and Herbes de Provence. Place in the air-fryer, cook at 390 F (or as high as your machine will go) until crispy, 15 to 20 minutes maximum. Shake occasionally. The pan, not necessarily yourself, but depending on what’s playing I say go for it.

INCREDIBLY SIMPLE #4

RICE WITH TURMERIC AND CARDAMON

We eat rice often, usually plain. But every once in a while it’s nice to guild the lily a bit. I love the color of turmeric and the flavor of cardamon. Together they make a simple bowl of rice shine. Literally.  Inspiration came from the newest book by Nigella Lawson, At My Table.

RICE WITH TURMERIC AND CARDAMON

1.5 cups of rice, rinsed and drained
2.5 cups water
1/2 tsp salt
1/8 to 1/4 tsp turmeric
3 cardamon pods, crushed

Add all ingredients to a pan. Bring water to a boil, reduce heat close tightly the lid.

Simmer for 20 minutes without opening the pan. Turn off the heat, open the lid, add a tea towel on the surface of the rice, close the lid again.

Let it rest for 10 to 30 minutes if you have the time, but it’s still nice if served right away.

ENJOY!

to print the recipe, click here

I hope you enjoyed these simple recipes. It’s nice to have a bunch of quick choices that you can make without even thinking too much. The scrambled egg, for instance, I don’t even measure anything. I sprinkle some turmeric, I add ricotta until I feel it’s going to be creamy enough, sometimes I add za’tar, sometimes Herbes de Provence, it’s never exactly the same twice in a row, but whatever you do it will be delicious.

New Potatoes: if you don’t have an air-fryer, you can still do the same on top of the stove or even roasting them in a super hot oven. The texture I get with the air-fryer is pretty unique, though, and allows that fried aura without too much fat. Love it.

ONE YEAR AGO: Tangential Quiche with Asparagus and Fennel

TWO YEARS AGO: Fakebouleh

THREE YEARS AGO: Yellow Squash Soup

FOUR YEARS AGO: Grilled Chicken with Tamarind and Coconut Glaze

FIVE YEARS AGO: Chicken-Apricot Skewers

SIX YEARS AGO:  Asparagus Quiche

SEVEN YEARS AGO: Two-stage Pea and Prosciutto Risotto

EIGHT YEARS AGO: Mellow Bakers: Corn Bread


FRENCH STYLE BAGUETTES

I have never met any person living in France who worries about baking baguettes at home. Why would anyone do so, when they can walk a few steps from the front door and find the very best examples, fresh from the oven? But when you live in the US the situation is totally different. The stuff you see sold as “baguettes” could bring Paris back to 1789. Some, if held up, will fold. Wrap your mind around that. A baguette with such poor inner structure, with so much stuff added to the dough to prolong its sorry life, that it folds under its own weight. I have a few recipes for baguette in the blog already, but decided to bite the bullet and try America’s Test Kitchen version. I say bite the bullet because, as my friend Cindy always says, their recipes ensure that you will dirty every single pan, bowl, utensil you have. They don’t cut corners. They create them. In the case of their baguettes, the issue is not so much messing up stuff, but the timing and super detailed instructions. You can find the full recipe in their site, I will give just a very minimal overview, as I could not get permission to publish their method.

FRENCH BAGUETTES
(from America’s Test Kitchen)

¼ cup (1⅓ ounces) whole-wheat flour
3 cups (15 ounces) all-purpose flour
1 teaspoon instant yeast
1 teaspoon diastatic malt powder (optional)
1½ teaspoons salt
1½ cups (12 ounces) water

OVERVIEW OF THE METHOD

Make a dough with all ingredients by kneading with a mixer for about 7 minutes. Leave it at room temperature and knead by folding three times, letting the dough rest for 30 minutes in between folding cycles. Refrigerate overnight.

Remove dough from fridge, divide in half, work with half the dough at a time. Follow their precise measurements to obtain four portions of dough.


They will instruct you to pre-shape the dough, minimizing how much you handle it, and with a lot of waiting time in between each manipulation, including the final shaping and stretching to a size compatible with home ovens.

After a final rise of 45 to 60 minutes, the baguettes will be ready for a 500F oven, baked for 5 minutes covered with a disposable aluminum baking pan (excellent method to create steam), and uncovered for the final 15 minutes for proper browning.

for full recipe, visit this site

You will be able to bake two baguettes at a time. I did not bother retarding the two last baguettes in the fridge, as the baking takes a reasonably short time.  Overall, it is a good recipe, just pretty convoluted in terms of all the instructions given for handling the dough.

The inner crumb had the uneven holes that are the mark of a good baguette, but I expected a slightly more open structure. Taste was pretty spectacular, I think the proportion of whole wheat and all-purpose flour is perfect.  I will probably do a few changes in the way I shaped it, because I suppose a bit more surface tension could be better, two of the baguettes were not as round as I would like.

America’s Test Kitchen insists they should be consumed within 3 to 4 hours. I beg to differ, and find that they freeze quite well and a small visit in a toaster oven brings them back to life…

ONE YEAR AGO: Sad Times

TWO YEARS AGO: Slow-Cooker Carnitas Lettuce Wraps and Paleo Planet Review


SaveSave

SaveSave

SaveSave

SaveSave

SaveSave

SaveSave

SaveSave

SaveSave

SaveSave

SaveSave

SaveSave

SaveSave

SMOKIN’ HOT MEATLOAF AND HOMEMADE KETCHUP

Time flies like a Boeing-777. Cliche, I admit, but truth is we got our electric smoker in December, but only now, almost 6 months later I get to share a recipe with you. It’s not for lack of playing with it, we’ve made salmon countless times, we’ve made ribs, we’ve smoked chicken wings, chicken thighs, even a big piece of brisket. But the recipe I decided to share with you first is a bit unusual – meatloaf. Yes, smoked meatloaf. It was superb. If you have a smoker, do try it. If you don’t you can do the exact same recipe in a 250 F oven, and add a touch of liquid smoke to the mix and half a teaspoon of smoked paprika.

SMOKED MEATLOAF
(inspired by Alton Brown and other sources)

½ cup ketchup (store-bought or home-made, recipe follows)
¼ cup tomato paste
1 tablespoon dark brown sugar
1 canned chipotle chile in adobo sauce, chopped fine
1 teaspoon cocoa powder
2 pounds ground chuck
1 pound ground pork
1/4 cup almond flour
1 medium shallot, diced
2 medium carrots, diced
1 celery rib, diced
1 tablespoon olive oil
2.5 tsp salt
1 tsp oregano
black pepper to taste
2 large eggs, beaten

Combine the ketchup, tomato paste, brown sugar, chipotle, adobo sauce and cocoa powder in a small bowl.

Place the shallot, carrot and celery into the bowl of a food processor and process
until finely chopped.  Heat the olive oil in a small saute pan and add the processed veggies, season lightly with salt and pepper. Cook until fragrant and the veggies start to soften. Reserve, cool to almost room temperature.

In a large bowl, combine the two types of meat with the ketchup mixture, reserving about 2 tablespoons to brush on the meat later.  Add the almond flour, eggs, all seasonings. Mix it all gently without overworking the meat. Shape as a loaf on top of a heavy-duty aluminum foil.  Close the foil around the meatloaf.

Heat the smoker (or use your oven) to 250F. Load it with the wood chips of your choice. We used applewood. Flip the package and poke holes at the bottom of the foil to allow fat to drip down.  Invert it again and place in the smoker, foil tightly closed for about 50 minutes.

Open the package and fold the foil back. Brush with the remaining ketchup mixture and continue smoking until the internal temperature reaches 130 ° F, about 40 minutes longer.

Remove the meat loaf from the smoker and let rest for 20 minutes before slicing and serving.

LOW-SUGAR KETCHUP
(adapted from Bacon & Butter)

1 ½ cups tomato paste
¼ cup water
4 tablespoons apple cider vinegar
1 tablespoon Worcestershire sauce
1 tablespoon mustard
½ teaspoon salt
⅛ teaspoon freshly ground black pepper
⅛ teaspoon ground cloves

In a large bowl, combine the tomato paste, water, cider vinegar, Worcestershire sauce, mustard, salt, pepper, and cloves. Whisk thoroughly to combine. Transfer to an airtight container. Chill for 1 hour to allow the flavors to incorporate.

ENJOY!

to print the recipes, click here

Comments:  I had never made ketchup from scratch, and this is obviously not the authentic way to do it, but I wanted something slightly less indulgent and simple to put together. It is not as sweet and thick as a normal ketchup but it delivers similar flavor. For a more authentic recipe, definitely try this one from my friend Karen.

Brown food is no eye-candy to a camera, but it tastes sooo good!

The texture and flavor of this smoked meatloaf were pretty spectacular. You’ll need to cut thick slices because it is so fragile it tends to crumble a little, but it’s not a serious drawback at all. Leftovers were good for three days in a row, twice for my lunch and one final appearance for our dinner. Yes, I did not get tired of it. At all.

The ketchup had a second chance to shine also. It was outstanding to make a bit of cocktail sauce for oysters on the half-shell.  I realize oyster season is over, but as I mentioned, this adventure happened a few months ago, when we were having oysters pretty much once-a-week.  One of the few things I love about cooler months.

ONE YEAR AGO: Banana Bread with Espresso Glaze

TWO YEARS AGO: Slow-Cooker Carnitas & Paleo Planet Cookbook Review

THREE YEARS AGO: The Making of a Nobel Reception

FOUR YEARS AGO: Fennel Soup with Almonds and Mint 

FIVE YEARS AGO: Green Curry Pork Tenderloin

SIX YEARS AGO: Farfalle with Zucchini and Ricotta

SEVEN YEARS AGO: Slow-baked Salmon with Lemon and Thyme

EIGHT YEARS AGO: Hoisin Explosion Chicken

SaveSave

SaveSave

SaveSave

SaveSave

SaveSave

SaveSave

SaveSave

SaveSave

SaveSave

SaveSave

SaveSave

SaveSave