BE MY VALENTINE SOURDOUGH BREAD

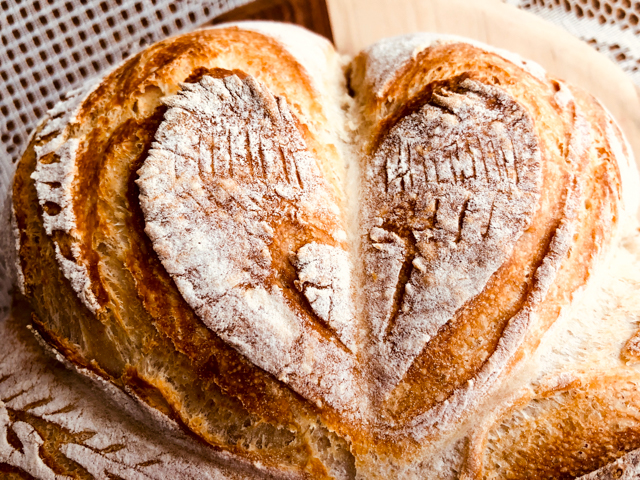
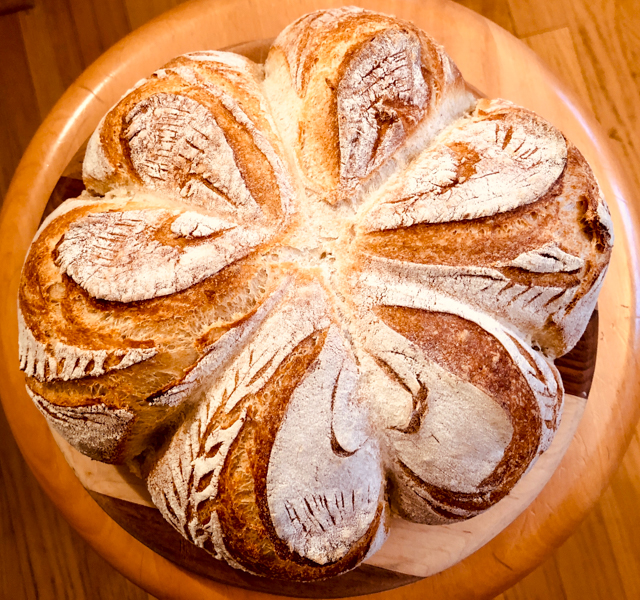
I had different plans for this post. It was going to be Kung Pao Chicken. Then it hit me. This is the last week before Valentine’s Day, so Kung Pao can wait. I shall dance to the romance. I have a special bread for you, decorated with a trio of hearts. Share it with someone who lives in your heart. If you are all alone in these crazy times, bake it for you. You deserve it.

BE MY VALENTINE SOURDOUGH
(from the Bewitching Kitchen)

450g bread flour
50g spelt flour
370g water
75g sourdough starter at 100% hydration
10g salt

Make the levain mixture about 6 hours before you plan to mix the dough. It should be very bubbly and active.

When you are ready to make the final dough, place the water in the bowl of a KitchenAid type mixer and dissolve the starter in it, mixing with a spatula briefly, then add the two types of flour, and salt. Turn the mixer on with the hook attachment and knead the dough for 4 minutes at low-speed all the time. You will notice the dough will gain quite a bit of structure even with just 4 minutes in the mixer. Remove from the machine, and transfer to a container lightly coated with oil, cover lightly with plastic wrap and allow it to ferment for 4 hours, folding every 45 minutes or so. Because the dough is already a bit developed from the initial time in the mixer, you should get very good structure after 3 and a half hours, or even sooner than that.

After four hours bulk fermentation, shape the dough as a ball, and place, seam side up, in a lightly floured banetton. Leave at room temperature one hour, and then place in the fridge overnight, from 8 to 12 hours.

Next morning, heat the oven to 450F.

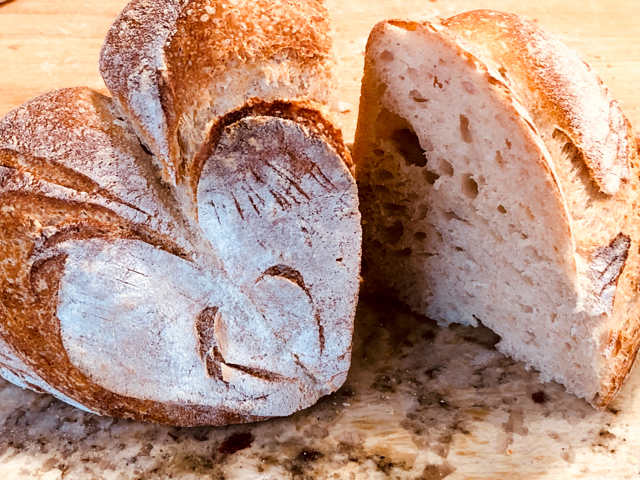
Place three strings over the dough nicely spaced, and touch the strings to glue them lightly to the bottom of the bread. Place a parchment paper on top, a flat baking sheet, and invert the dough, flipping it out of the banneton. Flour the surface of the dough, and tie the strings on top as shown in the composite picture. Score as desired, forming a heart pattern.

Bake at 450F for 45 minutes, preferably covered for the first 30 minutes to retain steam. I cut the strings quickly after 30 minutes when I open the pan, and moved them gently out of the bread. Don’t worry if some parts of the string stay glued to the bread, you can remove later. Cool completely over a rack before slicing.

ENJOY!

to print the recipe, click here

Comments: The other day I was chatting with my friend Dorothy from Shockingly Delicious and she suggested that I make a Valentine-inspired sourdough. I jumped on the idea right away. However, I cannot take credit for the look of this bread, I had seen the scoring months ago on youtube and simply followed more or less her method with a few minor differences because I found myself with less space for additional details around the hearts. I wanted to use beets and make a vibrant red concoction, but there was no way I would go to the store under the dreadful weather conditions of this past weekend. If you don’t know what Polar Vortex is, count yourself lucky. Enough said.

I’ve been a bit puzzled by the way my designs sometimes tend to disappear during baking, and just the other day saw a tip about it. Apparently if you bake it in a Dutch oven (as I do), cracking the lid open allows some of the moisture to escape and the flour rubbed on the surface of the dough is not incorporated into it, so the design will be more evident and crisp. Obviously I forgot all about it when I baked this loaf. I will try it next time for sure.

ONE YEAR AGO: Orange Streusel Cake

TWO YEARS AGO: Pink Praline Brioche

THREE YEARS AGO: A Spinach Salad to Write Home About

FOUR YEARS AGO: Karen’s Four Hour French Country Bread

FIVE YEARS AGO: The Siren’s Song of the Royal Icing

SIX YEARS AGO: Blog-worthy Roasted Butternut Squash

SEVEN YEARS AGO: Chocolate Currant Sourdough Loaf & Roasted Beet Hummus

EIGHT YEARS AGO: Sesame and Flax Seed Sourdough

NINE YEARS AGO: Spanakopita Meatballs

TEN YEARS AGO: Saturday Morning Scones

ELEVEN YEARS AGO: Pain de Mie au Levain

NUT-FREE LADY GREY MACARONS

Nut allergies. They prevent a human being from enjoying one of the most beloved cookies in the known universe. Such cruel fate. But this recipe uses sunflower seeds instead of almonds and I can tell you the outcome is quite amazing. The batter is slightly more grainy, but the macs baked with very nice feet and good texture. Please use caster sugar (super fine). It does make a difference, particularly in this version.

NUT-FREE LADY GREY MACARONS
(from the Bewitching Kitchen)

For the shells:
200g powdered sugar
115 g sunflower seed meal (or finely ground sunflower seeds)
115 g egg whites at room temperature (approx. 4 eggs)
1/8 tsp of cream of tartar (optional)
100 g caster sugar (or regular sugar made finer in a food processor)
¼ tsp vanilla paste or extract
Americolor food gel Super Black
Americolor food gel Fog
Americolor food gel Tulip Red
Royal Icing, thick consistency

for filling:
1/4 cup butter
170g powdered sugar
1/2 cup milk
1 bag Lady Grey tea
chai extract (optional, I used Olive Nation)

Line 3 heavy baking sheets with parchment/baking paper or Silpat mats. Layer the powdered sugar and sunflower seed meal in a food processor. Pulse until the mixture looks like fine meal, about 12 pulses. Pass through a sieve and transfer to a small bowl or to a sheet of parchment/baking paper. Set aside.

Place the egg whites and cream of tartar in the bowl of a stand mixer fitted with the whisk attachment. Make sure that the bowl and the whisk are impeccably clean. Starting on medium speed, whip the whites with the cream of tartar until they look like light foam. The whites should not appear liquid. The foam will be light and should not have any structure.

Slowly rain in the granulated sugar in five additions, trying to aim the stream between the whisk and the side of the bowl. Turn the speed up to high. Continue to whip the meringue until it is soft and shiny. It should look like marshmallow creme. Add the vanilla. Whip the egg whites until the mixture begins to dull and the lines of the whisk are visible on the surface of the meringue. Check the peak. It should be firm. Transfer the whites to a medium bowl.

Fold in the sunflower seed mixture in two increments. When the mixture is more or less homogeneous (but before you smash it to deflate it), separate a very small amount of batter into a bowl and add black food gel to it. Proceed to fully mix it (macaronage step), and place it in a small piping bag, no need to use icing tip. Reserve. Go back to the main mixture and add a few drops of fog gel color to it. Paint the mixture halfway up the side of the bowl, using the flat side of a spatula. Scrape the mixture down to the center of the bowl. Repeat two or three times, then check to see if the mixture slides slowly down the side of the bowl. Put the mixture in a piping bag fitted with your choice of piping tip (round, ¼ or ½ inch in diameter or 6 – 12 mm). Pipe shells, I like to count numbers in my head and use the same count for each shell so they end up similar in size. After piping 5 or 6 shells, get the piping bag containing the black batter and make a cut. Pipe dots all over the shells.

Slam each sheet hard four to six times on the counter/worktop. Let the unbaked macarons dry until they look dull but not overly dry. Drying time depends on humidity. In a dry climate, the macarons can dry in 15 to 20 minutes; in a humid climate, it can take 35 to 40 minutes.

While the macarons are drying, heat the oven to 300 F. Bake one sheet at a time on the middle rack. Check in 11 minutes. If the tops slide or move (independently of the ‘feet’ when you gently twist the top), then bake for 2 to 3 more minutes. Check one or two. If they move when gently touched, put them back in the oven for 1 to 2 more minutes until they don’t move when touched. Let the macaroons cool for 10 minutes before removing from the pan. The macarons should release without sticking.

Make the filling: Infuse the milk with the bag of tea for 15 min. Remove the bag, squeezing it well to release all the tea flavor into the milk. Let it cool. Whisk the room temperature butter with a handheld mixer until creamy. Add the powdered sugar, 2 tablespoons of infused milk (you won’t need it all) and chai extract (if using). Whisk for a couple of minutes. Adjust consistency with more infused milk or powdered sugar, if needed.

Assemble the macarons: find two macarons similar in size and add a good amount of filling to the bottom of one of them. Place the other on top and squeeze gently to take the filling all the way to the edge. Store in the fridge for 24 hours for perfect texture.

To decorate: pipe hearts with Royal icing dyed red. Use a black food pen to smooth the edges of the black dots, if needed, and a red pen to draw the edge of the heart (optional).

ENJOY!

to print the recipe, click here

Comments: I’ve made macarons last Summer using a little bit of sunflower seed for flavor, but this time I replaced the full amount of almond flour with sunflower seed meal (I used this product instead of grinding the seeds myself). The batter was slightly harder to mix (the macaronage stage), and had a slightly denser structure, but I was surprised by how tall the feet were during baking (they always deflate a bit as they cool).

A few words on the decoration. Because the batter turned out a bit on the thick side, the dots I made with black batter were not perfectly round, and many ended up with ragged edges. So I smoothed things out with a black food pen after baking, which I also used to make the little dots all over. The heart was piped with Royal Icing, thick consistency (like you would use for transfers), because it gives the hearts a plump look that I find pretty attractive. I also used a red food pen to trace the edge, but that step can be omitted, I don’t think it added that much to the whole design.

I really enjoyed the flavor of the tea-chai-buttercream. If you brew the tea strong enough, it will have enough flavor but using chai extract is definitely a nice touch. I love Olive Nation products, and was searching for an opportunity to put my chai extract to use. This basic decoration design will come back in the future. Different colors, piping different shapes, I have a few ideas brewing. Or, should I say… macaroning?

ONE YEAR AGO: Mini-Heart Cakes for your Valentine

TWO YEARS AGO: Blue Moon Milk

THREE YEARS AGO: Slow-Cooked Chicken Meatballs

FOUR YEARS AGO: Zesty Flourless Chocolate Cake

FIVE YEARS AGO: Maple Pumpkin Pecan Snacking Cake

SIX YEARS AGOSilky Gingered Zucchini Soup

SEVEN YEARS AGO: Sweet Fifteen!

EIGHT YEARS AGO: Sesame and Flaxseed Sourdough

NINE YEARS AGO: Green Beans with Miso and Almonds

TEN YEARS AGO: Saturday Morning Scones

ELEVEN YEARS AGO: White Bread

CLAY POT CORNISH HENS WITH RICE-PECAN STUFFING

No clay pot? No problem, I will tell you how to make the exact same recipe without it. What I love about the clay pot is how user-friendly it is. A little longer cooking never hurts, no risk of drying the meat or making it tough. Cornish Hens are perfect for a romantic meal, they bring a touch of elegance and cuteness at the same time. Often they are stuffed with wild rice, but I wanted to see if the humble white rice would work. I am here to tell you, it does! Aren’t you thrilled?

CLAY POT CORNISH HENS WITH RICE-PECAN STUFFING
(from the Bewitching Kitchen)

2 cornish hens
kosher salt and freshly-ground black pepper
2 tablespoons olive oil
1/4 cup chopped onion (I used fennel instead)
1/4 cup chopped celery
1/3 cup coarsely chopped pecans
1 tablespoon chopped fresh sage
1 cup cooked rice
1/2 cup dried cranberries
]flat-leaf parsley, chopped (amount to taste)
kosher salt and freshly-ground black pepper

for glaze:
2 tablespoons olive oil
2 tablespoons soy sauce
2 tablespoons honey
splash of lemon juice

Make the stuffing: Heat the olive oil in a skillet. Add onions (or fennel) and celery and cook until softened, about 5 minutes. Add pecans, sage, and 1/4 teaspoon each kosher salt and pepper. Cook until pecans are fragrant. Remove from heat and stir in cooked rice, cranberries, and parsley. Season to taste with additional salt and pepper. Set aside.

Make the glaze: mix all ingredients in a small bowl and set aside.

If using the clay pot, soak it for a couple of hours. If roasting in a regular pan, heat the oven to 425F. Remove hens from the refrigerator about 30 minutes prior to roasting. Rinse hens, and pat dry with a paper towel. Lightly season the cavities of the hens with salt and pepper. Spoon about 1/2 cup of stuffing into each cavity. Tie the legs closed with kitchen twine and tuck the wings under the birds. If using the clay pot, improvise a little “rack” using aluminum foil so that they don’t sit directly on the pot. Place the hens in the clay pot and place in a cold oven. Turn it to 450F. Roast for 1 hour, then open the clay pot and roast for 15 minutes longer, brushing with the glaze a couple of times.

If roasting in a regular pan, brush the skin with olive oil and roast for 20 minutes at 425F, then reduce the temperature to 375F and roast for about 50 minutes longer, brushing with the glaze a few times during roasting (if possible, check temperature at thigh, it should read 180F).

Let the hens rest for 15 minutes, then cut the kitchen twine and serve.

ENJOY!

to print the recipe, click here

Comments: I pretty much gave up trying to make nice pictures of roast chicken and its relatives. So I hope you can surf beyond the photos and trust that it was truly very good. I used bland, nothing-to-it leftover white rice for the stuffing and it got totally transformed during roasting. The juices of the hen gave it a very deep flavor, and the pecans, cranberries and sage closed the deal beautifully. As the husband said, “this must go into our rotation.” Agreed. 100%.

ONE YEAR AGO: Ivory Lentils, my newfound love

TWO YEARS AGO: Bouillabaise for a Chilly Evening

THREE YEARS AGO: Bergamot-Cherry Macarons

FOUR YEARS AGO: Roasted Veggies with Queso Cotija Dressing

FIVE YEARS AGO: Creamy Broccoli and Mushroom Casserole

SIX YEARS AGO: Maple Walnut Biscotti

SEVEN YEARS AGO: Barley Risotto with Peas

EIGHT YEARS AGO: Oatmeal Fudge Bars

NINE YEARS AGO: Cauliflower Steaks

TEN YEARS AGO: Soft Spot for Chevre

ELEVEN YEARS AGO: Quick sun-dried Tomato Crostini