THE HOME BAKERS COLLECTIVE: MAY PROJECT

Another month in this crazy year is coming to its end. For May, the Bakers Collective challenge was set up by Bianca (check her site with a click here). I love how she shook things up a bit. We had to bake something savory but not using yeast. It’s a nice change from sweets, and getting yeast out of the equation makes it a tad more challenging. I settled on my choice almost immediately, because I’ve been flirting with soda bread for a long time. Perfect opportunity to give it a go.

PANCH PHORAN SODA BREAD 
(from Nadiya Hussain)

for Panch Phoran mix (all as whole seeds):
1 tsp fenugreek
1 tsp nigella
1 tsp cumin
1 tsp black mustard
1 tsp fennel seeds

for bread:
250g whole-wheat flour
250g bread flour
1 tsp fine salt
1 tsp baking soda
1 tbsp panch phoran (made from mixture above)
400ml buttermilk

Heat the oven to 400F.

Mix all seeds in a small bowl (you will have mixture leftover).

Put the flours, salt, baking soda and 1 tablespoon of five-spice mixture into a large bowl and mix well. Make a well in the center and add a little over half the buttermilk. Bring the dough together by hand, adding more of the buttermilk if needed (I used the full amount).

As soon as all the flour is absorbed and the dough comes together, lightly flour the work surface, tip the dough onto it and roll into a neat ball. Place on the baking tray. Using a sharp knife, make a cross cut almost all the way down to the bottom of the bread, but do not separate the pieces.

Bake on the middle shelf for 30 minutes, until the bread is golden and sounds hollow when tapped on the base. Allow it to cool completely before slicing.

ENJOY!

to print the recipe, click here


Comments: Soda Bread does not get high marks in the beauty department, I admit. It takes rustic to unprecedented levels, but I promise you Nadiya’s version is very tasty. That mixture of spices is perfect. You can buy packages of the mixture, but it’s really quite simple to prepare it yourself, and I happened to have all those seeds already in my pantry. I had fun browsing amazon and reading the comments from people who bought the mix. Some were furious because “it does not have nearly enough fenugreek.” So if you want to make sure to use the authentic “five spice mixture”, make it yourself. I actually loved so much the flavor of this bread, that I intend to make a sourdough version using those spices. Stay tuned.

Although quick breads leavened with baking powder and with little fat in theory do not stay good for more than a day or so, I was surprised by how good the bread tasted after FOUR days once toasted. We froze half of it because with just the two of us there is a limit to how much bread we can consume. But I know I will be making this and other versions in the near future.

Bianca, thanks for such a cool challenge that made me bake something I had never baked before. I am no longer a Soda Bread Virgin!

To see what my tent-baker friends came up for their challenge, visit the Home Bakers Collective site…. (post might take a few hours to show up, so keep that in mind)

ONE YEAR AGO: Purple Star Macarons

TWO YEAR AGO: Smoked Salmon, Fait Maison

THREE YEARS AGO: Kouign-Amann, Fighting Fire with Fire

FOUR YEARS AGO: In My Kitchen, Yin and Yang

FIVE YEARS AGO: Chocolate Toffee Banana Bread

SIX YEARS AGO: In My Kitchen, June 2014

SEVEN YEARS AGO:  Strawberry Frozen Yogurt

EIGHT YEARS AGO: Baked Coconut and “The Brazilian Kitchen”

NINE YEARS AGO: Honey-Glazed Chicken Legs

TEN YEARS AGO: French-Style Rolls

BAKING THROUGH THE BLOGOSPHERE

And now for something completely different. I will share a few recipes straight from blogs I follow. You can click on the link to the original blog posts to get the recipes that perk your interest…

PERUVIAN ALFAJORES
(from Carlos’ blog)

Delicious cookies, filled with dulce de leche, which reminds me so much of my childhood!  My Mom used to pressure cook cans of condensed milk, open them to reveal the luscious caramel inside, and I would enjoy it by spoonfuls. I was such a picky eater, I suppose having that around would make sure I got enough calories to survive.  Carlos offers THE authentic version for these famous cookies. They are delicate, elegant, and incredibly tasty.

HELEN’S BROWNIES
(from Bakers Anonymous)

These are just amazing brownies. A huge hit of chocolate, perfect texture, got rave reviews from the resident brownie critic, who has been very VERY hard to please in the brownie department. His favorite version takes toasted pecans in the mix (follow Helen’s recipe and add 3/4 cup toasted pecans in the final mixing).

CHOCOLATE-SWIRLED BANANA BREAD
(from Jamlab)

This takes your regular banana bread and dresses it up for party… I find that people are usually divided into two groups when it comes to banana bread. Those purists who want a plain, banana-only taste in their loaf, and those who don’t mind bells and whistles. Obviously, this version is dedicated for those in the latter group. Don’t be stingy with the chocolate chips on top. They add a lot, and look super cute.

ALMOND TEA CAKES
(from Saving Room for Dessert)

A lot of fun to make, these are egg-free little cakes in bite-size format, deliciously addictive. You can add any kind of jam to their centers. I used boysenberry jam. Other than that, I followed the recipe from Tricia’s blog to a T. They turn out quite elegant also, I visualize them in a tea party next to Peruvian Alfajores. What a nice couple!

LOVE BARS
(from Helen’s Pastries like a Pro)

These are quite unusual, and the looks do not do justice to their taste. Helen described them so well in her blog, that I could not wait to bake a batch. The base bakes at the same time as the topping, simplifying the preparation quite a bit.  If you are into gingerbread type dessert, you will go nuts for this one. Trust me.

DOUBLE CITRUS POPPY-SEED BREAKFAST CAKE
(from Joanne’s Eats Well with Others)


This was an OMG type of cake. I slightly modified her recipe by using a mixture of Meyer Lemon and Blood Oranges, juice and zest. The slices on top were Meyer Lemons, but the drizzle was a mixture of lemons and blood oranges, so in the end the red color spoke louder. It is a very moist and tender cake, intensely fragrant. A crowd-pleaser.

CHOCOLATE DONUTS
(from Dana’s Wake and Bake Mama)

Baked donuts made as festive as possible through the power of sprinkles. Dana’s recipe is quick to assemble, one-bowl-type-thing. Less things to wash, no need to get the KitchenAid out to play. Granted, maybe I used a bit of a heavy hand with the sprinkles, but they make me happy.


TRADITIONAL SCOTTISH SHORTBREAD
(from Tanya’s Global Bakes)

Last December I went on a compulsive shortbread cookie adventure, and tried several recipes, including one super convoluted from America’s Test Kitchen, in which every single utensil of my kitchen was involved. Tanya’s version won my heart, apart from going a bit over the top with the decoration, I stayed true to her recipe. Two thumbs all the way up for it.

That’s the end of my walk through the blogosphere… all these bakes ended up as part of the Common Table meals, something that has kept me busy and “sane” through these odd times we are going through. Baking is a huge therapy for me, and I know I’m not alone, many of my baking friends feel the same way.

ONE YEAR AGO: Chickpea Burgers, Vegan and Delicious

TWO YEARS AGO: Macarons with Ganache Noisette

THREE YEARS AGO: Quiche with Asparagus and Fennel

FOUR YEARS AGO: Fakebouleh

FIVE YEARS AGO: Yellow Squash Soup

SIX YEARS AGO: Grilled Chicken with Tamarind and Coconut Glaze

SEVEN YEARS AGO: Chicken-Apricot Skewers

EIGHT YEARS AGO:  Asparagus Quiche

NINE YEARS AGO: Two-stage Pea and Prosciutto Risotto

TEN YEARS AGO: Mellow Bakers: Corn Bread


SMOKED CHOCOLATE MACARONS

Staying safe in Corona virus time: read the guest blog post by Phillip Klebba here.

If I wake up in the middle of the night, my mind often floats through baking projects. This past weekend I woke up thinking about marbled cakes and how much I like the method of pouring the batter in concentric circles instead of dropping patches of different colors around the cake pan. That thought took me to macarons. Two colors of batter. Two piping bags. Alternating colors on each shell, in a concentric pattern. I woke up next morning and went to work.

SMOKED CHOCOLATE MACARONS
(from the Bewitching Kitchen)

For the shells:
200g  Icing/powdered sugar
115 g ground almonds
115 g egg whites at room temperature (approx. 4 eggs)
1/8 tsp of cream of tartar
100 g granulated sugar
¼ tsp vanilla paste or extract
black gel food color

for the smoked chocolate ganache:
150g heavy cream (you won’t use the full amount in the ganache)
1 bag smoked black tea (Lapsang Souchong)
2 tsp corn syrup
230g semi-sweet chocolate in pieces

Start by making the filling, as it must cool down before using. Bring the heavy cream to a gentle boil, add the tea bag. Turn the heat off, close the pan and leave the tea infusing for 30 minutes. Squeeze the tea bag and remove it. Bring the cream to a gentle boil again, then pour 115g of it over the chocolate. Leave it for 5 minutes, gently whisk until smooth, add the corn syrup. Cool it until it gets to a good consistency for piping on the shells.

Make the macaron shells: Line 3 heavy baking sheets with parchment/baking paper or Silpat mats. Layer the powdered/icing sugar and ground almonds/almond meal  in a food processor. Pulse until the mixture looks like fine meal, about 12 pulses. Pass through a sieve and transfer to a small bowl or to a sheet of parchment/baking paper. Set aside.

Place the egg whites and cream of tartar in the bowl of a stand mixer fitted with the whisk attachment. Make sure that the bowl and the whisk are impeccably clean. Starting on medium speed, whip the whites with the cream of tartar until they look like light foam. The whites should not appear liquid. The foam will be light and should not have any structure.

Slowly rain in the granulated sugar in five additions, trying to aim the stream between the whisk and the side of the bowl. Turn the speed up to high. Continue to whip the meringue until it is soft and shiny. It should look like marshmallow creme (marshmallow fluff). Add the vanilla. Whip the egg whites until the mixture begins to dull and the lines of the whisk are visible on the surface of the meringue. Check the peak. It should be firm. Transfer the whites to a medium bowl.

Fold in the ground almond/almond meal mixture in two increments. When it is almost combined, divide the batter in two and add black food color to one portion.  Proceed to mix the batters separately until they both reach proper texture for piping (batter should form a figure 8 on the surface as you drop it from a spatula). Put each mixture in a piping bag fitted with a round, ¼ inch tip.   Pipe shells, using a little bit of one color, add the second on top, right in the center, then back to the first color, alternating in concentric circles. If desired, make a design with a needle. You need to work fast and pipe 4 to 6 shells before moving to a second batch.

Slam each sheet hard four to six times on the counter/worktop. Let the unbaked macarons dry until they look dull but not overly dry. Drying time depends on humidity. In a dry climate, the macarons can dry in 15 to 20 minutes; in a humid climate, it can take 35 to 40 minutes.

While the macarons are drying, heat the oven to 285 F (a lower temperature is better to keep the white color).  Bake one sheet at a time on the middle rack. Check in 13 minutes. If the tops slide or move (independently of the ‘feet’ when you gently twist the top), then bake for 2 to 3 more minutes. Check one or two. If they move when gently touched, put them back in the oven for 1 to 2 more minutes until they don’t move when touched.   Let the macaroons cool for 10 minutes before removing from the pan.  The macarons should release without sticking.

Assemble the macarons: find two macarons similar in size and add a good amount of filling to the bottom of one of them. Place the other on top and squeeze gently to take the filling all the way to the edge.  Store in the fridge for 24 hours for perfect texture.

ENJOY!

to print the recipe, click here

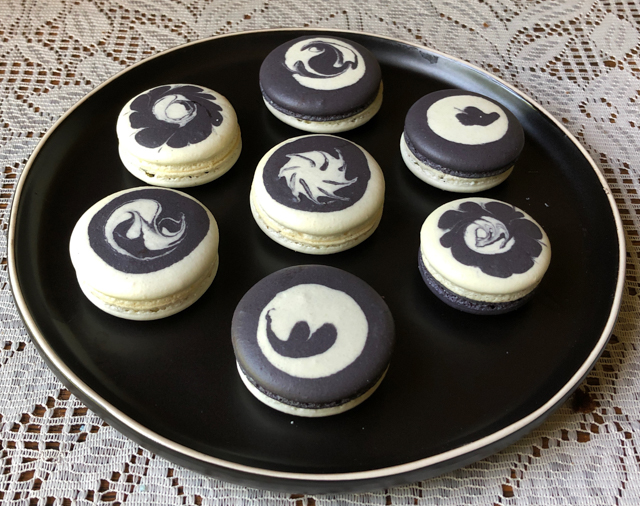
Comments: A few things are important to keep in mind if you try this piping technique. You should prepare two piping bags with round tips that are no bigger than 1/4 inch in diameter. A small opening is better because you will be piping each shell in three steps, alternating colors. Some shells I did “black-white-black”, some shells I did “white-black-white.” As you see in the composite picture, I started with a very small round of batter, and that was not a good idea. It is better to pipe a larger round, then add the other color in the center of it, so that the edge of the first color is still quite visible. The third piping will be pretty much just a small little blob that you do by touching the tip on the surface. My technique was changing a bit as I piped, you can see the “evolution” of the pattern below, from left to right. I also made a few mini-macs with solid color because small is beautiful (wink, wink).

With this method, it will be hard to make a small macaron, so be prepared to have cookies that will be up to 2 inches in diameter. When you make the first color large enough, it is easier to center the second on top, and the final one after that. As I was making the concentric pattern it occurred to me I could use a needle to create additional features to the shells, so that’s what I tried next.

Some stayed simple, and some received the needle treatment. Another thing to keep in mind is that you need to work fast. I made 4 to 6 shells at a time. Piped the first color, switched to the second, piped on top. Back to the first, finished them, and used the needle right away. Moved to the next batch. Working fast is important because you want the two batters to mingle together as one, as much as possible. I did bang the sheets on the surface, and that did not interfere with the design. I started baking the first sheet at 300F as I normally do, but the white got a slight hint of brown even at this temperature. To preserve the white as much as possible, bake them at 285F for a tad longer (I wrote the recipe already with this lower temperature in mind).

The smoked chocolate ganache is quite delicious. I first learned about it in a Japanese patisserie cookbook, and made it a few times in the past. I thought that it could go well with this black and white design of the shells. The tea is intensely flavored, so I think one bag is all you need. Some recipes call for two bags for the same amount of ganache. To my taste, it would be excessive.

I loved baking these macs, because that crazy thought the popped in my mind in the middle of the night materialized the way I hoped. The possibilities are endless, using three colors, different ways to work the needle, I can hardly wait to try it again. And again. I hope you do too…

ONE YEAR AGO: Chocolate Celebration Cake

TWO YEARS AGO: Incredibly Simple Times Four, May 2018

THREE YEARS AGO: Tangential Quiche with Asparagus and Fennel

FOUR YEARS AGO: Fakebouleh

FIVE YEARS AGO: Yellow Squash Soup

SIX YEARS AGO: Grilled Chicken with Tamarind and Coconut Glaze

SEVEN YEARS AGO: Chicken-Apricot Skewers

EIGHT YEARS AGO:  Asparagus Quiche

NINE YEARS AGO: Two-stage Pea and Prosciutto Risotto

TEN YEARS AGO: Mellow Bakers: Corn Bread


WHOLE CHICKEN SOUS-VIDE

No sous-vide? You can still make this recipe using a regular oven, very low and slow for the first part of cooking and then brush with the final glaze and roast under the broiler. But the texture you get from sous-vide is hard to beat. I just rubbed it with dry spices and sealed in the bag. Although on my first time I cooked a whole chicken inside the bag, I found it easier the way I share today. I cut the chicken in four pieces (two breast/wing, and two full legs, placing two pieces in a single bag. Works great and the final presentation is better than keeping it whole or even spatchcocking.

WHOLE SOUS-VIDE CHICKEN
(from the Bewitching Kitchen)

1 whole chicken, cut in four pieces
2 teaspoons Kosher salt
2 teaspoons smoked paprika
1 teaspoons ground black pepper
for final roasting:
2 tablespoons olive oil
1 tablespoon soy sauce
2 tsp agave nectar (or honey)
squirt of lemon juice

Pat chicken dry.  Rub the skin with the mixture of spices. Place in bag and seal.

Heat sous-vide to 150 F. Cook chicken for 6 hours.

Whisk all ingredients for the roasting step. Once the chicken is done, remove from the water bath and transfer it onto a plate. Pat with paper towels.  Place on a roasting pan. Brush the skin with the olive oil mixture, run under the broiler until the skin is cooked to your liking.  The meat will be tender and juicy.

ENJOY!

to print the recipe, click here

Comments: As usual, the timing with sous-vide is very forgiving, which is one of the reasons I love it. If you need to leave it longer than 6 hours, no harm done. You can change the spices to take this recipe in any direction you like. Gochujang will be happening soon in our kitchen.

We enjoyed it with sauteed Brussels Sprouts with Lemon and Almonds, and a little couscous with roasted butternut squash (full disclosure: the squash was leftover from a previous meal).

The leftover meat can be pulled from the bone and used in many different preparations, we usually save it for a couple of days and then the husband turns it into chicken fajitas or tacos. It has such perfect texture, all it needs is a brief encounter with a hot skillet, some lemon juice and additional spices, if so desired.

ONE YEAR AGO: Incredibly Simple Times Four, May 2019

TWO YEAR AGO: French Style Baguettes

THREE YEARS AGO: Sad Times

FOUR YEARS AGO: Slow-Cooker Carnitas Lettuce Wraps and Paleo Planet Review


CHARCOAL SOURDOUGH

I suppose I’ve resisted long enough. Charcoal baking was a big thing a while ago, I kept seeing all sorts of breads, desserts, drinks using this shocking, funky ingredient. I decided to give it a try and loved playing with it. There is no real taste of charcoal, it is more a visual experience. Charcoal can interfere with the absorption of some drugs, but the amount used in baking is very small, so I would not be worried about it.  If you are into trivia, a French chemist, Mr. Bertrand, first found out the power of activated charcoal to absorb toxins and prevent them from causing harm in animals. Then, in 1813 he went on to do a sort of “chemical performance” live, consuming an amount of arsenic that could kill a horse, but previously mixed with charcoal. He survived to tell the tale and proved the power of charcoal as an antidote. A few years later, another French scientist, Mr. Touery, swallowed a huge amount of strychnine in front of the French Academy of Medicine, and survived it. Gotta love the French!  I hope you try charcoal in your baking, but please, leave the arsenic and strychnine out of it…

CHARCOAL SOURDOUGH
(from the Bewitching Kitchen)

475g bread flour
25 g rye flour
120 g sourdough starter at 100%
10 g salt
2.5 g activated charcoal
380g water

Mix everything with a KitchenAid in low speed with dough hook for about 4 minutes. Adjust consistency with additional bread flour if the mixture seems too loose.

Transfer to oiled bowl and bulk ferment for 4 hours at room temperature, folding the dough at every hour. At the end of four hours shape as a round ball, and place in a banetton heavily floured, sticking it in the fridge overnight.

Invert on parchment paper, moisten the surface with a little water, place a stencil on top. Dust with flour over the stencil, and lift it very carefully. Score the bread in a way that will not interfere with your design.

Bake inside a Dutch oven at 450F for 30 minutes, removed the lid, leave it in the oven for additional 15 to 20 minutes, if necessary lower the temp a bit in the final 5 minutes. Cool completely before slicing.

ENJOY!

to print the recipe, click here

Comments: The charcoal powder I got is this one. Beware it is a very fine powder, so when you open the bottle and remove that little inner protection glued to the top, use caution. It flies everywhere. I mean everywhere. You catch my drift. Charcoal drift.  So far, I’ve only used it in bread and crackers (sourdough and regular), and really love the look, although I admit not everyone is fond of it. Some people are just turned off by breads with “unusual” color. As you probably figured it out, I am not part of that crowd.

Charcoal bread next to a cheese platter would look very nice, and of course, what could be better in a Halloween party?  Keep that in mind… I am actually planning my next sourdough charcoal adventure, and it will involve kalamatas. Taking black to the limit!

ONE YEAR AGO: Ispahan Macarons

TWO YEAR AGO: Smokin’ Hot Meatloaf and Homemade Ketchup

THREE YEARS AGO: Banana Bread with Espresso Glaze

FOUR YEARS AGO: Slow-Cooker Carnitas & Paleo Planet Cookbook Review

FIVE YEARS AGO: The Making of a Nobel Reception

SIX YEARS AGO: Fennel Soup with Almonds and Mint 

SEVEN YEARS AGO: Green Curry Pork Tenderloin

EIGHT YEARS AGO: Farfalle with Zucchini and Ricotta

NINE YEARS AGO: Slow-baked Salmon with Lemon and Thyme

TEN YEARS AGO: Hoisin Explosion Chicken