BRAZILIAN PAO DE MEL

In case you’ve missed my big announcement:
12 days to showtime!

Want to say it as a native? Pay attention to the nasal sound of PÃO… and repeat after me…

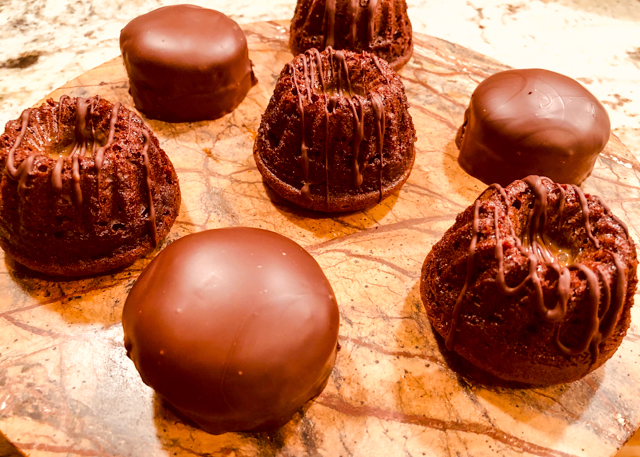
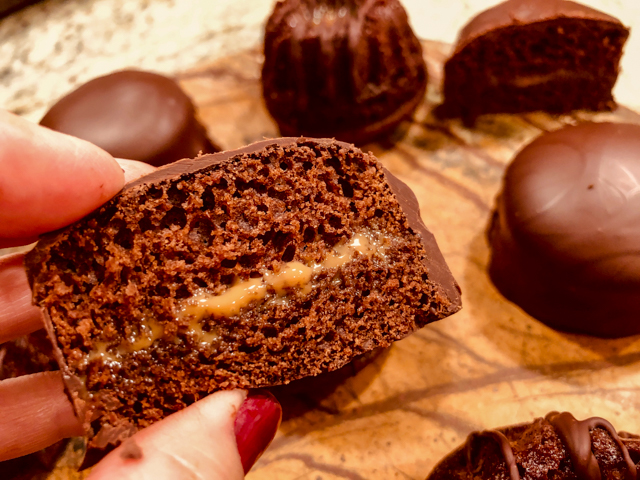
Pão de mel translates literally as “honey bread.” However, it is definitely not a bread, and honey might not be the first flavor that comes to mind once you take your first bite. I admit the name is misleading, but I am thrilled to share this recipe with you, because it is a real classic in my home country. It has flavors I adore (that ginger, spicy thing), enclosed in a nice chocolate shell. The ones I grew up with were a bit on the dense side. My family had no tradition of baking, so I only had pão de mel that you get in stores, wrapped in plastic for who knows how long. This version is so good, very soft, tender, sweet and spicy. I made two kinds, the traditional, covered with a shell of chocolate, and a little departure from the classic, in bundt shape. You decide which one you like best.
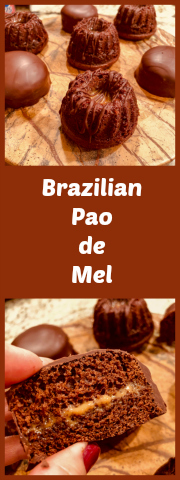
PÃO DE MEL
(from the Bewitching Kitchen, adapted from several sources)

1 egg
250mL whole milk
90 g  sugar
270 g honey
30 g butter, melted and cooled
240 g all purpose flour
7 g baking soda
1 teaspoon baking powder
1 tablespoon ground cinnamon
1/4 teaspoon salt
½ teaspoon of nutmeg
1/4 tsp ground cloves
3 tablespoons cocoa powder (Dutch process is fine)

for the filling;
dulce de leche (store bought or homemade)

for covering:
tempered bittersweet chocolate, about 500 g

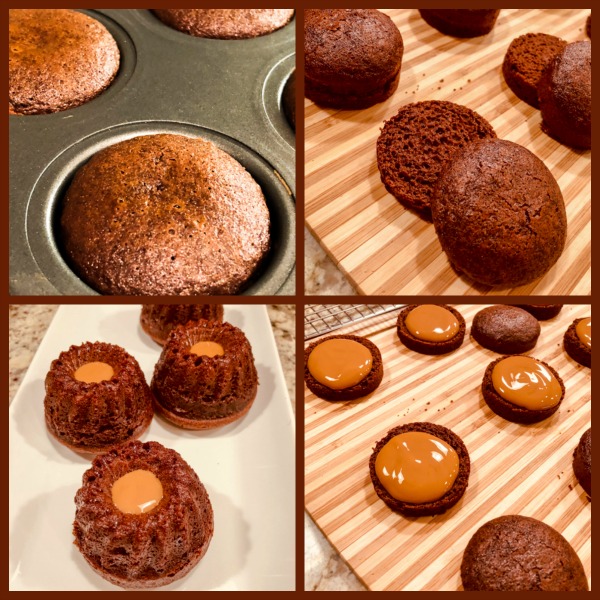
Mix the egg with milk, sugar, honey and butter in a large bowl. Whisk well. In another bowl, stir in the remaining dry ingredients and sift them slowly over the egg mixture in three portions, stirring well after each addition until a smooth, homogeneous mixture is formed.  Place batter in fridge for 15 minutes.

In the meantime, turn the oven on at 360 F. If using non-stick mini cake pans, you don’t need to do anything. Otherwise grease and flour the pans lightly.  Ideally you need a 6 cm round tin (a bit less than 2.5 inches). Pour the batter halfway through the tin, do not fill more than half.  Bake for 15 to 20 minutes. Unmold the still warm rolls and let them cool completely on a rack. Cut them in half and stuff each with the dulce de leche.

Temper chocolate and cover each little pao de mel.

Alternatively, bake the batter in mini bundt pans, fill the central hole with dulce de leche and decorate with a drizzle of tempered chocolate. Mini bundt pans will take slightly longer to bake. Cool them in the mold before unmolding.

ENJOY!

to print the recipe, click here

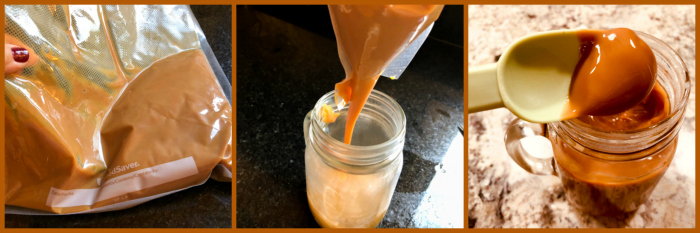
Comments: If you want to make your own dulce de leche, there are many methods to do so. Pressure cooker, slow oven, even the microwave. I opted for sous-vide and must say it was perfect. Simply pour the contents of 1 can of condensed milk into a bag, seal it and cook it at 185F for 12 to 16 hours. When the time is up, simply cut the bag and pour the contents into a container. Into the fridge ready for any dulce de leche emergency.

Homemade dulce de leche is a real treat, I highly recommend you give it a try, but of course, the canned product will work well too. Pão de mel can be frozen for a couple of months without the filling and chocolate covering. You can also simplify the process and skip the filling. The simplified version is actually more common to buy in Brazil. But normally, when people make them at home, they go the extra mile. A very sweet mile, if you ask me.

Which version was better, classic or mini-bundt? I honestly have a hard time deciding. The mini-bundt is a lot easier to make because once you un-mold the little cakes the hard work is done. You can conceivably even get by without tempering chocolate, just melting it gently and drizzling it all over. But of course, the traditional version is the one that brings fond memories of my past. It’s your turn now, make both and let me know what you think…

For those interested:  this is the pan I used to bake the cakes. I love it!

ONE YEAR AGO: Stir-Fried Chicken in Sesame Orange Sauce

TWO YEARS AGO: Monday Blues

THREE YEARS AGO: A New Way to Roast Veggies

FOUR YEARS AGO: Two Takes on Raspberries

FIVE YEARS AGO: Spice Cake with Blackberry Puree

SIX YEARS AGO: Own Your Kitchen with Cappuccino Panna Cotta

SEVEN YEARS AGO: Chicken Parmigiana, the Thriller

EIGHT YEARS AGO: Wild Mushroom Risotto

NINE YEARS AGO: Tartine Bread:  Basic Country Loaf 

TEN YEARS AGO:  Pugliese Bread

A REALLY BIG ANNOUNCEMENT

Dear friends, I’ve been keeping a secret from you for a long time. But finally I can share some super exciting news… Remember when I was a bit disappointed because I went all the way to the final audition for the Great American Baking Show 2018 and was not selected to go to the show? Well, well, well… persistence paid off. I am here to tell you that I WILL BE A CONTESTANT THIS YEAR!!!!  Can you imagine? I mean, I myself could not quite believe it. For a long time I walked around in a complete daze, unable to tell anyone, unable to have a “normal reaction” to the idea. It’s been an incredible adventure, for sure the biggest adventure of my life, but finally ABC Network announced the contestants, and yours truly is one of the ten who walked into that dreamy tent. Who baked for Paul Hollywood and Sherry Yard. Live. In real time. I know, crazy, right? I am so, so excited to share the news, and hope you will have a chance to watch the show. It airs December 12th!  I guarantee you it will be awesome. Get it on your schedule…

THE GREAT AMERICAN BAKING SHOW – “Cake and Bread Week” – On your marks, get set, bake! Cake and bread are on the menu when 10 aspiring bakers from around the country step into the famous white tent to tackle the challenges of cake and bread in the two-hour season premiere of “The Great American Baking Show: Holiday Edition,” THURSDAY, DEC. 12 (9:00-11:00 p.m. EST), on ABC. (ABC/Mark Bourdillon)
CARLOS, HELEN, SARITA, BIANCA, DANA, BROTHER ANDREW, TANYA, ALEX, MARISSA, SALLY


CHERRY CHIPOTLE CHICKEN THIGHS

Oddly enough, this chicken recipe was born from a batch of French macarons. I know, how could it be? It turns out that I made a filling for macarons using white chocolate ganache and sour cherry jam. Quite a bit of jam was left in the jar, and I knew it would sit in the fridge at the risk of being forgotten. Why not put it to use in a savory recipe? I adapted bits from a few cookbooks, and came up with a pressure cooker version for chicken thighs that had some sweetness, some spice, some sourness, and what I love the most: that falling-apart texture.  I hope you give it a try.

CHERRY CHIPOTLE SHREDDED CHICKEN
(from the Bewitching Kitchen, adapted from several sources)

One 28-ounce can whole tomatoes
1/2 cup sour cherry jam
¼ cup packed dark brown sugar
2 tablespoons red wine vinegar
1 tsp salt
1 canned chipotle in adobo sauce, stemmed, seeded, and minced
1 tablespoons paprika
1 tablespoon Worcestershire sauce
¼ teaspoon ground cinnamon
¼ teaspoon ground cloves
3 pounds boneless skinless chicken thighs, trimmed

Place the tomatoes, jam, brown sugar, vinegar, salt, chipotle, paprika, Worcestershire sauce, cinnamon, and cloves in a blender. Blend and pour the smooth sauce in a pressure cooker.

Add the boneless chicken thighs, whole. Close the pressure cooker (or Instant Pot) and bring to full pressure. Cook for 20 minutes,  release the pressure manually, and remove the chicken pieces to a cutting board. Shred the meat with two forks (it should be very tender). 

Add the shredded meat back to the sauce, heat gently for a few minutes, adjust seasoning (you may need a bit more salt).  Serve over rice or the side dish of your choice. Also great as a filling for fajitas.

ENJOY!

to print the recipe, click here

Comments: As a good Brazilian-American, I use my pressure cooker all year, but of course now that the temperature outside starts to fall down, this type of comfort food shows up more often in our menu. On weeknights, the pressure cooker is the best tool to have a meal with that aura of hours and hours in the making, materialize in the blink of an eye. Well, a few blinks. Not that many, though.

ONE YEAR AGO: White Chocolate Mini-Mousse with Sugared Cranberries

TWO YEARS AGO: You Say Ebelskiver, I say Falafel

THREE YEARS AGO: Happy Thanksgiving!

FOUR YEARS AGO: Two Takes on Raspberries

FIVE YEARS AGO: Spice Cake with Blackberry Puree & The Global Pastry Review

SIX YEARS AGO: Own Your Kitchen with Cappuccino Panna Cotta

SEVEN YEARS AGO: Chicken Parmigiana, the Thriller

EIGHT YEARS AGO: Wild Mushroom Risotto

NINE YEARS AGO: Tartine Bread:  Basic Country Loaf 

TEN YEARS AGO:  Pugliese Bread


PANETTONE, WILD YEAST VERSION

It is almost that time of the year, my friends! I firmly believe that Brazil might be the number 2 country in the world with the highest consumption of panettone in the month of December, losing to Italy, but barely so. They are obsessed over there. Odd bird that I was, I did not care for it until I was about 30 years old.  Now, not only I love it, but I am partial to the authentic version. No chocolate chips for me. Of course, I won’t be mad if you modify this version to include them. I  am open-minded, your chocolate chips will be fine with me!

Timing for the process:
Mix and ferment first dough: 12.5 hours
Mix final dough: 30 minutes or longer
First fermentation of final dough: 1 to 1.5 hours, with folds every 20 – 30 minutes
Divide, rest, and shape: 25 minutes
Proof: 4 – 6 hours at 80F, or about 12 hours at room temperature
Bake: about 40 minutes
Hang/cool: several hours

Time consuming? Yes. Very involved process? Yes.
Worth it? TOTALLY!

PANETTONE
(very slightly modified from Wild Yeast)

yield: two large loaves, best if baked in paper molds
(available at amazon.com)

for starter:
20 g mature stiff (50%-hydration) sourdough starter
20 g flour
10 g water

Mix all ingredients and ferment at 85F for 4 hours. Repeat feedings at 4-hour intervals, each time discarding all but 20 grams of starter, and feeding it with 20 grams of flour and 10 grams of water.

To feed the starter for a whole night, use only 10 g starter with the flour and water, then leave until next morning. Make sure that the final feeding right before you make the dough happens 4 hours before, so that the starter is at its peak. When you are ready to make the final dough, prepare enough starter using these proportions to have enough to use (make a little over 100 g to allow for  eventual evaporation)

First Dough Ingredients:
346 grams flour
190 grams water
1 gram (1/3 teaspoon) osmotolerant yeast, or 1.3 grams (1/2 teaspoon) instant yeast
85 grams sugar
55 grams egg yolk
7 grams (1.5 teaspoons) diastatic malt powder
85 grams unsalted butter, at room temperature
90 grams sweet starter

Final Dough Ingredients:
all of the first dough
82 grams flour
5 grams (7/8 teaspoon) salt
25 grams egg yolk
1/2 tsp vanilla paste
zest of a medium orange
115 grams water, divided
82 grams sugar
126 grams unsalted butter, at room temperature (pliable)
20 grams honey
126 grams raisins
150 grams candied orange peel

Glaze Ingredients (optional)
42 grams granulated sugar
3 grams (2 teaspoons) ground almonds (or almond flour)
3 grams (3/4 tsp) vegetable oil
3 grams (1/2 tablespoon) cornstartch
3 grams cocoa powder
15 g egg whites
1/8 tsp vanilla paste

Topping (optional)
powdered sugar
Swedish pearl sugar
whole blanched almonds

Make the starter over a period of one to several days. Its final feeding should be given 4 hours before mixing the first dough.

Prepare the first dough the evening before baking: In the bowl of a stand mixer, mix all of the first dough ingredients just until combined. Cover the bowl and ferment for 12 hours at warm room temperature (about 72F), or longer for a cooler room. The dough should more than triple in volume.

Make the final dough: To the first dough in the mixer bowl, add the flour, salt, egg yolks, orange zest, vanilla seeds, and 40 grams of the water. Mix in low speed until the ingredients are just combined, about 3 minutes.

Turn the mixer to medium speed, mix for a minute or two, then continue to mix while slowly adding the sugar, in about 5 or 6 increments. Mix for one to two minutes between additions.

Continue to mix until the dough pulls away from the sides of the bowl and the gluten is almost fully developed. Turn the mixer back to low speed and add the butter. Mix for a minute in low speed, then in medium speed until the butter is completely incorporated into the dough and the gluten has reached full development (forms a nice windowpane when gently stretched).

In low speed, add the honey, and about half of the remaining water. Mix until the water is fully incorporated. Add the remaining water and mix until it is fully incorporated. At first it will seem very soupy, do not worry about it, keep mixing and it will end up very smooth and nice.

In low speed, add the raisins and candied peels, mixing just until they are evenly distributed. Place the dough in a lightly oiled container (preferably a low, wide one, to facilitate folding). Ferment at warm room temperature for about one hour, folding the dough after the first 30 minutes. If the dough seems very loose, fold it at 20-minute intervals instead.

Turn the dough onto a buttered surface. Divide the dough into two pieces, and form each piece into a light ball.

Allow the balls to rest (may be left uncovered) for 20 minutes. Meanwhile, if baking in paper molds (recommended) skewer them in the lower third portion with  two wooden skewers inserted in parallel. They will hold the panettone after baking upside down to keep the shape. Shape the dough into tight balls and place into the skewered molds.

Proof at 80F for 4 – 6 hours (or about 12 hours at room temperature), until the tops of the dough domes are even with the top of the molds and the sides are an inch or so below the tops. When the dough is nearly fully proofed, preheat the oven to 350F, with the rack in the lower third of the oven.

To mix the glaze, whisk all ingredients together. Pour, brush, or pipe the glaze evenly onto the top of the loaves. Sift powdered sugar generously over the tops, then sprinkle with pearl sugar and garnish with whole blanched almonds.

Place the loaves directly on the oven rack and bake for about 35 – 40 minutes, until the tops are dark brown and the internal temperature is 185F. If the tops are already quite dark after 25 – 30 minutes, turn the heat down to 325F.

While the panettone is baking, set up your hanging apparatus (See above). When the bread is done, hang them as quickly as possible. Allow the panettone to hang for at least four hours, up to overnight.

ENJOY!

to print the recipe, click here

Comments: I urge you to visit Susan’s site (Wild Yeast) for her original post on the subject, as she goes through many small details I omitted, just to make this post slightly shorter.  I actually made the panettone three times last year and had some issues when I baked using a regular metal tin (as shown in the composite picture above).  The issue was un-molding and having the baked product keep its shape. It simply did not happen. The crumb is very delicate as it comes out of the oven and in both situations I had the loaf forming a very unattractive fold, in which the crumb got compressed and deformed. Did it affect the taste? Not at all, but once that happened (twice), I decided that baking in paper molds is definitely better. It makes cooling – inverted in the mold – a lot easier.

Just make sure you have a large enough pan to hold it. I should also say that for this third bake I halved the full recipe and made one single large loaf. Panettone will always be bittersweet for me, as last year I baked one and shared with people from the lab, sent some to Aritri and she loved it so much I gave her a whole loaf later. At the time she was already quite sick and her parents were in the US to help take care of her. They all loved the panettone, I believe it was their first time trying it. If you’ve never baked one, don’t let the apparent complexity of the recipe scare you. Keep in mind it’s an enriched dough with a lot of goodies added to it, so the process must be taken slowly, if you try to speed it up, the final product won’t be as good. Patience is key.

Susan, I know you are not blogging anymore, and I really miss your bread-wisdom in the blogosphere, but maybe this post will give you a smile knowing that your recipe was baked several times in the Bewitching Kitchen! Thank you!

ONE YEAR AGO: Turkey Chili Under Pressure

TWO YEARS AGO: Tiramisu Macarons

THREE YEARS AGO: Cider Mini-Cheesecakes with Caramel Sauce

FOUR YEARS AGO: Rustic Ciabatta and Mini-Meatloaves

FIVE YEARS AGO: Green Rice

SIX YEARS AGO: Potato-Crusted Italian Mini-Quiches

SEVEN YEARS AGO: Beetroot Sourdough for the Holidays

EIGHT YEARS AGO: Cod Filet with Mustard Tarragon Crust

NINE YEARS AGO: Soba Noodles: Light and Healthy

TEN YEARS AGO: Potato-Rosemary Bread

THE DOBOS TORTE


Several years ago I saw a recipe for Dobos Torte in a website and the image of those thin cake layers joined together with chocolate buttercream, plus the interesting crown of caramelized cake made me wish I could taste a piece right then through the screen. I said to myself I would be making it really soon. Days turned into weeks, weeks into months, and I swear it’s been at least 3 years if not more in my plans. Finally, I went for it, and it was one of the most rewarding experiments in our kitchen. I enjoyed the preparation of each component, and loved how they came together nicely. But what really makes this cake is the decoration on top. You must get the caramel dark enough so that it will stay hard on the cake, otherwise it might start to weep and you lose the textural contrast. This is definitely a cake fit for a special occasion. Like a gray Monday early in November that brought with it unexpected snow showers.

THE DOBOS TORTE
(adapted from a recipe from Chef Wilhelm Wanders)

for the sponge cake layers:
140 g egg yolks
120 g granulated sugar, divided (60 + 60g)
2 g salt
1 tsp vanilla paste
210 g egg whites
120 g all-purpose Flour
40 g unsalted butter, melted and cooled

for the chocolate buttercream:
250g granulated sugar
250 g whole eggs
550 g unsalted butter at room temperature
200 g dark chocolate (I used Lindt 70%)

for the caramel:
150 g granulated sugar
50 g water
10 g fresh lemon juice
1/2 tsp coffee extract

to decorate:
crispearls or shaved chocolate

Heat the oven to 375 F. 2. Prepare six sheets of parchment paper drawing a circle with 8 in diameter in the center. Flip the parchment, so that the pencil drawing is in the bottom. Reserve.

Important: weigh the bowl you will be using to make the cake batter and write down that number. 

Whisk the egg yolks with  half of the sugar (60g), salt and vanilla using a KitchenAid type mixer fitted with the wire whisk. You must whisk until the mixture is thick enough to form a ribbon when the batter drips from the whisk. It might take more than 8 minutes to get there, be patient.

In a clean mixing bowl with the whisk attachment, whip the egg whites and remaining 60 g of sugar on high speed to soft peaks. Fold the egg whites into egg yolk mixture, then fold the flour (sifted on top). Remove a small amount of the batter and mix with the melted, cooled butter. That makes it easier to incorporate the butter homogeneously into the cake batter. Fold the butter into the cake batter.  Weight the bowl and calculate exactly how much batter you have. Divide by six to get the exact amount you’ll need to spread on each parchment paper. In my case I played conservative, and although the calculations gave me 104 g of batter per circle, I used 100 g only.

Spread onto the parchment lined baking sheets within the circles. Bake for about 10 minutes, in my oven I could do two sheets at a time. The other circles can wait as you bake.  Remove from oven and transfer the baking sheet to a cooling rack.

Make the chocolate buttercream. In a clean metal mixing bowl, warm the sugar and eggs over a water bath to 140 F. Whisk in a KitchenAid at medium-high speed for 5 minutes, so that the mixture will cool almost to room temperature.  Add the butter (room temperature, preferably as close as possible as the temperature of the egg/sugar mixture) in small pieces, then the melted chocolate, and mix until homogenous and a spreadable consistency.

Make the caramel:  Stir the sugar, water, and lemon juice and melt in a saucepan over medium heat. Prepare an off-set spatula by coating it lightly with oil. Cook the sugar until the caramel turns amber. Pour the caramel onto one of the cake layers and spread with an oiled offset spatula.  Wait 30 to 60 seconds. With a well-oiled chef’s knife score the caramel-coated cake layer into twelve even pieces slices. Use scissors to cut neatly the 12 triangle shaped slices.  Set aside to cool in the fridge. Add 1/4 cup water and coffee extract to the pan with the leftover caramel, gently heat and make a simple syrup to use as a soaker for the cake slices.

Place the first sponge layer on work surface. Soak the sponge layer with simple syrup. Evenly spread a thin layer of buttercream filling on the cake layer. Repeat until five cake layers have been filled with equal amounts of buttercream filling. Frost the cake and decorate the sides using a cake comb.  Score the cake into 12 pieces.

Pipe decoration on each piece using a star-shaped piping tip. Place caramel sponge decoration on each cake piece and decorate the center with crispearls or shaved chocolate.  Cool for buttercream to set, but if possible bring to room temperature before serving.

ENJOY!

to print the recipe, click here

Comments: One of the best advices I’ve seen lately for baking in general is to weigh the bowls you use most often and write down that number someplace. I actually stuck a tape on my Kitchen Aid with the magical number 1,045. That is how much the bowl weighs.  Whenever I make cake layers I don’t need to think twice. Just weigh the bowl with the batter, subtract the magical number and work from there. If I  need to divide the batter in 2, 3, 4 pans, I do it on the scale and know exactly how much to pour.

In the case of the Dobos, it’s really important that the layers get uniform in thickness. Next time I will also weigh the amount of buttercream added to the first layer, so that I can make sure all others are exactly the same. I had a little too much enthusiasm filling one of the layers and it is evident in the sliced photo that you’ll see later. Finally, I think it could be also good to spread the cake batter slightly bigger than 8 inches in diameter and then use a cake ring to cut them all exactly the same size. Details like this will make the final product more polished.

I cannot praise enough that caramel coated-decoration. In fact, I think one could make cake-cookies just like that. I had to control myself not to go to the mail room in our department and steal all the decorations. But truth is I always send a picture of the dessert as a group email on Sunday, so it would be hard to explain how its crown would be all of a sudden absent.

The cake is obviously very rich but a small slice is more than enough. I’ve seen Dobos Tortes showcasing 8 or even 9 layers, so if you feel particularly brave and indulgent, make more cake batter and go for it. But you will need extra buttercream also, the recipe as written had enough to fill, cover and make the piped decorations with a small amount leftover. I have also seen variations without the cake layers fanned on top and using sugar work instead. I urge you to stick to the classic method. I hate to be repetitive, but… those caramelized pieces? You need to get up close and personal with them…

ONE YEAR AGO: Coffee-Caramel Entremet Cake

TWO YEARS AGO: Fennel Soup with Almond-Mint Topping

THREE YEARS AGO: Eataly

FOUR YEARS AGO: Spaghetti Squash Perfection

FIVE YEARS AGO: Skinny Eggplant Parmigiana

SIX YEARS AGO: Supernova Meets Wok

SEVEN YEARS AGO500 Posts and The Best Thing I ever made

EIGHT YEARS AGO: Back in Los Angeles

NINE YEARS AGO: White House Macaroni and Cheese

TEN YEARS AGO: Korean-Style Pork with Asian Slaw