GRILLED LAMB-STUFFED PITA BREAD

Amazing recipe. Ground lamb and grill take your mind to hamburger or koftas, right? But by enclosing it all inside a pita bread, you’ll have something totally different and incredibly tasty.  I first saw the recipe on a TV show by America’s Test Kitchen, then noticed variations of it in several Middle Eastern cookbooks. If you enjoy the flavor of lamb, give it a try. It’s a real keeper.

GRILLED GROUND LAMB PITAS
(adapted from The Splendid Table)

2 pounds ground lamb
1 cup fresh cilantro leaves
1/8 cup extra-virgin olive oil
1 tablespoon grated lemon zest plus 3 tablespoons juice
2 tsp ground coriander
1 tsp ground cumin
1 tsp paprika
2 teaspoons salt
1 teaspoon cayenne pepper
1/8 teaspoon ground cinnamon
4 (8-inch) pita breads

Mince cilantro very well. Transfer to large bowl. Stir in oil, lemon zest and juice, coriander, cumin, paprika, salt, pepper, cayenne, and cinnamon. Add lamb and knead gently with your hands until thoroughly combined.

Using kitchen shears, cut around perimeter of each pita and separate into 2 halves. Place 4 thicker halves on counter with interiors facing up. Divide lamb mixture into 4 equal portions and place 1 portion in center of each pita half. Using spatula, gently spread lamb mixture into even layer, leaving 1/2-inch border around edge. Top each with thinner pita half. Press each sandwich firmly until lamb mixture spreads to ¼ inch from edge of pita. Transfer sandwiches to large plate, cover with plastic wrap, and set aside.

Place sandwiches on hot grill, cover, and cook until bottoms are evenly browned and edges are starting to crisp, 7 to 10 minutes, moving sandwiches as needed to ensure even cooking. Flip sandwiches, cover grill, and continue to cook until second sides are evenly browned and edges are crisp, 7 to 10 minutes longer. Transfer sandwiches to cutting board and cut each in half crosswise. Serve immediately.

ENJOY!

to print the recipe, click here

Comments: If you look at the original recipe, you’ll see that I considerably reduced the amount of spices (and also the amount of olive oil, as lamb has enough fat). I tend to do that very often. In my opinion many recipes use too heavy a hand with spices, so that the flavor of the food itself becomes secondary. In this particular preparation, I prefer to let the taste of the meat shine a bit more. Do as you must to suit your taste. We loved these pitas, they were a complete meal with just the right amount of carbs to satisfy, and the lamb nicely seasoned.

You can adapt this method to ground turkey, ground beef, or even go vegetarian and make some type of garbanzo bean, mushroom concoction inside. That would be wonderful too, I am sure.

I made a pin for you…

ONE YEAR AGO: Elderflower Macarons (one of my favorite blog posts!)

TWO YEARS AGO: A Duet of Sorbets

THREE YEARS AGO: Sobering Peach Sorbet

FOUR YEARS AGO: Spiralizer Fun

FIVE YEARS AGO: Beer-Marinated Grilled Skirt Steak

SIX YEARS AGO:  Secret Recipe Club: Corn Chowda

SEVEN YEARS AGO: Page-A-Day Calendar (Pits and Chief 5 minutes of fame…)

EIGHT YEARS AGO: Home Sweet Home (our beloved Pits in one of his last photos)

NINE YEARS AGO: Marbled Rye


SaveSave

SaveSave

SaveSave

SaveSave

SaveSave

SaveSave

SaveSave

SaveSave

SaveSave

SaveSave

SaveSave

SaveSave

VAGUE MOUSSE CAKE

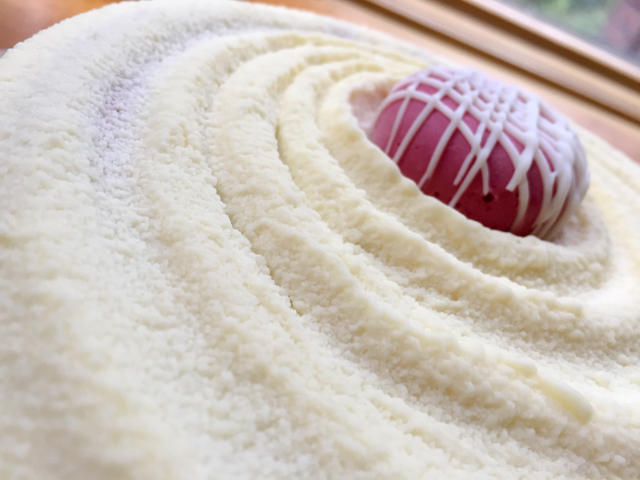
Once again I decided to push a little the limits of my comfort zone. Actually, let me rephrase that. With this project I threw caution to the wind and walked through pretty treacherous baking neighborhoods. When you buy a Silikomart Vague mold because you are mesmerized by its looks but have no idea what to use it for, you are in for a wild ride. It’s not as if you could order a cookbook called  “Silikomart 101.”  In fact, it’s hard to find even blog posts to help you out. Lots of amazing concoctions pop up in Pinterest, but instead of recipes they direct you to fancy patisserie pages in Paris, Rome, Prague. No help whatsoever to make them materialize in your own kitchen. Through some google-overwork, I finally saw a little light at the end of the tunnel through an Italian blog hosted by Vanessa (Tra Zucchero e Vaniglia = Between Sugar and Vanilla). Thanks to my limited ability to read the language and the help of google translate to fill in the blanks, I managed to put my beautiful mold to use.  With this project, I also tried for the very first time an amazing technique: chocolate spraying with a paint gun. I know. I am gone. Beyond recovery. But… can we still be friends?
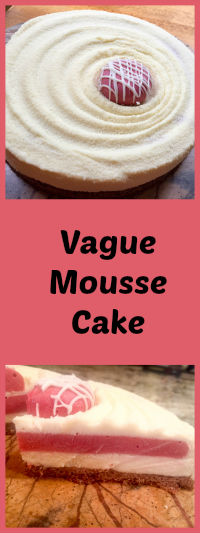
VAGUE MOUSSE CAKE
(inspired by Tra Zucchero e Vaniglia blog)

For the cookie base:
40 g all-purpose flour
3 tbsp (25 g) almond flour
¼ cup (25 g) hazelnut flour
1 tsp  unsweetened cocoa powder, sifted
50 g unsalted butter, room temperature
50 g light brown sugar

In a large mixing bowl, whisk the all-purpose, almond, and hazelnut flours and the cocoa powder. In a separate bowl, combine the butter and brown sugar, then incorporate the flour mixture. Refrigerate for at least 1 hour.

Heat the oven to 300°F. Line a baking sheet with parchment paper. Evenly spread the dough about ⅛ in thick onto the prepared baking sheet (the batter should be slightly larger than the cake ring that will be used for assembly). Bake for 12 to 15 minutes. Cool completely. Reserve.

for the creamy raspberry insert:
75 g sugar
190 g raspberry pulp (passed through a sieve to remove seeds)
100 g whole eggs (about 2, lightly beaten)
2.5 g gelatine in sheets
65 g butter

Coat a baking sheet with a silicone mat or parchment paper and place on it a 7-inch diameter flan or cake ring, preferably with a sheet of acetate lining it.  On another baking sheet, place a Silikomart globe mold (optional).

Soak gelatine in cold water. Put the beaten eggs, the granulated sugar and the fruit pulp in a glass bowl. Bring the mixture to 180 ° F in microwave at maximum power, measuring the temperature after 50 seconds. Continue to measure it every 30 seconds (it will take over 2 minutes to get there, depending on the power of your microwave).

Once the indicated temperature has been reached, add the gelatine and mix well to dissolve it completely. Cool to about 105 to 110 F and add the butter, emulsifying with an immersion blender. Pour the cream into the previously prepared steel circle until it also fills one of the globe mold cavities . Freeze for several hours or overnight.

for the white chocolate mousse
creme anglaise component (makes more than you’ll need):
175 g fresh cream
75 g fresh milk
55 g egg yolks
32 g sugar
1/4 tsp vanilla extract

Heat the milk and cream in a small saucepan until it starts to boil. Meanwhile, with a whisk mix the egg yolks, vanilla extract and sugar, taking care to incorporate as little air as possible. Add a small amount of the hot milk mixture slowly to the egg yolks to temper it, then slowly add the rest and blend well. Cook until it reaches 170 F.  Pass the cream through a sieve and transfer it into a cold container to stop cooking. If necessary, use an immersion blender to make it fully smooth. But if you are careful heating it gently and constantly stirring it, it should not need any further blending.

You will use 150 g of the creme anglaise for the white chocolate mousse, as follows.

for the white chocolate mousse:
150 g creme anglaise (made as described above)
250 white chocolate
225 g freshly whipped cream to soft peaks
2.5 g gelatin in sheets

Soak gelatin in cold water.

Chop the chocolate coarsely and melt it in the microwave with the defrost function or maximum power 500 W.

Warm up the creme anglaise to about 100 F. When the gelatin is soft, squeeze it to remove the water and add it to the creme anglaise. Mix gently to fully dissolve it. Pour the hot cream over the chocolate, wait a moment and mix well. Fold the whipped cream to the still warm mixture.  Reserve.

for the chocolate spray:
300 g white chocolate
200 g cocoa butter

Melt together and place in sprayer at 90 F.

to decorate the globe insert: melted white chocolate

Assemble the dessert. Place the Vague mold on a baking sheet that will fit inside your freezer.  Fill with the white chocolate mousse, making a thick layer at the bottom.

Remove the raspberry creamy disc from the steel ring, removing the acetate and place it in the middle of the mousse making it sink a little.

Cover with the remaining mousse and beat the pan gently on the countertop so as to bring out any air bubbles. Level the mixture with a spatula and transfer into the freezer for several hours, preferably overnight.

Once frozen, turn out the cake and spray it with the mixture of white chocolate-cocoa butter at 90 F. Make a light coating, otherwise the mixture might just slide off the surface instead of forming a nice velvet texture.

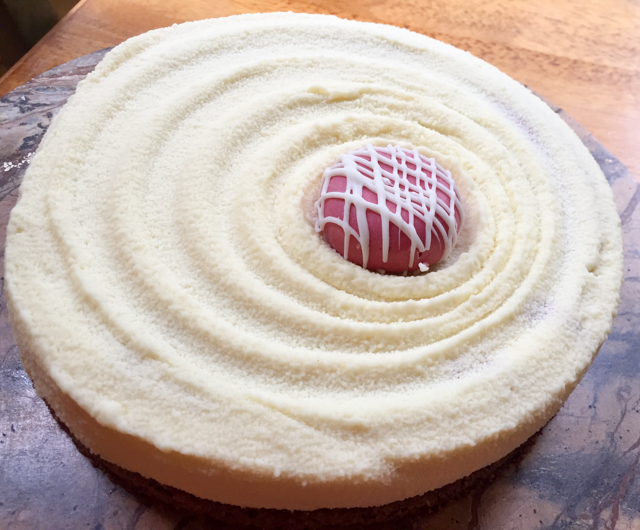
Place the mousse over the cookie base, decorate the globe insert with a drizzle of white chocolate and set it at the center of the cake.

Store in the fridge until ready to serve.

ENJOY!

to print the recipe, click here

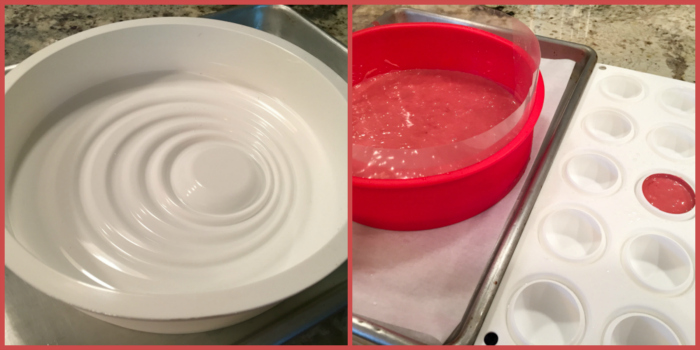
Comments: I completely changed the cookie base, as Vanessa’s recipe had some unusual way to deal with it. In her method, you make a dough, cool it, grate it, and press it to make the base. I felt too insecure to give it a try, and also thought it was a bit too convoluted. Plus, I wasn’t sure it would result in the texture I wanted for the bottom layer of my cake. I opted for a chocolate sable instead. It is a nice dough to work with, and I love the texture. For this torte, you’ll need two Silikomart molds, the Vague and a small globe mode to make the center decorative piece that goes on top. You can definitely omit it and serve the mousse cake plain. But it does add a striking look to the dessert.

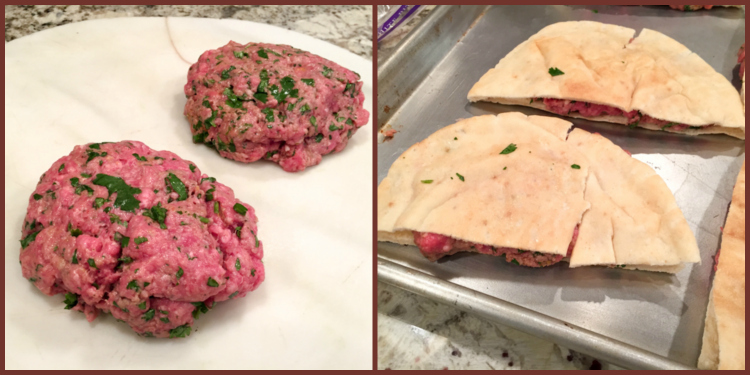
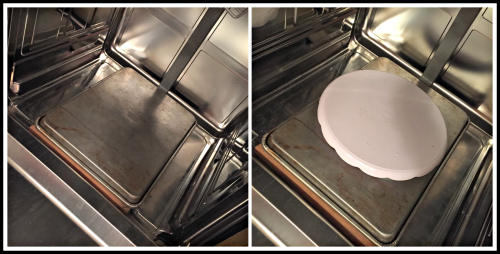
A few things I learned through pain and struggles. You can see in my picture above that I used a silicone cake pan to make the raspberry insert.  I had a pretty tough time un-molding it. The sides are too high, the material a bit too flimsy, I thought the whole thing was going to be ruined. Luckily, just a few boo-boos on the surface, no major harm done. Note to self: invest in a flan ring for this type of adventure. With a 7-inch metal ring, you simply freeze it and pull it up, leaving the perfect layer of mousse behind. Lesson learned. You need the right tools for the job.

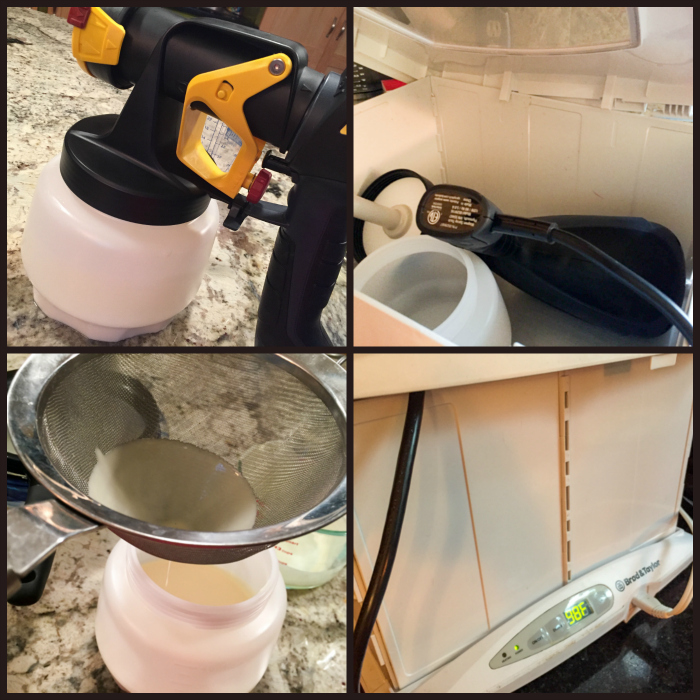
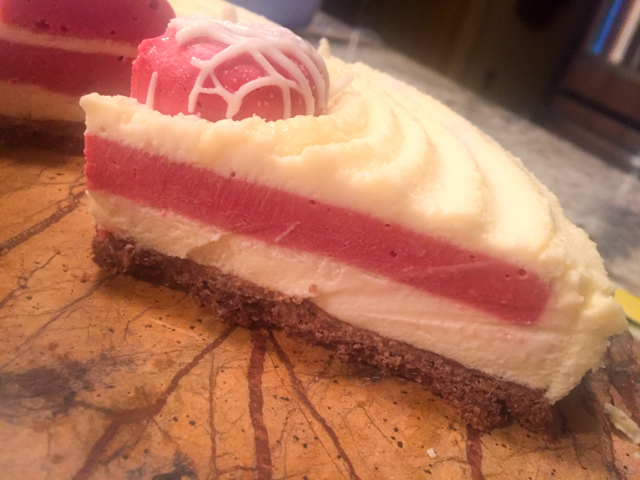
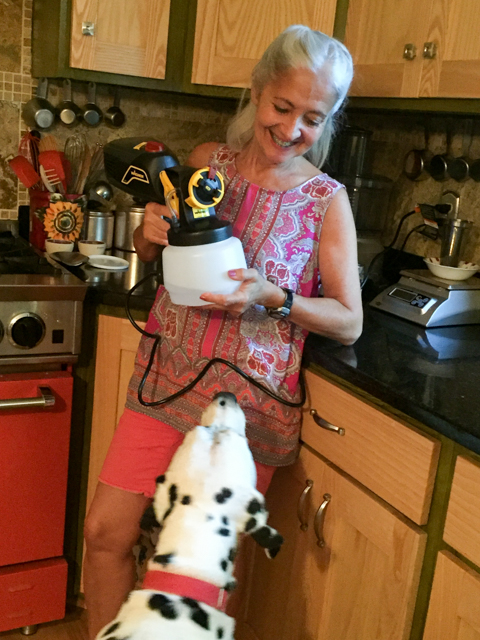
The overall scheme in this type of dessert goes like this: you make a cookie base, a creamy, frozen center insert with smaller dimension than the 8-inch full cake, and enough mousse to fill the mold, surrounding the insert. Once you have these three components, all that is left is to freeze it solid, un-mold and decorate the top. Chocolate spray is one cool method, as it gives a beautiful velvet texture. Contrary to fondant, it is a pleasure to eat. But no doubt, it is a very involved process. I used a Wagner sprayer that was a surprise gift from the saint I married. He actually tricked me. Asked me to go to Menard’s with him. Once we were there, he made a bee line to the paint section, next thing I knew, the box was in the shopping cart. He had even researched the model to get, as he knew I had been dreaming about spraying my world with chocolate. You knew already he is a keeper. This just confirms it… 

The velvet texture requires two things: the surface to be sprayed must be frozen, and the chocolate suspension must be at a maximum of 90 F, even a bit colder if possible. You need it to flow well, but to freeze immediately upon contact, forming the little velvety looking texture. Since the suspension needs to be passed through a fine sieve before going into the sprayer, things can cool down pretty fast. I decided to use my bread proofing box set at 98F to store the sprayer for 30 minutes or so. Then, I got the chocolate ready at the right temperature and worked as fast as I could to get the spray going. That brings another very important point: it is a very messy process. Very messy. People use all sorts of tricks to deal with it, usually doing it outside or in a garage with cardboard boxes forming a wall all around the piece to be decorated. But I found a tip that worked better than anything else: setting up the spraying unit inside the dishwasher!  I just removed the racks, placed a baking sheet inverted on it, a plastic turntable to hold the cake, and that was absolutely perfect. All I had to do was run the dishwasher in the end.

I watched quite a few youtube videos on chocolate spraying to make sure I would have some chance of getting it right. One thing is certain: no matter how many videos you watch, how many detailed instructions you read, nothing prepares you for the real thing. It’s a wild experience. The sprayer works very efficiently but it is very hard to see what is happening because there is a haze of spray everywhere. It was also not very easy to turn the cake while spraying, the Wagner is not feather-light. Plus, my heart was beating at 120 bpm, maybe faster. To summarize, things got intense pretty quickly. Let me rephrase that also: Hell broke loose, big time. I hope the next adventure will be easier, though. At least I am confident that the set up I designed works well to keep the temperature in the correct range for a while, I won’t need to rush to get it done. Apart from a few problems here and there, I am reasonably happy with the way my first adventure with the Silikomart Vague turned out.

As far as taste is concerned, this was absolutely scrumptious! It is pretty hard to beat this trilogy: chocolate cookie, white chocolate mousse, and raspberry cream. They all go together like a dream…

Things to keep in mind for next time:

1. A little more gelatin in the mousse so that it will un-mold with a more defined surface.

2. Place the raspberry insert slightly more on the center of the dessert, so that it won’t be at all visible underneath the top mousse layer. In other words, add a bit more mousse inside the mold before setting the insert on top.

2. The cookie base could be rolled thinner, but opinions are divided on this issue. Phil thought it was perfect the way it was.

3. Be a bit more Zen with the spray paint gun. There’s really no need to scare three dogs and a husband into hiding. Even if your contact lenses fogged up with the spray, no amount of screaming will make them clear up. That is a fact you proved to yourself. Next time,  keep calm, and spray on.

Make Sally and Bogey Quit That happy, grab a pin!


ONE YEAR AGO: Cottage Loaf, my very own technical challenge

TWO YEARS AGO: Pork Ribs: Sticky, Spicy and Awesome

THREE YEARS AGO: Sobering Peach Sorbet

FOUR YEARS AGO: Buttermilk-Blueberry Breakfast Cake

FIVE YEARS AGO: Silky Cauliflower Puree with Almond Milk


EIGHT YEARS AGO:
 Popeye-Pleasing Salad
.
NINE YEARS AGO: Summer’s Finale


SaveSave

LEBANESE LENTIL SALAD AND A COOKBOOK REVIEW!

Not too long ago I reviewed a cookbook by a fellow member of The Secret Recipe Club, remember? Well, here I am once again to share with you a recipe and a little overview of the beautiful cookbook just published by my friend Susan, Simply Vegetarian Cookbook. She is also a former-secreter, someone I used to have a ton of fun with “behind the curtains.” Good times, good times indeed!  I miss those days, although we are still in touch through our blogs and Facebook. I actually prepared two recipes to feature, so I tossed a coin (literally) to pick this one. The second will go as I often do, as a teaser. No recipe, just a photo. I’ve been called a teaser more than once in my lifetime. There are worse adjectives out there, so I accept the label with a smile.

LEBANESE LENTIL SALAD
(slightly modified from Susan’s Simply Vegetarian Cookbook)

3 cups vegetable broth or water
1 cup French green lentils
1 teaspoon kosher salt, divided
3 tablespoons sherry vinegar
1 teaspoon Dijon mustard
2 tablespoons olive oil
2 cups peeled and diced cucumber
1½ cups halved cherry tomatoes
½ cup crumbled feta cheese
¼ cup fresh mint leaves, thinly sliced
¼ teaspoon freshly ground black pepper

Bring the broth (or water) to a boil in a medium pot. Add the lentils and ½ teaspoon of salt. Reduce the heat to a simmer, cover, and simmer for 15 to 20 minutes, or until the lentils are tender and the liquid is absorbed. If there is any liquid remaining, drain it.

In a large bowl, whisk together the sherry vinegar and Dijon mustard. Whisk in the olive oil until emulsified. Add the cooked lentils, cucumber, tomatoes, feta cheese, and mint, and toss to coat. Season to taste with the remaining ½ teaspoon of salt and the pepper.

Serve at room temperature.

ENJOY!

to print the recipe, click here

Comments: There are many types of lentils out there. For this particular recipe (and in fact, anytime you want to make a lentil salad), it is worth searching for French green lentils (such as Puy). They hold their shape after cooking, which is what you want in a salad, nothing worse than a mushy grain mixed with crunchy veggies and dressing. I love Susan’s approach of making the dressing right in the bowl you will serve the dish, one less item to wash. I normally do that even with leafy salads. I just don’t mix everything in advance. Place the more sturdy leaves (like Romaine lettuce) at the bottom, add the other components and toss them all when we are ready to eat.

I served this colorful and flavorful salad with grilled pork tenderloin on day one. Next day leftovers were amazing for lunch, re-visited with the highly fashionable fried egg (I know, many are tired of the fried egg omnipresence, but I happen to love it).


And now it’s time for a virtual tour of Susan’s book… come with me!

and please, make sure to visit Susan’s site too

The book is organized in a very clever, non-traditional way. Chapters are organized by method of cooking instead of course, or type of food.

CHAPTER ONE: Meatless Made Easy, is a great write-up on what to consider if you’d like to either become fully vegetarian or reduce the overall intake of meat in your diet. Susan cooks and eats mostly vegetarian dishes, but her husband is a full-blown carnivore, so she includes in her recipes little final tips she calls “flexitarian tips.” How the same recipe could be served or made to include some animal protein. Pretty clever, and definitely expands the usefulness of the book. I am a full-blown omnivore, and appreciate that aspect of the book.  As I like to do in my reviews, I will pick 2 or 3 top favorite recipes from each chapter, so you can get an idea of what it’s all about.

CHAPTER TWO: NO COOK RECIPES. Tough to pick just a couple of examples. She starts with smoothies, all pretty tempting. But I think the ones that truly called my name are Mediterranean Wrap with Spicy Chickpeas (I cannot have enough chickpea recipes), White Bean Wrap with Jalapeno-Apple Slaw, and her beautiful Lemony Romaine and Avocado Salad (I actually made a departure on it).

CHAPTER THREE: THIRTY MINUTES MAX. Who does not love that type of recipe, when we work all day and come home starving? From this chapter comes the featured recipe, Lebanese Lentil Salad, which is a winner all the way! But I had my eyes set on Middle Eastern Cauliflower Steaks, and Smashed Chickpeas and Kalamata Pasta (I considered making it with zoodles for a low-carb version full of flavor).

CHAPTER FOUR: FIVE INGREDIENTS. Another non-fuss chapter, which makes her book so appealing, you just know it will be an easy culinary project to get the meal ready. My favorites: Baked Sweet Potato Latkes (I know you just drooled), Delicata Squash and Black Bean Quesadillas (my favorite squash that I should bring home more often), Caprese Avocado Grilled Pitas (talk about creativity!).

CHAPTER FIVE: ONE-POT AND SKILLET. I went crazy for the recipes in this chapter, truly difficult to select just a few. I loved the idea of her Spicy Skillet Eggs, Cilantro-Lime Cauliflower Rice, and Crispy Black Bean Burgers. Just to share a few.

CHAPTER SIX: SHEET PAN AND BAKING DISH. Chapter opens with a huge contender, I almost made it to feature today: Kofta-Style Chickpea “Meatball” Pitas. Curried Cauliflower Tetrazzini, and Baked Cheesy Broccoli with Quinoa make my top list too.

CHAPTER SEVEN: SLOW-COOKER and PRESSURE COOKER. Well, those are dear to my heart. I love using both cooking gadgets, and have a huge collection of recipes waiting to be made. My top choices from this chapter include: Tomato-Mushroom Ragu, Butternut Squash and Barley Risotto (these two are made in a slow-cooker). For the pressure cooker, I will go with Chickpea and Coconut-Curry Soup and Tomato Biryani.

CHAPTER EIGHT: KITCHEN STAPLES. Now that’s an interesting chapter. I confess that in every single cookbook that includes this type of chapter, I don’t look twice. I am never that interested in making a bunch of sauces or dressings and saving them in the fridge. Just not my style of cooking. What ends up happening is that I forget all about them and next thing I know, they get moldy, and into the trash they go. Now that I confessed my capital sin, let me say that I was pleasantly surprised by my reaction to Susan’s Kitchen Staples. Lemony Breadcrumbs, Miso Butter, Smooth and Creamy Hummus, Tahini Miso Dressing? I want them all… Go figure.

She ends the book with a big reference guide to cooking all things veggie. Quite useful if you are considering venturing more and more into this type of nutrition. A very comprehensive list, with all the details for optimal preparation.

Before I leave you, let me offer the teaser recipe. This was soooo delicious! Another colorful salad, a Lebanese Chopped Salad (from Chapter Two) with torn pita bread. The dressing involves buttermilk… I say no more. Amazing! You need the book, and you know it (wink, wink).

Susan, thanks for allowing me to publish one recipe from your beautiful book, and I wish you the best of luck with it… I can imagine the amount of work involved from the conception to the publishing of a cookbook, so congratulations are in order!

ONE YEAR AGO: Cottage Loaf

TWO YEARS AGO: Sourdough Loaf with Cranberries and Walnuts

THREE YEAR AGO: Sichuan Pork Stir-Fry in Garlic Sauce

FOUR YEARS AGO: Our Green Trip to Colorado

FIVE YEARS AGO: Ditalini Pasta Salad

SIX YEARS AGO: Celebrate Wednesday with a Thai Seafood Curry

SEVEN YEARS AGO:  Post-workout Breakfast

EIGHT YEARS AGO: Semolina Barbecue Buns

NINE YEARS AGO: Lavash Crackers


SaveSave

SaveSave

JAPANESE-STYLE CUPCAKES WITH CHERRY BLOSSOM ICING

Two first-timers happened in the Bewitching Kitchen. My adventure with Japanese cheesecake, and with the intriguing flavor of cherry blossoms. Have you heard of Japanese cheesecakes? They originated in Hakata, back in 1948. Considerably lighter than the American variety, they are also baked in a water-bath, delicate creatures that they are. I intend to make them as such in the near future, but for the time being I share a departure on the basic method, taking them into cupcake territory. The steam part is provided by a big pan with water kept in the oven. And now for the unusual flavoring: Sakura, aka cherry blossom extract. I first heard about it years ago, finally caved and ordered some from Japan. The smell is amazing, floral as expected, but not as potent as rose extract, for instance. Think of vanilla with less of a sweet component, more pungent and bright. I know, trying to describe a smell is a big waste of typed words. Oh, well…  Without further ado, here are my Japanese-style cupcakes.

JAPANESE COTTON-SOFT CUPCAKES WITH SAKURA ICING
(adapted from Mowielicious)

for the cupcakes:
250g cream cheese
50g unsalted butter
100ml whole milk
1 tsp vanilla paste
60g all-purpose flour
20g cornstarch
1 tbsp lemon juice
6 egg yolks
6 egg whites
1/4 tsp cream of tartar
150g sugar

for the buttercream:
150g unsalted butter
300g icing sugar
50ml heavy cream
1 tsp sakura (cherry blossom) extract
pink colour gel (I used Chefmaster)
sparkling sugar to decorate (optional)

Heat the oven to 300 F. Half-fill a baking tray with water and place on the bottom shelf. Line a cupcake tray with cupcake cups.

Place the cream cheese, butter, milk and vanilla paste in a bowl over a hot water bath and stir until mixture is smooth and creamy. Remove bowl and allow to cool to room temperature.

Sift the flour and cornstarch into the cheese mixture, add the lemon juice and egg yolks and stir until a smooth mixture forms.

In the bowl of an electric mixer, whisk the egg whites and cream of tartar until frothy, then slowly add the sugar and whisk until soft peaks form. Add the egg white mixture to the cheese mixture and gently fold.

Pour into cupcake cups and place in the middle of the oven over the water bath and bake for about 1 hour or until golden brown. Remove from the oven and allow to cool.

To make the buttercream, whisk the butter and icing sugar until crumbly, then add the double cream and flavouring and whisk until smooth. Place the buttercream in a piping bag fitted with a Wilton 1M tip and pipe swirls on the top of the cooled cakes.  Decorate with sparkling sugar, if desired.

ENJOY!

to print the recipe, click here

Comments: The most amazing thing about these cupcakes is how light they are. I mean light in terms of weight… Feather-light. Very airy. I am definitely going to try the cheesecake soon, because I know it will be right up my alley. The Sakura flavor is delicate and complements the cupcake well. The only thing I would change for a next time is the buttercream component. The recipe uses your classic American buttercream, which not only is the sweetest type, but it also crusts after piping when in contact with air. It is often the buttercream of choice for elaborate piped effects, as they will not melt away. But in the case of this simple swirl, I think a Swiss buttercream will be perfect. Something to consider if you want to make them. By the way, if you don’t have Sakura extract, a little rose-water, or orange blossom water can be substituted.

A little sprinkle of sparkling sugar to dress them up, and we were all set!

Japanese baking is a whole new universe for me.
I’ve been exploring two excellent cookbooks on the subject.
Stay tuned for some exotic adventures in the future!

ONE YEAR AGO: Quick Weeknight Soups

TWO YEARS AGO: Sourdough Loaf with Cranberries and Walnuts

THREE YEARS AGO: Sichuan Pork Stir-Fry in Garlic Sauce

FOUR YEARS AGO: Our Green Trip to Colorado

FIVE YEARS AGO: Ditalini Pasta Salad

SIX YEARS AGO: Celebrate Wednesday with a Thai Seafood Curry

SEVEN YEARS AGO:  Post-workout Breakfast

EIGHT YEARS AGO: Semolina Barbecue Buns

NINE YEARS AGO: Lavash Crackers


SIMPLY THE BEST CHOCOLATE CHIP COOKIES

Every once in a while Phil finds a recipe, sends it my way with a little comment: I think we-you should make this. His source is almost always the NYT Food section. I subscribe to that too, but confess to almost never clicking on it. I’m usually absorbed by my mile-long list of stuff I want to make. Soon. Anyway, last week he sent me a link about these chocolate chip cookies endorsed (with enthusiastic ravings) by Dorie Greenspan. You know, royalty in the food world. I made them that same evening, and into the fridge they went, for a mandatory period to mature the dough before baking. The dough contains a fair amount of rye flour. And poppy seeds. And dried cranberries. And chocolate chunks. A sprinkle of Maldon sea salt on top, a step that often makes me roll my eyes to the ceiling (like avocado toast does). But, trust me. It works. These might be the best choc chip cookies I’ve ever made.

MOKONUT’S RYE CRANBERRY CHOCOLATE CHIP COOKIES
(from Dorie Greenspan through New York Times)

130 grams rye flour (I used dark rye)
85 grams all-purpose flour
1 teaspoon baking powder
¾ teaspoon fine sea salt
½ teaspoon baking soda
10 tablespoons (140 grams) unsalted butter at room temperature
100 grams sugar
100 grams light brown sugar
1 large egg
cup (50 grams) poppy seeds
cup (80 grams) moist, plump dried cranberries
113 grams bittersweet chocolate, chopped into chunks
Flake salt, such as Maldon, for sprinkling

Whisk together the rye flour, all-purpose flour, baking powder, sea salt and baking soda; set aside.

Working with a mixer  beat the butter and both sugars together on medium speed for 3 minutes, until blended; scrape the bowl as needed. Add the egg, and beat 2 minutes more. Turn off the mixer, add the dry ingredients all at once, then pulse the mixer a few times to begin blending the ingredients. Beat on low-speed until the flour almost disappears, and then add the poppy seeds, cranberries and chocolate. Mix only until incorporated. Scrape the bowl to bring the dough together.

Have a baking sheet lined with parchment, foil or plastic wrap nearby. Divide the dough into 15 pieces (I made 16), roll each piece into a ball between your palms and place on the baking sheet. Cover, and refrigerate the dough overnight or for up to 3 days.

When you’re ready to bake, center a rack in the oven, and heat it to 425. Line a baking sheet with parchment paper and arrange the cookies on the sheet, leaving 2 inches between each cookie. Sprinkle each cookie with a little flake salt, crushing it between your fingers as you do.

Bake the cookies for 10 minutes, pull the baking sheet from the oven and, using a metal spatula, a pancake turner or the bottom of a glass, tap each cookie lightly. Let the cookies rest on the sheet for 3 minutes, then carefully transfer them to a rack. Serve after the cookies have cooled for about 10 minutes, or wait until they reach room temperature.

ENJOY!

to print the recipe, click here

Comments: These are simply amazing. They are complex, they have sweetness and sourness, they have a hint of salt, and they are addictive. I inhaled three. Me, the Self-Proclaimed-Moderation-Queen, had three cookies. Don’t let their humble looks fool you, they stopped Dorie in her tracks (her own words), and they will stop you too. Make sure you have friends, co-workers, family members to share, because there’s not enough aerobics in a day to counteract the damage you can inflict upon yourself if left in a room with a full platter of these babies. You’ve been warned!

ONE YEAR AGO: Incredibly Simple Times Four

TWO YEARS AGO: Going naked, and my husband loved it

THREE YEARS AGO: Cream Cheese Mini-Pancakes with Smoked Salmon

FOUR YEARS AGO:  Star-Shaped Chocolate Brioche Bread

FIVE YEARS AGO: Blueberry-Banana Bread 

SIX YEARS AGO: Into the Light Again

SEVEN YEARS AGO: Five Grain Sourdough Bread

EIGHT YEARS AGO: The Nano-Kitchen

NINE YEARS AGO: Kaiser Rolls