
Amazing recipe. Ground lamb and grill take your mind to hamburger or koftas, right? But by enclosing it all inside a pita bread, you’ll have something totally different and incredibly tasty. I first saw the recipe on a TV show by America’s Test Kitchen, then noticed variations of it in several Middle Eastern cookbooks. If you enjoy the flavor of lamb, give it a try. It’s a real keeper.
GRILLED GROUND LAMB PITAS
(adapted from The Splendid Table)
2 pounds ground lamb
1 cup fresh cilantro leaves
1/8 cup extra-virgin olive oil
1 tablespoon grated lemon zest plus 3 tablespoons juice
2 tsp ground coriander
1 tsp ground cumin
1 tsp paprika
2 teaspoons salt
1 teaspoon cayenne pepper
1/8 teaspoon ground cinnamon
4 (8-inch) pita breads
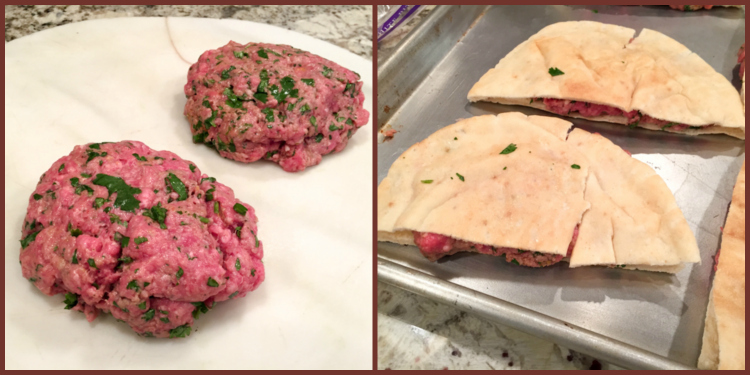
Mince cilantro very well. Transfer to large bowl. Stir in oil, lemon zest and juice, coriander, cumin, paprika, salt, pepper, cayenne, and cinnamon. Add lamb and knead gently with your hands until thoroughly combined.
Using kitchen shears, cut around perimeter of each pita and separate into 2 halves. Place 4 thicker halves on counter with interiors facing up. Divide lamb mixture into 4 equal portions and place 1 portion in center of each pita half. Using spatula, gently spread lamb mixture into even layer, leaving 1/2-inch border around edge. Top each with thinner pita half. Press each sandwich firmly until lamb mixture spreads to ¼ inch from edge of pita. Transfer sandwiches to large plate, cover with plastic wrap, and set aside.
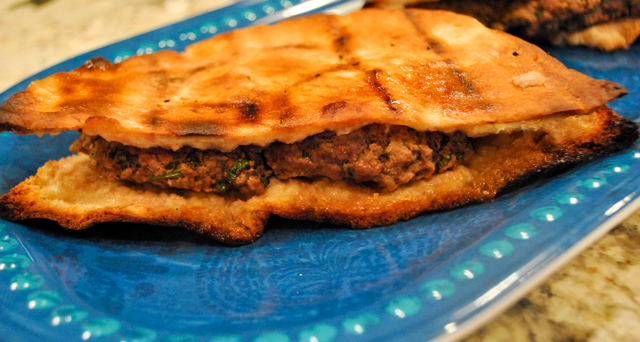
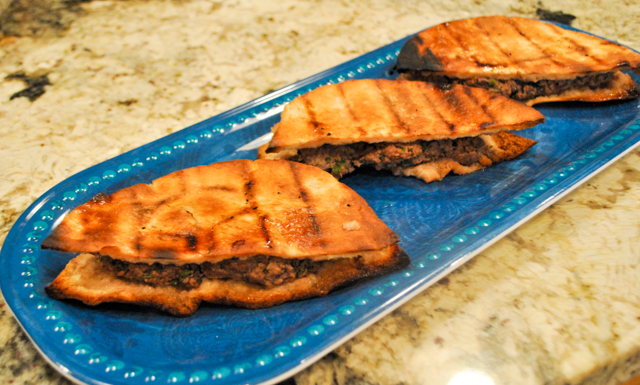
Place sandwiches on hot grill, cover, and cook until bottoms are evenly browned and edges are starting to crisp, 7 to 10 minutes, moving sandwiches as needed to ensure even cooking. Flip sandwiches, cover grill, and continue to cook until second sides are evenly browned and edges are crisp, 7 to 10 minutes longer. Transfer sandwiches to cutting board and cut each in half crosswise. Serve immediately.
ENJOY!
to print the recipe, click here
Comments: If you look at the original recipe, you’ll see that I considerably reduced the amount of spices (and also the amount of olive oil, as lamb has enough fat). I tend to do that very often. In my opinion many recipes use too heavy a hand with spices, so that the flavor of the food itself becomes secondary. In this particular preparation, I prefer to let the taste of the meat shine a bit more. Do as you must to suit your taste. We loved these pitas, they were a complete meal with just the right amount of carbs to satisfy, and the lamb nicely seasoned.
You can adapt this method to ground turkey, ground beef, or even go vegetarian and make some type of garbanzo bean, mushroom concoction inside. That would be wonderful too, I am sure.
I made a pin for you…
ONE YEAR AGO: Elderflower Macarons (one of my favorite blog posts!)
TWO YEARS AGO: A Duet of Sorbets
THREE YEARS AGO: Sobering Peach Sorbet
FOUR YEARS AGO: Spiralizer Fun
FIVE YEARS AGO: Beer-Marinated Grilled Skirt Steak
SIX YEARS AGO: Secret Recipe Club: Corn Chowda
SEVEN YEARS AGO: Page-A-Day Calendar (Pits and Chief 5 minutes of fame…)
EIGHT YEARS AGO: Home Sweet Home (our beloved Pits in one of his last photos)
NINE YEARS AGO: Marbled Rye
SaveSave


