BOEUF BOURGUIGNON ON A SNOWY EVENING

Phil rarely requests a specific recipe for dinner, with the exception of my chicken parmigiana, that he craves on a regular basis.  Last weekend, though, he did not even blink when I asked for ideas.  Boeuf Bourguignon.  Clearly, a man of fine tastes! It was my turn to cook on Sunday, so that was a perfect suggestion.  With all our grocery shopping done the day before, I indulged in the preparation of this French classic all afternoon.  The snow falling outside was a perfect setting for our dinner…
served1

BOEUF BOURGUIGNON
(adapted from Julia Child)

6 oz bacon
2 Tbsp olive oil
4 pounds beef chuck, cut into 2-inch cubes
Salt and freshly ground pepper
1 cup sliced onions
2 cups sliced carrots
1 bottle of red wine
2 cups beef broth
1 cup chopped tomatoes
1 bouquet garni (tie 8 parsley sprigs, 1 large bay leaf, a few sprigs of dried thyme and wrap in cheese cloth)
24 pearl onions
2 tablespoons butter, divided
1 teaspoon sugar
Chicken stock
1  pound cremini mushrooms, cut in large pieces

Blanch the bacon to remove its smoky taste by dropping the slices into 2 quarts of cold water, bringing to a boil, and simmering for 6 to 8 minutes. Drain, rinse in cold water, and dry on paper towels.

In a large frying pan, sauté the blanched bacon to brown slightly in a little oil; set them aside. Brown the chunks of beef on all sides in the bacon fat and some olive oil, season with salt and pepper, and put them into a heavy casserole pan with a lid. Cut the bacon into 1-inch pieces and add to the browned beef.

Remove all but a little fat from the frying pan, add the sliced vegetables and brown them.  Add the veggies to the casserole containing the beef and bacon. Deglaze the frying pan with the wine, mixing it well to dissolve all the browned bits left from browning the meat and veggies. Once it’s all deglazed, add the wine into the casserole along with enough stock to almost cover the meat. Stir in the tomatoes and add the herb bouquet. Bring to a simmer, cover, and place in a 325°F oven, until the meat is tender, about 3 hours.

While the stew is cooking, prepare the onions. Blanch them in boiling water for 1 minute. Drain and rinse in cold water to stop the cooking. Peel the onions and score the root end with 1/4 inch cuts. Sauté onions in a single layer in a tablespoon of butter until lightly browned. Add chicken stock or water half way up the sides of the onions. Add a teaspoon of sugar, and season with salt and pepper. Cover and simmer slowly for 25 minutes or until tender. The onions should absorb most of the water. If there is water remaining after cooking, drain the excess. Set aside.

A few minutes before serving the stew saute’ the mushrooms in butter until browned and cooked through.

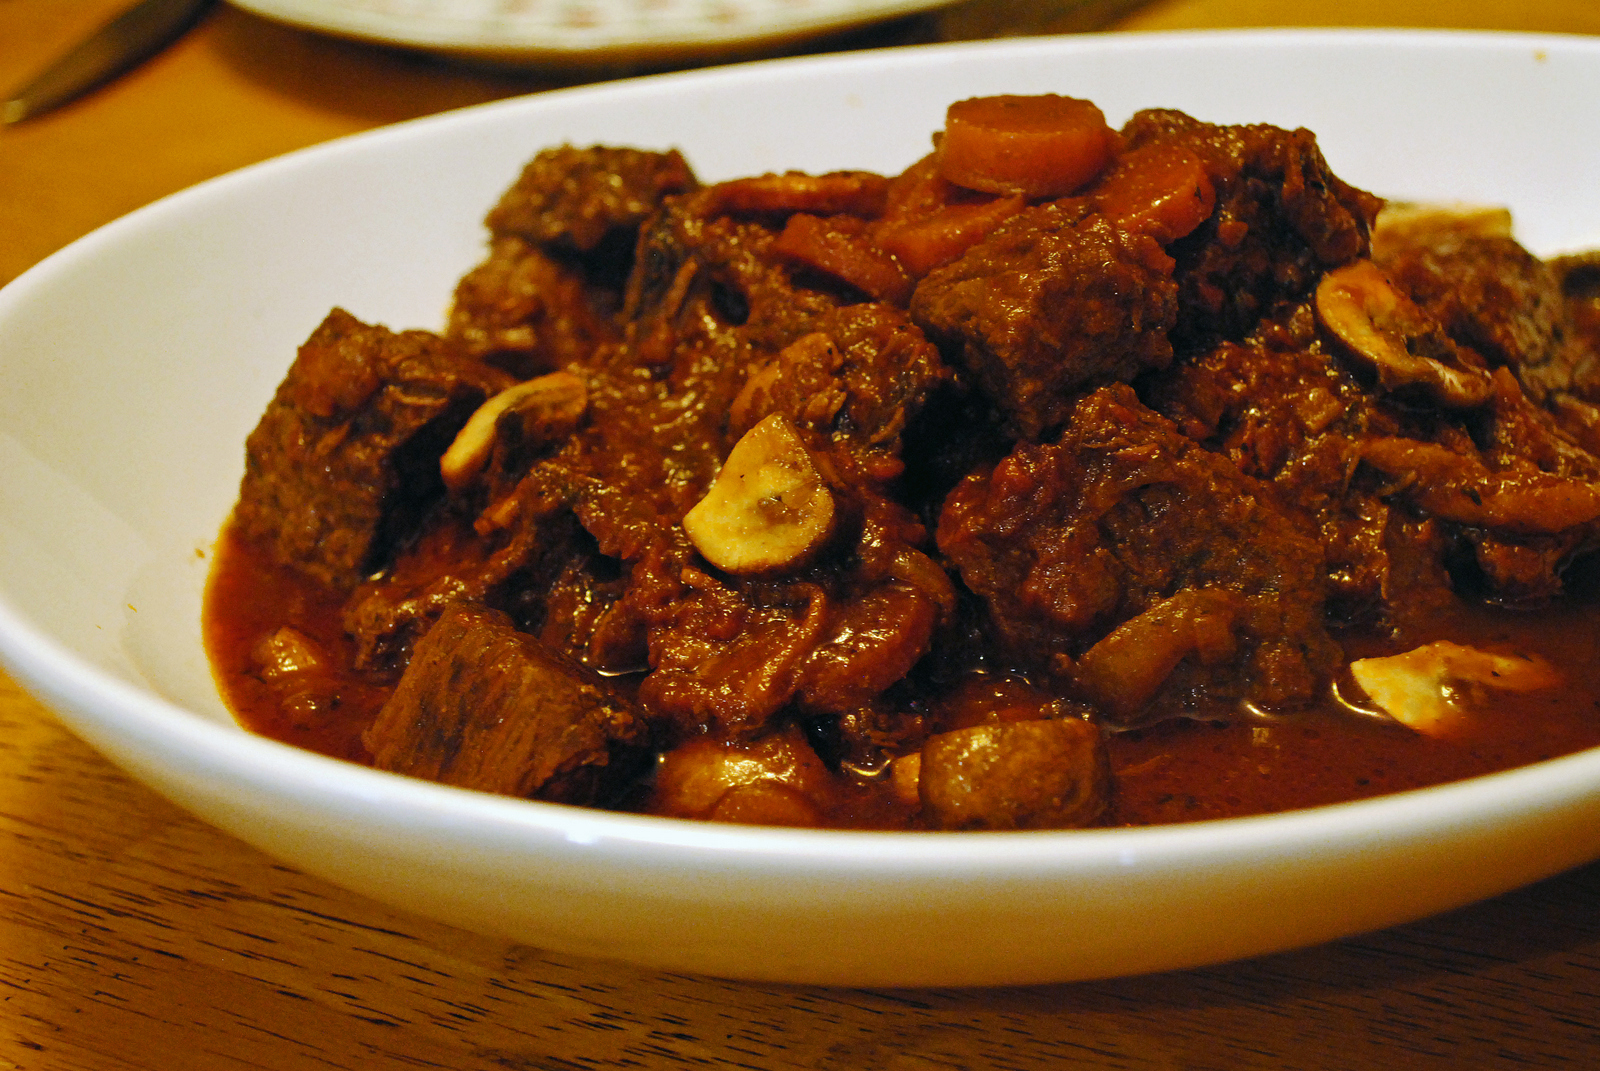
When the meat is tender, remove the bouquet garni from the cooking liquid, if necessary cook longer without the lid to reduce it further. Add the onions, mushrooms, and serve.

ENJOY!

to print the recipe, click here

plated1-001

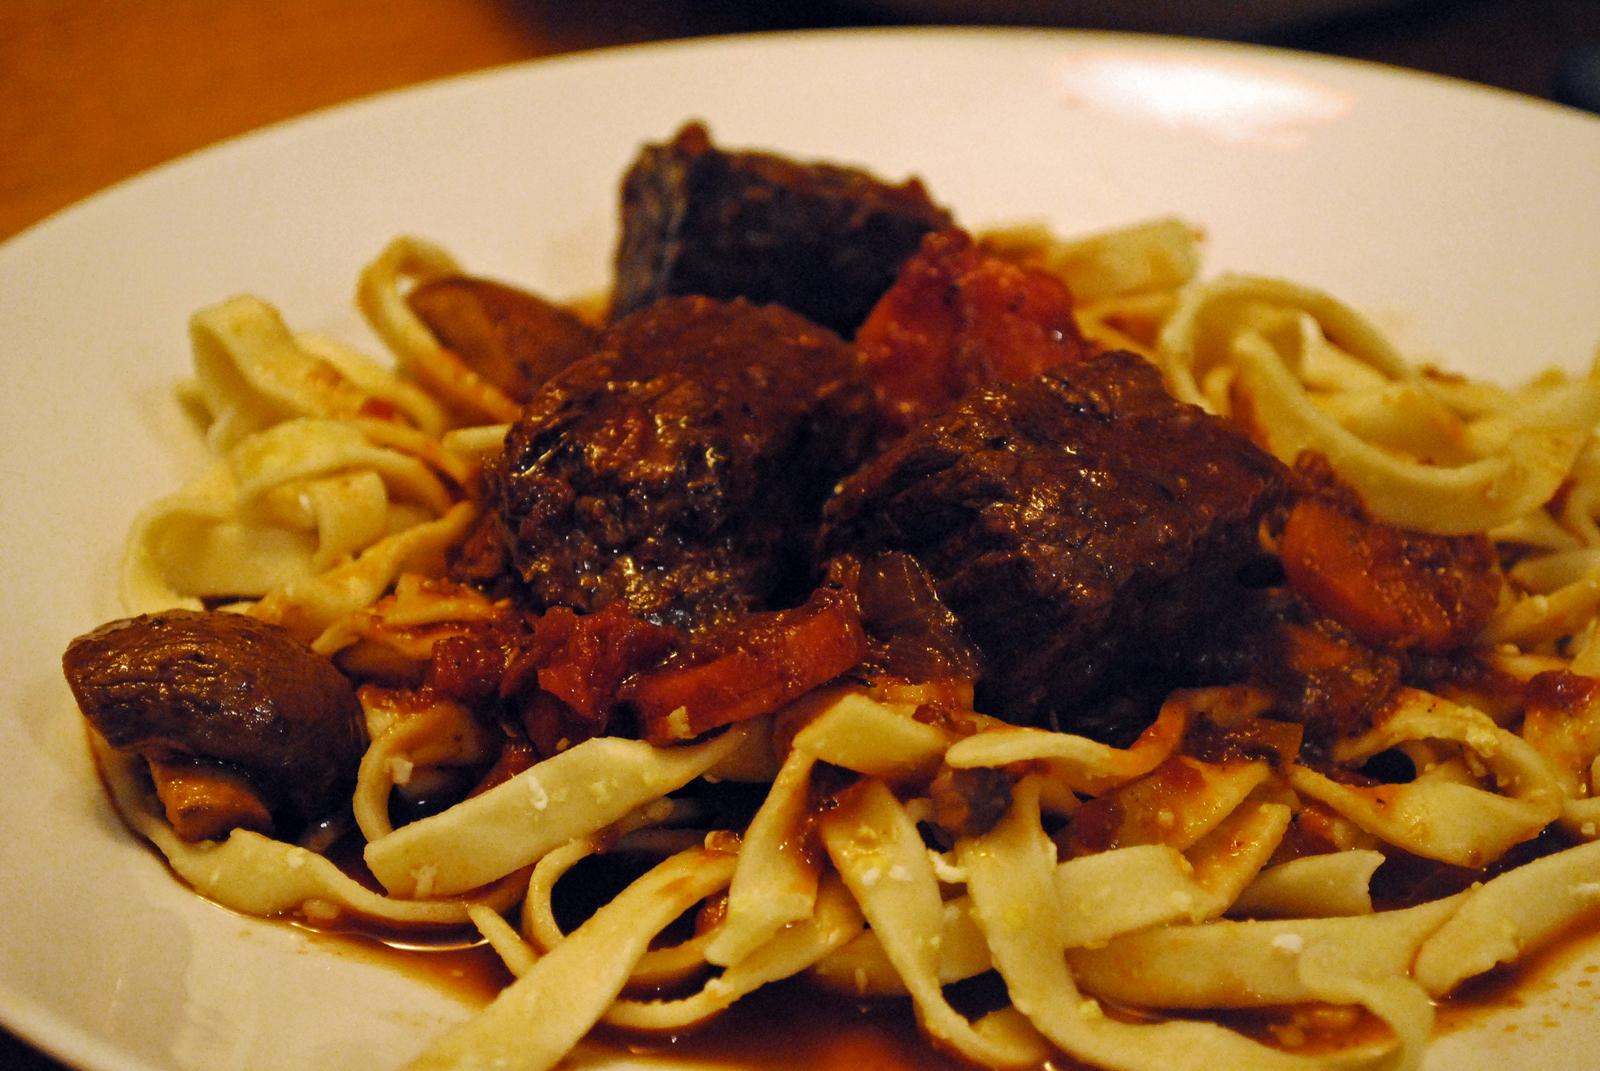
This is comfort food at its best!  The big batch I made lasted us for three meals, and it was better and better each day.  My only modification of the classic was omitting a beurre manie’ step at the end.  Julia thickens her sauce with a mixture of butter and flour, but instead I cooked the meat longer in the oven, reducing the sauce without any need for thickening agents.  It was luscious and plenty thick for our taste. In fact, on the last evening I had to add some water to the leftovers to thin it slightly.

When you make this dish, I’d say the most important step is browning the meat.  You’ll need all that caramelization on the outside to give maximum flavor and a perfect texture at the end of the cooking time.  It makes me think of a Zen proverb, full of the wise simplicity often associated with them:  “When walking, walk. When eating, eat.”    Not to make light of the Chinese wisdom, I’d like to add:  “When browning the meat, brown the meat.”   😉  Do it slowly, do it mindfully, do it well.  No crowding the pieces in the oil, no moving them around until they are properly seared.  Enjoy the process!

ONE YEAR AGO: Chickpea Salad

TWO YEARS AGO: Soft Spot for Chevre

THREE YEARS AGO: Roasted Onion and Asiago Cheese Miche (this bread is simply outstanding!)

SECRET RECIPE CLUB: OATMEAL FUDGE BARS

platter2

Mondays keep coming, rushing over me, but the toughest day in the week is made brighter when it’s…. Reveal Day of The Secret Recipe Club!  This club is getting more and more interesting, as new food bloggers join in. I heard the waiting list is huge, so if you have any interest in this type of group event, get yourself in line!    This month I was paired with the blog Everyday Insanity. The name describes my days quite closely… 😉  I also love her tag line: Tackling life, one brownie recipe at a time!  Everyday Insanity is hosted by Cindy, and her choice of name for the blog might be due to her having 6 kids and 14 grandchildren!  My life all of a sudden feels like a walk at the park. Seriously.  Her blog is full of tasty recipes, not only sweets.  I was very tempted to make her Thai Coconut Chicken soup, but these bars won me over. Plus, the timing was perfect: I brought them to our department on Valentine’s Day!

OATMEAL FUDGE BARS
(from Everyday Insanity)

1 cup quick-cooking oats
1+1/4 cup light brown sugar, divided
1 cup all-purpose flour, divided
1/4 tsp baking powder
1/4 tsp baking soda
1/4 tsp salt + 1 pinch, divided
10 tbsp unsalted butter, divided
1 + 1/2 cups chocolate chips
1 egg

Heat your oven to 325 degrees. Line an 8 inch square baker with aluminum foil, allowing excess to hang over the edges of the pan.  Grease foil; set pan aside.

Combine the oats, 1 cup of brown sugar, ¾ cup of flour, baking powder, baking soda, and a pinch of salt.  Stir together in a bowl to combine.  Melt 8 Tbsp butter and stir into the oat mixture until combined.  Reserve ¾ cup of the mixture for the topping.  Sprinkle the remaining oat mixture over the bottom of the prepared pan and press into an even layer.  Bake until light golden brown, about 12 minutes.  Cool completely, about 1 hour.

Combine the remaining ¼ cup flour, the remaining ¼ cup brown sugar, and the remaining  ¼ tsp salt in a bowl.  Set aside.

Melt the chocolate chips and the remaining 2 Tbsp butter in a large bowl, microwaving at 50% power in 30 second intervals, stirring after each.  Let cool slightly.  Add the egg and whisk until combined.  Use a rubber spatula to fold in the flour mixture, stirring until just combined.

Pour the chocolate filling over the cooled crust and sprinkle with the remaining oatmeal mixture.  Bake until a toothpick inserted into the center comes out with a few moist crumbs attached, 25-30 minutes. Cool completely on a wire rack.  Using the foil overhang, lift the bars from the pan and cut into squares.  Store leftovers in an airtight container at room temperature.

ENJOY!

to print the recipe, click here

cutting
Comments:  Valentine’s Day this year fell on a Thursday, so I bravely decided to tackle this recipe the evening before. After work. After dinner. Not a smart move.  I completely overlooked the instruction to “reserve part of the mixture for the topping”, and of course got into full-blast panic mode when I noticed my mistake.  By then the base of the bar was already in the oven.   I rushed to make a little more topping, calculating proportions of all ingredients quickly in my mind, hoping for the best.  Probably due to my level of stress, the chocolate seized in the microwave, prompting me to throw one of those fits that brings Phil back into the kitchen, already holding a box of Kleenex.  To make a long story short, without him, there would be no bars.  Unbearable thought.

So, when you make these absolutely delicious bars, do yourself a favor and follow the recipe as written.  That way the base of your bar will the thinner, and the crumb topping will be lighter, as intended.

Cindy, it was wonderful to get to “meet” you through this baking adventure!  Thanks to you (and also to the imperturbable man I married), I could take a platter full of sweetness to work on the sweetest day of the year!

department

To see what others in my group prepared for Reveal Day, click on the funky little frog smiling at the end of the post. Do you want to know who got my blog and what she cook from it?   Jane, from The Healthy Beehive picked a favorite recipe of mine, check it out by clicking here

ONE  YEAR AGO: Cauliflower Steaks

TWO YEARS AGO: Soft Spot for Chevre

THREE YEARS AGO: Quick sun-dried Tomato Crostini


JAMMIN’ BLUEBERRY SOUR MILK PANCAKES

Once again, a guest post by Phil, my husband, best-friend, and labmate!  😉

closeup

This delicious recipe goes back to another era, back to Sunday Mass at St. Casimir’s  in Lansing MI, when I was 8 or 9 and each week mom and dad dragged us in our Sunday best to the 8 or 9 am mass, about which I most remember kneeling for extended periods with my head buried in my clasped hands on the pew, thinking about playing baseball or slot cars.   The only “redemption” from that experience was the batch of sour-milk pancakes  my mom often whipped up afterwards.   I liked them so much that after a while I began to help her, and eventually took over the Sunday morning cooking duties.   Since then I made these pancakes for my housemates, girlfriends, wife, siblings, sons and visitors to our home.    They are so simple that I never forgot them.  The key component is a now seldom-used or seen ingredient, sour milk.  In those days it was easy to come by, probably from less efficient pasteurization or fewer preservatives.   But, you can still let a quart of milk go sour, or you can buy a quart of buttermilk,  an adequate substitute.

Of course, I try to make them in a way that duplicates my mom’s,   and also my grandma’s and aunt Mildred’s pancakes.  The recipe became so popular in our family that everyone from Detroit to Chicago knew it, and they both made them for us when they visited.   However, because they all departed this world before I thought to question them about their excellent techniques, my recipe has a few of my own modifications.  I’m still wondering why my grandma’s rose less during the cooking.  I’m working on that.
pancakes1

SOUR MILK PANCAKES
(a family recipe)

Ingredients:
1 Tablespoon butter
2 Tablespoons sugar
1/2 teaspoon salt
1 large egg
7/8 cup flour (see recipe for details)
1/2 teaspoon baking powder
1 cup sour milk (or buttermilk)
1/2 teaspoon baking soda

Method:
1.  In a large bowl cream 1 T butter, 2 T sugar, ½ t salt.

2.  Beat in 1 large (or extra-large / jumbo) egg.

3.  To the flour  (cake, unbleached, whole-wheat, buckwheat or my favorite: half unbleached/half whole-wheat flour) mix in ½ t baking powder; add it to the egg mixture.

4.  To 1 cup sour milk (or buttermilk) in a 2-cup measuring container add ½ t baking soda; whip by hand with a fork until the sound deepens when the milk thickens; add to the batch and fold until fully mixed.

5.  Rub a gas or electric griddle (at 375 F) with a small tab of butter on a paper towel.  Use an ice-cream scoop to deposit the pancakes; sprinkle in blueberries if you like; cook until the bubbles pop and then flip them for a couple of minutes.

6.  Splurge and serve with real maple syrup.  No need to butter them.   Skip the blueberries on half the batch and  top a couple of  pancakes with  eggs fried over-easy…that’s breakfast, baby.

ENJOY!

to print the recipe, click here

composite

Sally’s comments: I find it hard to believe that this blog is approaching its 4th year of life, and I had not yet shared Phil’s recipe for blueberry pancakes. It is outrageous! One important thing to consider: these pancakes must be made by a man still wearing his pajamas. It is part of the deal. They taste much better this way…  😉

battertable

ONE YEAR AGO: Scallops with Black Pasta in Orange Cream Sauce

TWO YEARS AGO: Stir-fried Chicken with Creamed Corn

THREE YEARS AGO: Potato, Cheddar, and Chive Torpedo

BROCCOLI-WALNUT SOUFFLE FROM A SPECIAL COOKBOOK

served1Last month I got a wonderful gift from Fer, my virtual friend who hosts the blog “Chucrute com Salsicha“.   She sent me a cookbook:  The Vegetarian Epicure Book Two, written by Anna Thomas.  Anna’s family was originally from Poland, but she was born in Germany, and moved to the US as a young child. While in college at film school in UCLA, she wrote a masterpiece of a cookbook, The Vegetarian Epicure, at a time when avoiding meat was not very common.  I enjoyed my gift so much that I could not resist getting her most recent book, Love Soup. It will have a special spot in our home, as the first cookbook I bought this year. By exercising considerable restraint, I lasted through the first week of February. I certainly make  my readers proud!  ;-)Fer’s thoughtful gift arrived at our doorstep on a Thursday.  Forty eight hours later, we enjoyed this very delicious souffle.

BROCCOLI-WALNUT SOUFFLE
(reprinted with permission from Anna Thomas)
Original recipe in  The Vegetarian Epicure Book 2, published by Alfred Knopf, New York, 1988

4 Tbs butter
4 Tbs flour
1 + 1/2 cup hot milk
5 egg yolks
1 + 1/2 cups chopped cooked broccoli
1/2 cup finely chopped walnuts (I lightly toasted them first)
2 Tbs minced onions
2 Tbs grated Parmigiano cheese
1/2 tsp salt, ground black pepper to taste
7 egg whites
pinch of cream of tartar

Butter a 2-quart souffle dish and tie a buttered “collar” made of parchment paper if you want (I omitted this step).

Melt the butter in a saucepan and stir in the flour. Cook the roux over medium heat for a minute or two, stirring constantly. Then add the hot milk and stir with a whisk as the sauce thickens.

When the sauce is smooth, remove it from the heat and whisk in the egg yolks, one by one. Then add the cooked broccoli, the walnuts, the onions, and the cheese. Stir well and season with salt and pepper.

In another bowl, add a pinch of cream of tartar to the egg whites and beat them with a clean whisk or beater until they are stiff enough to form peaks.  Stir about 1 cup of the beaten egg whites into the warm sauce. Now add the remaining egg whites and gently fold them in, making sure not to lose the air incorporated into it.

Pile the souffle into the prepared dish, place it in the middle of a 375 F oven, and bake it for 40 to 45 minutes.

Serve immediately. Remember, a souffle waits for no one…  😉

ENJOY!

to print the recipe, click here

before

Comments: We always alternate cooking days. One day I’m in charge, the other day it’s Phil.  That Saturday, mid-afternoon, Phil looks at me and asks “Am I cooking tonight?”  Before I could answer, he remembered that no, it would be me.  He quickly changed the question to “What are we having tonight?”  I tried to be as nonchalant as possible, “We are having a souffle“.    Oh, the big smile that I love so much!  But, how could a souffle not bring a smile?  It makes any meal special…

This version is heartier than your regular cheese souffle, with the broccoli and the nuts.  It is satisfying, creamy, and delicious to the last bite!  It won’t rise as lightly as a cheese-only, as the eggs need  to carry heavier stuff with them. But, what it might lack in airy nature, it compensates with flavor.   I think it is wonderful as a full meal, served with a salad and a piece of bread.  But, if you absolutely must have some  meat with it,  a simple roast chicken will do.  French home-cooking at its best!

Double thank you is in order:  Fer, thanks for sending me this book, and Anna, thank you for your kind emails, and giving me permission to publish your recipe in my blog!  Your Love Soup is such a great book, I already have 5 or 6 recipes fighting to be prepared first… 😉

ONE YEAR AGO: Voila’ les baguettes!

TWO YEARS AGO: Cornmeal English Muffins

THREE YEARS AGO: Butterflied Cornish hens with apricot-pistachio dressing

2012 FITNESS REPORT: P90X2

Disclaimer:  This is a post exclusively about exercise.
Back to food next week… 😉

As I mentioned before, I’ve been keeping exercise records since January 1998. Each month for the past 15 years I strive to exercise more than 50% of the days.  The only way I can keep my exercise routine going is by adding variety to it. P90X was perfect in that sense, so when I heard that Tony Horton was launching the P90X2 (December 2011), I had to try it. Similarly to my experience with the original system, it took me longer than 90 days to wrap it up, but I did it. I wrote a very detailed article about the original program, and hoped to do the same for the X2. However, I found a wonderful review online that saved me all the work. If you are interested, click here. I will instead simply summarize the differences between the two programs.

P90X22
A common question:
is P90X2 harder than P90X?   Yes. I would not start with the X2, as right from the get-go it involves exercises that are close to the top level of difficulty in the original program.  One example: Yoga-X ends the standing series with a sequence of Warrior III, Half-Moon, and Twisted Half-Moon. You will be standing on one leg for almost 3 minutes, balancing, twisting, breathing hard, wishing Tony Horton had never been born.  😉   Fast forward to P90X2, and you will see the Warrior III and the Half-Moon poses showing up not only in the yoga routine, but in the middle of strength-training and aerobic exercises as well.  While in Warrior III or Half-Moon you will be doing bicep curls, triceps kick-backs, abdominal crunches (yes, abdominal crunches while in standing splits), and other weight-bearing moves.  The bottom line is, in P90X2, you will see a lot more combined exercises that target many muscle groups simultaneously. They require balance, flexibility, and core strength all at the same time.

plyocide
Another aspect of P90X2 is a mixture of aerobics and strength training in the same routine.  It was a bit shocking to realize that doing 52 minutes of aerobics (original Plyometrics-90X)  is not as hard as 40 minutes of a mixture of  aerobics with strength-training (the Plyocide-90X2 routine).  Somehow the body struggles harder when demanded to constantly change gears. But, as Tony would put it: “it’s good for you”   😉

yogaX2
Surprisingly,  two routines of the new system are actually easier.  First, yoga. I was afraid of what 90X2 yoga would be like, but  it is shorter (you are done in 1 hour instead of 90 minutes), and the exercises are at the same overall level of difficulty of the original series.  Second, the abdominal workout from the original  series. Ab-RipperX is actually harder  (and I think more efficient) than the Ab-RipperX2.  In fact, I don’t even bother with it anymore, the original version is my default routine.

motivation
Some exercises of X2 are so incredibly hard that I was forced to adapt them to my level.  I simply will not do a pull-up and then curl my body up into a ball going over the bar.  One should keep in mind that Tony targets a broad audience including extremely fit men, who want to bulk up. They need to be challenged to their limits.  I also won’t attempt to do the push-ups balancing my body in four medicine balls as the top photo shows.  Tony Horton himself described that exercise as “doing push ups during an earthquake“.  Sounds like a ton of fun, but I rather not risk breaking my nose… 😉  When exercises like this come, he always demonstrates variations that do the job on a more
“humane” level.  And that’s the road I humbly follow.

progress

Having “graduated” from both programs,  I went on with a mix-and-match of the two, picking the routines the way I feel like and working out according to how sore I am. But, after moving to Kansas our life got so frantic that I had to find quicker workouts for some weekdays. I looked for alternatives lasting at most 30 minutes, but still challenging.  That’s how I got to Jillian Michaels’  6-Week/6-Pack,  Ripped in 30, and a few others of her many DVDs.   I will be reviewing her exercise program in the future.  It won’t be pretty, though. Expect some harsh words. I will say one thing upfront: unless you are very careful, you will get injured.  And I speak from experience (sigh). Stay tuned!

never say never

We never know what lays ahead in our path. I can only hope I will be healthy enough to follow the footsteps of this impressive woman! 

ONE YEAR AGO: Caramelized Bananas

TWO YEARS AGO: Roasted Lemon Vinaigrette

THREE YEARS AGO: Whole-Wheat Bread