PUMPKIN SOURDOUGH

I admit, I caved into the recent trend of shaping bread as a pumpkin. Thanksgiving is right at the corner, and this bread would be perfect to celebrate the occasion. You can use any bread dough you like, but to keep with the seasonal atmosphere, some canned pumpkin puree found its way into my recipe. I kept hydration a bit lower, as I did not want the bread to expand too much. It was a wild experiment (got it? wild yeast involved), and I am a bit surprised that it worked so well on my first attempt. Beginner’s luck?

PUMPKIN SOURDOUGH
(from the Bewitching Kitchen, inspired by photos everywhere)

400 g bread flour
100 g spelt flour
300 g water
120 g canned pumpkin puree
120 g active sourdough starter
12 g  fine sea salt 

Mix all ingredients in a large bowl, no need to make it very smooth at this point. Just form a shaggy mixture and leave it at room temperature for 30 minutes.

Ferment the dough for 4 hours at room temperature, folding a few times during this period. I did 4 cycles of folding, at about 45 min intervals, allowing the dough to rest untouched after the 4th folding cycle. Shape it as a ball, place in a well-floured banetton and leave it in the fridge overnight.

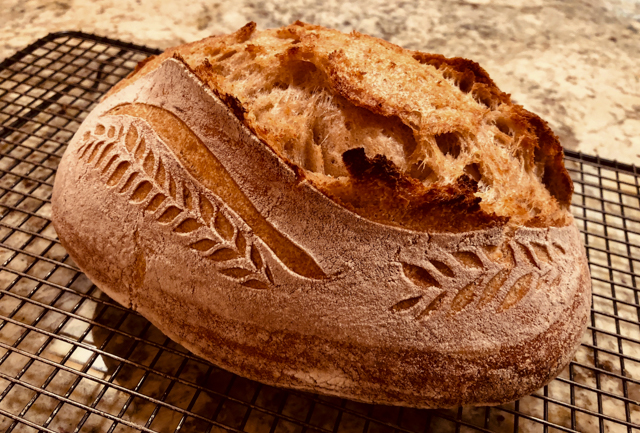
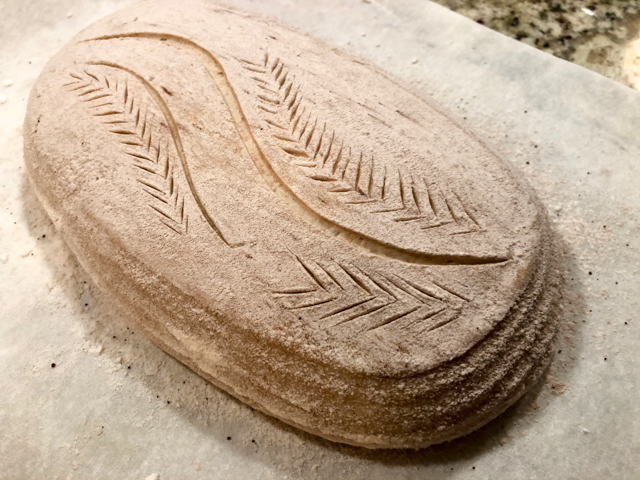
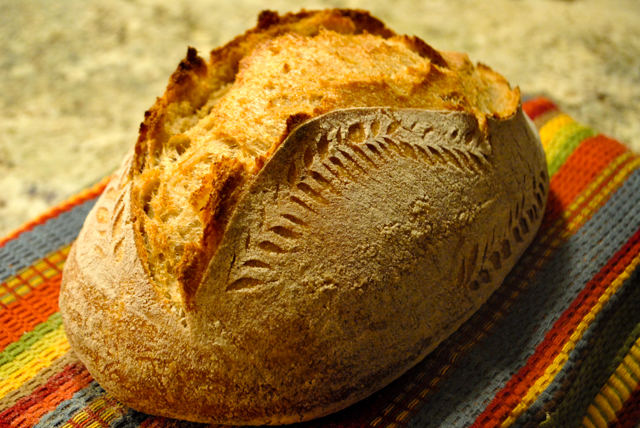
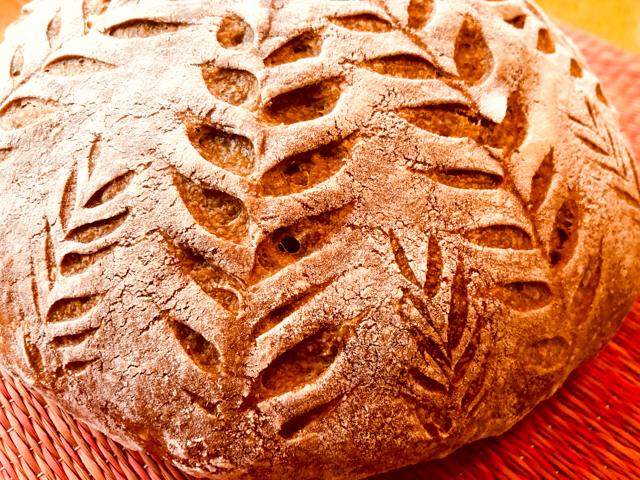
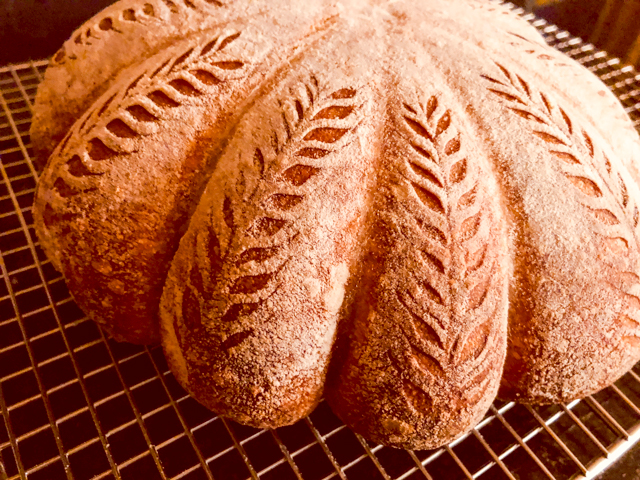
Next day, place pieces of kitchen twine as shown in the composed picture over parchment paper. Grease the kitchen twine slightly so it won’t glue to the bread. Place the bread on top, seam side down, and cover it slightly with flour, rubbing it with your hands to form a nice coating. Tie the twine around it to form the wedges of a pumpkin. If desired, add a pattern with a very sharp razor blade, held in your fingers (be careful).

Immediately place the shaped bread in a Dutch oven, cover it, and place into a 450 F oven for 30 minutes. Uncover, and bake for 15 minutes more, until golden brown. Let it cool completely, remove the twine, and slice.

ENJOY!

to print the recipe, click here

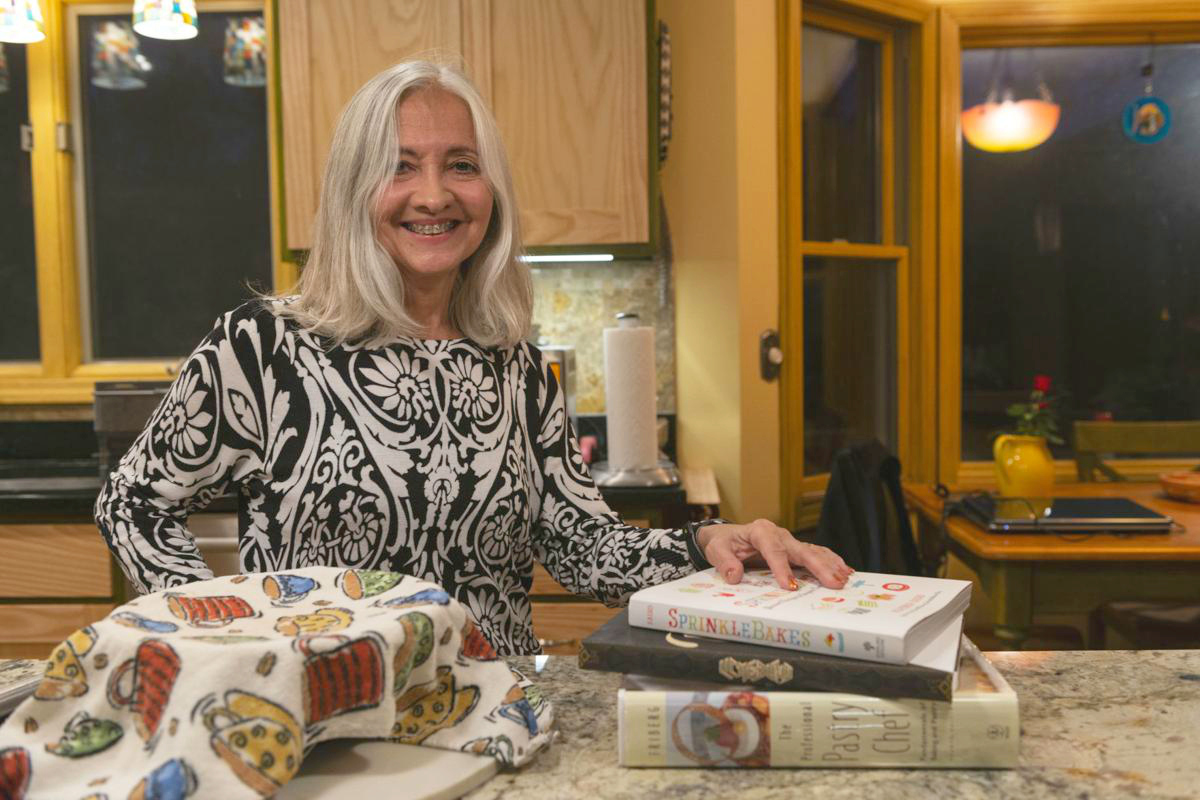
Comments:  This bread was a complete impulse bake. I need to tell you a little secret, though. I was contacted by our newspaper in town to be part of their Monday feature called “Our Neighbors.”  They feature someone in town that does something cool, or special, or fun. And for some reason they thought that a scientist who works with bacteria at KSU during the day and blogs on the side, could be featured. They stopped at home to take pictures and I quickly assembled this dough, having refreshed my Star starter in the morning. You know, the ultra-active starter I got from my friend Elaine. They took a ton of pictures of me kneading the dough, I was hoping they would include one in the article, but they picked a different one, in which my pumpkin bread dough is already covered for its final fermentation.

If you like to read the article, click here. If the link is blocked where you live, click page 1 and page 2 for PDF versions.

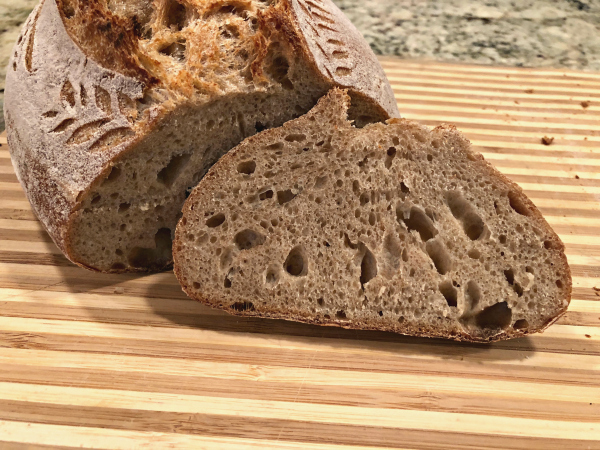
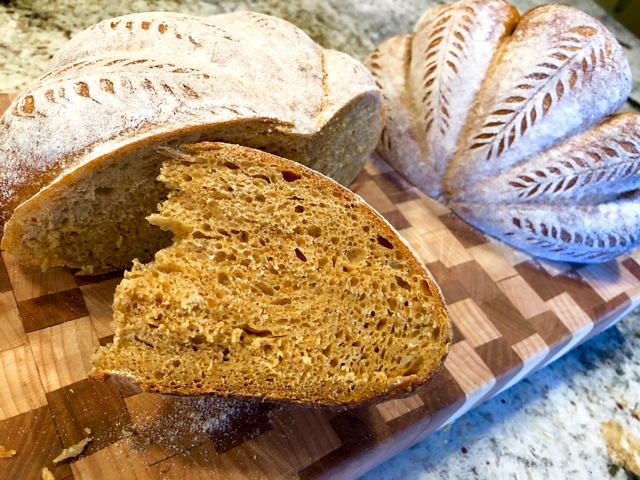
But back to bread. This was so easy to shape, main thing is to make sure the strings stay put where you want them as you move the bread to the Dutch oven. Since I use a cold pot, it’s easier to go back inside and tweak the twine (I was really hoping to use this phrase). The pumpkin flavor is not evident, you won’t say it’s pumpkin, but it gives the sourdough a softer texture (crumb included) and a sweeter taste, a lot of the sourdough character will be toned down. We really liked it.

I hope you give this bread a try. Evidently, no need to use a sourdough, any formula will work, just adapt the fermentation time and go for it. You can also use roasted pumpkin made from scratch. Honestly, I don’t know how that will compare with canned pumpkin in terms of hydration. I prefer to use canned because it’s pretty reproducible, but I am sure the bread tolerates a certain range of hydration values without too many issues. Worth experimenting with. It’s just a little flour, water, and yeast, after all…

ONE YEAR AGO: First Monday Favorite

TWO YEARS AGO: Secret Recipe Club: Paalak Paneer, a Farewell Post

THREE YEARS AGO: In My Kitchen, November 2015

FOUR YEARS AGO: Helen Fletcher’s Oatmeal Cookies

FIVE YEARS AGO: Thai-Style Pesto with Brown Rice Pasta

SIX YEARS AGO: Shrimp with Spicy Orange Sauce

SEVEN YEARS AGO:  A Simple Appetizer (Baked Ricotta)

EIGHT YEARS AGO: Sour Cream Sandwich Bread

NINE YEARS AGO: Pasta with Zucchini Strands and Shrimp

WORLD BREAD DAY 2018

I am a bit of a loner as far as blogging is concerned, rarely taking part of group events. But World Bread Day is special, and whenever I have a chance, I like to join the party started in 2006 by Zorra.  This year (my third time participating) I share a sourdough loaf made with my friend Elaine’s starter, Star. It flew all the way from England and now lives quite comfortably in its new home in our kitchen in Kansas. A well-traveled starter! A few details made this bake quite special for me. Read on…

SOURDOUGH BATARD
(from the Bewitching Kitchen)

50 g active starter (at 100% hydration)
375 g water, room temperature
400 g bread flour
100 g whole-wheat flour
10 g salt

Mix all ingredients for the bread in a large bowl, making a shaggy mass. Let it sit at room temperature for 30 minutes. Mix gently folding the dough a few times until smooth.

Allow it to ferment for 4 hours at room temperature, folding the dough 3 times during the four hours, no need to be precise about the spacing of folding cycles. Just make sure you fold it a few times.  At the end of four hours, shape it either as a round ball or a batard.

Transfer to a well floured banneton, seam-side up, and place in the fridge overnight, 8 to 12 hours, longer if needed.

Next morning, heat the oven to 450 F. Invert the shaped loaf, still cold from the fridge over parchment paper. Dust the surface with a little flour (I added just a touch of cocoa powder to make it darker, but it’s not necessary).  Score with a brand new razor blade.

Place in a cold Dutch oven, cover, and stick in the hot oven for 30 minutes with the lid on, and 15 more minutes with the lid off.  Allow it to cool completely before slicing.

ENJOY!

to print the recipe, click here

Comments: With this bake, I finally felt I managed to shape a batard reasonably well. Most of my attempts in the past were epic failures. I also had never tried a more artistic scoring on a batard-shaped loaf. The central slashing perhaps a tad too enthusiastic, so the dough exploded more than expected.

First special thing about this bake: no discard of starter whatsoever. I followed Elaine’s method, and I must say it’s pretty amazing how well it works. I had about 60 g of starter in the fridge, sleeping in there for a full week. The morning of the bake, I took it straight from the fridge and added 40 g water + 40 g flour to it. Let it come to life at room temperature, by mid-afternoon it was bubble party in the container. So I just removed 50g needed for the bake and placed the rest back in the fridge.  I’ve used this approach three weeks in a row, without refreshing the starter for two or three days and discarding most of it every time. The oven spring is impressive, and the bread does not taste more sour than usual. If you are concerned with waste this method is for you.  Give it a go. I haven’t tried to keep the starter longer than 1 week in the fridge before using it, but it’s definitely worth experimenting with it.

Second special thing about the bake: shaped dough was placed in a COLD baking container. I cannot tell you how much I love this! I am so tired of juggling the super hot pot and lid, often burning my arm in the process. No more. When the oven is hot, you place the cold pot with the shaped bread inside, no need to add a bit of water for steam, nothing. It simply works, even with bread straight from the fridge. Excellent oven spring, as I mentioned before, and excellent crust texture.  Elaine has been playing with cold pot, cold dough, in a cold oven that she turns on when she places the pot inside it. I doubt it would work for me, as my oven heats very slowly, but she’s been baking amazing loaves using this method. Stop by her site to learn more about her experiments.

I hope you have a chance to celebrate World’s Bread Day, either bay baking or enjoying a great loaf of bread. Zorra, thank your for organizing the event, I look forward to seeing the contributions coming from all over the world…

Grab a pin!

ONE YEAR AGO: Slow-Roasted Tomatoes

TWO YEARS AGO: Spicy Cotija and Black Olive Sourdough

THREE YEARS AGO: Apple Cinnamon Oatmeal Cake

FOUR YEARS AGO: Sourdough Rye Bread with Flaxseeds and Oats

FIVE YEARS AGO: PCR and a Dance in the Mind Field

SIX YEARS AGO: October 16: World Bread Day

SEVEN YEARS AGO: The US Listeria Outbreak 2011

EIGHT YEARS AGO: 36 Hour Sourdough Baguettes

NINE YEARS AGO: October 16 is World Bread Day

A STAR FROM ENGLAND IN THE BEWITCHING KITCHEN

Kit Harington? You’d think? Well, that did not happen (Sally fans herself). But another superstar from England did arrive, albeit inside an envelope. Star, the sourdough starter produced by my dear friend Elaine, from foodbodsourdough.  I wasted no time. Opened the package, refreshed my new baby, made my first loaf a couple of days later. The starter is really powerful, I love it.  For my first adventure with Star, I chose a turmeric-scented loaf, full of black sesame seeds.

BLACK SESAME TURMERIC SOURDOUGH
(from the Bewitching Kitchen)

200 g sourdough starter (at 100% hydration)
325 g water at room temperature
450 g bread flour
50 g dark rye flour
9 g salt
1/2 tsp turmeric
30 g black sesame seeds

Dissolve the sourdough well in the 325 g water. Add the flours, salt and turmeric, mix until a shaggy dough forms. Leave 10 minutes undisturbed.  Add the sesame seeds and mix well by kneading/folding.

Leave to ferment for 4 hours with folding at 40 minutes, 1 hour and 20 minutes, 2 hours, and 3 hours. At the end of four hours, shape as a round loaf, and place in a banetton, seam side up. Transfer to the fridge and leave it overnight (about 12 hours).

Remove the shaped dough from the fridge as you heat the oven to 450 F.

Invert the dough on parchment paper, slash and bake with initial steam (I use a covered Dutch oven for 30 minutes, then remove the lid).  Bake for 45 to 55 minutes, reducing the heat if necessary to 425 F.

Cool completely on a rack before slicing.

ENJOY!

to print the recipe, click here

Comments:  Elaine’s Star Sourdough starter comes in a very nice package containing the dried up sourdough in small pieces, and a beautiful card explaining how to deal with it. A little water, a little flour, and you are done for that day.  The composition photo above shows in the bottom right the starter just a few hours after the first refreshment, and on the bottom left what I found on the morning of the day I made the bread. Star maybe missed his Mom and wanted to leave me?  It definitely seemed like it!

I used my regular method of folding the dough. As for slashing, the sesame seeds definitely prevent too much artistic input, as they make slashing a bit trickier, so I opted for a more random approach. The bread had tremendous oven spring, and when it was cooling, it sang “The Song of My People”, as great bread always do. I love it when it happens.

Phil went crazy for this bread, thought that the crust in particular was perfect. It turned out thinner than most sourdoughs I usually bake (no idea why), and the taste was spectacular. The turmeric flavor is quite subtle. Saffron would be equally nice too, I just did not think about it in advance to soak a little water with saffron threads and have it ready.  I prepared the dough on a Friday, end of the day, and the bread was in the oven by 6am next day. Nothing beats the smell of fresh bread to start a weekend.

Elaine, I wish you all the luck with your new adventure! For those who live in the UK, Elaine is offering sourdough baking classes in her home in Milton Keynes, north of London. She offers basic and advanced classes, so anyone will find a reason to join. She is a natural teacher, and passionate about sourdough baking. If I lived closer I would take her advanced class for sure.

Here is the address of her new website and Facebook group (closed group, she loves to get new members). In her site you can find all the information for her classes and how to order Star (she ships worldwide).

ONE YEAR AGO: Hommage to the Sun

GILDING THE SOURDOUGH LOAF

Two sourdough posts in a row! But this one brings back the subject to its most classic use: a rustic bread made less rustic with a razor blade and a ton of fun. Here is my baby, all dressed up for party!

CLASSIC SOURDOUGH BREAD
(adapted from Anna Gabur)

for the levain:
120g water
40g starter
40g whole-wheat flour
80g all-purpose white flour

for the final dough:
Half of the levain above (about 140g)
375g water
50g spelt flour
150g whole-wheat flour
300g bread flour
10g salt dissolved in 15g water

Make the levain mixture about 6 hours before you plan to mix the dough. It should be very bubbly and active.

When you are ready to make the final dough, dissolve half the prepared levain in water (375g), then add all flours. Save the remaining levain in the fridge for later.  Mix well with your hands until a shaggy dough forms.  Leave it at room temperature for 30 minutes.

Add the salt dissolved in the remaining water, and incorporate by folding repeatedly the dough over itself. Now let the dough ferment for a total of 4 hours, folding a few times every 40 minutes. You don’t have to be precise, but allow the full four hours fermentation to take place.

Shape as a round ball and place inside a banetton covered with a cloth and lightly floured. Keep it in the fridge overnight, from 8 to 12 hours.

Next morning, heat the oven to 450F.

Invert the dough on a piece of parchment paper and lightly, very lightly coat it with flour, then rub all over the surface with the palm of your hand. Score the guiding lines according to the desired pattern, use a razor blade to slash the dough with firm, short slashes.

Bake at 450F for 45 minutes, preferably covered for the first 30 minutes to retain steam.  Cool completely over a rack before slicing.

ENJOY!

to print the recipe, click here

Comments: I love a rustic sourdough that is left untouched, opens up in the oven according to its own desire, or one that gets a very basic crisscrossed slash at the top to get things started. But I must admit it’s nice to work a little magic on the crust. However, my previous attempts failed to match my expectations. In other words, I had issues to transfer to the razor blade the image I had in my mind for the baked loaf.

A couple of weeks ago I found an online course taught by a gorgeous woman named Anna Gabur on artistic bread slicing. I asked myself, do I really need this? Not sure what happened, but before I could give an honest answer to that question, my paypal account was activated and the online class was playing on my screen. Very odd. Must be a computer virus or something. At any rate, I am very glad this odd phenomenon happened, because I loved the class, learned a lot and was very pleased with the results of my very first attempt. I followed her design very closely, but maybe at some point I’ll feel confident to come up with my own creations (fingers crossed).

Between you and me, I can hardly believe this bread came out of our own oven… I was in total awe when I opened the lid and saw the oven spring, the pattern, the crust starting to get golden. A real baker’s thrill…

I highly recommend that you get Anna’s course if you are passionate about bread baking. You don’t need to make a sourdough, any bread formula will work, as long as it’s not very high in hydration. You need some structure to be able to slash it, so high-hydration formulas won’t work as well. Also, it helps a lot if the bread gets its final fermentation in the fridge, so that its surface is tight and easier to slash. My loaf went straight from fridge to pre-heated oven, it took me less than 10 minutes to finish the slashing, and I bet most people can do it much faster.  You’ll need a regular razor blade that you will hold between two fingers, not using a lame holder. And, according to Anna, one blade should last you for about 5 loaves. It needs to be truly sharp. She makes it seem so easy, it is a pleasure to watch her in real-time making a very elaborate design on the loaf. You can also marvel at all her photos on Instagram.

The bread had excellent taste and crust, the crumb was not super open, but that was expected from a bread with a lower hydration level.

Anna has quite a few articles about bread baking written on her blog, like this one that goes over basics of artistic slashing, and this one that shares her favorite bread formula. If you’d like to sign up for her online tutorial, follow this link.    She lives in Moldova, and often has to adapt her bread baking for the types of flour she can find. I often get a bit upset with “trendy” bread cookbooks that insist you must obtain the flour that was milled 4 days ago under a full moon, otherwise don’t bother making the recipe.   All you truly need is flour, water, a bit of yeast, a touch of salt, and the right amount of passion… Anna’s masterpieces prove this point!


ONE YEAR AGO: Lolita Joins the Bewitching Kitchen

TWO YEARS AGO: Cashew Cream Sauce

THREE YEARS AGO: Blood Orange Margaritas

FOUR YEARS AGO: Smoked Salmon Appetizer

FIVE YEARS AGO: Clementine Cake

SIX YEARS AGO: Springtime Spinach Risotto

SEVEN YEARS AGO: The end of green bean cruelty

EIGHT YEARS AGO: Torta di Limone e Mandorle

SaveSave

SaveSave

SaveSave

SaveSave

SaveSave

SaveSave

SaveSave

SaveSave

SaveSave

SaveSave

SaveSave

SaveSave

SaveSave

SaveSaveSaveSave

SaveSave

SaveSave

SaveSave

SaveSave

SaveSave

SaveSave

SaveSave

SaveSave

SaveSave

SaveSave

SaveSave

SaveSave

SUNFLOWER SEED KAMUT SOURDOUGH

Inspired by classic recipes around, this bread is for those who love a little texture with their soft crumb, and a very mild sourdough taste. The kamut flour makes the crumb slightly more “creamy” than a sourdough made exclusively with white flour. You can substitute it with spelt, whole wheat, or semolina flour, all will work well in the formula.

SUNFLOWER SEED KAMUT SOURDOUGH
(from the Bewitching Kitchen)

100 g sourdough starter at 100% hydration
110 g water, at room temperature
200 g bread flour
50 g kamut flour (or another flour of your choice)
100 g sunflower seeds, toasted
3/4 tsp sea salt
2 tablespoons honey
1/2 teaspoon instant yeast

Combine the flours with the toasted sunflower seeds and the salt in a large bowl. In another bowl, mix the water with the sourdough starter, dissolving it gently. Add the honey and the yeast, mix to combine.

Add the liquid ingredients to the bowl with the flour mixture, and incorporate it all using your hands. It will be pretty shaggy, once it’s more or less incorporated, allow it to rest for 10 minutes.

Knead briefly on a surface coated with oil (avoid adding more flour), allow it to rest for 10 minutes.

Knead briefly again, and let the dough rest for 30 minutes.

Knead briefly one last time and let the dough rest for 1 hour.

Shape it as a ball, place in a banetton with the seam side up to rise for 2 hours.

Invert it on a piece of parchment paper, slash the surface and bake in a 450 F oven for 40 minutes, with initial steam.

Allow it to cool completely before slicing.

ENJOY!

to print the recipe, click here 

Comments: This recipe makes a reasonably small loaf, perfect for the two of us to enjoy and then freeze a few more slices for delayed bread pleasure. The toasted sunflower seeds have almost a popcorn flavor, do not skip the toasting part because it is a game changer in this type of bread.

A perfect match for this sourdough is a slice of Roquefort cheese. Something about the sunflower seeds meeting the salty and sharp nature of the blue cheese makes it all pretty hard to resist.

ONE YEAR AGO: Sweet Potato “Hummus”

TWO YEARS AGO: Cauliflower Crust Pizza

THREE YEARS AGO: Silky Rutabaga Puree

FOUR YEARS AGO: Bon Bon Chicken: Light and Spectacular

FIVE YEARS AGO: Red Wine Sourdough Bread with Cranberries

SIX YEARS AGO: Award-Winning Sourdough Baguettes

SEVEN YEARS AGO: Country Rye (Tartine)

EIGHT YEARS AGO: Penne a la Vechia Bettola


SaveSave

SaveSave

SaveSave

SaveSave

SaveSave

SaveSave

SaveSave

SaveSave