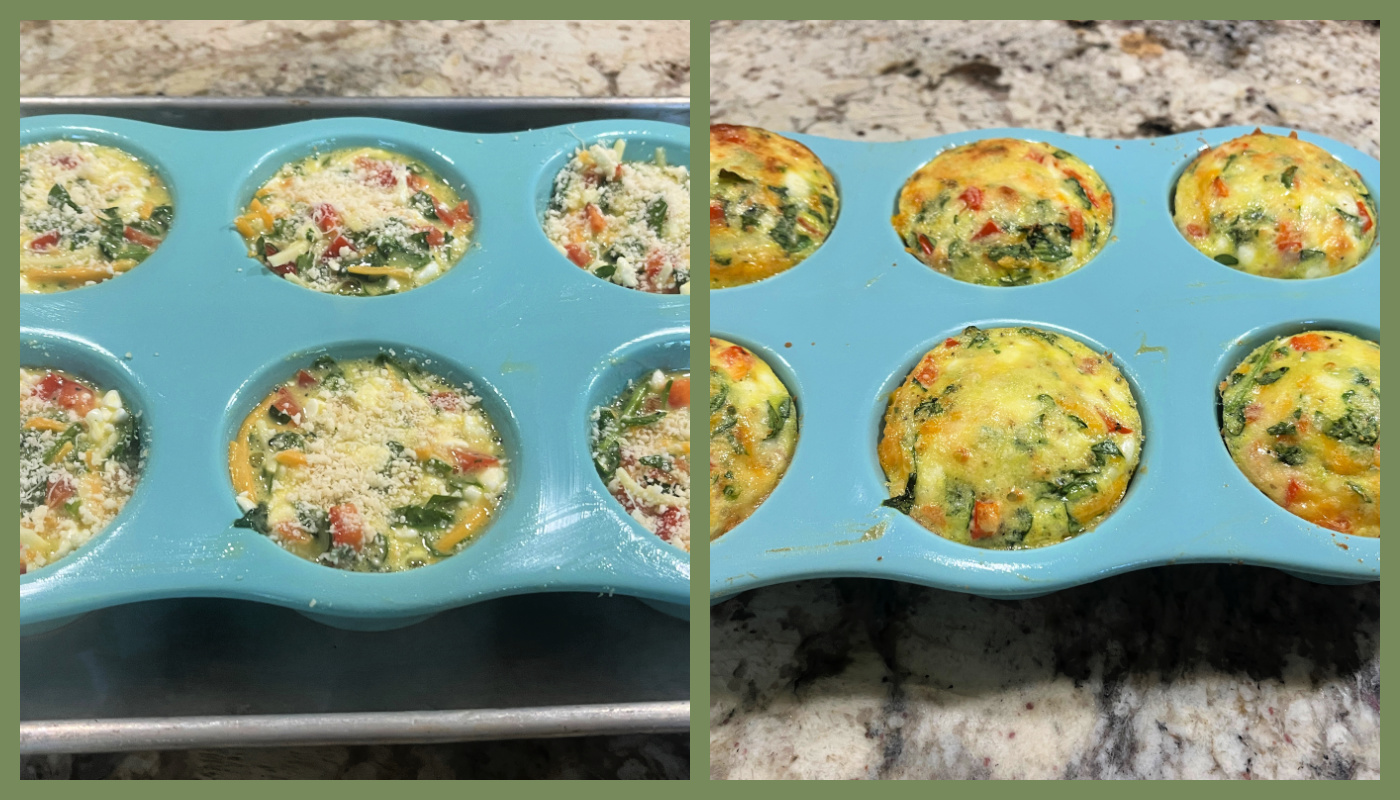
Honestly, not sure what to call them… they remind me of the sous-vide egg bites sold at Starbucks, but are more complex in flavor and texture. Low-carb, perfect for a light lunch. Leftovers, kept in the fridge, heat surprisingly well in the microwave, no rubbery texture. Love them!
COTTAGE CHEESE FLOURLESS MUFFINS (from The Bewitching Kitchen)
3 large eggs 1/2 cup cottage cheese 1/4 cup shredded mozzarella cheese 1 bell pepper, seeded, de-veined, chopped small ½ cup spinach, chopped ½ teaspoon salt ¼ teaspoon black pepper ¼ teaspoon paprika dash of nutmeg grated Parmigiano-Reggiano cheese
Heat oven to 375F. Spray a muffin tin with oil. Reserve.
In a mixing bowl, whisk together the eggs, cottage cheese, and spices. Whisk very well until everything is incorporated together. Add the veggies and the mozzarella cheese, fold to combine. Fill the muffin tins about 3/4 full, sprinkle with Parmigiano-Reggiano cheese.
Bake for 20 to 25 minutes, until all puffed and golden on top. Serve warm or at room temperature.
Comments: I have a slightly problem digesting bell peppers, usually red and orange are not too bad, but when I made them a second time, I used black olives instead of bell pepper, and loved the way they turned out. If bell peppers don’t love your digestive tract, consider that change. I was quite happy with the way they re-heated a couple of days later, when I had them for lunch. Will definitely make this recipe again and again, I hope you’ll give it a try.
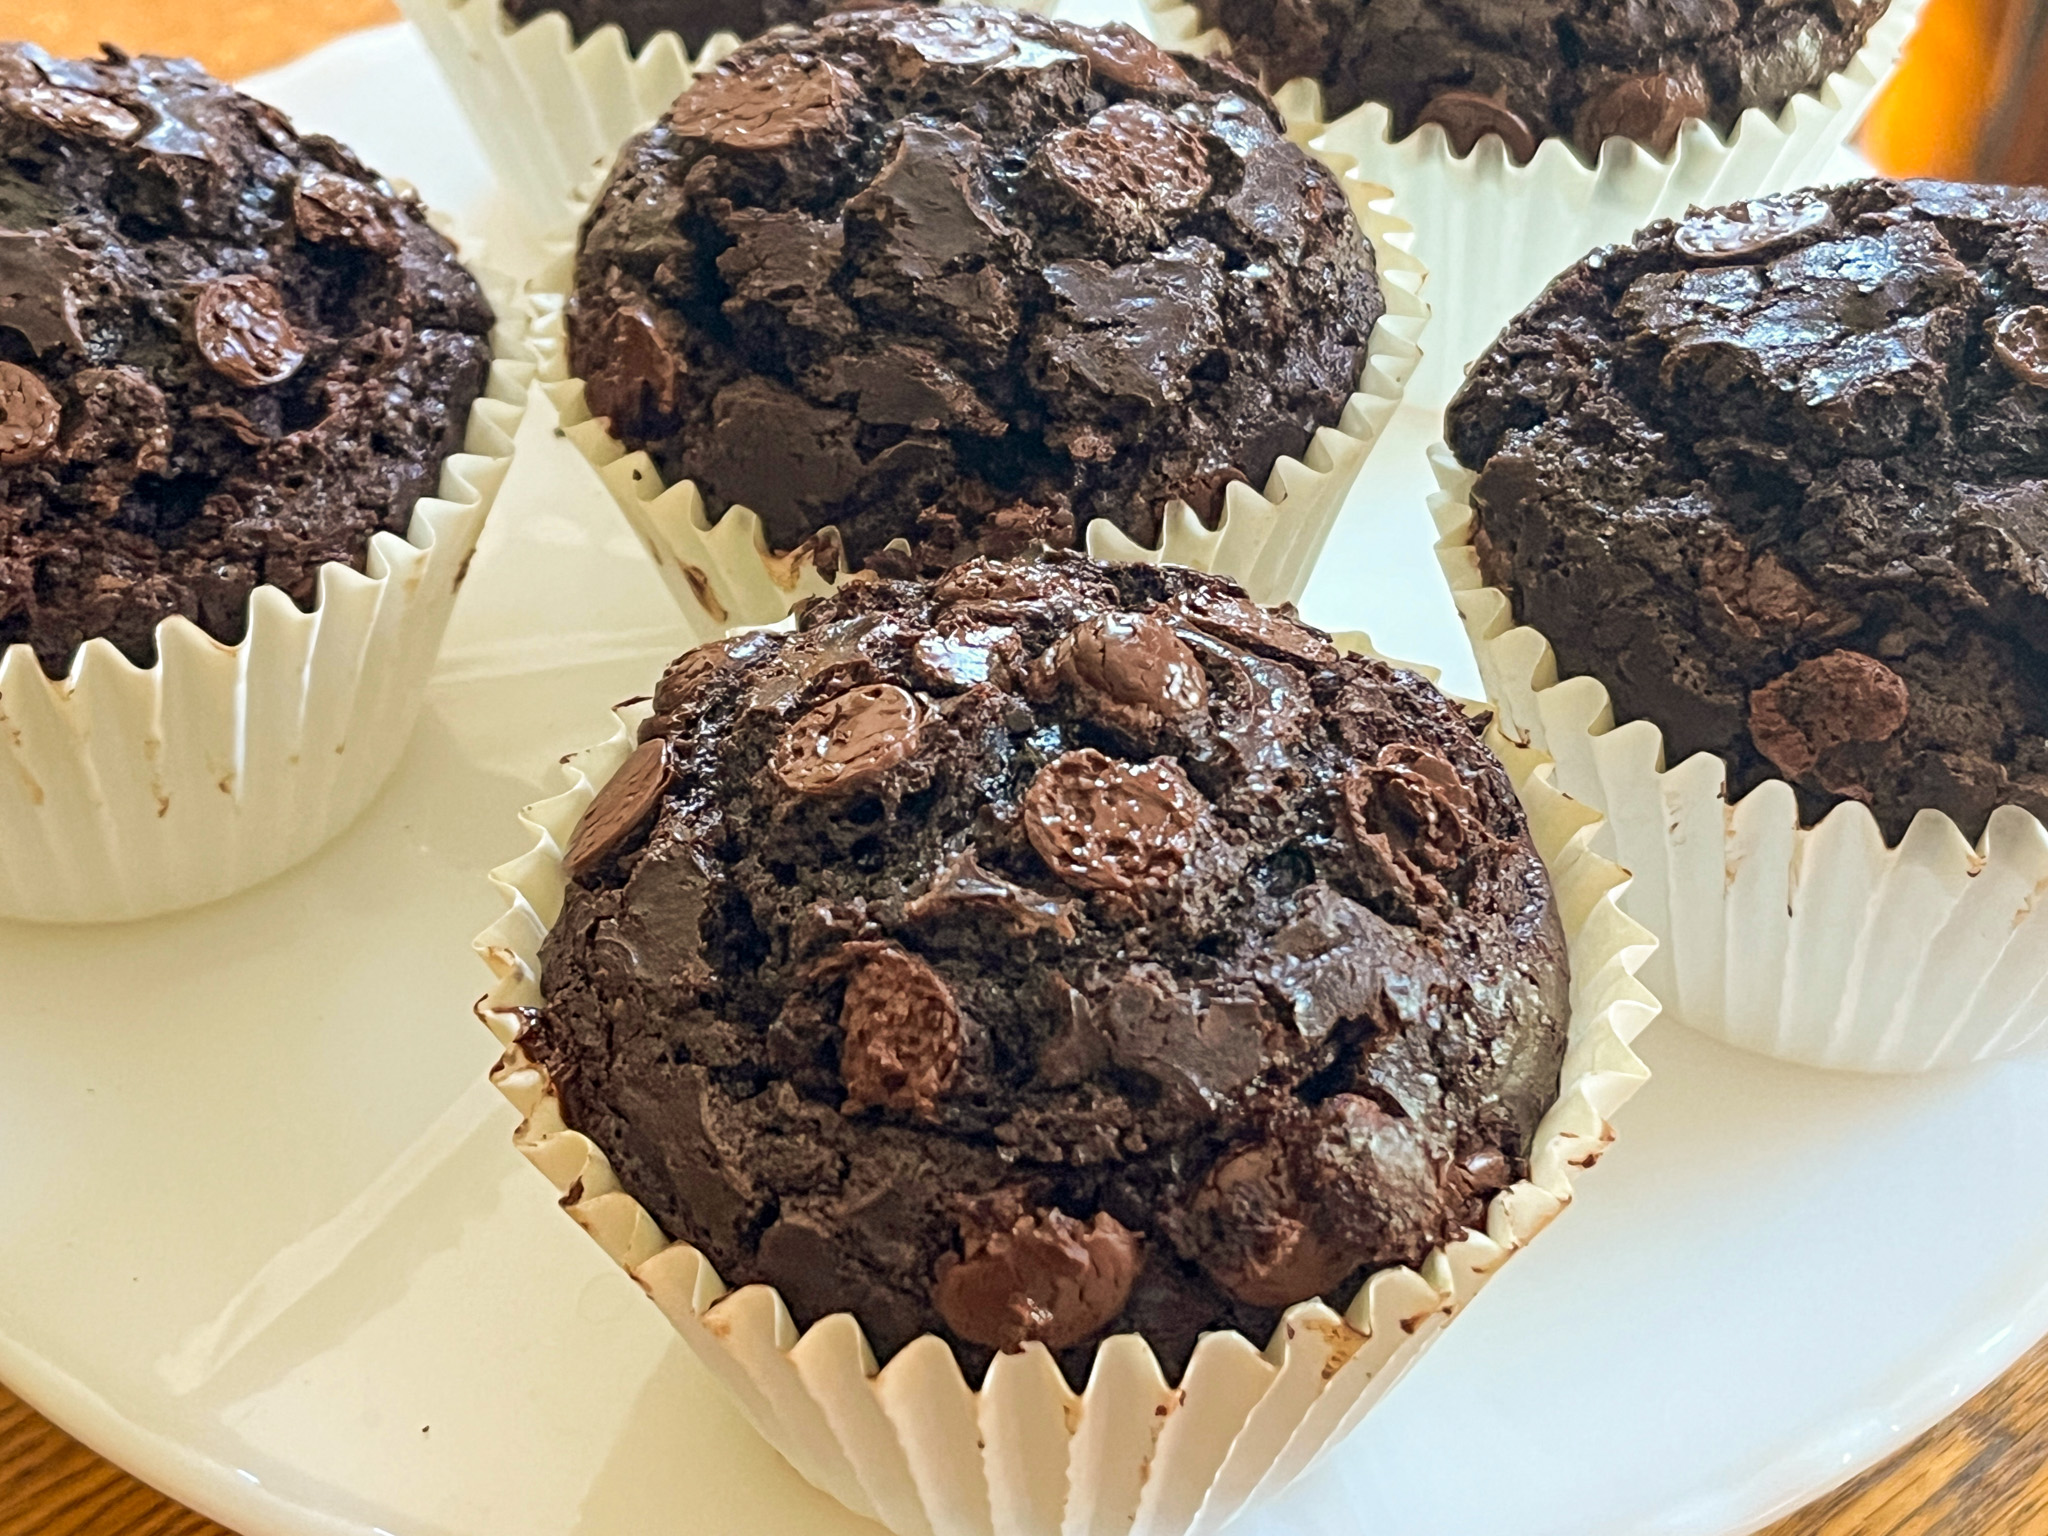
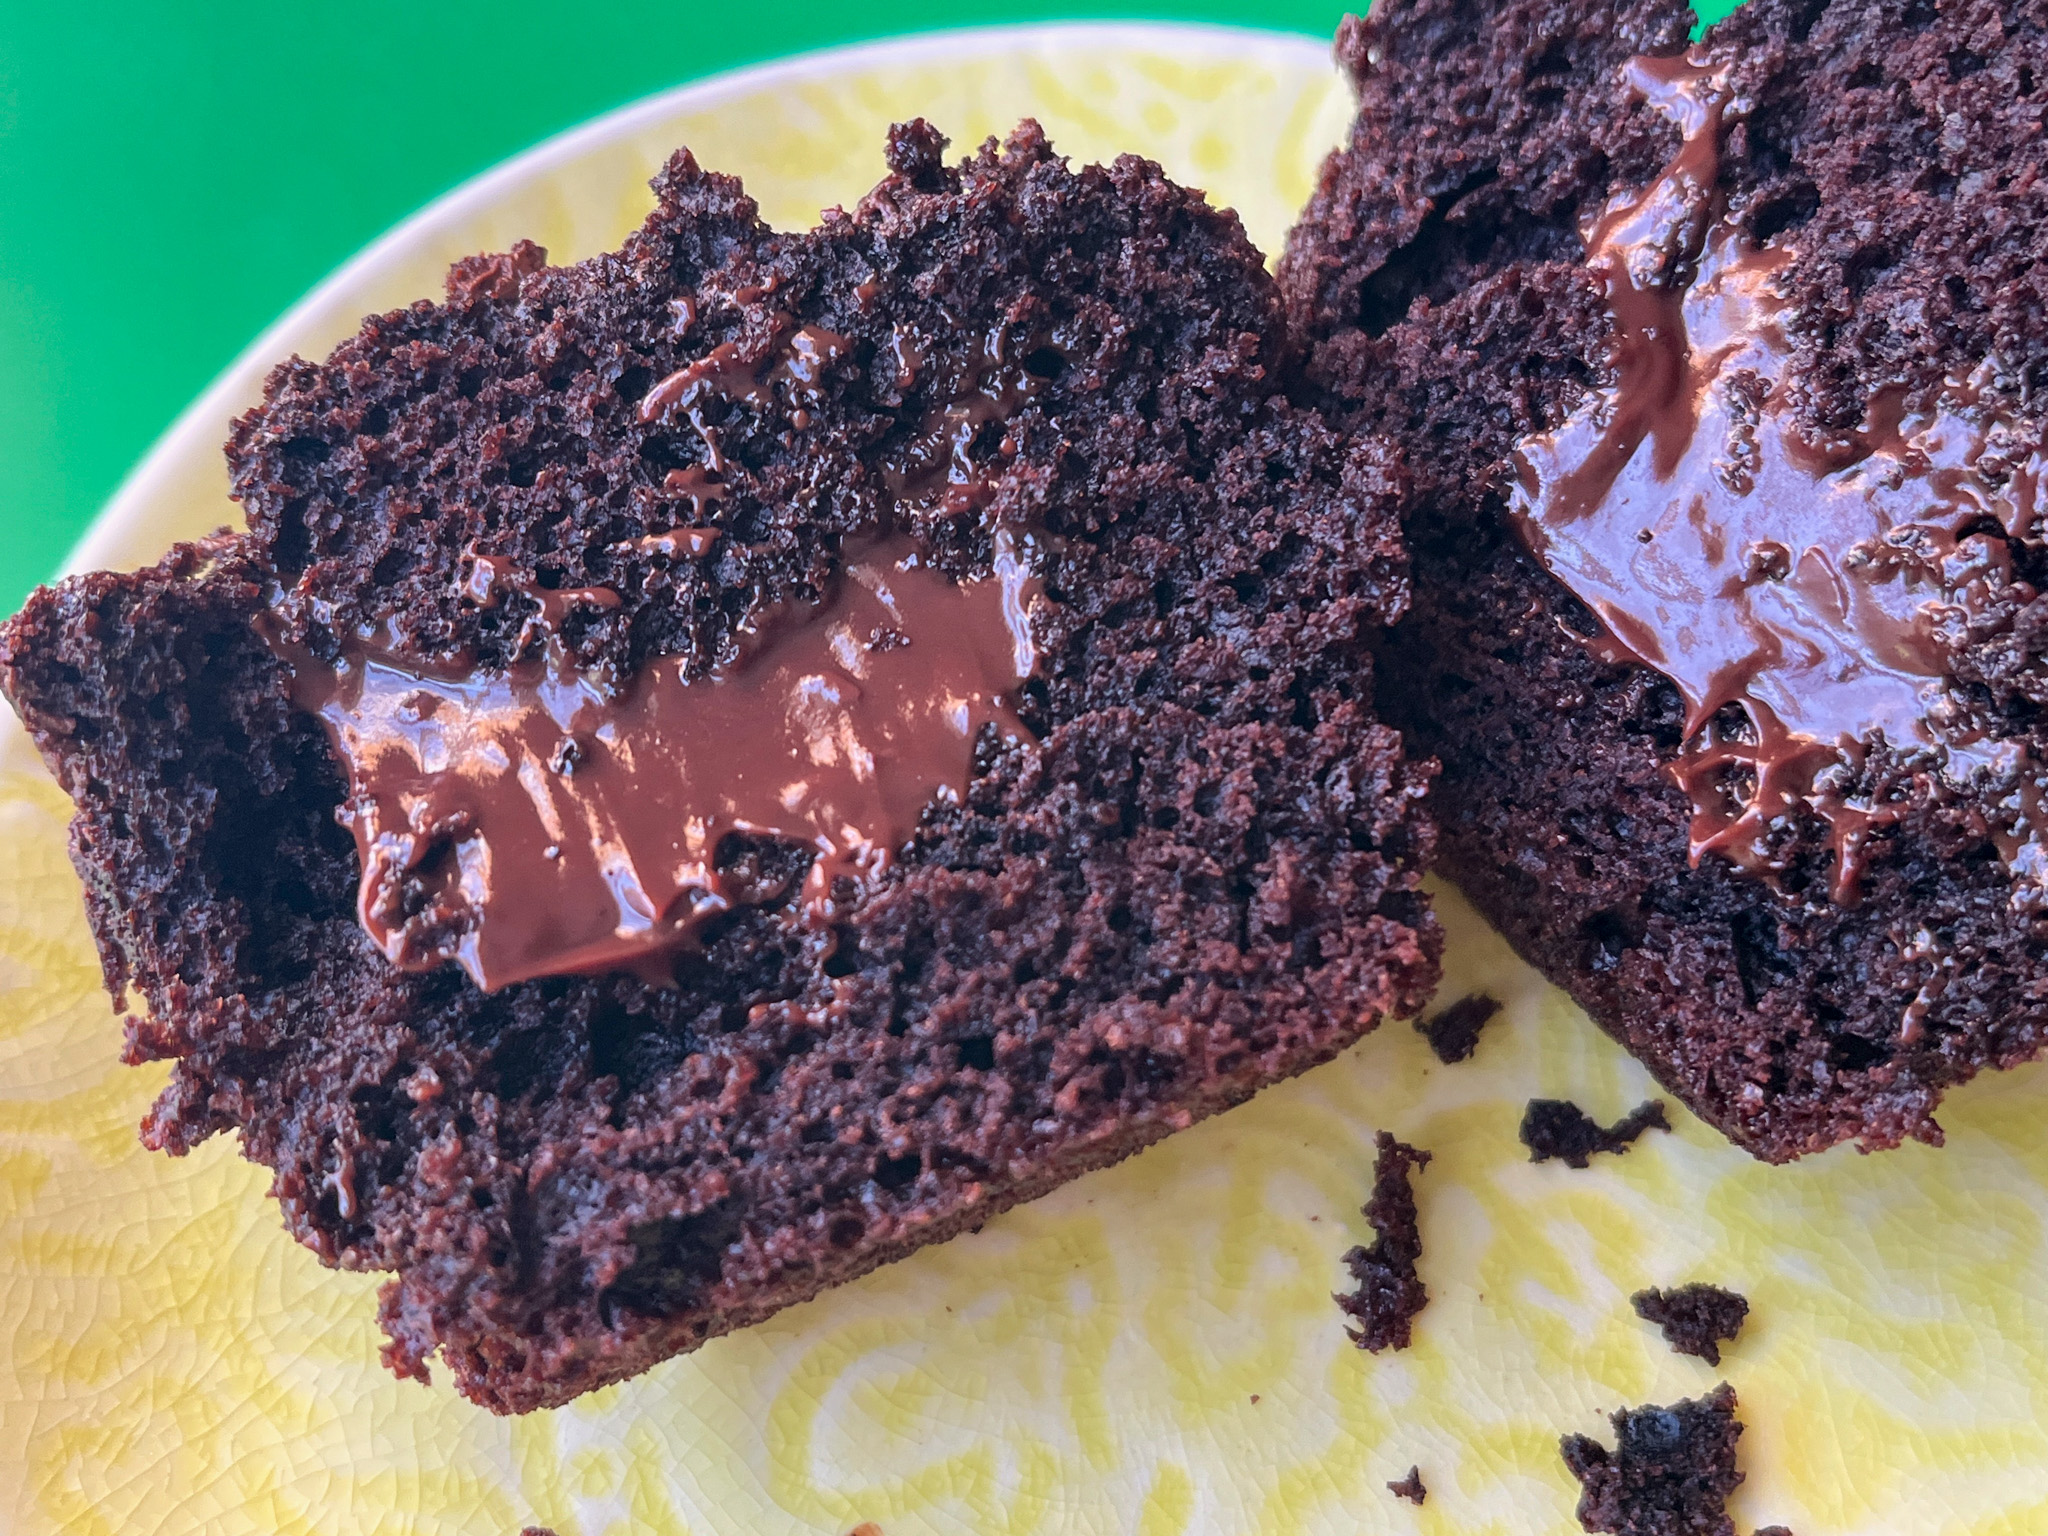
Today I share three delicious recipes that center on that dreamy ingredient that almost every human being loves: chocolate. I have known a few members of our species who claim to “hate” chocolate, and my hope is that they get their genomes sequenced to solve the mystery. Anyway, I digress. The first recipe comes from my favorite baker-instructor-guru, Helen Fletcher. These are beyond amazing and not for the faint of heart. Rich. Decadent. Luscious. Special. They are Double Chocolate Truffled Muffins!
For the truffle component: ½ cup heavy cream 2 tablespoons unsalted butter (30 grams) 2 tablespoons granulated sugar (25 grams) 5 ounces semisweet or bittersweet chocolate (140 grams) 1 teaspoon vanilla extract
for the muffin component: 1 ½ cups all-purpose flour (210 grams) 1 cup Dutch cocoa (85 grams) ¼ teaspoon baking powder ¾ teaspoon baking soda 1 teaspoon salt (I use table salt) 1 ⅓ cups brown sugar, either dark or light (265 grams) ½ cup whole milk ¾ cup canola or vegetable oil 2 large eggs 1 cup sour cream (225 grams) 1 tablespoon vanilla 1 teaspoon instant coffee or espresso powder 1 cup chocolate chunks (114 grams)
Start by making the truffle filling: Heat the cream, butter and sugar together in a small saucepan just until steamy. Do not let it come to a boil. Submerge the chocolate under the cream mixture and let it sit for 3 or 4 minutes. Whisk until smooth, making sure to get into the corners. Using a rubber spatula, go around the edges of the pan and bottom to make sure all of the chocolate is incorporated. Add the vanilla. Cover the surface with plastic wrap and set aside to cool.
Make the muffins: Line 9 jumbo muffin holes with paper liners. Set aside. Heat the oven to 425°F.
Sift the flour into a large bowl. Sift the cocoa, baking soda, baking powder and salt on top of the flour. Whisk together to mix well. In a very small bowl stir together the coffee or espresso and vanilla until the coffee or espresso is dissolved.
In a third smaller bowl, whisk together the milk, canola oil, eggs, sour cream, and coffee mixture. Pour the liquid ingredients over the dry ingredients and stir with a spoon or fold together with a rubber spatula just until everything is mixed well. Do not over mix.
With a #8 disher/scooper or a ½ cup measure, drop the batter into the paper lined muffin cups for the jumbo muffins. Top generously with the chocolate chunks. Bake at 425°F for exactly 6 minutes for the jumbo and lower the temperature to 350°F. Continue to bake for about 20 minutes or until a tester comes out clean. Cool the muffins.
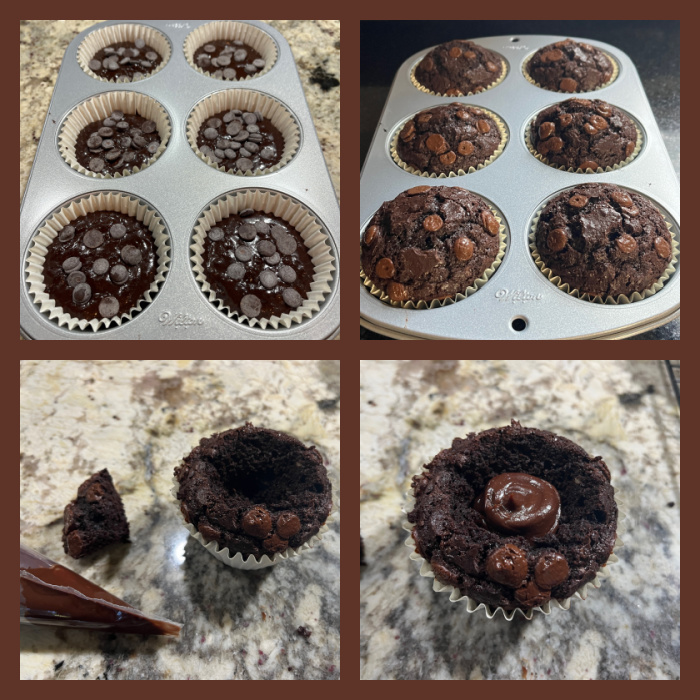
Starting about ½” from the edge of a muffin, insert a paring knife slanted towards the middle of the muffin and go all the way around the muffin. Remove the wedge shaped cake and set aside intact. To enlarge the hole for more filling, use a small spoon and scoop out additional cake.
Fit a piping bag with a ½” tip, fill with the truffle filling and pipe into the hole almost up to the top. Alternately, spoon the filling in. Replace the wedge shape piece pushing it into the filling.
Comments: Please make sure to read Helen’s blog post about them, as she gives detailed explanation of their origin and how she adapted the recipe to make it more user-friendly without any loss of deliciousness (I can testify to that, they are spectacular). The pictures do not make it justice, as so often is the case with brown food. Their texture is superb, and that filling is unreal! Thank you thank you thank you, Helen!
.
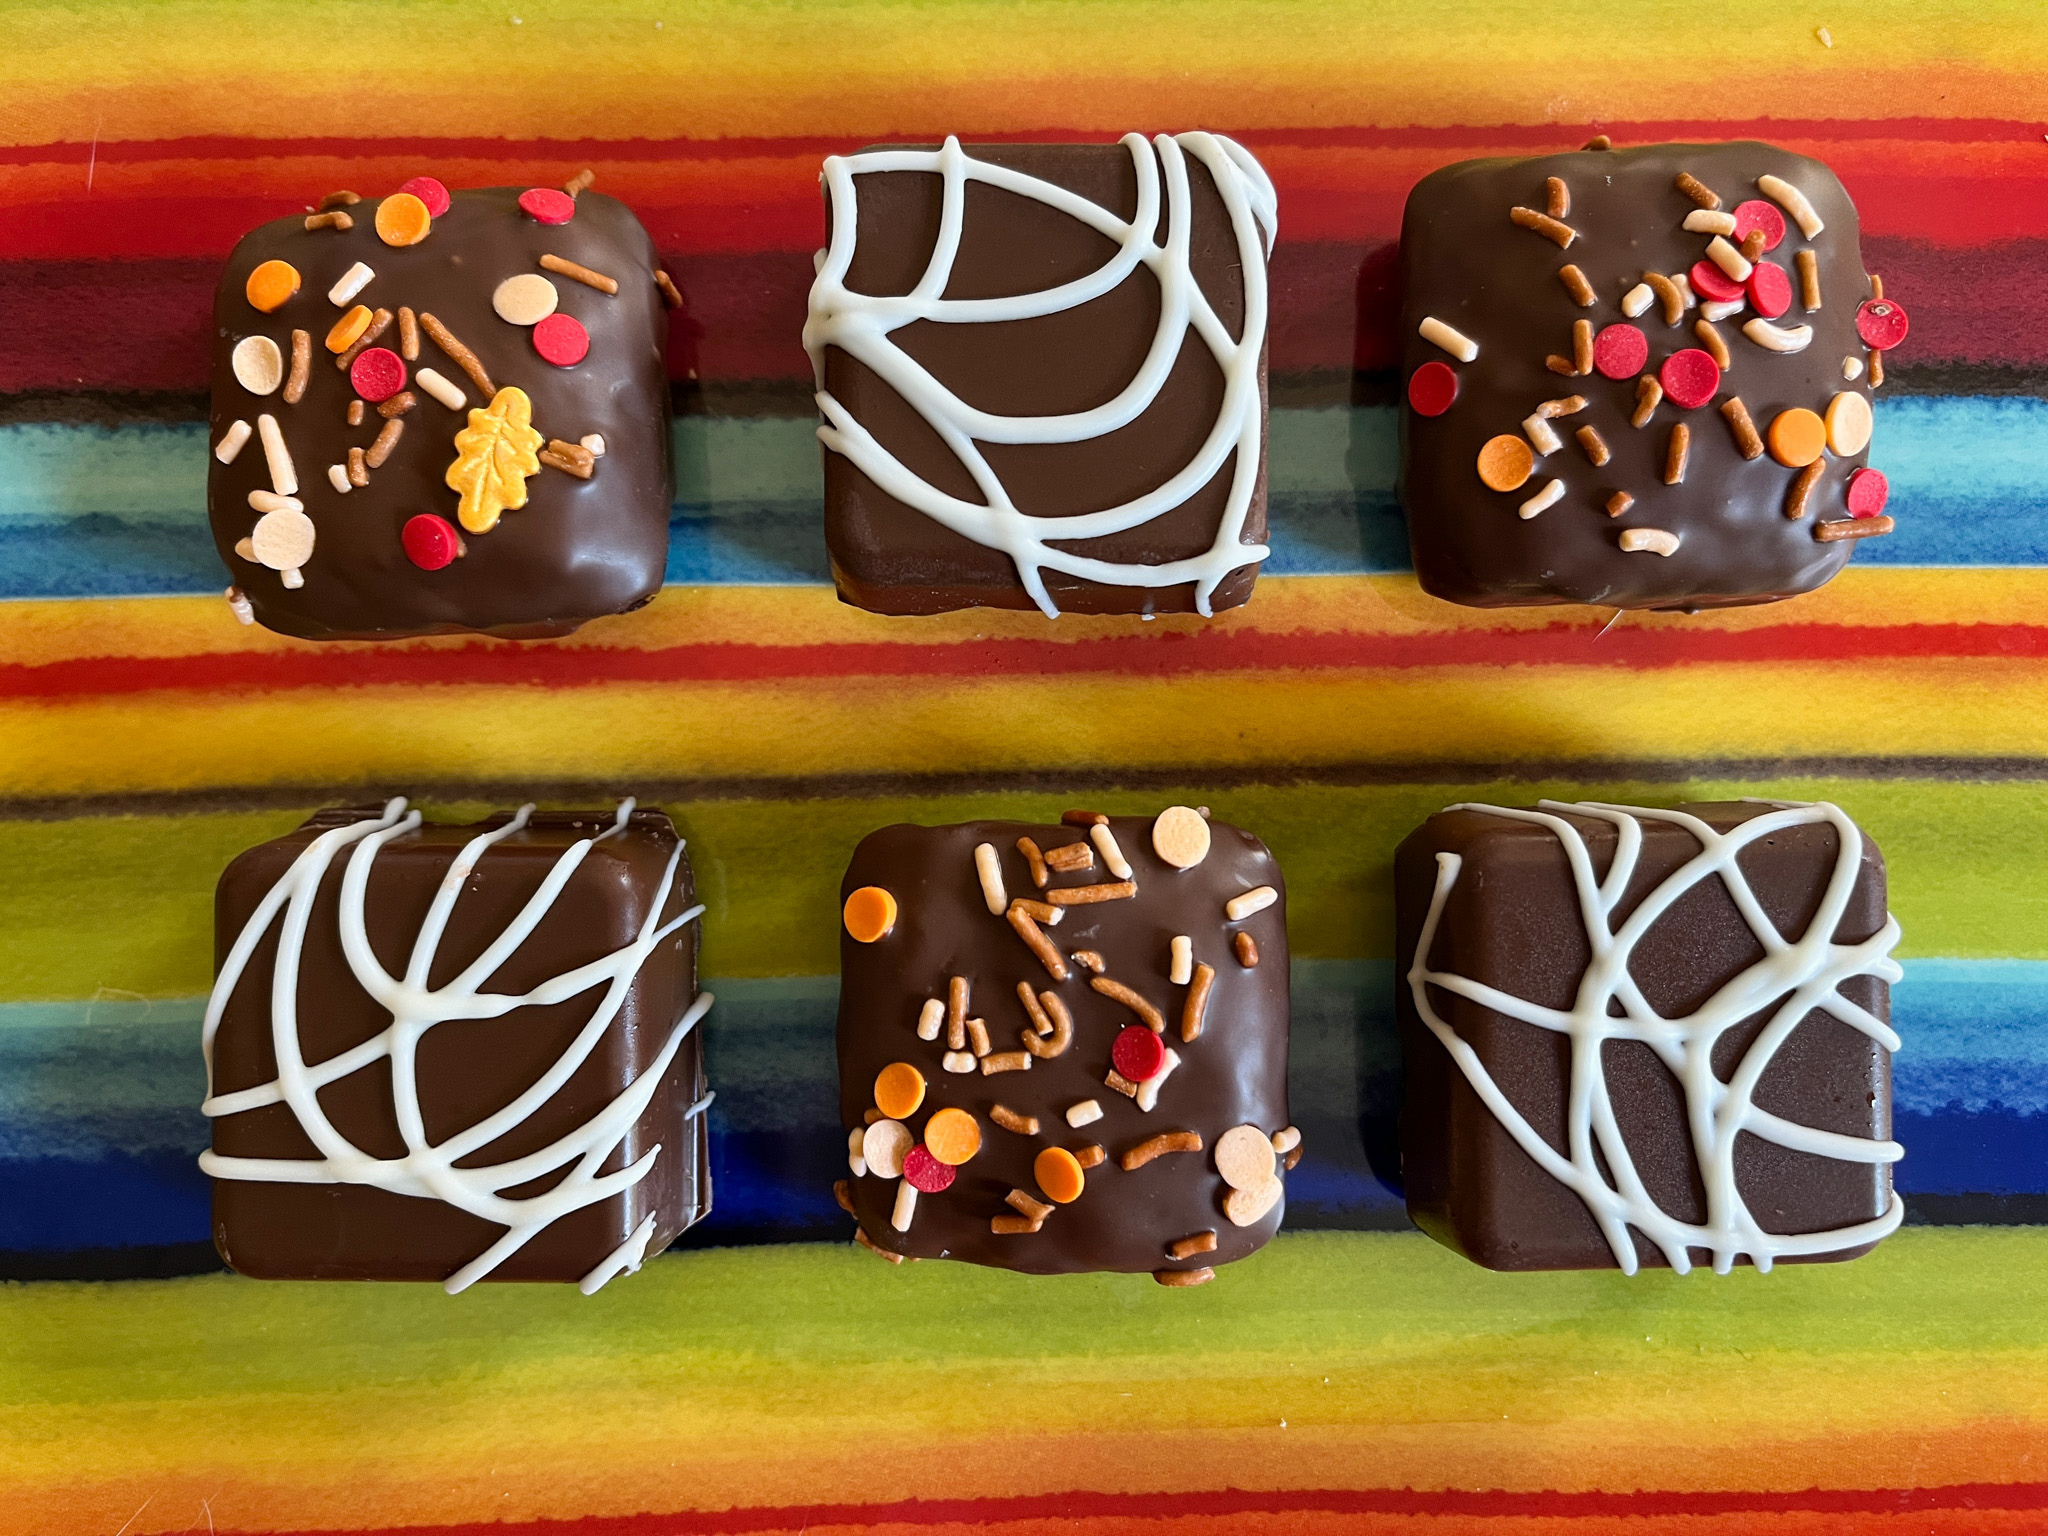
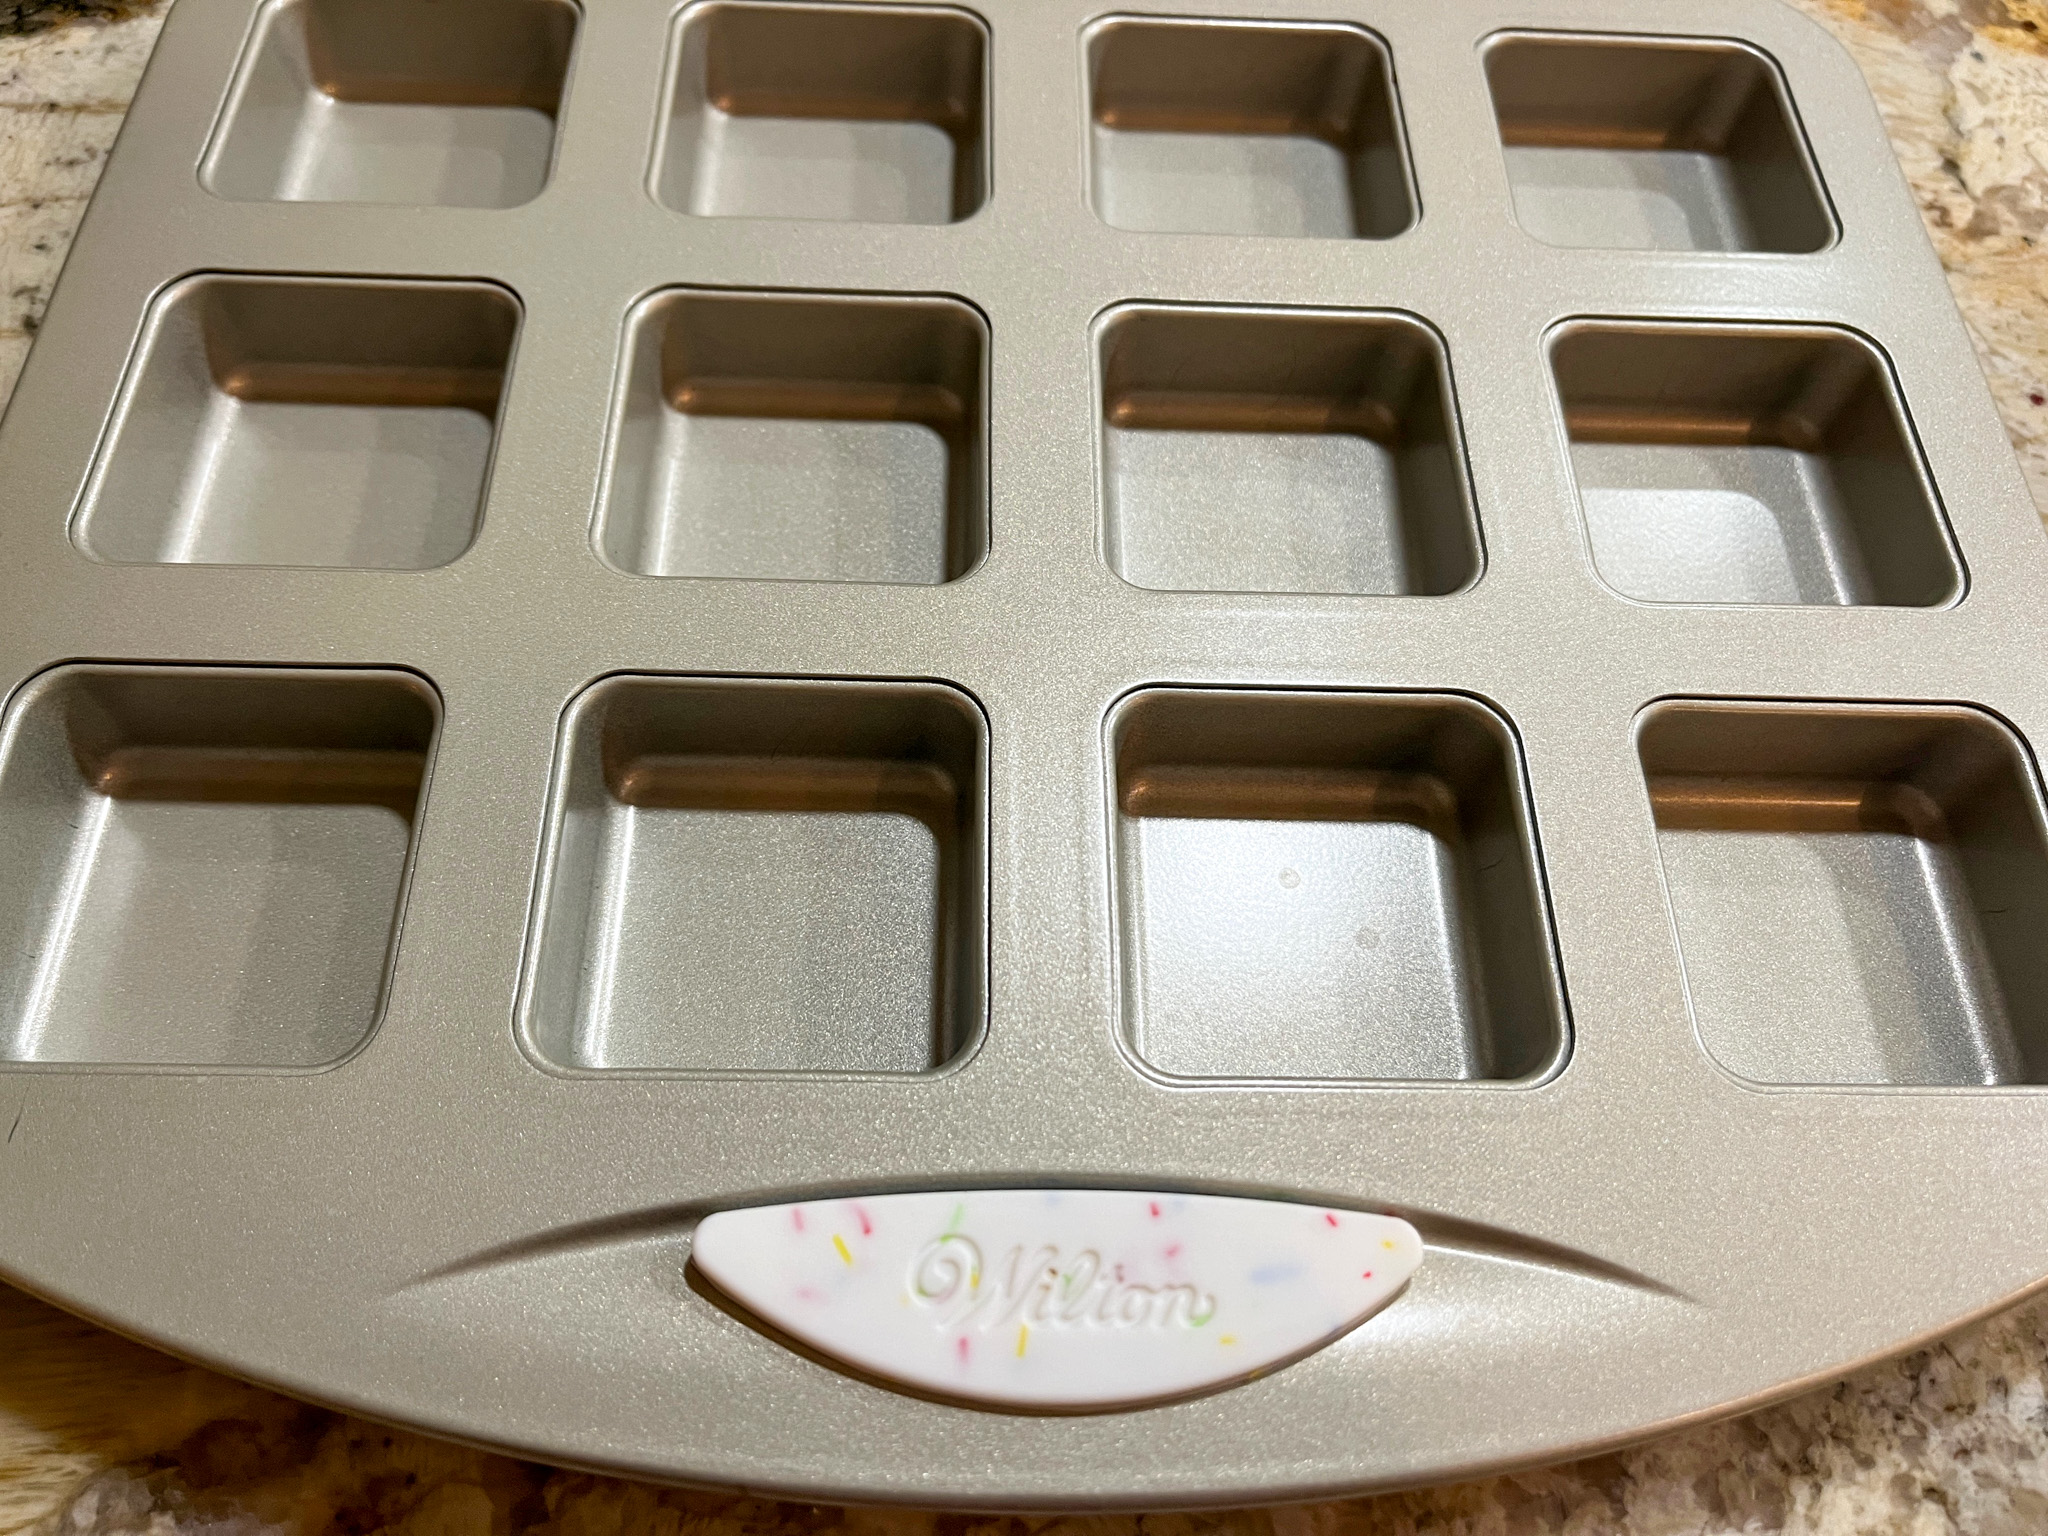
Moving on to the second recipe, credit goes to my beloved husband, who suggested that instead of coating Oreos with chocolate, I could do small pieces of brownies. I used a very small pan from Wilton to bake them. Without further ado…
1 cup all-purpose flour (130g) 1 cup granulated sugar (200g) 1/3 cup cocoa powder (35g) 1/2 teaspoon baking powder 1/4 teaspoon salt 1/2 cup vegetable oil 1 egg, lightly beaten 3 tablespoons milk 1/2 teaspoon vanilla extract
to coat: compound chocolate like Candy Melts or Almond Bark to decorate: sprinkles (optional)
Heat the oven to 350°F. Prepare the pan with baking spray.
In a medium bowl, whisk together flour, sugar, cocoa powder, baking powder and salt. Add vegetable oil, egg, milk and vanilla extract; stir well until smooth. Divide batter evenly between cavities, smoothing into an even layer (about 1 tablespoon per cavity). Bake for 13-16 minutes, or until edges are set and a toothpick inserted in the center comes out almost clean. Cool in pan on a cooling rack 5-10 minutes, loosen edges if necessary, and remove. Let cool completely on the rack.
Melt the compound chocolate until smooth using gentle power in the microwave. If too thick, add a small amount of coconut oil (refined). Coat the bites and decorate right away, or after setting, if going with drizzles of melted compound chocolate.
Comments: I got this pan at a sale in Jo-Ann store in town, and of course, could not resist it (info here). You can use silicone pans, or any other type of pan that makes mini-cakes. To coat, you can use two different methods. First, just melt the chocolate in a bowl and dip the cake to coat. That will give a rustic appearance, and you can add sprinkles right away. Second method will require you to clean the pan, then add melted chocolate in each cavity and quickly place the cake inside, pressing a bit so that the chocolate moves up along the sides. You can coat the bottom or not. Let it harden, remove from the pan, and if desired, make decorations with swirls of melted chocolate, I used white for that. Below you can see the different outcome.
And now for the last recipe, what might seem like your regular chocolate chip cookie, but it is truly special, due to the inclusion of an unexpected ingredient: buttermilk. You must give this recipe a try!
BUTTERMILK CHOCOLATE CHIP COOKIES
BUTTERMILK CHOCOLATE CHIP COOKIES (slightly modified from Yesterfood blog)
2 cups flour (260g) 1/2 teaspoon baking soda 1/2 teaspoon salt 1/2 cup butter, unsalted, melted 3/4 cup cocoa powder (75g) 1 + 1/2 cups sugar (300g) 1 teaspoon vanilla 2/3 cup buttermilk 1 (12 oz.) bag semi-sweet chocolate chips (about 2 cups)
Heat oven to 350 degrees. Line cookie sheets with parchment paper. Set aside. In a medium bowl, combine flour, baking soda, and salt. Whisk to combine. Set aside. In a large bowl, whisk the cocoa powder and melted butter until very smooth. Stir in the sugar, vanilla, and buttermilk until well combined.
Add the flour mixture to the chocolate mixture in thirds, stirring each time just until combined. Stir in the chocolate chips.
Scoop cookie dough onto prepared cookie sheets by heaping tablespoonfuls about 2″ apart. Bake for 10 to 12 minutes, until cookies are puffed, edges are set, and center is still moist. Place cookie sheets on wire racks for 5 minutes, then remove cookies onto wire racks to cool completely. Store tightly covered.
Comments: These cookies will definitely please any chocolate lover out there. It almost feels as if you are having a brownie. Excellent texture, I reduced the sugar from the published version and I think it was a good move. I do hope you give it a try…
So, that’s all for now, three real nice recipes celebrating chocolate!
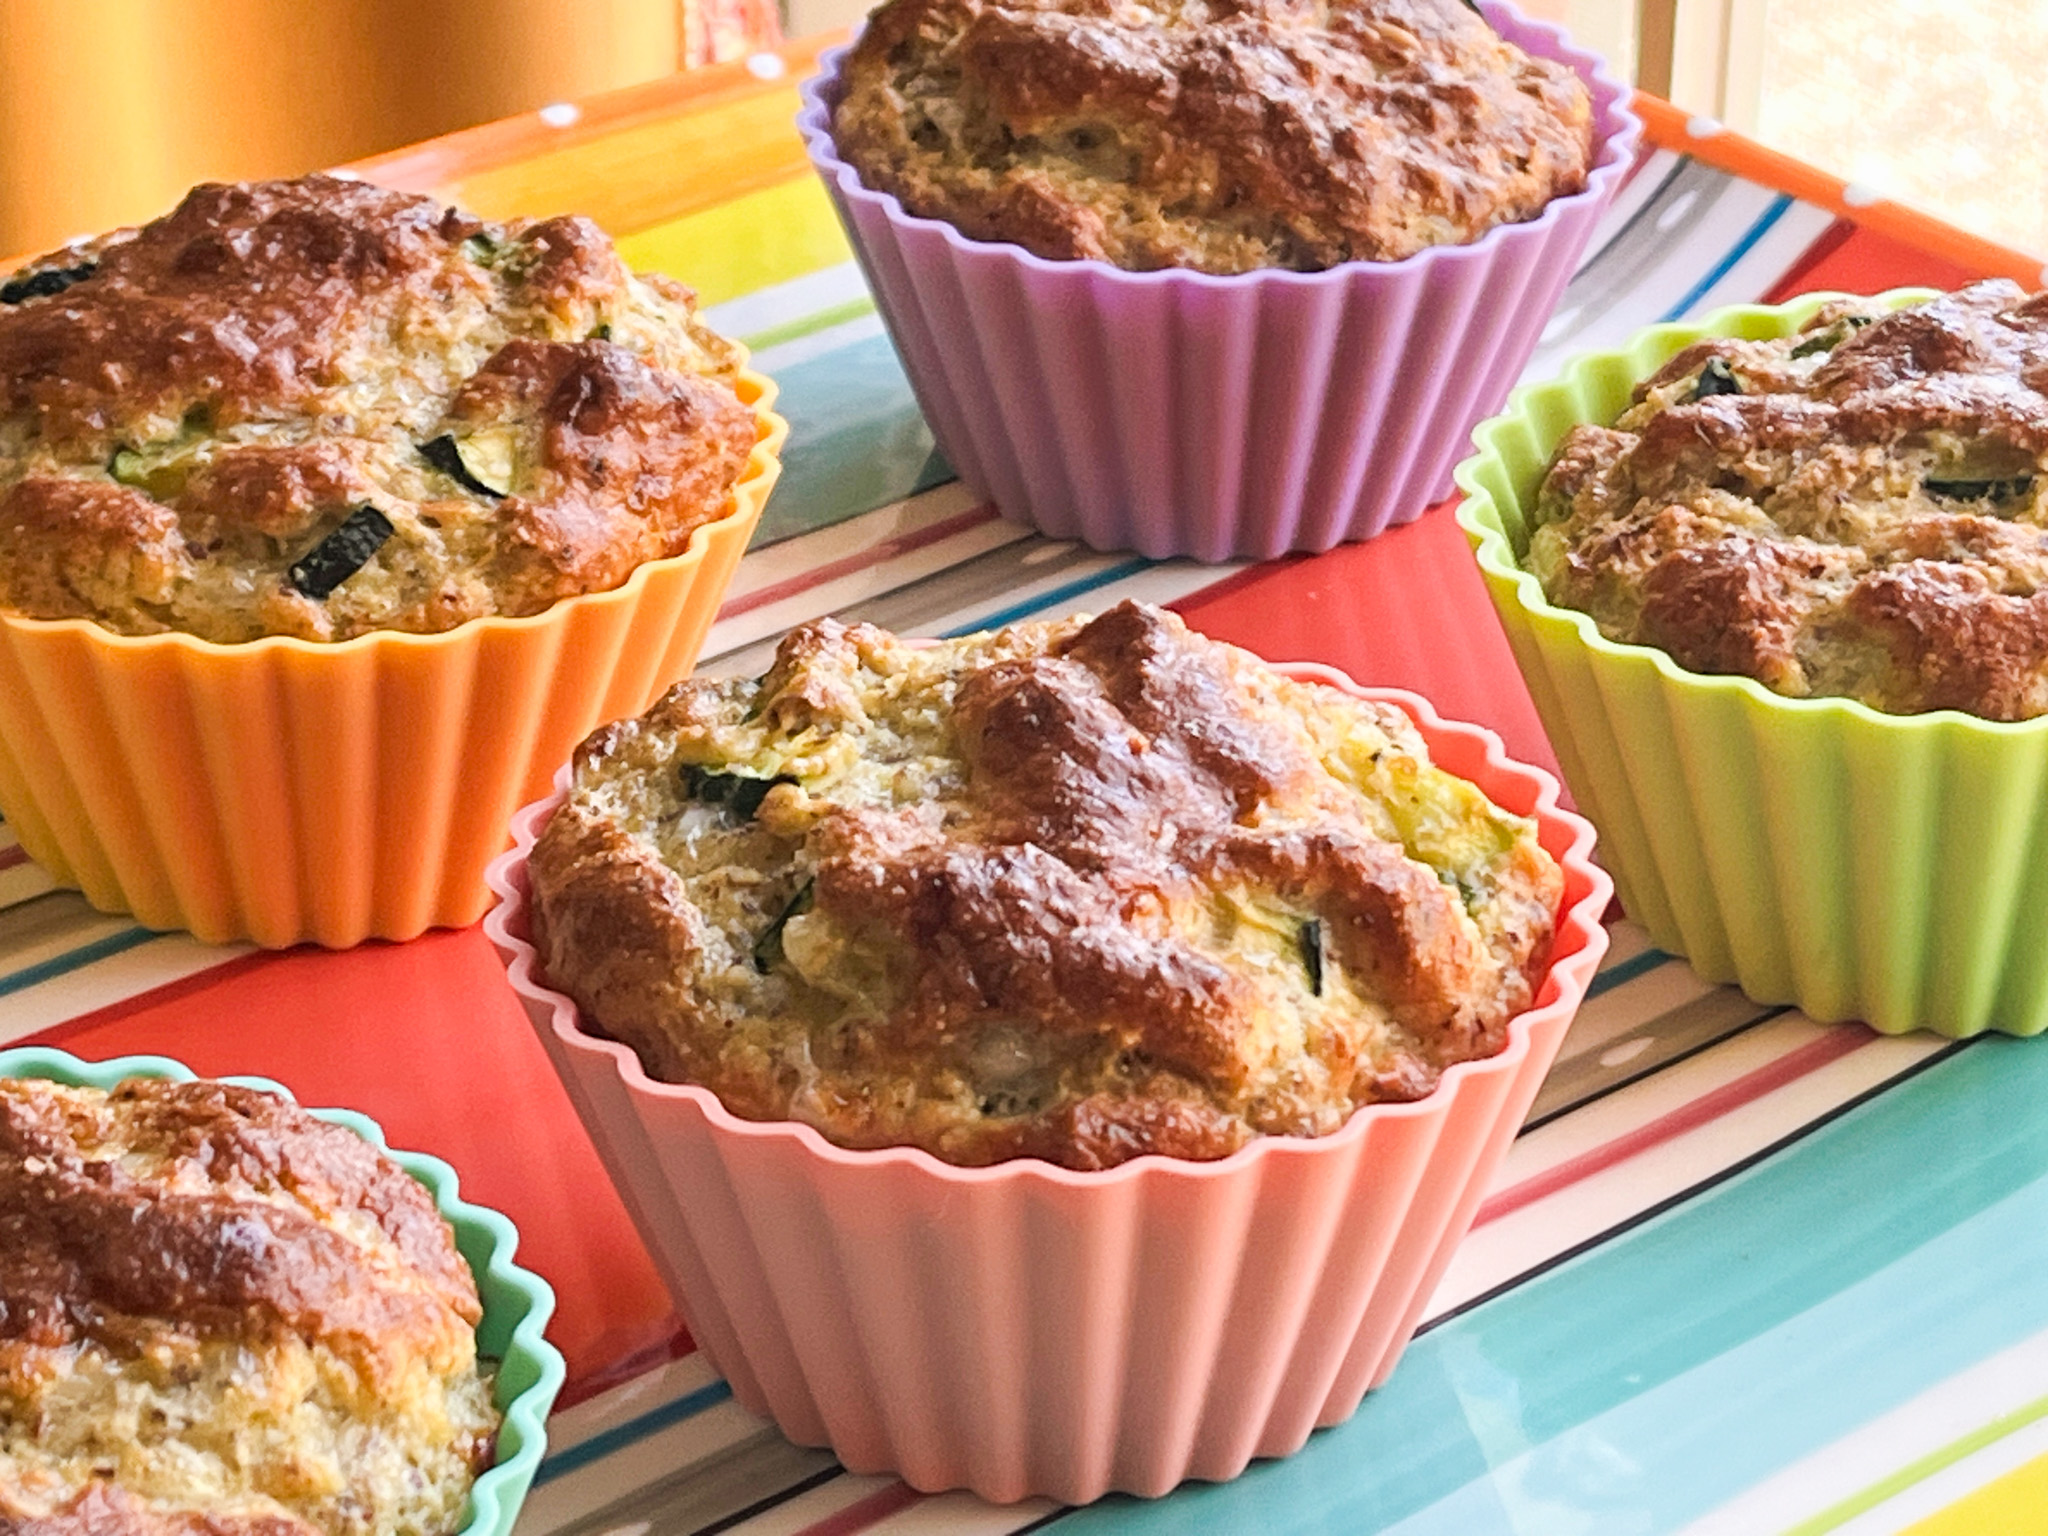
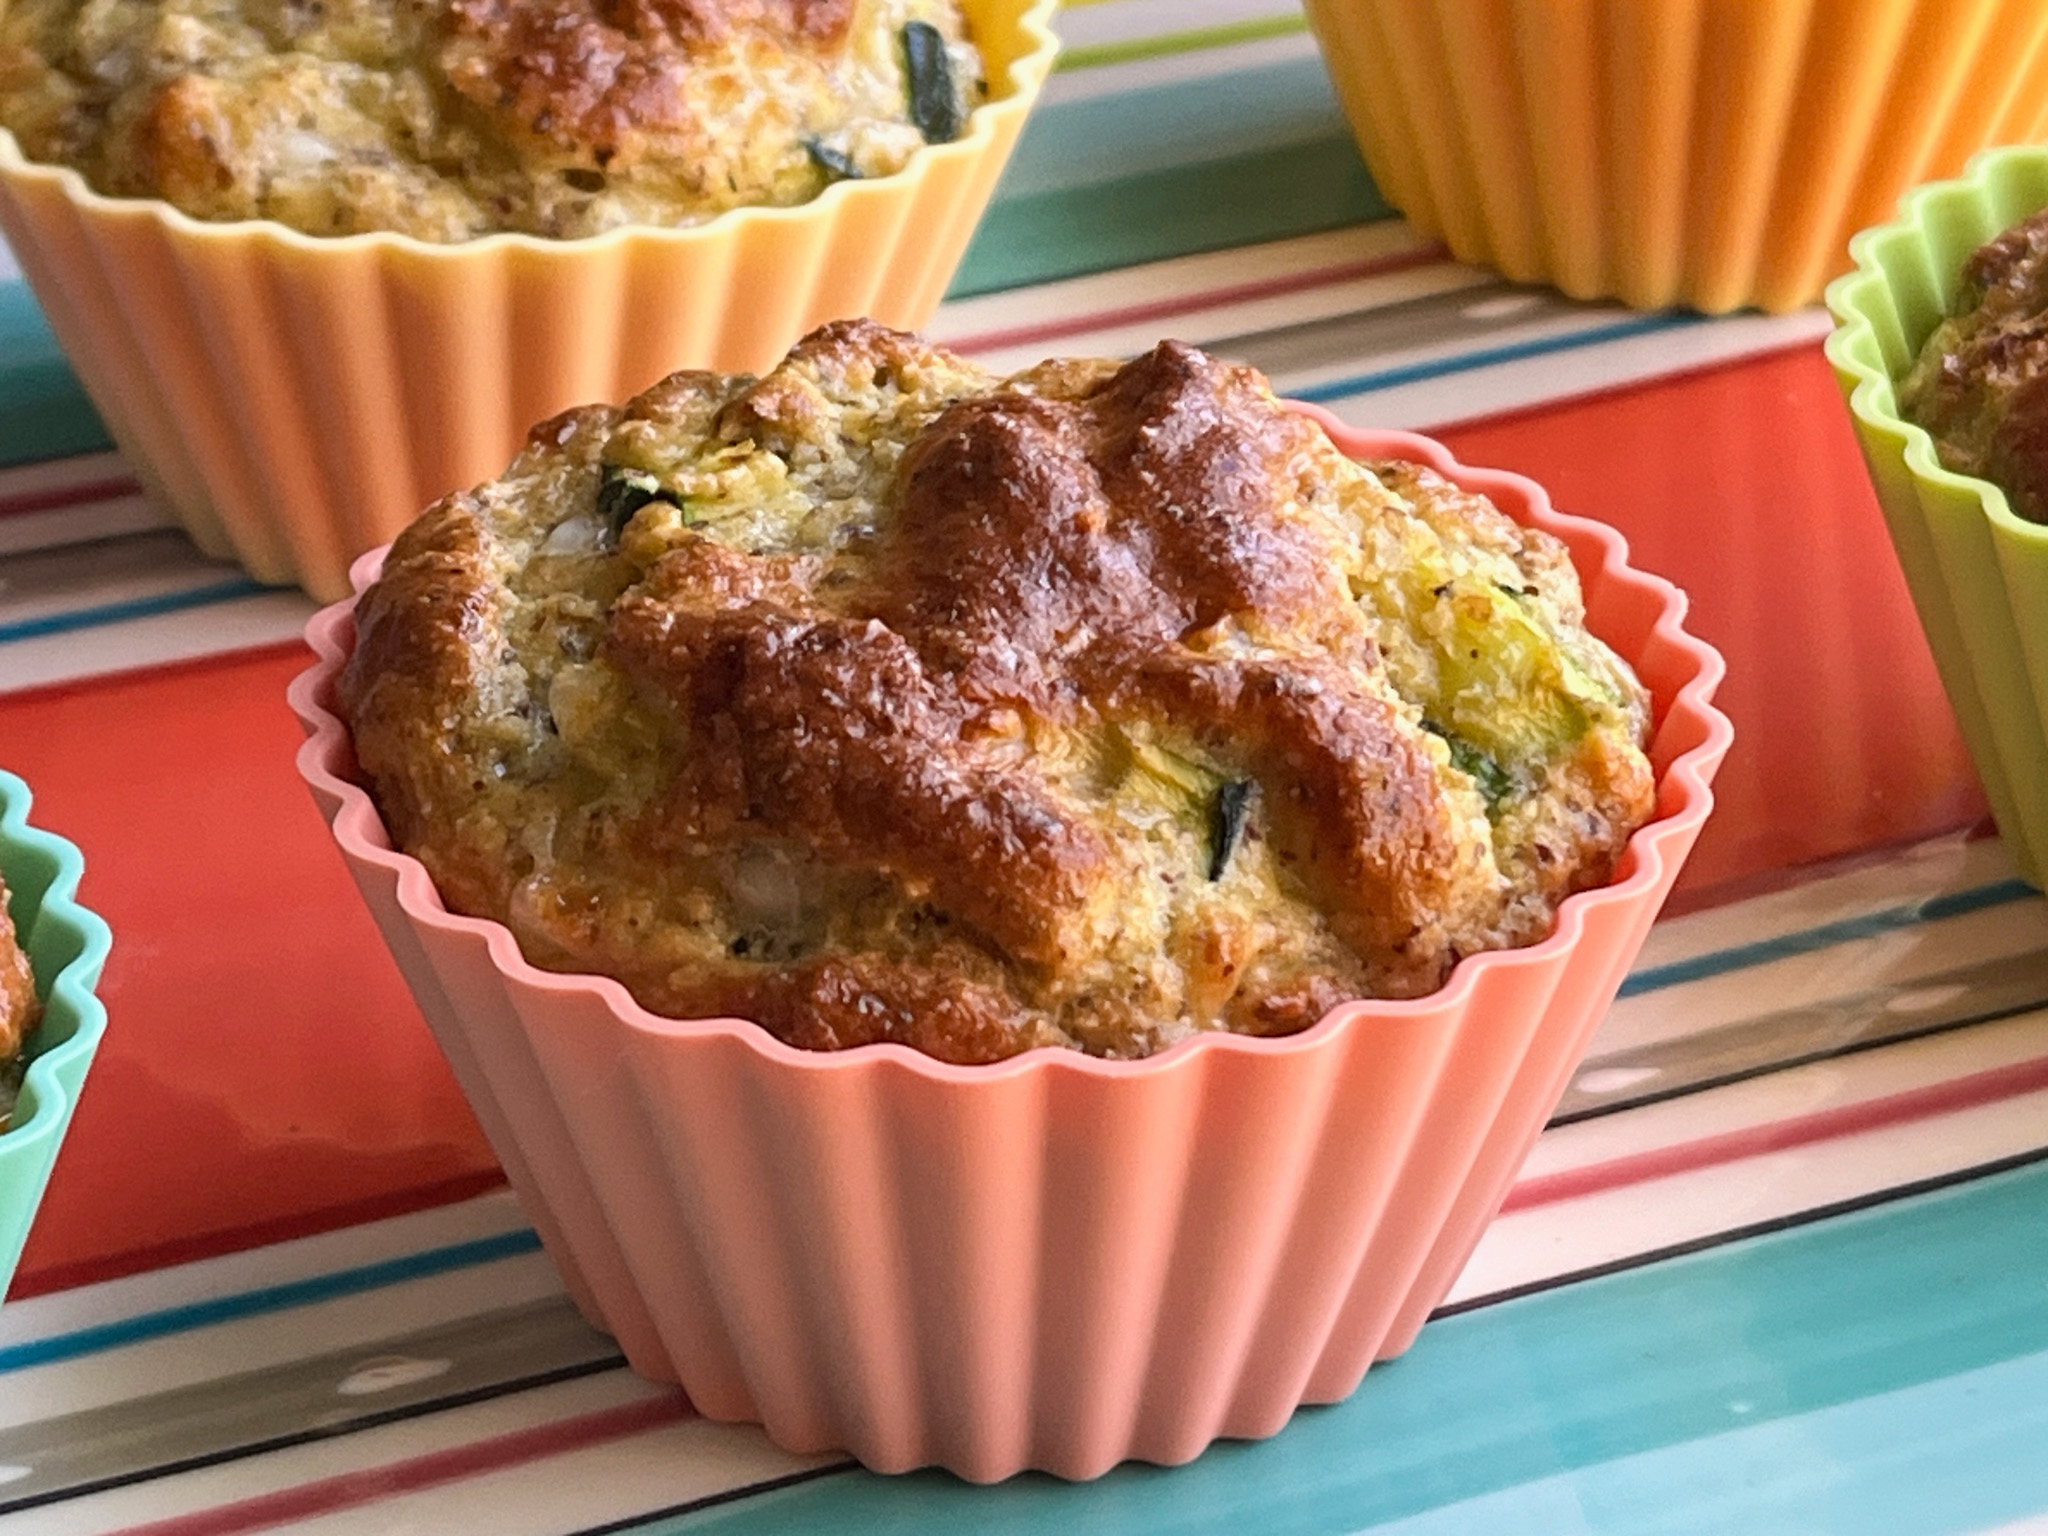
I’ve been following food bloggers for a very long time. Many stopped blogging, but a few of my favorites still hang on over many years. Kalyn is one blogger who passed the 15-year mark (a milestone I am going to hit in a few weeks…). For the most part she focuses on low-carb recipes and everything I cooked from her blog has been delicious. No lack of flavor, no odd textures. Back in 2022 she shared a recipe for zucchini muffins and I finally made them. They delivered all that she promised. No matter your take on amount of carbs, these are great. The almond flour makes them moist and quite tender. I made a few minor changes from her published version.
1 small zucchini 2 tsp olive oil 1 tsp Herbes de Provence salt and black pepper to taste 3/4 cup cottage cheese 1/2 cup coarsely grated Parmesan cheese 8 eggs, well beaten 2 cups almond flour 1/2 cup flaxseed meal 2 T baking powder
Heat oven to 375F.
Cut stem and blossom end off zucchini, then cut in fourths lengthwise. Then on each piece, trim off and discard part of the white center part of zucchini, so you have zucchini strips with skin and about 1/4 inch of white. Cut those pieces into thinner strips, then dice to make small cubes around 1/4 inch square. You will have about 1 + 1/2 cups diced zucchini. Heat olive oil in non-stick frying pan and cook zucchini seasoned with the Herbes de Provence, salt and pepper until it’s softening and just starting to brown, about 3 minutes.
Put cottage cheese in a fine strainer placed in the sink and rinse with cold water, then let it drain well. Beat the eggs until yolks and whites are well-combined.
In a bowl combine the cooked zucchini, cottage cheese, Parmesan cheese and beaten eggs. In a smaller bowl mix almond flour, flax seed meal and baking powder.
Mix the dry ingredients into the wet ingredients, adding only part at a time and stirring each time until the mixture is combined. Fill muffin cups, dividing the mixture evenly among 9 muffins cups. Bake about 27 minutes, or until muffins are firm and slightly browned.
Comments: I omitted feta cheese because I did not have any. I made bigger muffins and instead of twelve I ended up with nine. These jumbo silicone liners are absolutely great! If you don’t have a jumbo muffin pan, they will still stand upright on a regular baking sheet. You can find a link to get them in Kalyn’s blog, I’ve had mine for a while. Love the colors also, as you might imagine…
They would be pretty nice with chunks of feta in the crumb, so consider adding that. The crumb is very delicate and they are perfect for a light lunch. The muffins freeze well, you can microwave them for 1 minute, and enjoy good as fresh.
Kalyn, thank you for yet another great low-carb recipe!
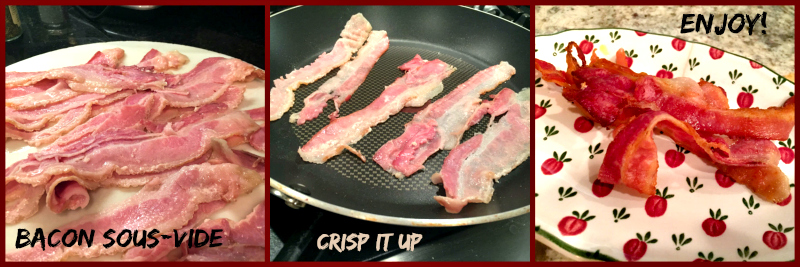
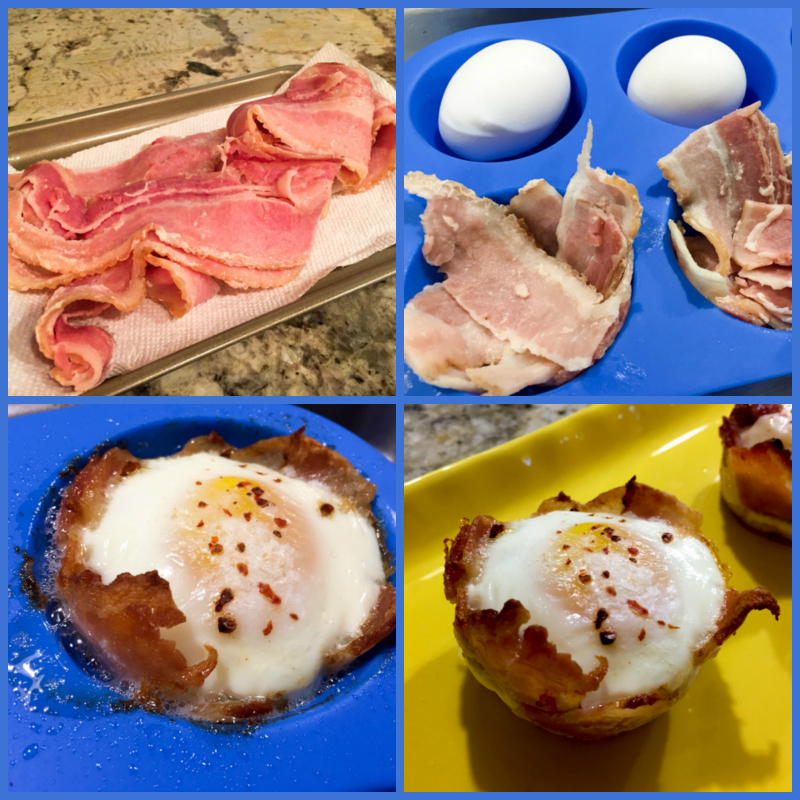
Should I be embarrassed to blog about a “recipe” that is essentially two ingredients plus seasoning? Potentially, yes. But in reality I am not, because this non-recipe has a nice little unexpected twist to it: the bacon was pre-cooked sous-vide. WAIT! Don’t run away, you can make it if you don’t have the Anova gadget sitting in your kitchen drawer. But I must say bacon cooked sous-vide and stored in the fridge waiting to shine in any recipe is a very nice item for the busy cook. Or any cook, actually, because this method gets quite a bit of the greasy “feel” of bacon out of the equation, and the texture will be superb.
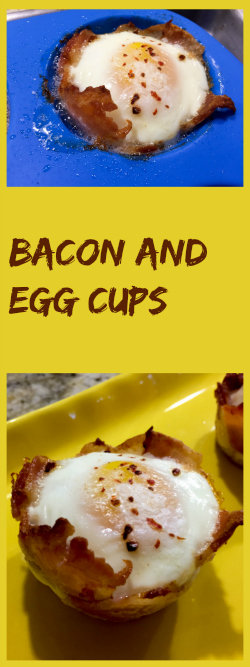
BACON AND EGG CUPS (from the Bewitching Kitchen)
several slices of bacon, preferably cooked sous-vide
large eggs
salt
Aleppo pepper (or pepper of your choice)
If cooking the bacon sous-vide, place the slices in a bag and submerge in the water-bath set to 147 F (64 C) overnight. I left mine 12 hours, but you can do it longer if more convenient. At the end of the cooking time, a lot of fat will have accumulated inside the bag. You can save it if you like to cook with it, or discard it. Place the cooked slices of bacon over paper towels to dry them well. Store them in the fridge until ready to use. If not using sous-vide, cook the bacon on a skillet, but do not allow it to get too brown or crispy. Drain them well in paper towels before assembling the cups.
Heat the oven to 375 F (175 C).
Cover the bottom of a muffin baking tin with bacon, making sure to come up all the way to the top. Gently break an egg and place it inside. Season with salt and pepper. Bake according to your preference. I like the egg yolks to be runny, so 10 to 15 minutes maximum will be enough. If you like your eggs fully cooked, go for 20 minutes, but pay close attention, you don’t want to over-dry the egg.
Comments: I made this recipe for the first time in July, and since then we’ve been cooking bacon sous-vide on a regular basis. To me, it takes bacon to a whole new level, cutting some of the harshness I find overpowering. If you get your pan screaming hot, you can get by simply searing one side of the bacon slice, as the whole thing is already perfectly cooked to start with. But, even if you crisp up both sides, the texture will be perfect.
These little cups are perfect for breakfast, or a light lunch. Having the bacon waiting in the fridge makes this preparation a breeze. All you need to do is warm up your oven (we use the Breville that heats up super fast), grab the muffin tin, and you are less than 20 minutes away from a nice meal. I also made those using prosciutto and ham. Both work very well, but the sous-vide bacon is my favorite. Keep also in mind that if you’d like a vegetarian version, cooked spaghetti squash strands can be a nice receptacle for the egg. I intend to blog about that sometime. The secret is to be assertive in the seasoning, otherwise it can be a bit bland.
For those interested, this is low-carb, Paleo-friendly, Whole30-friendly, but above all, it’s very very tasty!
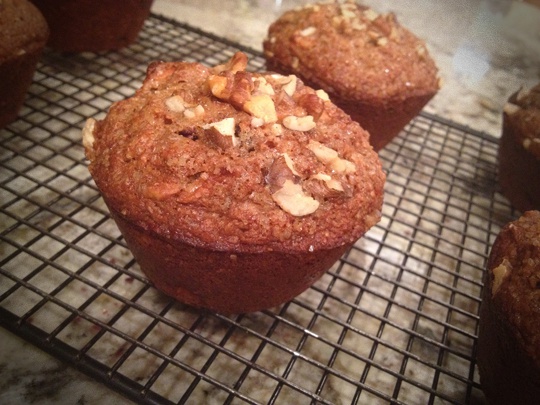
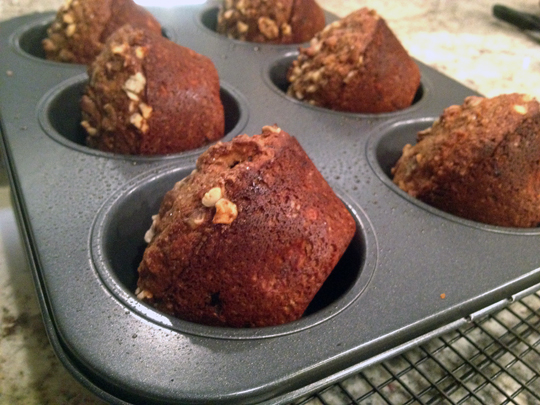
I would love to take full credit for coming up with the title of this post, but I can’t. “A Bran Muffin Stole My Heart” was the title of a blog post by Michelle published almost 3 years ago, and brought to my attention by a friend over on Facebook (thank you, Tracy!). After reading Michelle’s post, I had the intuition that this recipe would be a winner. For starters, it makes big, very big muffins. Then, it proceeds by crowning each muffin with a tempting sprinkle of walnuts and sugar, that gets irresistibly crunchy as they bake. I had to make a batch and put it to the test of my resident bran muffin critic-extraordinaire… 😉
APPLE-RAISIN BRAN MUFFINS (slightly modified from Put in Some Sugar)
1 + 1/4 cups whole-wheat flour
1 teaspoon baking soda
1 + 1/4 teaspoon salt
1 cup wheat bran
1/4 cup chopped dried apple
1/2 cup raisins
1/4 cup cranberries
1/4 cup diced walnuts
1/2 cup boiling water
1/4 cup unsalted butter, softened
1/2 cup brown sugar
1/4 cup honey
1 large egg
1 cup buttermilk
Raw sugar, for sprinkling
walnut pieces, for sprinkling
Heat your oven to 400 F. Prepare a muffin pan, with either paper cups or spray.
.
In a small bowl, mix together the flour, baking soda and salt. Set aside. In another small bowl, combine the wheat bran and dried fruits. Add the boiling water and let sit.
.
In the bowl of a stand mixer, beat the butter until fluffy, then add the sugar and beat until well combined and creamy. Add the honey and mix. Add the egg, mixing well.
Mix in the buttermilk and flour mixture in three additions each, beating each addition until just combined. Stop the mixer and scrape the bowl. Mix in the bran mixture.
.
Scoop the batter into the muffin cups. It should take about 1/2 cup of batter for each muffin if you are using a jumbo muffin pan. For regular muffin pans, use 1/4 cup. Top each muffin with a teaspoon of raw sugar and sprinkle with a teaspoon of chopped walnuts.
.
Bake 20 minutes or until browned on top and a toothpick inserted in the middle comes out clean.
These muffins are the ones that got the closest to those from Phil’s past. I have no doubt that the larger size helped a lot, so getting the jumbo size muffin pan was a great move by Sally.
The topping adds a lot to these muffins, but I loved everything about them, from taste to texture. What can I say? I think I’ve been assimilated.
“I don’t always eat breakfast, but when I do, I prefer a bran muffin”.