BUTTERFLY PEA FLOWER ACCORDION BREAD

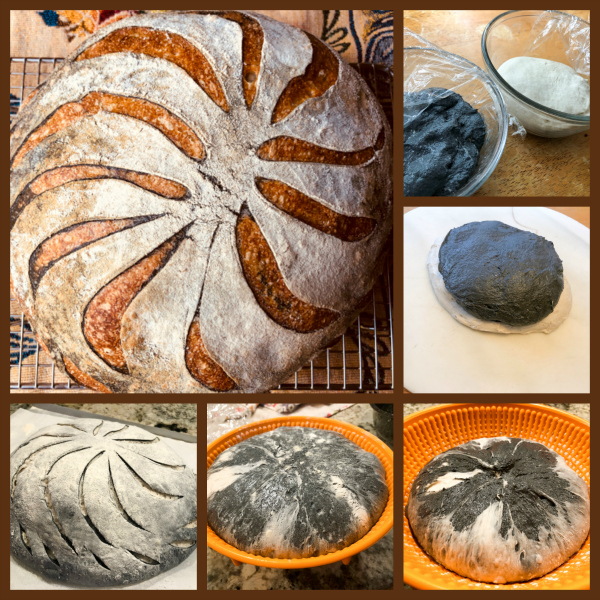
I am so thrilled with this recipe! You can use different ingredients to obtain the bicolor effect: charcoal powder, carrot powder, ube, sweet potato powder, just keep in mind that it needs to be concentrated enough not to mess up with the dough, so liquid things won’t work well. Stick to powder and thick pastes. I used butterfly pea flower powder from Selefina (click here for ordering info).

ACCORDION BREAD
(adapted from this recipe)

180 ml warm milk
4g instant yeast
375g bread flour
18g dry milk powder
7g salt
50g sugar
1 large egg
56g softened butter
5g butterfly pea flower powder dissolved in 2 tsp milk
Egg wash (1 egg + 1 tbsp milk)

Combine yeast, warm milk, and 5 g of the sugar in a small measuring cup or bowl. Stir and let it sit for 5-10 minutes.

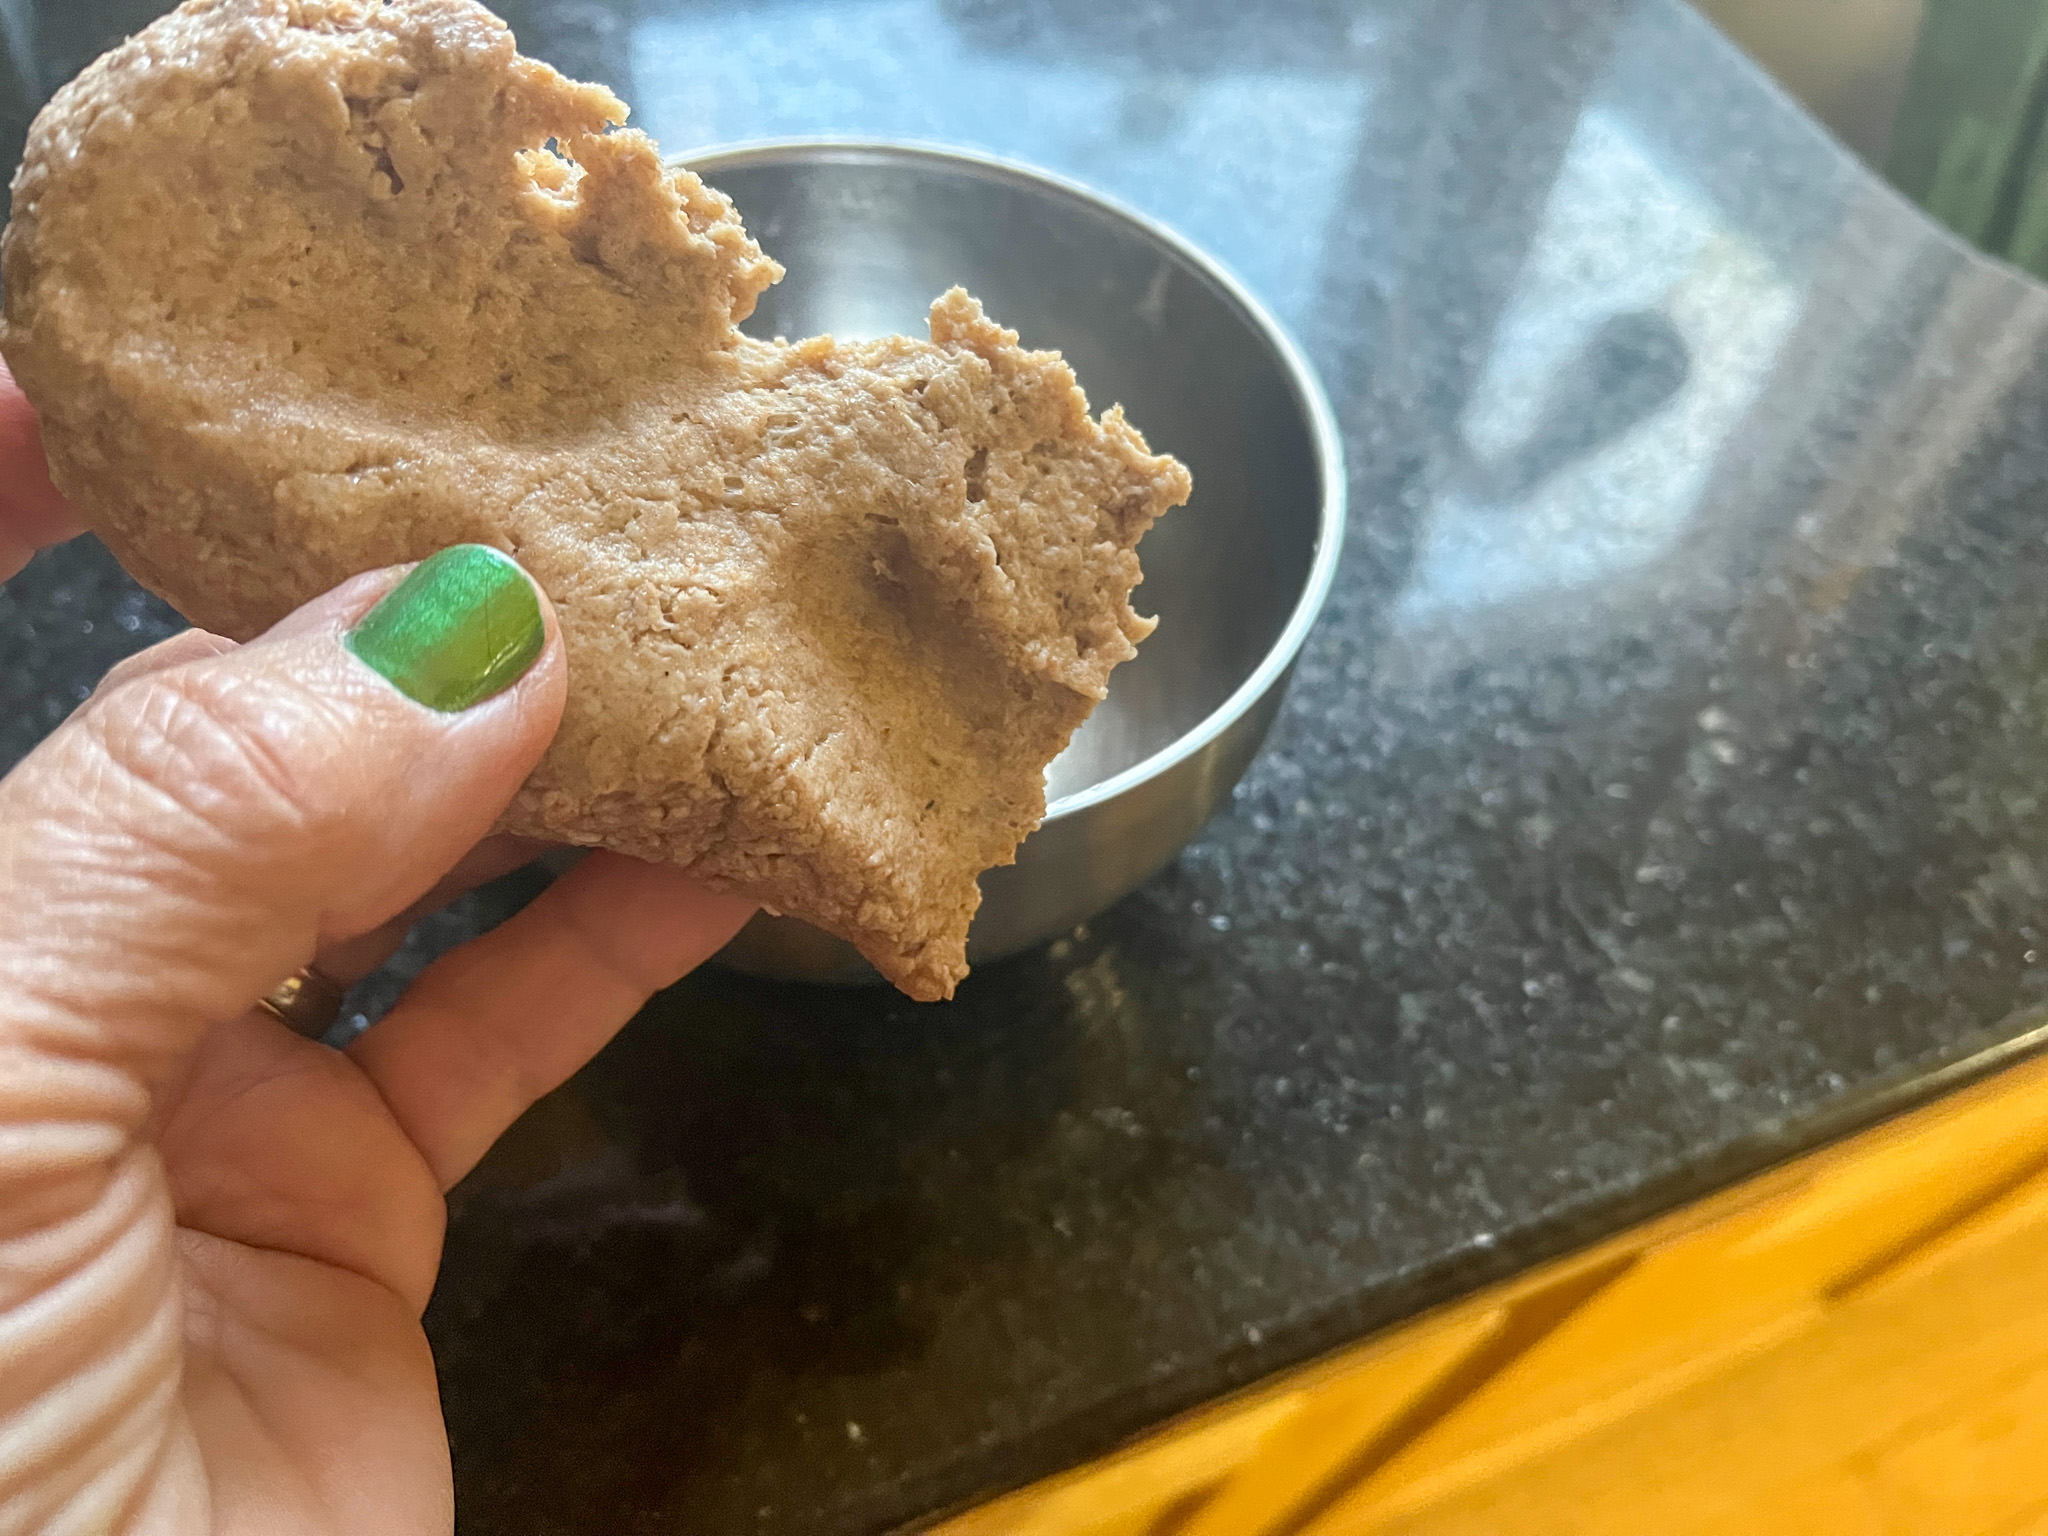
In a stand mixing bowl fitted with the dough hook, add the flour, salt, milk powder, egg, yeast mixture, and knead on med-low speed until dough comes together and no dry flour is visible. Add in remaining 45g of sugar. Incorporate all the butter, little by little. Knead on med-high for 8-10 mins, or until dough is smooth and releases from the sides of the bowl.


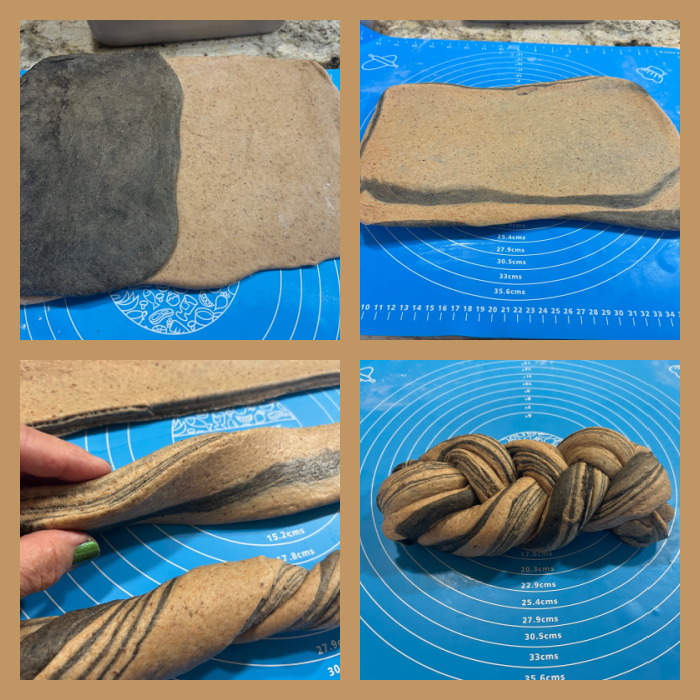
Split dough into two, placing one half the dough back in the mixer, adding the dissolved butterfly pea powder over it. Knead until color is well combined. Cover both doughs in clean bowls, and let rise 1.5 to 2 hours or until they have doubled in size.


Punch and degas doughs. Using a rolling pin, roll out each dough into an oblong shape. Layer the two doughs with colored dough on the top. Perform an envelope fold meeting both sides in the center. Wrap dough in cling wrap and chill in fridge for 15 minutes.
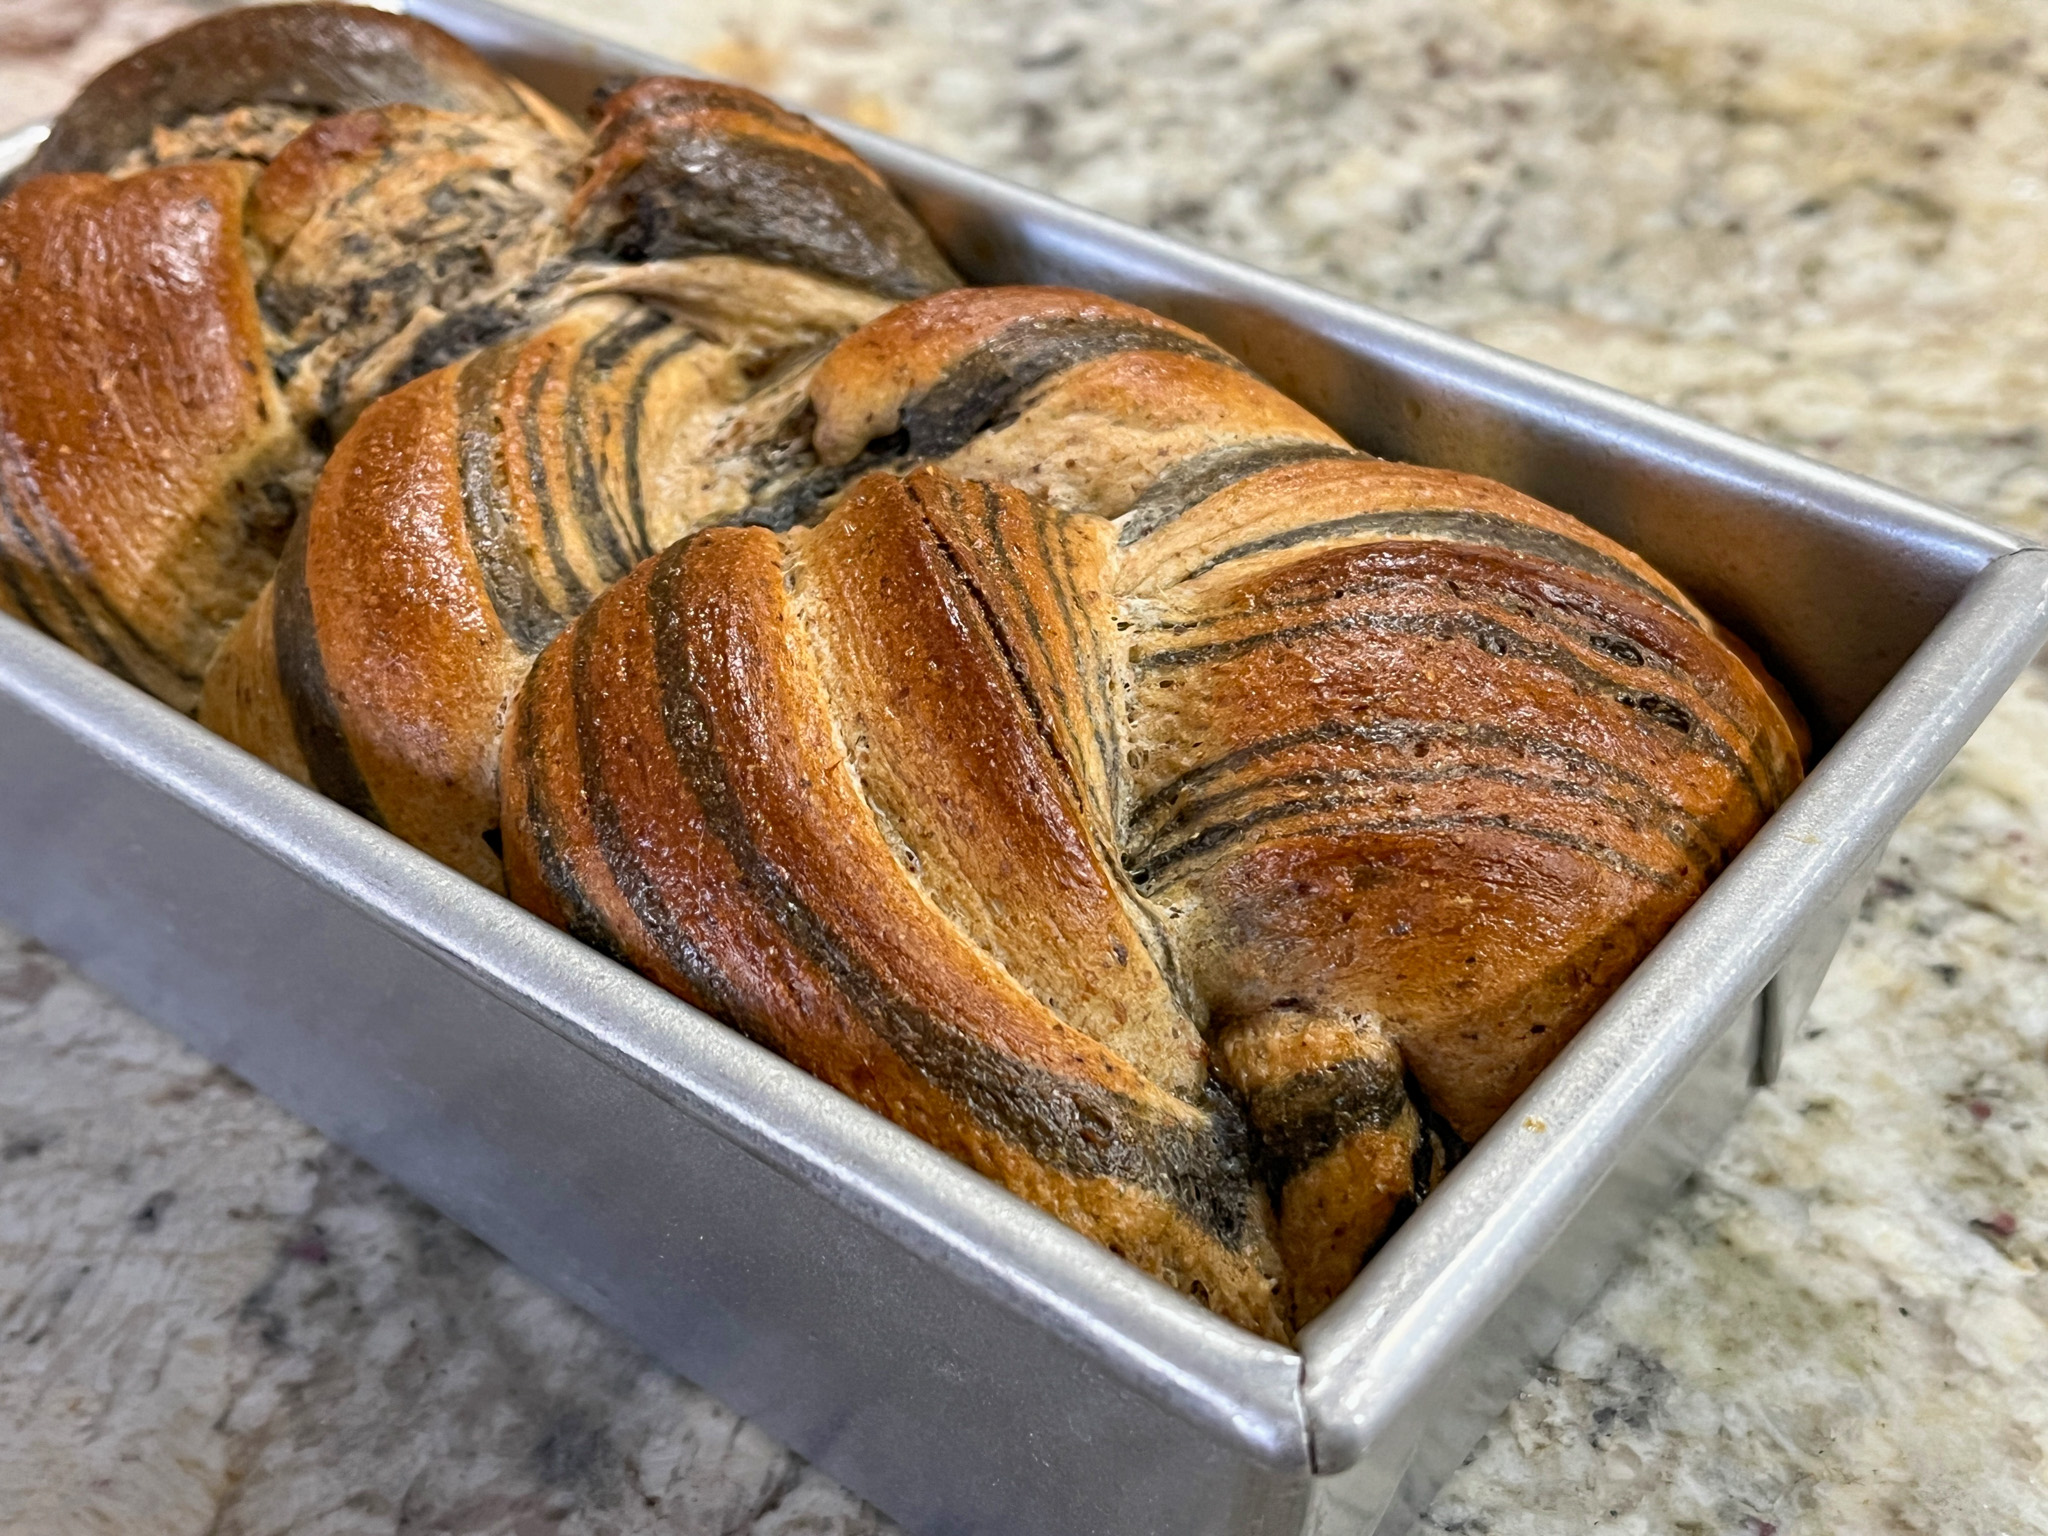
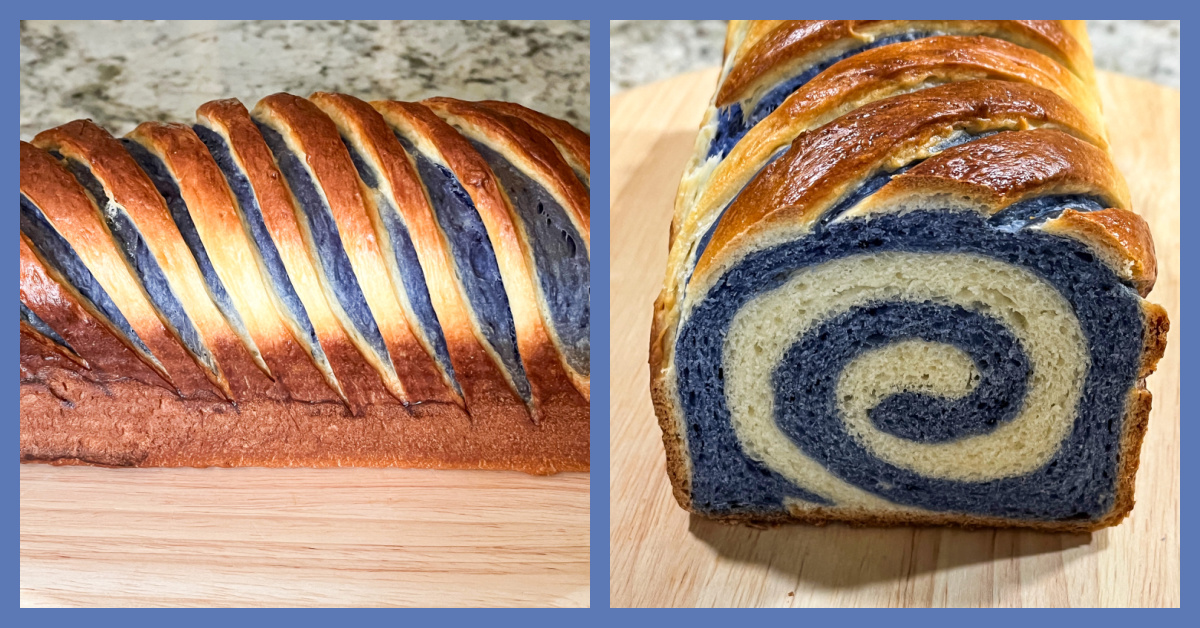
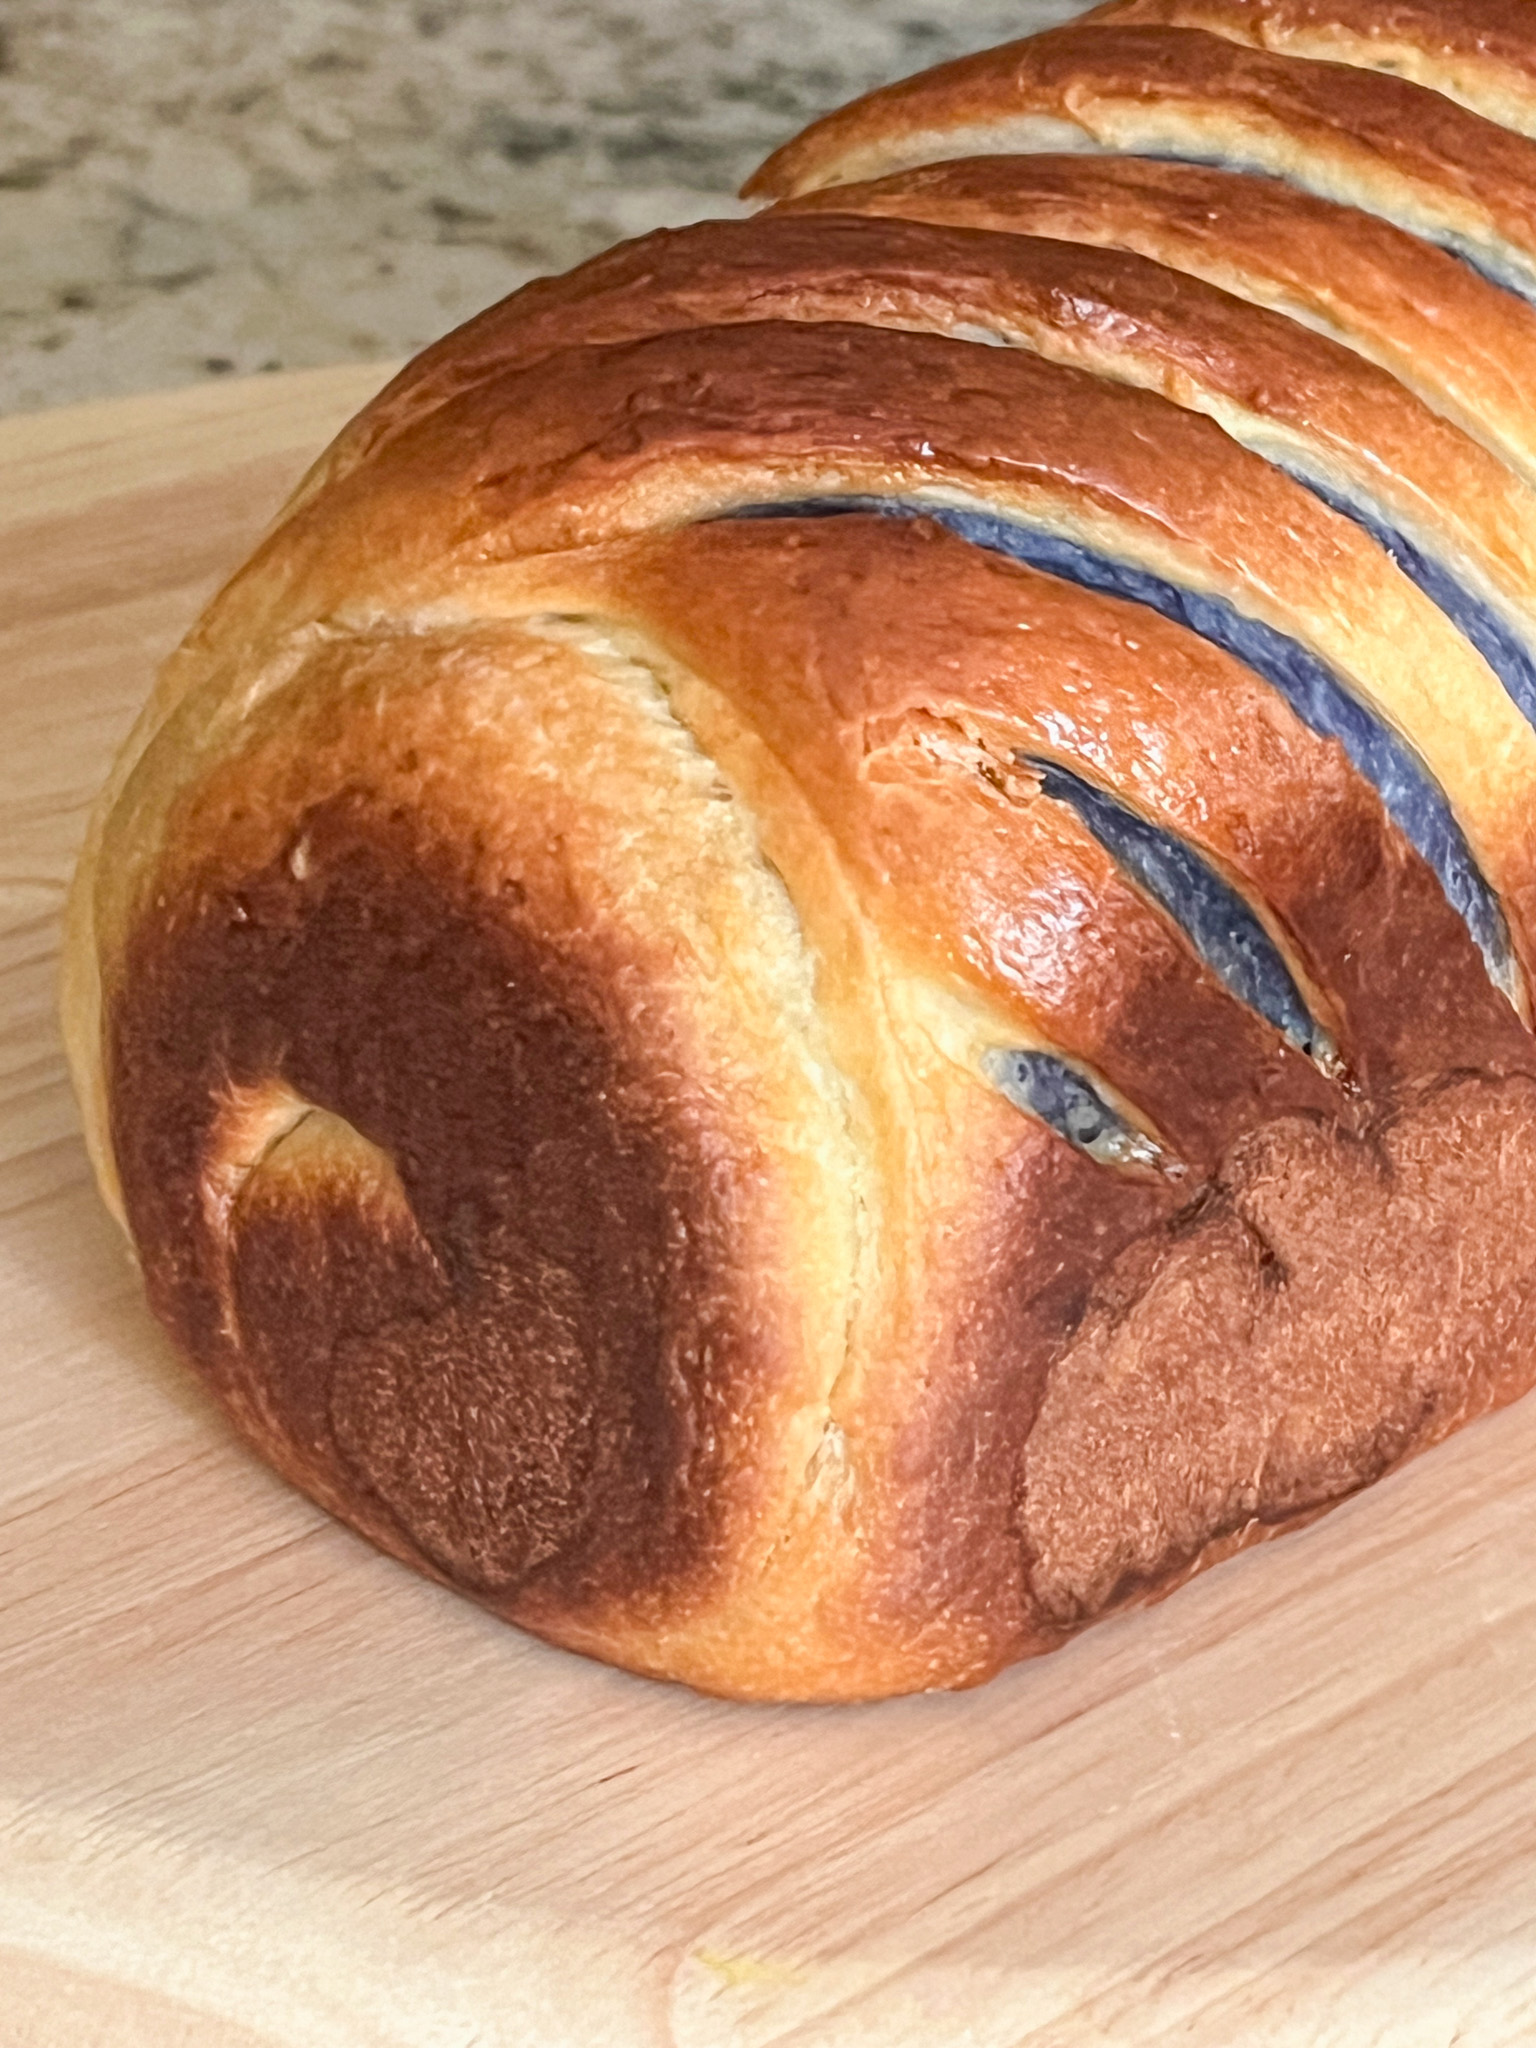
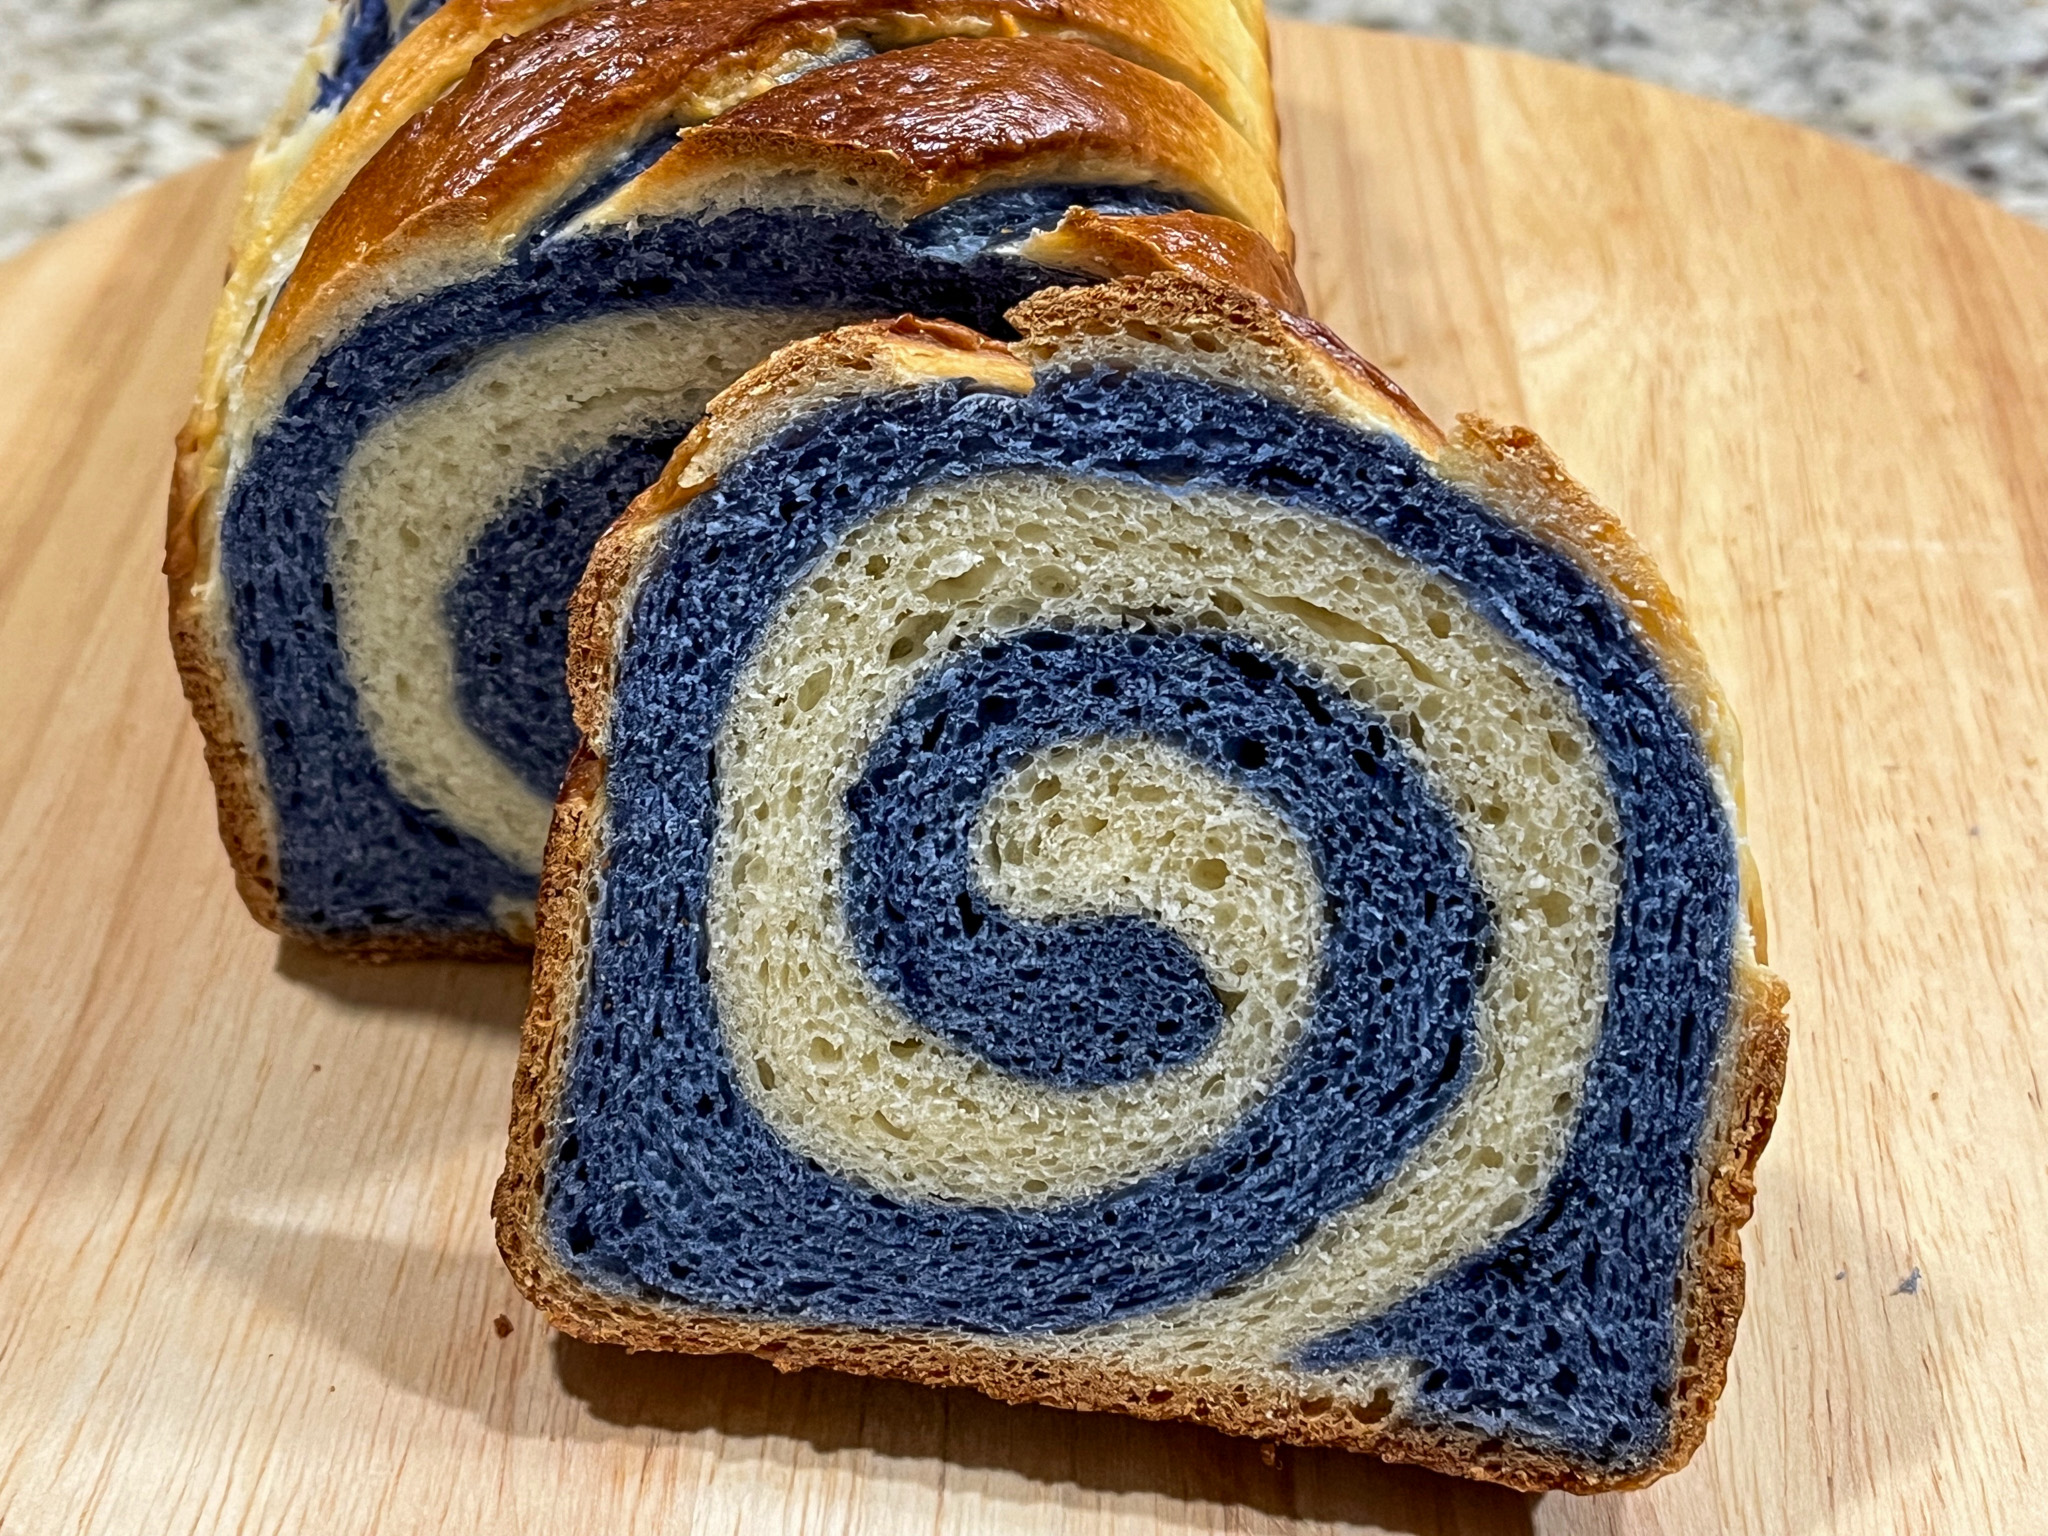
Unwrap dough and roll out into a long even rectangle. Staring from one end, roll in dough to create a swirl, making sure colored dough is inside while regular dough is facing out. Using a sharp blade or razor, score the dough evenly across the top to create “accordion” effect. Lines should be approx 1/4 inch apart and 1/8 inch deep to reveal the colored dough. Place in 450g Pullman loaf pan, cover, and let proof for 45 mins.

Heat oven to 355 F. Brush egg wash and bake for 40-42 mins until loaf is golden brown. Release bread from pan after 10 minutes, then cool completely on wire rack before slicing and smiling at the swirl…

ENJOY!

to print the recipe, click here

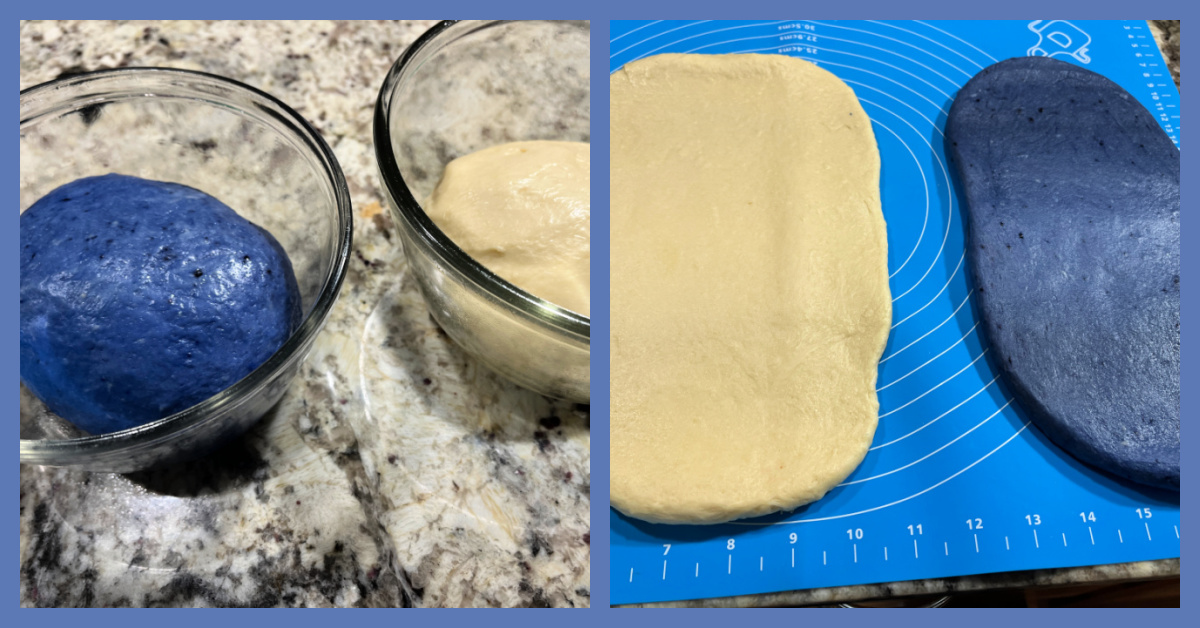
Comments: The dough, like most enriched doughs, is a pleasure to work with, rolls very easily and you can stretch it and adjust so that both layers sit perfectly on top of each other.

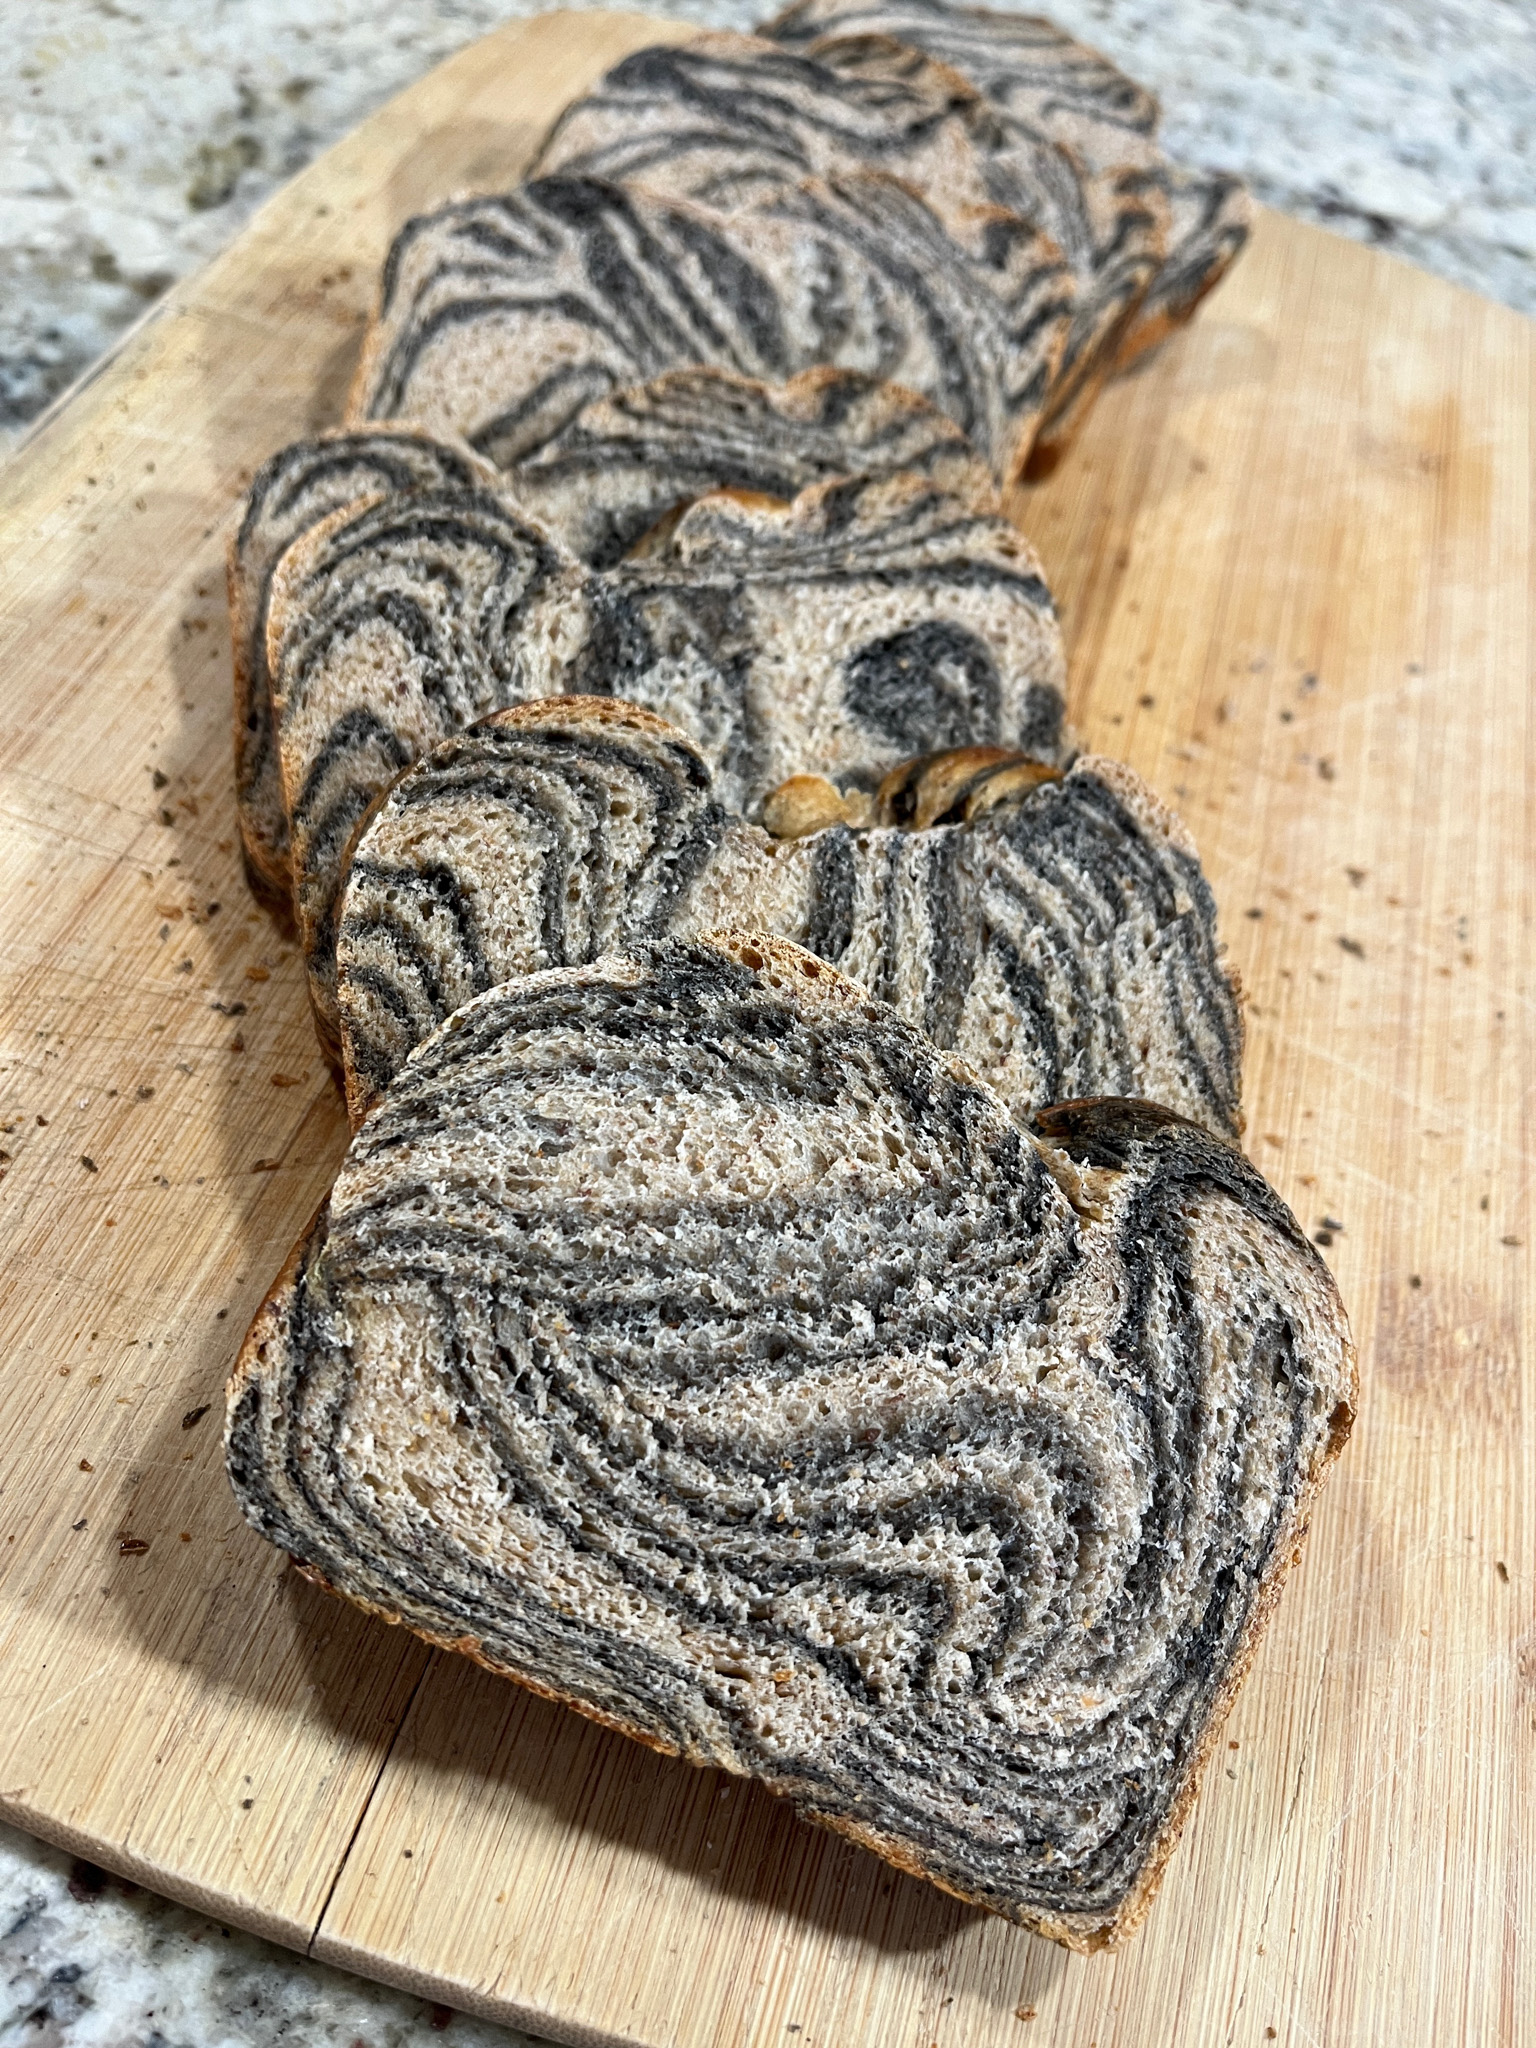
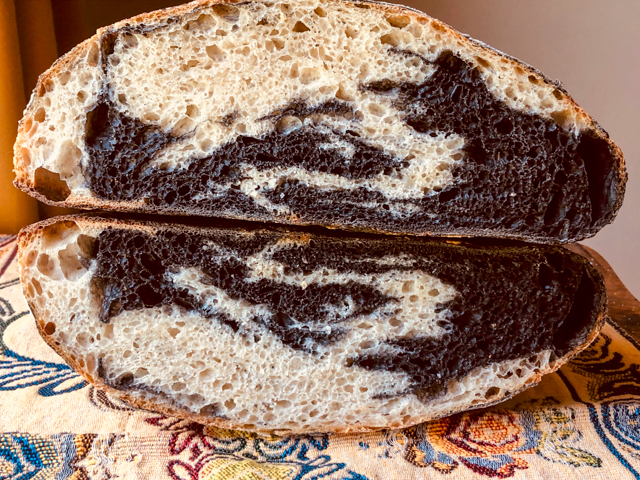
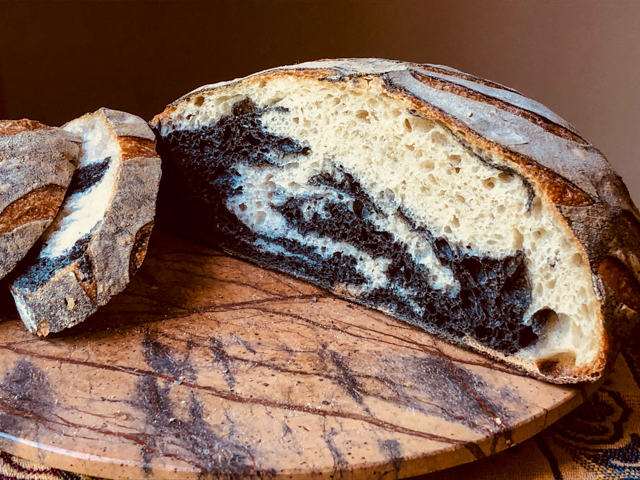
Make sure to slice the external layer with a sharp razor blade and all the way through to see the colored dough underneath. The sugar and milk in the recipe give it a nice brown color after baking.

But the best part? That swirl revealed once you slice through!

.

The bread has a very mild flavor, the butterfly pea flower does not contribute much in terms of flavor, just color. I will be making other versions for sure…

.

ONE YEAR AGO: Slow-Cooker Pineapple Carnitas

TWO YEARS AGO: Three Little Cakes

THREE YEARS AGO: From our Garden to You

FOUR YEARS AGO: Lady Bug Macarons

FIVE YEARS AGO: Five-Stranded Braided Bread

SIX YEARS AGO: Green Olive Salad

SEVEN YEARS AGO: Coffee Macarons Dressed up to Party

EIGHT YEARS AGO: Blogging Hiatus

NINE YEARS AGO: Tomato Tatin

TEN YEARS AGO: Headed to Colorado!  

ELEVEN YEARS AGO: Farofa Brasileira

TWELVE  YEARS AGO: Thai-Inspired Pork Tenderloin

THIRTEEN YEARS AGO: A yummy Brazilian cake: Bolo de Fuba’

FOURTEEN YEARS AGO:  Summer’s Tomatoes

FIFTEEN YEARS AGO: Leaving on a jet plane… 

SHOKUPAN MARBLED BLACK SESAME BREAD

Not too long ago I got notification of a new blog post by my friend Karen. You can check her post here. She mentioned the yudane method, a kind of tahgzhong on steroids. I am familiar with tangzhong and love it, but yudane was new to me. I could not wait to give it a try. I ended up following this recipe that was linked at the end of Karen’s post.

In the tangzhong method, part of the flour is gently cooked until a paste forms. To make yudane, you boil water and mix with the flour, then place in the fridge for 4 to 24 hours. That gets incorporated into the bread dough. Fascinating, Mr. Spock, fascinating…

I loved making this bread. For the full recipe, please visit Bread Experience (click here). My modifications were just a few: I did not have white whole-wheat, and did not have kamut in the pantry, so I used the full amount of regular whole-wheat, King Arthur’s brand. For the liquid component I used oat milk. Finally, I used store-bought black tahini, just eye-balled about 2 tablespoons and got a nice dark color. The dough is a pleasure to work with, and the marbling worked perfectly!

The crumb is soft, tender, and the bread is absolutely delicious with a hint of sesame taste. I highly, highly recommend you give yudane a try. This is what it looks like…

Just don’t forget it in the fridge, make sure to grab it when you are ready to make the dough! (Yes, I almost forgot about it).

And look at that crumb!

I hope you give yudane a try, the bread stays soft and moist for at least a couple of days. After that I sliced and froze for later.

THANK YOU, KAREN AND CATH FOR THE BREAD INSPIRATION!


ONE YEAR AGO: Chicken with Pasilla-Pecan Sauce

TWO YEARS AGO: A Versatile Silicone Pan

THREE YEARS AGO: Buffalo Chickpeas

FOUR YEARS AGO: Bi-Color Croissant and Pain au Chocolat

FIVE YEARS AGO: Lemon-Blueberry Entremet Cake

SIX YEARS AGO: Walk Strong3: Jessica Smith’s latest workout program

SEVEN YEARS AGO: Pork Medallions with Black Berry Compote

EIGHT YEARS AGO: Indian-Spiced Chicken with Chickpeas and Spinach

NINE YEARS AGO: Curry Cardamon Cookies

TEN YEARS AGO: In My Kitchen, March 2014

ELEVEN YEARS AGOBoeuf Bourguignon for a Snowy Evening

TWELVE YEARS AGO: Chickpea Salad

THIRTEEN YEARS AGO: Soft Spot for Chevre

FOURTEEN YEARS AGO: Roasted Onion and Asiago Cheese Miche

MARBLED CHARCOAL SOURDOUGH

Lately a dramatic, marbled sourdough keeps popping everywhere in the blogosphere and Instagram world. I find marbling pretty cool in cakes, cookies, icings. So, why not take it into bread territory?  Most bakers opt for laminating the two doughs together. I have tried the lamination process and found it a bit too convoluted. To make matters worse,  I never get as much structure and gluten development as I like, so I just took my normal default recipe and used it as a starting point. Read the comments after the recipe, if you are interested in the details. Without further ado, here is my first bi-color sourdough.

MARBLED CHARCOAL SOURDOUGH
(from The Bewitching Kitchen, inspired by many sources)

475g bread flour
25 g whole-wheat flour
100 g sourdough starter at 100%
10 g salt
2 g activated charcoal
375 g water

Mix everything (except the charcoal)  with a KitchenAid in low speed with dough hook for about 3 minutes. Adjust consistency with additional bread flour if the mixture seems too loose. Divide the two in two parts, add the charcoal to half of it, knead until fully incorporated (you can do it by hand or place it back in the KitchenAid for a minute or so).

Transfer the two doughs to individual oiled bowls and bulk ferment for 4 to 4.5 hours at room temperature, folding the dough at every 45 minutes to 1 hour. On folding cycle number 3, incorporate the two doughs together, and continue with the bulk proofing. Fold one last time, shape the bread as a round ball, place in a banetton heavily floured, sticking it in the fridge overnight.

Next morning, heat the oven to 450F. Invert the bread straight from the fridge on parchment paper, dust the surface with a small amount of flour, and slash it with a brand new razor  blade.

Bake inside a covered Dutch oven for 30 minutes, remove the lid, leave it in the oven for additional 15 to 20 minutes, if necessary lower the temp a bit in the final 5 minutes. Cool completely before slicing.

ENJOY!

to print the recipe, click here

Comments: As I mentioned, bakers often use a lamination process to marble different colors of dough, or even to add components such as herbs or nuts. One of my issues with the lamination is that the process tends to be quite a bit longer. When I do my initial mixing in the KitchenAid for 3 to 4 minutes, the dough starts with a solid kneading that not only advances the process of gluten formation, but makes the whole thing quite a bit “cleaner.” The dough, once out of the KitchenAid, already handles quite smoothly for the subsequent folding by hand. And I can tell right away if I need any adjustment, just by the way it behaves during this initial step of mixing.

Most recipes that use lamination rely on a long (3 hours or more) autolyse step,  in which you just mix water and flour, then another pretty long proofing after the starter is incorporated. The hydration level of the dough is often higher (you need to add more water to be able to stretch the dough nicely and laminate it), and that forces you to go through more cycles of folding. I sometimes had to do 5 cycles and still felt the dough a bit weak at the end, but by then it was getting so late I had to call it a day and shape it. If you like to try, search youtube, there are countless videos showing the process.

To achieve this level of mixing between the two types of dough, I joined them at cycle 3 out of 4 total foldings. If you prefer both colors to be more uniformly mixed, join them at folding cycle number 2 instead of 3, and be more aggressive with the way you handle it. I can see a Halloween version with pumpkin and charcoal on my horizon…

ONE YEAR AGO: Sundried Tomato and Feta Cheese Torte

TWO YEARS AGO: Blueberry and Mango Curd Macarons

THREE YEARS AGO: First Monday Favorite

FOUR YEARS AGO: In My Kitchen, August 2016

FIVE YEAR AGO: Ka’Kat, a Middle Easter Snack Bread

SIX YEARS AGO: Spinach and Chickpea Curry

SEVEN YEARS AGO: Sautéed Zucchini with Sun-dried Tomatoes and Basil

EIGHT YEARS AGO: Orzo with Heirloom Tomato Relish

NINE YEARS AGO:  Headed to Brazil!

TEN YEARS AGO: The Rhubarb Brouhaha: Revelation Compote

ELEVEN YEARS AGO: Love me tender…