KALE AND PROSCIUTTO-WRAPPED CHICKEN BREASTS

Are you going to run away if I tell you this is a sous-vide recipe? No need, because you can make it on the stove. It will just require a little more hands-on attention so that the meat ends up properly cooked and still tender and juicy. With the sous-vide you can set it, forget it, and concentrate on making your side-dish, as the final preparation of the chicken takes literally minutes.

KALE AND PROSCIUTTO-WRAPPED CHICKEN BREASTS
(from the Bewitching Kitchen)

4 chicken breasts
kale leaves, tough stems removed
prosciutto slices
lemon juice
salt and pepper to taste
2 tablespoons olive oil

Set the sous-vide to 148F.

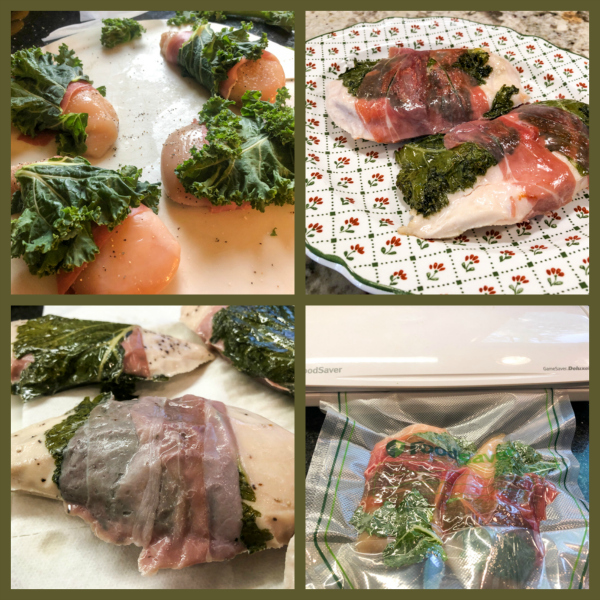
Season the chicken breasts with salt and pepper, rub a bit of lemon juice all over them. Wrap with kale leaves, then with prosciutto slices.  If using the sous-vide, no need to worry too much about wrapping it all tightly because it will firm up as you seal the packages.  If not using sous-vide, try to wrap as tightly and neatly as possible.

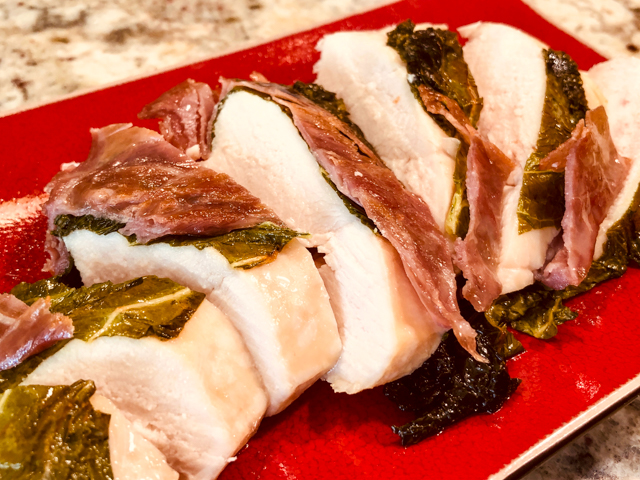
Seal the pieces of in a vacuum-bag and submerge in the water-bath for 2 hours (up to 4 hours will be ok). When the time is up, remove the chicken pieces from the bag, dry them well and sautee quickly both sides in olive oil, preferably using a non-stick skillet. Let it cool briefly and slice to serve.

If not using sous-vide, sear both sides of the chicken in olive oil, also using a non-stick skillet. When both sides are golden brown, add a little chicken stock to the pan, a squirt of lemon juice, reduce heat to a simmer, cover the skillet. Cook until the chicken is done to your liking, it will probably take around 15 minutes.

ENJOY!

to print the recipe, click here

Comments: Sous-vide does such a fantastic job for tender meats like chicken breast, and pork tenderloin, it’s truly hard to beat this method of cooking. I sometimes cook a few chicken breasts seasoned with salt, pepper, and lemon juice, and keep it in the fridge, still vacuum-sealed in the bag. They are ready to use in stir-fries, or curries, anything you feel like it. The first time I made this recipe, I wrapped the kale outside of half of the pieces. It also works, but I prefer the prosciutto outside, it gets a nice texture once you brown it. This recipe is now part of our regular rotation, husband refers to it as “that prosciutto chicken.”  We both loved it!

ONE YEAR AGO: Memories of Pasteis

TWO YEARS AGO: And now for Something Completely Different

THREE YEAR AGO: Parsnip, Coconut, and Lemongrass Soup

FOUR YEARS AGO: In My Kitchen, October 2016

FIVE YEARS AGO: Paleo Moussaka

SIX YEARS AGO: In My Kitchen, October 2014

SEVEN YEARS AGO: In My Kitchen, October 2013

EIGHT YEARS AGO: Crimson and Cream Turkey Chili

NINE YEARS AGO: Taking a break from the nano-kitchen

TEN YEARS AGO: Chocolate Chip Cookies


SLOW-COOKED CHICKEN MEATBALLS

A little note added after publication: today is the first Monday of the month, so let me tell you which was my favorite post of January: Happy New Year in My Kitchen!  If you’ve missed it, here is the link.  But come right back, ok?  To see what many of my virtual friends pick as their best post, visit Sid’s blog.

Sometimes a dinner makes me so happy I cannot stop smiling. This was one.  Not only because it was delicious, but because I made it all in advance and we arrived home to a dinner ready and waiting, without that “crock pot taste” that so often is present when recipes take the “dump it and forget it” approach. Basically, not every type of meat shines during long cooking. These meatballs do. And they even hide a little surprise inside…

SLOW-COOKED CHICKEN MEATBALLS
(from the Bewitching Kitchen, adapted from many sources)

1 pound ground chicken
1/2 pound mild Italian sausage (casings removed)
1 Tablespoon coconut oil (or olive oil)
1 bunch kale, stems removed, coarsely chopped
1 small shallot, finely minced
1 egg + 1 egg yolk, lightly beaten
1/4 cup almond meal
salt and pepper to taste
1 large can (28 oz) crushed tomatoes
1/2 stick unsalted butter
1/3 cup water (or chicken broth)
1 tsp Herbes de Provence
small mozzarella balls, one per meatball

Start by sauteing shallots in coconut oil in a large skillet until translucent and fragrant. Season lightly with salt and pepper, then add the kale. Cook until wilted, transfer to a bowl and allow it to completely cool. If you like to cool it faster, add it to a baking sheet on a single layer.

In a large bowl, add the two types of meat, the sautéed kale, egg and egg yolk. Season with a little salt (the sausage is already seasoned), then add the almond flour.  Mix gently and form into large balls, incorporating a small mozzarella ball in the center. You should have enough for 8 to 9 chicken meatballs. Refrigerate them for one hour or more to firm them up. You can make this the day before.

Pour the crushed tomatoes in the bowl of a crock pot, add the water (or stock) and the butter cut into large pieces. Season with some salt and pepper, add the Herbes the Provence. Place the meatballs gently inside. Cook on low for 5 hours. If you have a chance, flip the meatballs after a couple of hours.

Serve right away or save in the fridge for next day, when flavors will be even better.

ENJOY!

to print the recipe, click here

Comments: I prepared the chicken meatballs on Sunday, stored them in the fridge, started them cooking next day during our lunch break. My slow-cooker keeps the food warm for a couple of hours, so we don’t have to worry about rushing home in that type of situation. Mondays are usually tough. You’d think that we would be all relaxed after the weekend, but truth is there is so much to do around the house that by the time Monday comes we are seriously hoping it would be Friday instead… For that reason I try to plan a very easy dinner for the first evening of a working week.

Now, of course, not everyone is as spoiled as we are, having the chance to go home for lunch. Keep in mind you can always do the slow-cooking part in the evening, then enjoy them for dinner the day after, they only get tastier. I was thrilled that Phil decided to stick with his smoothie and cereal bar for lunch later that week. I did not have to share the leftovers…  Yes, he is a keeper. But I suppose I’ve mentioned that a few times.

ONE YEAR AGO: Zesty Flourless Chocolate Cake

TWO YEARS AGO: Maple Pumpkin Pecan Snacking Cake

THREE YEARS AGOSilky Gingered Zucchini Soup

FOUR YEARS AGO: Sweet Fifteen!

FIVE YEARS AGO: Sesame and Flaxseed Sourdough

SIX YEARS AGO: Green Beans with Miso and Almonds

SEVEN YEARS AGO: Saturday Morning Scones

EIGHT YEARS AGO: White Bread

SaveSave

SaveSave

SaveSave

SaveSave

SaveSave

SaveSave

SaveSave

SaveSave

SaveSave

SaveSave

SaveSave

SaveSave

SECRET RECIPE CLUB: LEEK AND CHEESE TART

tart1

One more month flew by us! Last Monday of April, first Secret Recipe Club of a favorite season, Spring!  I was paired with the blog Food Baby Life, and had a blast browsing Susan’s site. She has a well-organized index which makes life a lot easier for the stalker.  Being a busy mom, many of her recipes are compatible with our own life style. You know, that life style in which the day doesn’t seem to have enough hours, and each night we ask ourselves “why isn’t tomorrow Saturday instead of Tuesday?”   😉    I had quite a few recipes on a list of favorites to choose from, including her  Spiced Meatball Wrap, but settled on this tart because of the unusual crust: instead of butter, olive oil. Instead of white flour, a combination of 50/50 white and whole-wheat. A few modifications of my own for reasons specified in the comments, and there you have it: a Leek and Kale Tart with Olive Oil Crust!

LEEK AND KALE TART WITH OLIVE OIL CRUST
(adapted from Food Baby Life

for the filling:
2 large leeks, washed and sliced thinly
1 small bunch kale, sliced thinly
1 tbsp olive oil
1 clove garlic, crushed
dash of nutmeg
salt and pepper to taste
4 eggs
1 cup (250ml) evaporated milk
125g cheddar cheese, grated (see comments)
for the crust:
125g plain flour
125g whole -wheat flour
1 ts salt
60 ml olive oil
100-120ml cold water
Lightly grease a 28cm (11 inch) tart dish, preferably one with a removable bottom, but a Pyrex type will work too.  Heat  the oven to 390 F  (200 degrees Celsius).
To make the pastry, place the flours and salt in a large bowl and whisk to combine. Pour in the oil and stir with a fork. Add the water and continue to stir with a fork until it is just absorbed then start to knead with your hand, until the dough forms a ball and comes away from the sides of the bowl.

Turn the dough out onto a floured surface and roll out to fit the tart pan. Transfer the dough to the pan, trim the edges and place in the fridge for 30 minutes.

While the pastry is chilling, make your filling. Melt the olive oil in a large saucepan over medium heat. Add the leeks and garlic and cook, stirring often for about 10 minutes, then add the kale and cook for a few minutes more, until wilted. Season with nutmeg and remove from the heat and allow to cool for 10 minutes or so. In a separate bowl whisk together the eggs and milk along with salt and pepper to taste.

Blind bake the pastry for 10 minutes lining it with parchment paper and filling it with beans. Remove the beans and paper and bake for a further 10-15 minutes or until the edges are golden and the base is totally dry to the touch. Remove and allow to cool for 10 minutes.

To assemble the tart, fill the pastry shell with the cooked leek and kale mixture, sprinkle over the cheese and then pour over the egg mixture. Bake for approximately 25 minutes. The filling should be just set and the edges of the pastry a deep golden brown. Cool for at least 15 minutes before serving.

ENJOY!

to print the recipe, click here

composite
Comments:
What’s life without a little adrenaline rush? You would think that by staying away from cakes I’d be safe, right?  Not so fast.  Things were going quite well up to the moment of adding evaporated milk to the game. I grabbed my can opener, a little gadget that works like a charm, smooth, graceful, leaving no sharp edges. It usually performs a little magic around the edges, so that you cannot quite tell the can is open, but it is.  Or is it really?  Something about the edge of the can of evaporated milk simply would not cooperate and it refused to open.  I had a second can in the pantry, tried to work on it,  again no luck. I searched everywhere for an old-fashioned type can opener, but apparently ours was lost during the move.  A few slammed doors and drawers, a few words not fit to print, I finally had the brilliant idea of pairing an oyster knife with a hammer.  Punched a square hole on top of the can, and back in business I was.  (BTW, I don’t recommend doing that, it is both messy and dangerous).

IMG_1627
To add a little more emotion to the day, I forgot to buy Cheddar cheese for the recipe!  I had no cheese around, except for three little triangles of “Laughing Cow Light Original Swiss Cheese”.   I ended up mixing it as well as I could to the evaporated milk, and that was that. Finally, If you followed the original link to Baby. Food. Life, you will notice that she removed the excess dough after covering her tart pan, for a very polished look. I don’t know what I was thinking, but obviously I went into a different direction.  Oh, well…   What matters is that this crust might very well become my default recipe from now on.  We both absolutely loved it, it does have a more rustic quality thanks to the whole-wheat flour and the olive oil.  Plus, making it in a bowl using just a fork and your hands was awesome!

Susan, it was great to meet you and your blog through The Secret Recipe Club, we loved this recipe, enjoyed it three days in a row, it only got better and better!

slice

For those who want to see what my fellow friends from group D cooked up this month, don’t be shy, just click on the blue frog at the very end of my post, and happy browsing!  And those who are curious to see which recipe was chosen from my blog, and who had it, jump here for a fantastic article by Fran!  She made a favorite of ours, Vietnamese Spring Rolls.

ONE YEAR AGO: Secret Recipe Club; Triple Chocolate Brownies

TWO YEARS AGO: Shaved Asparagus Salad

THREE YEARS AGO: Indonesian Ginger Chicken


THE MANY FACES OF KALE

The other day I bought a huge, and I mean HUGE bunch of kale with the firm idea of making a frittata with it. As the afternoon moved along, I changed my mind on our menu, and the kale transmogrified into a light gratin.   But I also  toyed with the idea of simple kale chips (which I love), only to drop that and settle on a salad.  Maybe settle is not quite right.  By the time I jumped on dinner preparation, the kale ended up as pesto. Flip-flopper? Who, me?  😉

FARFALLE WITH KALE PESTO
(from the Bewitching Kitchen)

1 big bunch of kale, stems removed, leaves coarsely chopped
1/4 cup of walnuts, toasted
pinch of red pepper flakes
olive oil
squeeze of lemon juice
salt and pepper
1/4 to 1/3 cup yogurt

Bring a large pot of lightly salted water to boil.  Drop the kale leaves and blanch them for a couple of minutes.  Immediately drain, and rinse briefly in cold water. Drain well, then place in a salad spinner to dry the leaves as much as possible.

Add the toasted walnuts and red pepper flakes to the bowl of a food processor, and process for a few seconds.  Add the blanched kale and process together with the nuts until a paste forms.  Season with salt and pepper.  Squeeze lemon juice all over. Close the processor, and add the olive oil as a stream.  Once the oil is incorporated, stop to scrape the sides of the bowl, add yogurt and process until everything is smooth.   Taste, adjust seasoning, and reserve.

Meanwhile, cook farfalle pasta until al dente, reserving some of the pasta cooking water.  When the pasta is cooked, mix with the pesto, and add the reserved cooking water to thin the sauce, if necessary.   Serve with plenty of parmigiano-reggiano cheese grated on top.

ENJOY!

to print the recipe, click here

Comments:  I’ve seen recipes for kale pesto in which the raw leaves are processed with the usual suspects (garlic and olive oil).  I decided it would be too harsh for our taste, so  I took the extra step of blanching the leaves.  If you are a garlic lover, add a couple of cloves together with the walnuts.   I loved this version of pesto,  and even used some as a spread for a ham sandwich at lunch next day.   All amounts are a bit eye-balled,  if you like the flavor of olive oil to be more pronounced, use more and omit or reduce the yogurt.   Don’t leave the lemon juice out, though – it adds that citric brightness that is a must in this recipe.

For additional kale inspirations, a small sample of recipes from the internet:  

Kale Gratin … A nice recipe from Taste Food,  she used spinach, but I think kale would be great too

Kale Salad with Butternut Squash… from Eats Well with Others

Kale Frittata... from My Kitchen in the Rockies

Golden Chard Pie… from the early days of my blog

Kale Chips… from not so early days of my blog

and for an interesting twist on this great veggie, take a look at these cute Quinoa and Kale Patties

ONE YEAR AGO:  Short and Sweet

TWO YEARS AGO: Ciabatta, a Classic Italian Bread

THREE YEARS AGO: Magical Lamb Stew

THE GREEN CHIP ALTERNATIVE

Anne Burrell has a way to get me into the kitchen and make her recipes shortly after watching her show.  Last week she made kale chips, and I was mesmerized. They were very simple to prepare and she munched on them with so much gusto, I could not wait to try some.  Serendipity happened: I arrived at the grocery store for my weekly shopping, and found bunches of organic kale that looked absolutely perfect.   I left the store with a huge smile on my face, hoping that Phil would get as excited about kale as I was (yeah, right ;-)).

KALE CHIPS
(from Anne Burrell)

1 bunch of kale leaves
olive oil
salt and pepper

Wash the kale leaves, dry them well, cut them in half lengthwise, removing the central, thick stem.

Place them in a single layer over a rimmed baking dish, spray olive oil lightly over the leaves, season with salt and pepper.  Repeat the misting with olive oil on the other side of the leaves.  Gently toss them around, trying to distribute the oil throughout the leaves.

Place them back on the baking dish in a single layer, trying not to overlap them too much.  Bake on a 250 F oven for  30 to 35 minutes.   Keep an eye on them, remove leaves that start to crisp up too much.

ENJOY!

to print the recipe, click here

Before….

and after….

These chips are addictive! I hope you’ll give them a try, even if kale is not your favorite veggie. I kept the small amount that was left inside a bowl covered with plastic wrap, and two days later enjoyed the last pieces, still crispy and delicious.   Add less salt than you think they need (sorry, Anne Burrell): the leaves shrink a lot during baking, and the salt tends to get concentrated on spots.

Husband’s verdict:  Two thumbs up! 

ONE YEAR AGO: Weekend Pita Project

TWO YEARS AGO: Tried and Tasted Roundup

Add to FacebookAdd to DiggAdd to Del.icio.usAdd to StumbleuponAdd to RedditAdd to BlinklistAdd to TwitterAdd to TechnoratiAdd to Yahoo BuzzAdd to Newsvine