HELLO THERE, CUPCAKE!

For several months now I’ve been including cupcakes in my weekly box of donations. I try to vary the buttercream component and come up with different styles and colors each Friday. Because variety is the spice of life, right?

.

You can find my buttercream recipe with a click here. I used it for all cupcakes, except the Chocolate Cardamon with Espresso Icing.

.

RUSSIAN ICING TIPS

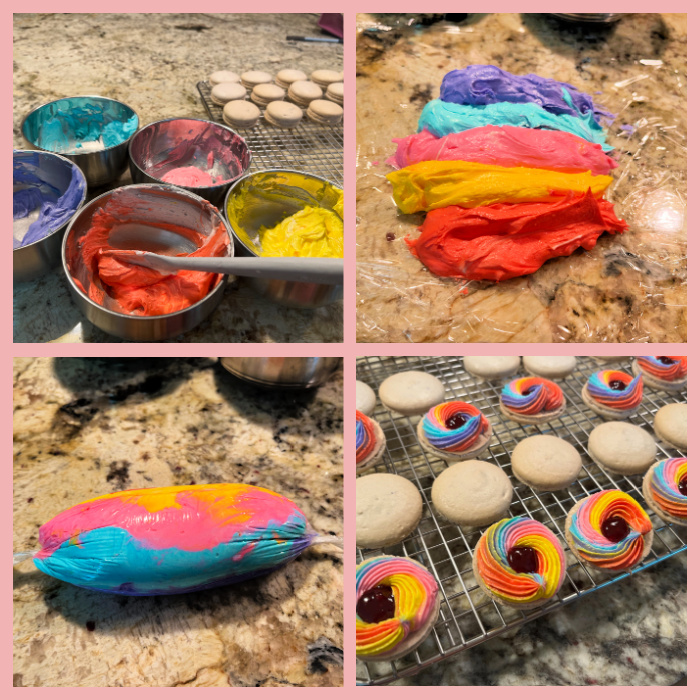
A long, long time ago I tried my hands at these funky looking icing tips, and promised that I would never touch them again. But trust Marlyn from @montrealconfections to make me change my mind. She had a nice video from years ago showing exactly how to use them, and I could not resist giving it a second chance (check it out here). She demonstrated two ways to using them, and I tried them both. First, the usual piping of flowers by dropping little blobs of two-color icing. If the consistency is just right, it works like a charm…

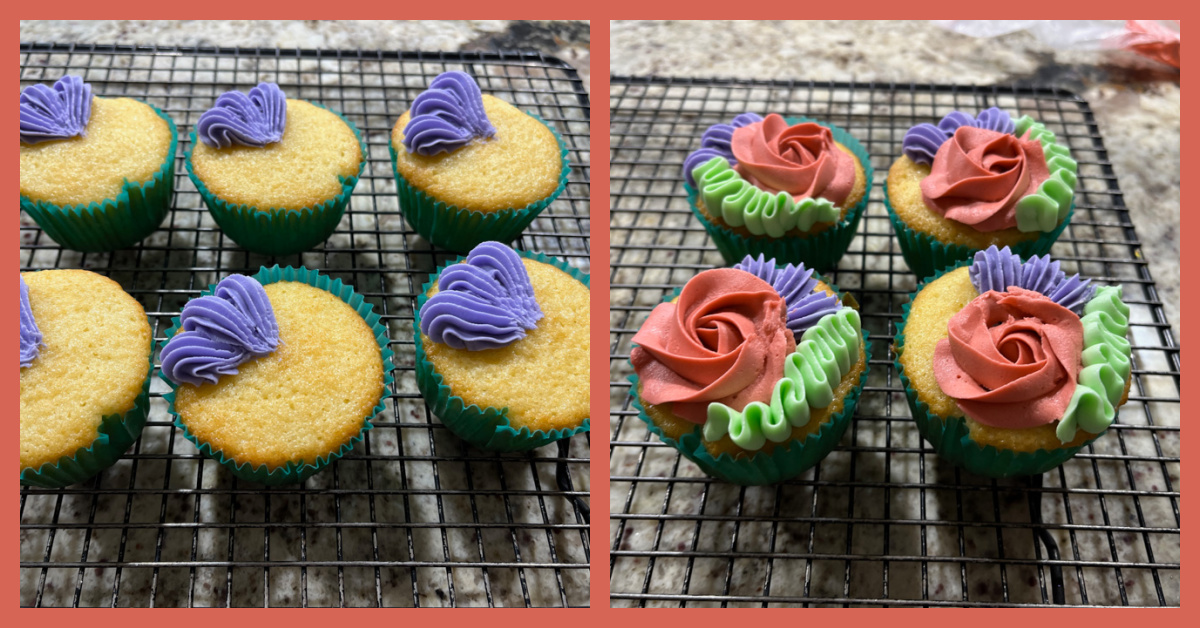
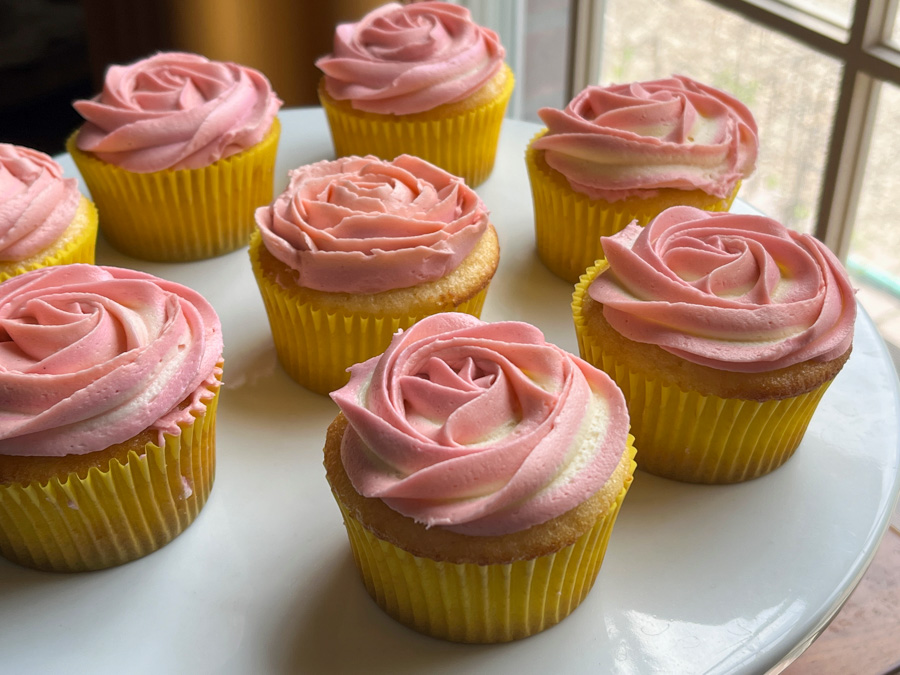
For these I used two color buttercream icing, half dyed pink, half left with no added color. The Russian tip was used to drop 6 tiny roses to the cupcake. A little buttercream dyed green added the final touch, which is of course optional.

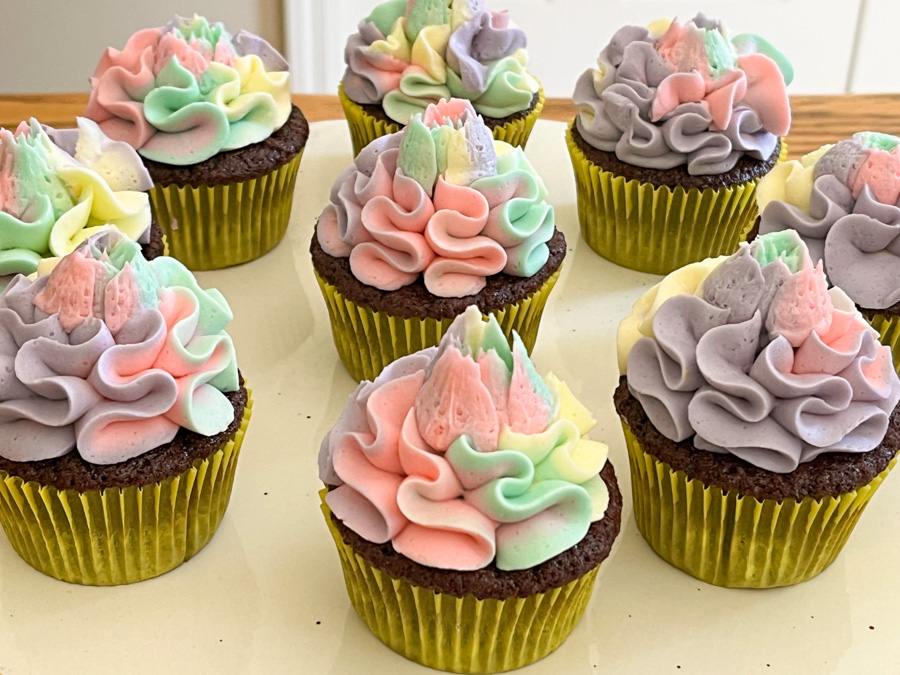
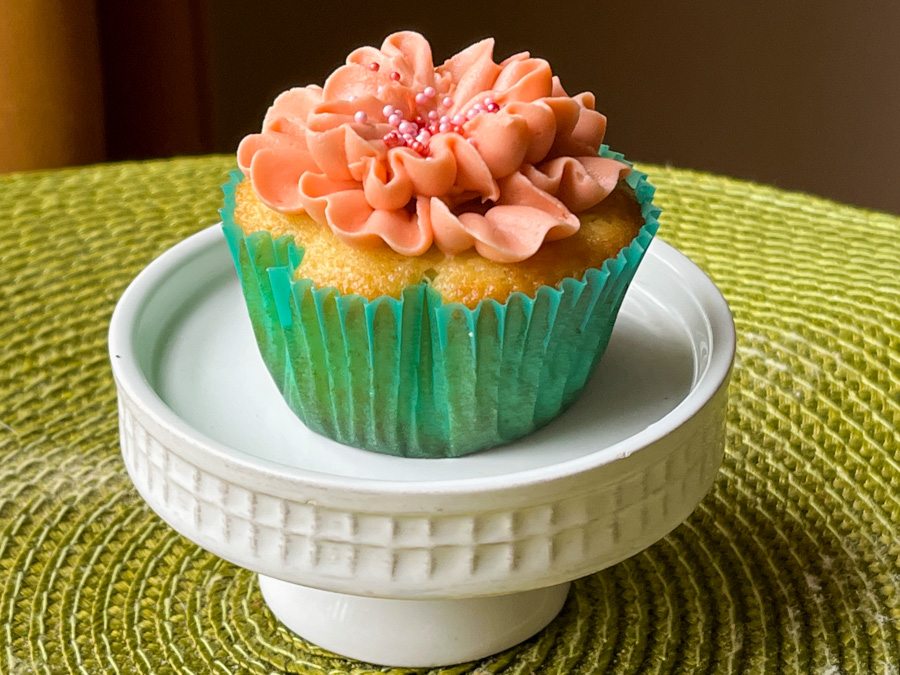
This fun ruffled look is also given by a Russian ball-tip, piping and twisting the cake from one side to the other. Check Marlyn’s video to see exactly how it is done. The central portion is then filled with a drop flower as in the previous cake.

.

SIMPLE ROSES


Probably one of the simplest designs to pipe but with a nice visual effect, the 1M tip never disappoints. It looks nice when used with two tones of icing, but as you cam see below, it will work as a single color also.

The cupcakes above used a wonderful recipe from my friend Caroline, which you can find in her blog with a click here. Chocolate Cardamon Cupcake with Espresso Icing (OMG!). I added a little chocolate flower, made by painting tempered chocolate over a real leaf and then dusting with golden powder.

.

OPEN STAR TIP

For this look I used the Ateco 865 tip, but any open star should work. Just make a swirl starting from the center. It will give a more flat top that is nice coupled with any decorations you’d like. Above I used tempered chocolate painted on transfer sheets to add a design, and cut into small circles.

The same type of frosting will also go well with meringue sticks, in this case leftover from a cake of my recent past.

These cupcakes are Pink Lemonade flavor, and I used this recipe from Food Network (I made only half which was more than enough for 12 cupcakes).

.

SPRINGTIME FLOWERS

For the cupcakes above, I used either a petal tip or a Wilton tip #81, as shown in this video (around 19 minutes).

.

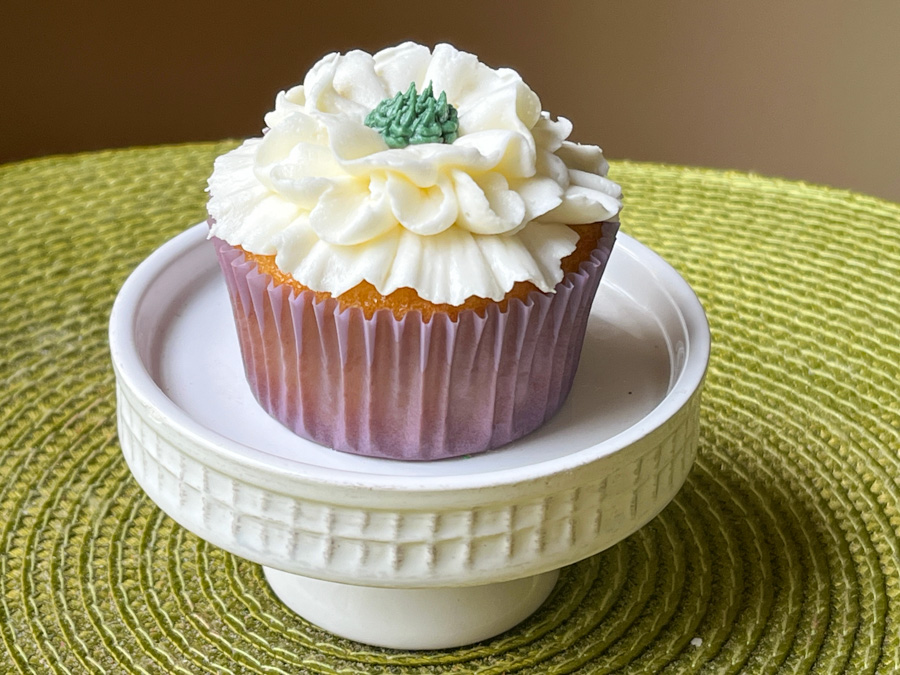
Petal tips such as 102, 103 or 104 can also make beautiful flowers by laying them more flat on the surface. I like the simple elegance of a fully white flower.

I hope you’ve found some inspiration in case you need to bake a batch of cupcakes to share with friends, family, or co-workers.

ONE YEAR AGO: Two Deliciously Refreshing Cucumber Salads

TWO YEARS AGO: Grilled Shrimp with Parsley Oil over Black Rice Noodles 

THREE YEARS AGO: Chicken Shawarma, the Easiest Way

FOUR YEARS AGO: Marshmallow Macarons

FIVE YEARS AGO: Mango-Lime Macarons

SIX YEARS AGO: Honey-Glazed Sriracha Meatballs

SEVEN YEARS AGO: Slow-cooker Braised Lamb Shanks

EIGHT YEARS AGO: How about some coffee with your steak?

NINE YEARS AGO: Celebrate Wednesday with a Spiral Kick

TEN YEARS AGO: Carrot Flan with Greens and Lemon Vinaigrette

ELEVEN YEARS AGO: Granola Bars

TWELVE YEARS AGO:  Awesome Broccolini

THIRTEEN YEARS AGO:  A Twist on Pesto

FOURTEEN YEARS AGO: Ciabatta: Judging a bread by its holes

SPRINGTIME CUPCAKES

Spring is taking its time to show up, we even had a light snow the other day, but apparently now things are headed in the correct direction (knock on wood). These cupcakes celebrate the season. You can use any recipe you like for the cake component. I went with a very basic vanilla concoction. The frosting is your humble American buttercream. Honestly, I don’t see the need to go through the extra work of a Swiss buttercream to cover cupcakes. It crusts well, so transporting the cakes (which matters a lot to me) is not a problem. They also stand well to sitting at room temperature for an hour or more.

The basic formula is simply 1X amount of butter + 2X amount of powdered sugar. Change the starting weight of butter according to how many cupcakes and how many colors you’ll need, as you will see in the individual cupcakes after the recipe.

BASIC BUTTERCREAM FOR CUPCAKES
(from The Bewitching Kitchen)

226g butter, unsalted, softened
452g powdered sugar
pinch of salt
Vanilla extract, about 1 tsp or more to taste
a couple or more tablespoons of milk (to adjust consistency)

Place the softened butter in the bowl of a KitchenAid type mixer with the paddle attachment, add the pinch of salt, and whip at high speed for about 7 minutes. It needs to be really soft and lighter. Stop the mixer. Eyeball the amount of powdered sugar, add 1/3 and mix at low speed at first, once the sugar is starting to get incorporated, increase the speed to medium-high.

Add the second portion of the sugar, and incorporate the same way. Add the final portion, start at low speed, clean the sides of the bowl well with a spatula, add the vanilla and increase the speed slowly all the way to high. Whip it until very smooth. Add milk to desired consistency. If desired, add any flavoring ingredients, about 1/4 cup (Nutella, jam, teaspoon of emulsions). If working with different colors, divide the buttercream into small bowls and dye each one with food gel color.

Fill piping bags fitted with the icing tips of your choice. Ice fully cooled cupcakes.

ENJOY!

to print the recipe, click here

LUCK OF THE IRISH CUPCAKES

For 12 cupcakes my starting point was 150g butter + 300g powdered sugar, plus 1/4 cup Nutella as flavoring.
I used 1M tip to make rosettes, and gilded the lily with sprinkles and a fondant clover.

HYDRANGEA CUPCAKES

For these cupcakes, I made buttercream with 200g butter + 400g powdered sugar. Divided in three portions and dyed them very very lightly with pink, lavender, and blue. The colors were spread as bands over plastic, and a little sausage was formed, then dropped in an icing bag with the1M tip. To make the flowers, I piped small blobs all over anda second layer going up towards the center.

RUFFLED FLOWER CUPCAKE

These cupcakes were made together with the last one (multiple colors) so for the full batch (12 cupcakes) I used the recipe as published (226g butter). I was playing with several colors and did not want to run out of any of them. A more experienced baker might get by with a smaller amount of icing to start with.

This flower was made with the petal tip 104, laying very flat on the surface of the cake, in two rows to give more lift and volume. Sprinkles added just because. You could make a center with buttercream dots in a contrasting color, if you prefer.

MULTICOLOR FLORAL CUPCAKES

I divided the buttercream in four batches and dyed them pink (toned down with a touch of brown), purple, green and yellow. Four tips were used. Wilton 1M for purple, closed star for flower (Wilton 2D), petal tip for green (Wilton 104), and a small open star for the yellow (Wilton 18).

Inspiration to decorate these cupcakes came from this video available on youtube.

Cupcakes are so much fun to decorate….
ALMOST as much as cookies!

ONE YEAR AGO: Eggplant-Hummus Phyllo Rolls

TWO YEARS AGO: Happy Easter!

THREE YEARS AGO: Brioche Pepin

FOUR YEARS AGO: Sakura Buche du Printempts

FIVE YEARS AGO: Clay Pot Roast Chicken

SIX YEARS AGO: In My Kitchen, April 2017

SEVEN YEARS AGO: Secret Recipe Club: Chicken Korma and a Bonus Recipe

EIGHT YEARS AGO: Josey Baker’s Olive Bread

NINE YEARS AGO: Almonds, A Cookbook Review

TEN YEARS AGO: Pomegranate-Molasses Glazed Carrots

ELEVEN YEARS AGO: Codruta’s Rolled Oat Sourdough Bread

TWELVE YEARS AGO: Roasted Corn and Tomato Risotto

THIRTEEN YEARS AGO: Light Rye Bread

PRIDE MACARONS

With Pride Month in mind, I made a batch of colorful macarons, filled with raspberry jam and lemon-flavored buttercream. The universe conspired so that in that exact week I had a maintenance appointment with my orthodontist. And to my surprise, they were “wigging it”: every staff member, orthodontists included, went to work wearing a colorful wig. They asked the patients to do the same, if they were so inclined… I was more than happy to comply (see the end of this post).

For the macaron shells, follow this recipe (I added 1/4 tsp egg white powder to the granulated sugar, whisked very well, before incorporating into the meringue, because humidity was at 58% the day I made the macarons)

LEMON-BUTTERCREAM MULTICOLOR FILLING

120g butter, softened
320g powdered sugar
zest of 1/2 lemon
1 tsp lemon juice
pinch of salt
heavy cream to adjust consistency

Whisk the butter for 30 seconds or so, then add all other ingredients except the heavy cream. Whisk until the sugar is fully dissolved, then adjust the consistency with heavy cream. Divide the buttercream in 5 or more little bowls, add gel color to each bowl. Place lines of buttercream in different colors over plastic wrap, then roll them together as a little sausage. Cut one end, and place the roll inside a piping bag with a star tip. To assemble the macarons, add a circle of buttercream and a small dollop of seedless raspberry jam in the center.

ENJOY!

to print the buttercream recipe, click here

Comments: These were a lot of fun to make. After the shells were assembled, I used different luster powder colors diluted with vodka to pain a stripe for a simple, but effective decoration. They were delivered to the staff at Hayden and Kholmeier office with proper wig, as required…

ONE YEAR AGO: Blood Orange Macarons

TWO YEARS AGO: One-Two-Three Macarons

THREE YEARS AGO: Marshmallow Macarons

FOUR YEARS AGO: Fujisan Bread

FIVE YEARS AGO: Air-Fried Tomatoes with Hazelnut Pesto & Halloumi Cheese

SIX YEARS AGO: Red Velvet Layered Cake

SEVEN YEARS AGO: Lemon-Lavender Bars

EIGHT YEARS AGO: Quinoa Fried Rice

NINE YEARS AGO: Carrot Flan with Greens and Lemon Vinaigrette

TEN YEARS AGO: The Secret Recipe Club: Granola Bars

ELEVEN YEARS AGO:  Awesome Broccolini

TWELVE YEARS AGO:  A Twist on Pesto

THIRTEEN YEARS AGO: Ciabatta: Judging a bread by its holes

A TRIO OF COOKIES

As you may remember, I have a blog dedicated exclusively for cookies (click here), but it does not include recipes. It is a venue to document my path through cookie decorating. Come to think of it, check out my 3D macs that were published yesterday...) When I try a new, blog-worthy recipe, it will be shared right here. Today I offer you three recipes, all from bloggers I follow and love. They are listed in chronological order, the last one I made last weekend.

SPRITZ BARS
(from Helen Fletcher)

I made these cookies in October last year, and they were a huge hit. The instructions in Helen’s site are super detailed, and you’ll end up with little cookies that look very professional, uniform in size, the type of bake that makes me think of a certain tent of my past. For the full recipe, visit this post. I just love the use of Swedish pearl sugar.

CREAM CHEESE SUGAR COOKIES
(by Tanya Ott)

When Tanya raves about a sugar cookie, I listen. She knows her cookies well… The addition of cream cheese tames the sweetness and gives it a wonderful texture. She mentioned they hold the shape well – notice the recipe does not call for leavening agents – so I put it to a harsh test, using a patterned rolling pin. As you can see, the recipe passed the test with no issues! This batch was made in November last year, right after Tanya blogged about it (for the full recipe, click here)

The cookies would be perfect without any adornment, but I could not resist brushing a little pink luster dust and then some pearl. Just because…

TOFFEE SANDWICH COOKIES WITH BROWN BUTTER BUTTERCREAM FILLING
(from Josette, TheBrookCook)

If you read Josette’s post about it, you’ll understand why I jumped on making them right away. I was intrigued by the use of Toffee bits in the dough. Works like a charm. And the combination of cookie plus brown butter buttercream is outstanding. Make them, you won’t be disappointed. I changed the decoration to a drizzle of chocolate, but check her version for the authentic recipe (click here).

These three blogs are a constant source of inspiration for me,
and I am sure they will be for you also!

ONE YEAR AGO: The Many Faces of Brownie Cupcakes

TWO YEARS AGO: Olive Oil Brioche

THREE YEARS AGO: Coconut and Lime Macarons

FOUR YEAR AGO: Flank Steak Carnitas

FIVE YEARS AGO: Sesame and Poppy Seed Sourdough

SIX YEARS AGO: Pecan-Crusted Chicken from Southern at Heart

SEVEN YEARS AGO: Lamb Shanks en Papillote with Cauliflower-Celeriac Purée

EIGHT YEARS AGO: Chestnut Brownies and a Blog Award!

NINE YEARS AGO: Quinoa with Cider-Glazed Carrots

TEN YEARS AGO: Celebrate Wednesday: Heirloom Tomatoes Steal the Show

ELEVEN YEARS AGO: Pain de Provence

TWELVE YEARS AGO: Golspie Loaf, from the Scottish Highlands

BLOOD ORANGE MACARONS

For the first post of a new year in my blogging life, I will once again feature macarons, as they are so special to me. Our grocery store had gorgeous blood oranges a couple of weeks ago, and the moment I saw them I knew resistance was futile.

BLOOD ORANGE MACARONS
(from the Bewitching Kitchen)

For the shells:
200g powdered sugar
115 g almond flour
115 g egg whites at room temperature (approx. 4 eggs)
1/8 tsp of cream of tartar (optional)
100 g granulated sugar
¼ tsp vanilla paste or extract
Tulip Red and Orange gel color
luster powder, pearl and brown (optional)
Everclear (optional)

For filling:
60 g unsalted butter softened
160 g powdered sugar
zest of 1/2 blood orange
2 tsp blood orange juice
1/8 tsp blood orange oil
pinch of salt
heavy cream if needed to adjust consistency

Line 3 heavy baking sheets with parchment/baking paper or Silpat mats. Layer the powdered sugar and ground almonds/almond meal in a food processor. Pulse until the mixture looks like fine meal, about 12 pulses. Pass through a sieve and transfer to a small bowl or to a sheet of parchment paper. Set aside.

Place the egg whites and cream of tartar in the bowl of a stand mixer fitted with the whisk attachment. Make sure that the bowl and the whisk are impeccably clean. Starting on medium speed, whip the whites with the cream of tartar until they look like light foam. Add all the sugar at once and keep whisking until the meringue is soft and shiny. Add vanilla and food colors.

Whip the egg whites until the mixture begins to dull and the lines of the whisk are visible on the surface of the meringue. Check the peak. It should be firm. Transfer the whites to a medium bowl.

Fold in the ground almond/almond meal mixture in two increments. Paint the mixture halfway up the side of the bowl, using the flat side of a spatula. Scrape the mixture down to the center of the bowl. Repeat two or three times, then check to see if the mixture slides slowly down the side of the bowl. Put the mixture in a piping bag fitted with your choice of piping tip (round, ¼ or ½ inch in diameter or 6 – 12 mm). Pipe shells, I like to count numbers in my head and use the same count for each shell so they end up similar in size. If making snowmen, make a template with two circles joined together to form head and body, and pipe each section.

Slam each sheet hard four to six times on the counter/worktop. Let the unbaked macarons dry until they look dull but not overly dry. Drying time depends on humidity. In a dry climate, the macarons can dry in 15 to 20 minutes; in a humid climate, it can take 35 to 40 minutes.

While the macarons are drying, heat the oven to 300 F. Bake one sheet at a time on the middle rack. Check in 11 minutes. If the tops slide or move (independently of the ‘feet’ when you gently twist the top), then bake for 2 to 3 more minutes. Check one or two. If they move when gently touched, put them back in the oven for 1 to 2 more minutes until they don’t move when touched. Let the macaroons cool for 10 minutes before removing from the pan. The macarons should release without sticking. Mix the luster dust with everclear and paint flowers in a loose design. Later add an outline with fine tip black pen.

For the filling, use a hand-held electric mixer and whisk the butter until creamy. Add the other ingredients except the heavy cream, and whisk until creamy and smooth. If needed, add a bit of heavy cream to loosen the mixture.

Assemble the macarons: find two macarons similar in size and add a good amount of filling to the bottom of one of them. Place the other on top and squeeze gently to take the filling all the way to the edge. Store in the fridge for 24 hours for perfect texture.

ENJOY!

to print the recipe, click here

Comments: I did two different designs for the decoration, painting some flowers with pearl or brown luster powder. Very loose, no need for precision. The outline with the black pen brings the design together. The pictures don’t show very well, I am afraid, but I really like the dark flowers better, even if they have nothing to do with orange blossoms…

Extracts, emultions, and oils can have a bit of an artificial taste, but this product from LorAnn is very nice. A small amount added to the buttercream intensified the blood orange component without any aftertaste. It works great in ganache also.

I finally figured out a way to get the nice ridges in the filling. I was always using the wrong tip, 1M, because it is my favorite for so many piping jobs. However, I know realize that the best tip to use in macaron fillings to get the effect I like, is a French star type. Pick a size compatible with your shells.

ONE YEAR AGO: One-Two-Three Macarons

TWO YEARS AGO: Marshmallow Macarons

THREE YEARS AGO: Fujisan Bread

FOUR YEARS AGO: Air-Fried Tomatoes with Hazelnut Pesto & Halloumi Cheese

FIVE YEARS AGO: Red Velvet Layered Cake

SIX YEARS AGO: Lemon-Lavender Bars

SEVEN YEARS AGO: Quinoa Fried Rice

EIGHT YEARS AGO: Carrot Flan with Greens and Lemon Vinaigrette

NINE YEARS AGO: The Secret Recipe Club: Granola Bars

TEN YEARS AGO:  Awesome Broccolini

ELEVEN YEARS AGO:  A Twist on Pesto

TWELVE YEARS AGO: Ciabatta: Judging a bread by its holes